
Popular categories
Looking for a yarn?


|
|
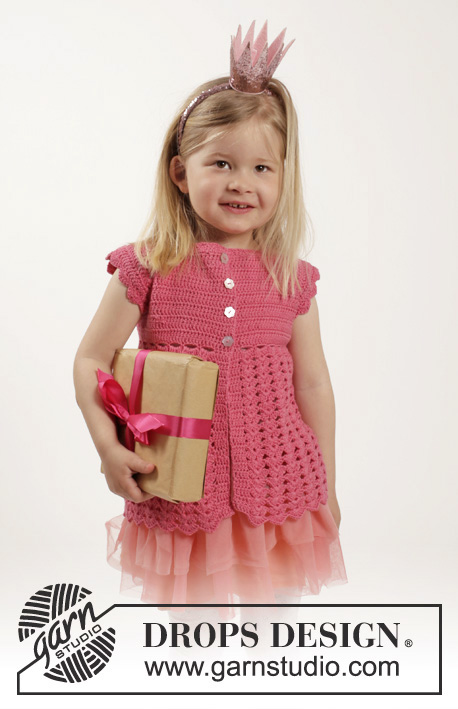
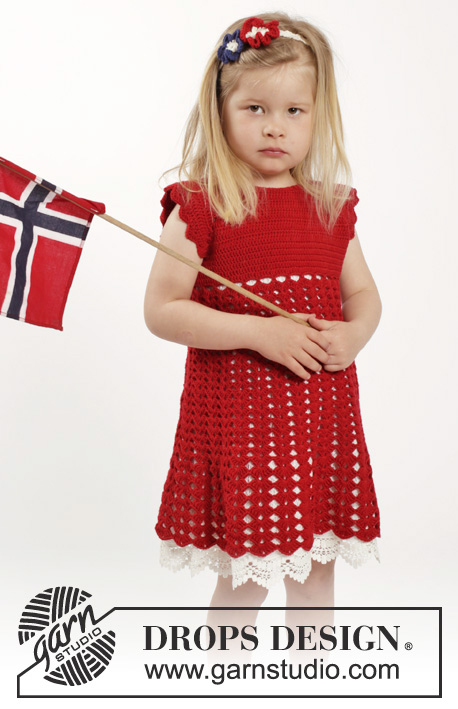
Princess Matilde |
|
 |
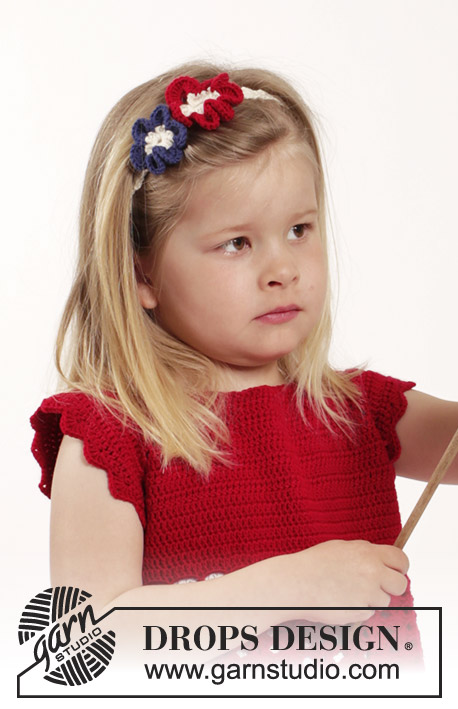 |
Crochet dress worked top down with raglan, short sleeves and fan pattern plus hair band with flowers in DROPS BabyMerino, DROPS Safran or DROPS ♥ You #7. Size children 2 - 10 years
DROPS Children 26-5 |
|
|
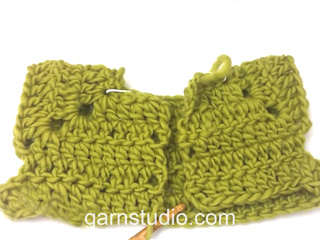
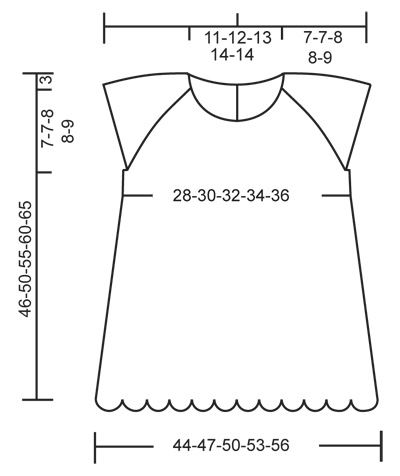
CROCHET INFO: Replace first tr at beg of every tr round/row with 3 ch. Finish round with 1 sl st in 3rd ch from beg of round. Finish row with 1 tr in 3rd ch from beg of previous row. INCREASE TIP: Inc 1 tr by working 2 tr in same st. ---------------------------------------------------------- DRESS: The piece is worked top down. Work back and forth from mid back to after vent mid back, then work piece in the round. YOKE: Work 77-81-85-85-89 loose ch (incl 1 ch to turn with) on hook size 3.5 mm with Baby Merino, Safran or DROPS ♥ You #7. Work 1 dc in 2nd ch from hook, then work 1 dc in every ch the entire row = 76-80-84-84-88 dc on row. Now insert 4 markers in piece for raglan as follows (beg mid back – NOTE: Do NOT work while inserting markers): Skip 12-13-14-14-15 dc (= right back piece), insert 1 marker in next dc, skip 12 dc (= sleeve), insert 1 marker in next dc, skip 24-26-28-28-30 dc (= front piece), insert 1 marker in next dc, skip 12 dc (= sleeve) and insert last marker in next dc (there are now 12-13-14-14-15 dc on left back piece after last marker). READ ALL OF THE FOLLOWING SECTION BEFORE CONTINUING: READ CROCHET INFO and work next row as follows from RS: Work 1 tr in every dc but in every dc with marker work 2 tr + 2 ch + 2 tr = 88-92-96-96-100 tr on row (= 12 tr inc). Then inc for raglan: Continue with tr, and work 2 tr + 2 ch + 2 tr in every ch-space in every raglan line (= 16 tr inc on row). Repeat inc on every row 6-6-7-8-9 more times (= 7-7-8-9-10 times in total) = 200-204-224-240-260 tr on row. REMEMBER THE CROCHET TENSION! Work next row as follows from RS: Work 1 tr in each of the first 28-29-32-34-37 tr (= right back piece), skip the next 44-44-48-52-56 tr (= sleeve), work 8 ch, work 1 tr in each of the next 56-58-64-68-74 tr (= front piece), skip the next 44-44-48-52-56 tr (= sleeve), work 8 ch and work 1 tr in each of the last 28-29-32-34-37 tr (= left back piece). Sleeve caps are now done and piece is worked in the round. BODY: Put piece tog mid back with RS out and work 1 round with tr (work 1 tr in every tr from previous round and 1 tr in every ch under each sleeve – remember CROCHET INFO) = 128-132-144-152-164 sts on round. NOW MEASURE PIECE FROM HERE! Continue with 1 tr in every tr until piece measures 4-4-4-5-5 cm, on last round inc 2-3-1-3-1 tr evenly - READ INCREASE TIP = 130-135-145-155-165 tr. Now work fan pattern as follows: ROUND 1: 1 dc in first tr, *4 ch, skip 4 tr, 1 dc in next tr *, repeat from *-* the entire round and finish with 4 ch, skip 4 tr and 1 sl st in first dc = 26-27-29-31-33 ch-spaces. ROUND 2: 3 tr + 2 ch + 3 tr in every ch-space. ROUND 3: Work sl sts until first ch-space, then work 3 tr + 2 ch + 3 tr in every ch-space. Repeat 3rd round until piece measures 15-17-18-20-21 cm WORK NEXT ROUND AS FOLLOWS: Work sl sts until first ch-space, then work 4 tr + 2 ch + 4 tr in every ch-space. Repeat this round until piece measures 25-28-31-34-36 cm WORK NEXT ROUND AS FOLLOWS: Work sl sts until first ch-space, then work 4 dtr + 2 ch + 4 dtr in every ch-space. Repeat this round until piece measures 35-39-43-48-52 cm Fasten off. ADJUSTING NECKLINE: For better fit work a small elevation at the back of neck. Insert 1 marker in st in each corner in neck, i.e. at beg of every raglan line and 1 marker mid front. Work on hook size 3.5 mm as follows: Beg mid back, work 1 dc in every st until 1 st remains before st with marker, work 1 htr in next st, 1 tr in st with marker and 1 htr in next st, then work 1 dc in every st until 1 st remains before next st with marker, 1 htr in next st, 1 tr in st with marker and 1 htr in next st, the work 1 dc in every st until 4-4-5-5 (5-6) sts remain before marker mid front. Turn piece and work 1 dc in every dc back to mid back but at every marker work 3 dc tog, i.e. work 1 dc in htr but wait with last YO and pull through, work 1 dc in st with marker but wait with last YO and pull through, work 1 dc in next htr but now pull last YO through all 4 sts on hook (= 2 dc dec). Cut the yarn and repeat from mid back to mid front in the other side. BUTTON BAND AT THE BACK: Work along left opening mid back as follows: Work 2 dc in every tr-row and 1 dc in every dc-row. Work 4 rows in total with dc back and forth, fasten off. Along right opening mid back work buttonholes as follows (beg from RS at neck line): Work 4 dc (2 dc in the first two tr-rows), 4 ch (= 1 buttonhole), skip approx. 1 cm, work dc until approx. mid on band, 4 ch, skip approx. 1 cm, work dc until 1 cm remains on band, 4 ch and fasten with 1 dc in last st. Fasten off. Sew the buttons on to button band in the left side. NECK EDGE: Work around the neck as follows: 1 dc in first st, * 2 ch, skip 2 sts, 1 dc in next st *, repeat from *-* the entire row, fasten off. FAN EDGE AROUND SLEEVE CAPS: Work as follows: Work 1 dc in each of the 8 sts mid under sleeve, then work fan edge around the sleeve opening as follows: * Skip approx. 2 cm, in next st work 3 tr + 2 ch + 3 tr, skip approx. 2 cm, 1 dc in next st *, repeat from *-* and finish with 1 sl st in first dc from beg of round (= approx. 9-9-10-10-11 fans along sleeve cap). Fasten off. Repeat at the bottom around the other sleeve cap. ---------------------------------------------------------- HAIR BAND: Work 6 ch on hook size 3.5 mm with off white. Work first row as follows: Work 1 dc in 4th ch from hook, work 1 dc in each of the next 2 ch, turn piece = 3 dc + 3 ch on row. ROW 2: 3 ch, 1 dc in each of the 3 dc from previous row, turn piece. Repeat 2nd row until hair band measures approx. 42-44-46-48 cm (or desired length, subtract approx. 6-8 cm according to the head's circumference). Cut the yarn and sew the 2 short sides tog edge to edge with small stitches. LARGE CROCHET FLOWER: Work 7 ch on hook size 3.5 mm with off white and form a ring with 1 sl st in first ch. ROUND 1: 3 ch (= 1 tr), 2 tr in ch-ring, * 6 ch, 1 dc in last tr made, 3 tr in ch-ring *, repeat from *-* a total of 6 times and finish with 6 ch and 1 sl st in 3rd ch from beg of round = 7 ch-spaces with 3 tr between each. Fasten off. ROUND 2: Switch to red. Work 1 dc in the middle of the first 3 tr on round, * 12 tr in ch-space, skip 1 tr, 1 dc in next tr, skip 1 tr *, repeat from *-* the entire round and finish with 1 sl st in first dc from beg of round. Fasten off. SMALL CROCHET FLOWER: Work 6 ch on hook size 3.5 mm with off white and form a ring with 1 sl st in first ch. ROUND 1: 2 ch (= 1 htr), 2 htr in ch-ring, * 5 ch, 1 dc in last htr made, 3 htr in ch-ring *, repeat from *-* a total of 5 times and finish with 5 ch and 1 sl st in 2nd ch from beg of round = 6 ch-spaces with 3 htr between each. Fasten off. ROUND 2: Switch to blue. Work 1 dc in the middle of the first 3 htr on round, * 10 tr in ch-space, skip 1 htr, 1 dc in next htr, skip 1 htr *, repeat from *-* the entire round and finish with 1 sl st in first dc from beg of round. Fasten off. ASSEMBLY: Sew flowers on hair band with small sts. |
|
|
|
|
Have you made this or any other of our designs? Tag your pictures in social media with #dropsdesign so we can see them! Do you need help with this pattern?You'll find tutorial videos, a Comments/Questions area and more by visiting the pattern on garnstudio.com. © 1982-2024 DROPS Design A/S. We reserve all rights. This document, including all its sub-sections, has copyrights. Read more about what you can do with our patterns at the bottom of each pattern on our site. |
|


With over 40 years in knitting and crochet design, DROPS Design offers one of the most extensive collections of free patterns on the internet - translated to 17 languages. As of today we count 304 catalogues and 11422 patterns - 11422 of which are translated into English (UK/cm).
We work hard to bring you the best knitting and crochet have to offer, inspiration and advice as well as great quality yarns at incredible prices! Would you like to use our patterns for other than personal use? You can read what you are allowed to do in the Copyright text at the bottom of all our patterns. Happy crafting!
Comments / Questions (39)
Is the white underneath crocheted or just fabric lining? Do you have a tutorial on how to make that part? And I just missing it? Thanks!
30.07.2017 - 21:03DROPS Design answered:
Dear Heather, that white lace edge is the endge of a white underskirt the little girl is wearing in one of the pictures (you can see in the picture with the bike, where is is not wearing it underneath, that there is no white lace edge. However, if you want to try, you can crochet into each stitch in the row before the last (with the white yarn), a treble in each stitch and add any crochet edging you like.Thus it would look like two separate layers. I hope this helps. Happy Crocheting!
30.07.2017 - 23:22Sidder og hækler fra kataloget, der er fejl i . Kan nu se opskriften online er rettet.
25.05.2016 - 06:53Der må være fejl i kjolen str 2 år. 76 m op + udt 7 x 16 = 188 m ialt og ikke 200 m !!! Der mangler 12 m , Der er ikke 28 m til hø forstyk, men kun 26 m. Så er spørgsmålet om man skal tage ud en gang mere eller ??
25.05.2016 - 06:47DROPS Design answered:
Hej Anette. Du har 76 og tager ud förste gang som beskrevet = 88 st på rækken. Saa tager du ud 7 gange totalt: 7 x 16 m = 112 = 200 st i alt.
25.05.2016 - 13:52Noha Ahmed wrote:
Thank u for you patterns but when i made first size(2 years size) i Work 77 Then inc & repeat inc on every row 6 more times (= 7 times in total) to check stitches number you write it should be Work 1 dc in each of the first 28- dc (= right back piece) but i have only 26 dc on the yoke and i checked all steps many times are there any corrections in this pattern??!!
18.05.2016 - 22:30DROPS Design answered:
Dear Mrs Ahmed, have you checked the number of sts after all inc for raglan? you should have 200 sts= 28 sts for each back piece, 44 sts for each sleeve, 56 sts for front piece (28+44+56+44+28=200). Happy crocheting!
19.05.2016 - 09:07Aha - no the pattern is right - only I had not had enough coffee :) Soon as I hit the send button I saw I forgot to think about the fm I am increasing in ;)
14.05.2016 - 12:38HELP ! Somethng wrong here.... if I increase 2st+2lm+2st in the fm were the markers are (4 markers) I will have increase 16 st in every round but it reads there should be only 12 in first round you increase. Is this an error in the pattern ?
14.05.2016 - 12:32DROPS Design answered:
Dear Helda, we're happy you got it!! Happy crocheting!!
14.05.2016 - 18:46Buongiorno, potreste cortesemente controllare la traduzione in italiano? Nella ultima parte del corpo e' scritto 4 m.a . + 2 Cat + 4 m.a come nella parte precedente. Confrontandolo con le traduzioni dovrebbe invece essere 4 m.a.d. Potreste confermarmi? Grazie molte
16.10.2015 - 23:41DROPS Design answered:
Buongiorno Laura. Abbiamo corretto il testo; sono m.a.d. La ringraziamo per la segnalazione. Buon lavoro!
17.10.2015 - 08:27Ciao! Vortex realizzare questo modello con le maniche lunghe, è possibile? Mi sapreste dire come fare, per favore? Grazie! Hi! Is it possible to make this pattern with long sleeves? Do you have any suggestion on how I could make it? Thanks!! Giulia
30.09.2015 - 09:19DROPS Design answered:
Buongiorno Giulia. Per aggiungere delle maniche, può riprendere le m intorno all’apertura delle maniche e invece di lavorare il bordo, proseguire con le maniche, riproponendo p.es lo stesso motivo del vestito o lavorando tutta la manica a maglie alte e lavorare il bordino solo sul polso. Buon lavoro!
01.10.2015 - 12:14Princess Matilde SmåDrops 26-5 Undrar hur man ska virka den vita underkjolen? Kan inte hitta de i mönstret?
28.05.2015 - 00:43DROPS Design answered:
Hej Viktoria. Den hörer ikke til mönstret. Det er en del af den underkjole pigen har paa under. Desvaerre
28.05.2015 - 10:36