
Popular categories
Looking for a yarn?


|
||||||||||||||||||||||
Nostalgia |
||||||||||||||||||||||
|
|
||||||||||||||||||||||
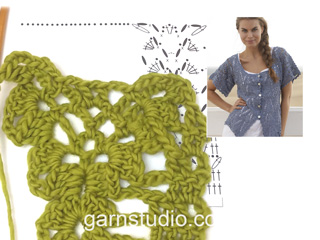
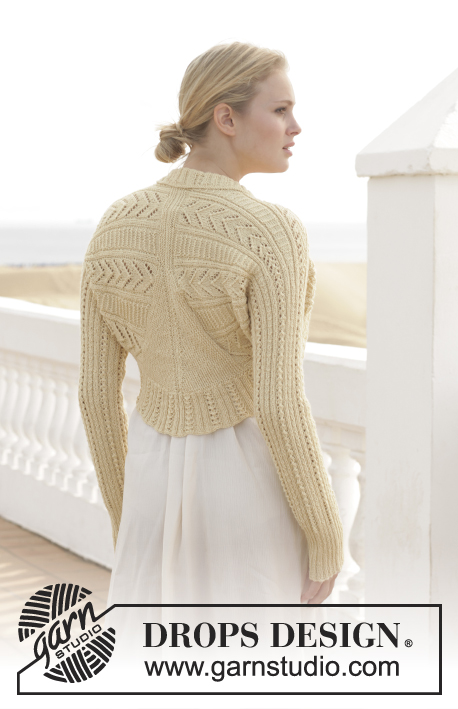
Crochet DROPS jacket with lace pattern in ”Safran”. Size: S - XXXL.
DROPS 152-3 |
||||||||||||||||||||||
|
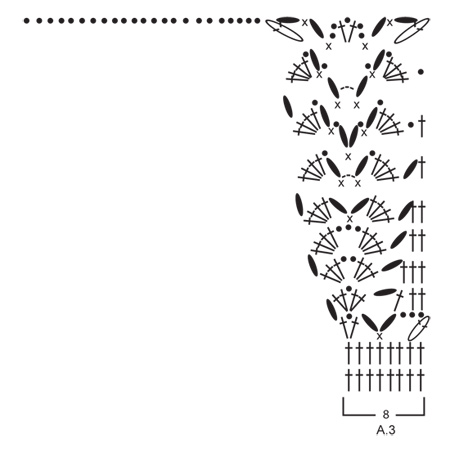
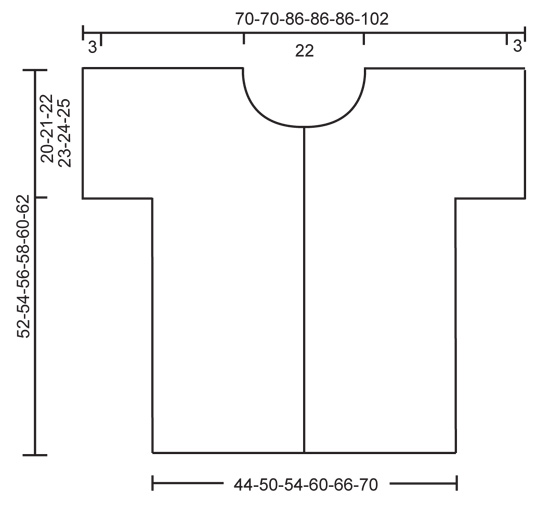
CROCHET INFO: Replace first tr at beg of every tr row with 3 ch. CROCHET TIP 1: When one whole repetition of pattern vertically in diagrams A.1-A.4 have been worked, continue with pattern but now work A.X. CROCHET TIP 2: Work 3RD ROW of A.6 as follows over 6 tr: Work 3 ch (to turn with), 3 tr in 3rd tr from hook, 2 ch, 3 tr in next tr. On each row starting with A.6 (i.e rows with tr-groups) ch 3 to turn with before working A.6. Repeat pattern in chart from 4th row. CROCHET TIP 3: When working A.6 on front band work 1st row as follows: Work 3 ch (to turn with), 3 tr in 6th ch from hook, ch 2, 3 tr in next tr. On each row starting with A.6 (i.e rows with tr-groups) ch 3 to turn with before working A.6. Repeat pattern in chart from 4th row. PATTERN: See diagrams A.1 to A.6. The diagrams show all rows in pattern seen from RS. BUTTONHOLES: Measure from neck edge at the front and sew buttons on left band: SIZE S: 2, 8, 14, 20 and 26 cm SIZE M: 2, 8, 14, 20 and 26 cm SIZE L: 2, 9, 16, 23 and 30 cm SIZE XL: 2, 9, 16, 23 and 30 cm SIZE XXL: 2, 10, 18, 26 and 34 cm SIZE XXXL: 2, 10, 18, 26 and 34 cm ---------------------------------------------------------- JACKET: The piece is worked top down. RIGHT FRONT PIECE: Work 62-62-82-82-82-102 ch on hook size 4 mm with Safran. Work 1ST ROW (= RS)(= 1ST ROW in diagram A.1, A.2, A.3 and A.6) as follows: 1 tr in 4th ch from hook, 1 tr in next ch, * skip 1 ch, 1 tr in each of the next 4 ch *, repeat from *-* 11-11-15-15-15-19 times in total, skip 1 ch, 1 tr in last ch = 48-48-64-64-64-80 tr – READ CROCHET INFO. ROW 2: Work 1 tr in each of the 48-48-64-64-64-80 tr. ROW 3 (= RS): Then work PATTERN according to diagram A.6 over 6 tr 1 time - READ CROCHET TIP 2! Continue with A.1 over 18 tr, A.2 over 16-16-32-32-32-48 tr, and A.3 over 8 tr. Continue like this back and forth with pattern the same way, AT THE SAME TIME inc sts for neck in diagram A.3. When 1 whole repetition vertically of A.3 has been worked, work 23 new ch towards mid front for A.4 and A.6 (= band) – READ CROCHET TIP 1 and CROCHET TIP 3! Then work as follows with pattern from WS: A.6, A.4 over 17 ch, A.2 2-2-3-3-3-4 times, A.1 1 time, and A.6 1 time. Continue like this back and forth until piece measures 20-21-22-23-24-25 cm in total = right sleeve. On next row from WS continue as before with A.6, A.4 and A.2 until 1-1-2-2-2-3 repetitions of A.2 have been worked in width. Then work ch-spaces as follows: Work 1 dc in next st, * 3 ch, skip approx. 1 cm, 1 dc *, repeat 1-2-0-1-2-0 more times (= 2-3-1-2-3-1 ch-space in total). Turn and work as follows from RS: Beg on 3rd row in A.6 and work 1 repetition in the next 2-3-1-2-3-1 ch-space, continue with A.2, A.4 and A.6 as before until piece measures 52-54-56-58-60-62 cm in total, - or adjust after one whole repetition vertically. LEFT FRONT PIECE: Work 61-61-81-81-81-101 ch on hook size 4 mm with Safran. Work 1ST ROW (= RS)(= 1ST ROW in diagram A.2, A.4, A.5 and A.6) as follows: 1 tr in 4th ch from hook, * skip 1 ch, 1 tr in each of the next 4 ch *, repeat from *-* 11-11-15-15-15-19 times in total, skip 1 ch, 1 tr in last ch = 47-47-63-63-63-79 tr. ROW 2: Work 1 tr in each of the 47-47-63-63-63-79 tr. Then work as right front piece but reversed and work according to diagram A.5 instead of A.3, A.4 instead of A.1, and A.1 instead of A.4. BACK PIECE: Work right shoulder as follows: Work 62-62-82-82-82-102 ch on hook size 4 mm with Safran. Work 1ST ROW as follows: 1 tr in 4th ch from hook, 1 tr in next ch, * skip 1 ch, 1 tr in each of the next 4 ch *, repeat from *-* 11-11-15-15-15-19 times in total, skip 1 ch, 1 tr in last ch = 48-48-64-64-64-80 tr. ROW 2 (= 1ST ROW in diagram A.2, A.4 and A.6): Work 1 tr in each of the first 47-47-63-63-63-79 tr on row, work 2 tr in last tr on row = 49-49-65-65-65-81 tr. Cut the yarn and put piece aside. Work left shoulder as follows: Work 61-61-81-81-81-101 ch on hook size 4 mm with Safran. Work 1ST ROW as follows from RS: 1 tr in 4th ch from hook, * skip 1 ch, 1 tr in each of the next 4 ch *, repeat from *-* 11-11-15-15-15-19 times in total, skip 1 ch, 1 tr in last ch = 47-47-63-63-63-79 tr. ROW 2 (= 1ST ROW in diagram A.1, A.2 and A.6): Work 2 tr in the first tr on row, then work 1 tr in each of the remaining 46-46-62-62-62-78 tr on row = 48-48-64-64-64-80 tr. ROW 3: Work 1 tr in each of the next tr on left shoulder, work 46 LOOSE ch for neck, 1 tr in every tr on right shoulder = 143-143-175-175-175-207 tr. ROW 4: 1 repetition A.6 over 6 tr, A.4 over 17 tr, A.2 over 96-96-128-128-128-160 tr, A.1 over 18 tr, and finally A.6 over 6 tr - read CROCHET TIP 2. Continue this pattern back and forth until piece measures 20-21-22-23-24-25 cm in total (adjust according to front piece). Fasten off. Then work ch-spaces along one sleeve as on front piece – adjust to beg the same distance from edge on sleeve as on front piece and work ch-spaces as follows: * 1 dc, 3 ch, skip approx. 1 cm, 1 dc *, repeat 1-2-0-1-2-0 more times (= 2-3-1-2-3-1 ch-space in total). Continue over back piece with pattern as before, and finish with ch-spaces the same way in the other side. Continue as on front piece with A.6 in each side and pattern as before until piece measures 52-54-56-58-60-62 cm in total. ASSEMBLY: Sew the shoulder seams. Place front piece on top of back piece and work the sides and underarm seams tog in one as follows: Work 1 dc in front piece, 3 ch, 1 dc in back piece, * 3 ch, 1 dc in front piece approx. 1 cm higher up, 3 ch, 1 dc in back piece approx. 1 cm higher up *, repeat from *-*, finish with 1 sl st. Fasten off. Repeat in the other side. Sew buttons on to the left band and button through right band - see explanation above. NECK EDGE: When piece is assembled, work a neck edge as follows: Beg from RS, mid front on right band, fasten yarn with 1 sl st, * 3 ch, skip approx. 1 cm, 1 dc *, repeat from *-* around the entire neck. Fasten off. |
||||||||||||||||||||||
Diagram explanations |
||||||||||||||||||||||
|
||||||||||||||||||||||

|
||||||||||||||||||||||
|
||||||||||||||||||||||

|
||||||||||||||||||||||
|
||||||||||||||||||||||
|
Have you made this or any other of our designs? Tag your pictures in social media with #dropsdesign so we can see them! Do you need help with this pattern?You'll find tutorial videos, a Comments/Questions area and more by visiting the pattern on garnstudio.com. © 1982-2024 DROPS Design A/S. We reserve all rights. This document, including all its sub-sections, has copyrights. Read more about what you can do with our patterns at the bottom of each pattern on our site. |
||||||||||||||||||||||


With over 40 years in knitting and crochet design, DROPS Design offers one of the most extensive collections of free patterns on the internet - translated to 17 languages. As of today we count 304 catalogues and 11422 patterns - 11422 of which are translated into English (UK/cm).
We work hard to bring you the best knitting and crochet have to offer, inspiration and advice as well as great quality yarns at incredible prices! Would you like to use our patterns for other than personal use? You can read what you are allowed to do in the Copyright text at the bottom of all our patterns. Happy crafting!
Comments / Questions (105)
Sehr geehrte Damen und Herren, wie kann ich feststellen welche Größe ich häkeln muss? Sind die Nummern an dem Schnittmuster Reihen und Maschen oder cm Angaben? Beste Grüße Roxane
01.04.2015 - 19:37DROPS Design answered:
Es sind alles cm-Angaben, in der Reigenfolge, in der oben im Kopf die Größen angegeben sind. Sie können also Maß an sich nehmen und die für Sie passende Größe auswählen (das Brustmaß ist dabei das Wichtigste).
02.04.2015 - 09:52Sto eseguendo il davanti dx e sono arrivata ai 21 cm. di altezza totale. Ora continuo con i diagrammi come prima ma dopo solo una ripetizione di A.2 (invece di 2 e poi A.1), si dice di fare degli archetti fino a fine riga. Non capisco come fare. I miei complimenti per i modelli splendidi e per le spiegazioni. Grazie
21.03.2015 - 22:44DROPS Design answered:
Buongiorno Tiziana. Quando il lavoro misura 21 cm, non deve più lavorare sulle m della manica. Conti quante m ci sono in un cm. Lavora poi la riga successiva come segue (sul rovescio): diagrammi A.6, A.4 e A.2 (1 volta), 1 m.b nella m successiva, * 3 cat, salta le m che formano un cm e nella m successiva lavora 1 m.b *; ripete le indicazioni tra gli asterischi altre 2 volte, in modo da avere tre archi di cat. Giri il lavoro e prosegua lavorando la riga 3 del diagramma A6 negli archi di cat e le rimanti m come prima. Buon lavoro!
23.03.2015 - 14:47... (letzter Teil ;-) 4. Wird bei A.6 zum Wenden das jeweils erste Stb durch 3 Lm ersetzt (also 3 Lm + 2Stb - 2 Lm - 3Stb) oder werden die 3 WendeLm wie im Häkeltipp 2 in allen R extra gehäkelt (also 3Lm - 3Stb - 2Lm - 3Stb) oder gar keine WendeLM? ... Ich habe alle drei Varianten ausprobiert, aber es wird nie so eine schöne Kante mit runden Bögen, wie auf dem Photo :-( Danke schon mal für die Hilfe!
07.03.2015 - 00:24DROPS Design answered:
Die 3 Lm werden bei A.6 am Anfang jeder R zusätzlich als Wende-Lm gehäkelt und ergeben an sich diesen Bogenrand wie auf dem Foto.
08.03.2015 - 14:13... 3. werden die Stb. bzw. fM jeweils in den Bogen (also um die Lm herum) oder exakt in die Lm eingestochen, z. B. R.4 die Stb Nr. 2,3 und 4 bzw. 5,6,7 und 8 (z.B. in A.4); oder die fM in R.7 (in allen Mustern); oder die Stb. in A.6? ...
07.03.2015 - 00:23DROPS Design answered:
Reihe 4 A.1: Das 2. und 3. Stb häkeln Sie in die Lm, das 4. Stb in die 1. Lm der 3 Lm. Das 5. - 8. Stb der R wird um die einzelne Lm, die zwischen den beiden Stb der 3. R liegt, gehäkelt. Die fM können Sie im die Lm häkeln, die Stb in A.6 häkeln Sie ebenfalls um die Lm.
08.03.2015 - 14:07Hallo, ich habe gleich mehrere Fragen und schreibe deshalb in Etappen: 1. wird das Zwei-in-eins-Stb in der 3.R. von A.1 mit dem ersten Stb zusammen abgemascht (also nur eine Masche in der 4. R) oder das erste Stb. und das Zwei-in-eins-Stb jeweils einzeln (also zwei Maschen in R.4)? 2. genauso in R.3 bei den zwei Zwei-in-eins-Stb am Übergang zwischen A.1/A.2 und A.2/A.4 ? ...
07.03.2015 - 00:22DROPS Design answered:
Das allererste Stb der R steht für sich. Sie häkeln also in der 3. R bei A.1 zunächst 1 normales Stb. Dann überspringen Sie 2 Stb der darunterliegenden R und häkeln dann in das nächste Stb 2 zusammengehäkelte Stb. Der Übergang zwischen A.1 und A.2 geht wie folgt: 2 zusammengehäkelte Stb in 1 Stb, 3 Stb der darunter liegenden R überspringen, 2 zusammengehäkelte Stb in das nächste Stb. Ebenso beim Übergang von A.2 zu A.4.
08.03.2015 - 09:58Bonjour, pour le devant gauche, je ne vois pas comment je peux faire les 23 mailles en l'air au 11ème rang, vu que je commence le rang 11 par la droite. Me suis je trompée quelque part?
17.02.2015 - 19:42DROPS Design answered:
Bonjour Catherine, pour le devant gauche, le 1er rang se fait sur l'envers (mention ajoutée), ainsi, les ml se font en fin de rang, côté encolure. Bon crochet!
06.03.2015 - 14:09Ik ben begonnen met het rechter voorpand (met haaknaald 3 -> zie mijn eerdere vraag) en ben nu klaar met regel 11, maar moet ik nu nog een keer herhalen? Er staat: Haak als 1 hele herhaling in de hoogte van A3 klaar is. Hoe ga ik verder na regel 11? Ik snap er niets van en ben slecht ter been, dus heb niet veel zin om weer naar de winkel te rijden (wordt volgende week voor 2e keer aan enkel geopereerd, dus zou graag lekker aan het haken slaan). Help !!
19.01.2015 - 20:54DROPS Design answered:
Hoi Margreet. Je leest verder in het patroon: Je haakt dan 23 nieuwe l middenvoor voor A.4 en A.6. Dan haak je: "Haak dan als volgt in patroon aan de verkeerde kant: A.6, A.4..."
22.01.2015 - 15:06Volgens mij klopt er niets van de stekenverhouding. Met haaknaald 4 wordt het proeflapje veel te groot. Met haaknaald 2,5 wordt het proeflapje te smal (9 cm) en te lang) 11,5 cm als ik 20 steken haak en 12 toeren met stokjes. Als ik dit ga breien (op advies van Schouten in Hoorn) kom ik met naald 3 smaller uit en moet ik nog veel meer toeren breien. Ik vind het wel lastig zo, hoe ik dit moet oplossen. Ik ga nog een haaknaald 3 kopen en daar mee proberen waar ik op uit kom.
14.01.2015 - 12:11Ich bin absolut keine Anfängerin, aber das ist fast unmachbar und die Diagramme sind wirklich sehr verwirrend. Bei der 4. Reihe bin ich dabei aufzugeben. Schade.
10.01.2015 - 22:33I am having trouble with this pattern, Nostalgia. The symbols for the chain stitches do not look right when I work them. The pattern is beautiful. I will keep trying and will look forward to your info.
08.01.2015 - 19:29