DROPS BabyAlpaca Silk
70% Alpaca, 30% Silk
Discontinued
find alternatives
DROPS Kid-Silk
DROPS Kid-Silk
75% Mohair, 25% Silk
from 4.60 £ /25g
DROPS Super Sale

Spring Rising

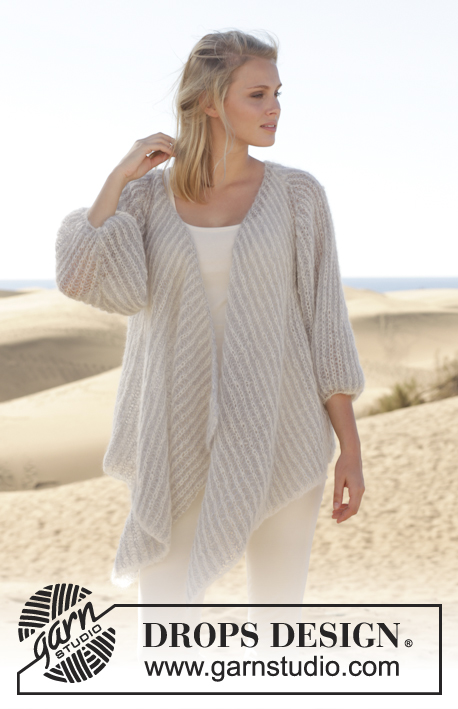
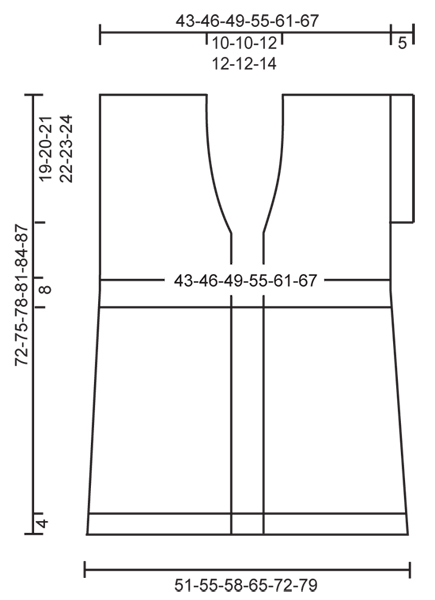
Knitted DROPS jacket in stocking st with lace pattern in "BabyAlpaca Silk" and "Kid-Silk". Size: S - XXXL.

DROPS 152-11
DROPS design: Pattern no bs-069
Yarn group A + A or C
-----------------------------------------------------------
Size: S - M - L - XL - XXL - XXXL
Materials:
DROPS BABYALPACA SILK from Garnstudio
250-300-300-350-400-400 g colour no 7219, pistachio
And use:
DROPS KID SILK from Garnstudio
100-125-125-150-150-200 g colour no 18, apple green

DROPS CIRCULAR NEEDLE (80 cm) SIZE 5 mm – or size needed to get 17 sts x 22 rows in stocking st with 1 strand of each yarn = 10 x 10 cm or A.1 + 7 sts in stocking st = 7 cm in width.
DROPS CIRCULAR NEEDLE (80 cm) SIZE 4.5 mm - for rib.
DROPS MOTHER-OF-PEARL BUTTON NO 522: 2 pieces for all sizes

-------------------------------------------------------

Alternative Yarn – See how to change yarns here
Yarn Groups A to F – Use the same pattern and change the yarn here
Yarn usage using an alternative yarn – Use our yarn converter here

-------------------------------------------------------

DROPS BabyAlpaca Silk
70% Alpaca, 30% Silk
Discontinued
find alternatives
DROPS Kid-Silk
DROPS Kid-Silk
75% Mohair, 25% Silk
from 4.60 £ /25g

Pattern instructions

NOTE: This pattern is written in British English. All measurements in charts are in cm. For conversion from cm to inches - click here. There are different terms for crocheting in British and American English. If this pattern includes crochet, click for "crochet terms" here. For this pattern in American English, please click here.
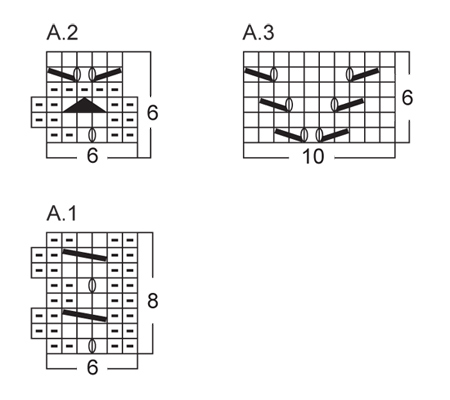
GARTER ST (back and forth on needle):
K all rows. 1 ridge = 2 rows K.

KNITTING TIP (applies to band):
To keep the band from contracting work short rows over bands every 10th row as follows: * Beg from RS on right front piece (= mid front) and K 1 row over the outermost 16 sts (= band – do not work the other sts on row), turn piece, tighten yarn and K 1 row, turn piece and work 1 row as before (with garter st and pattern) over all sts, turn piece, K 1 row over the outermost 16 sts (= band on left front piece – the other sts on row are not worked), turn piece, tighten yarn and K the rest of row *, repeat from *-* on every 10th row.

PATTERN:
See diagrams A.1 to A.3. The diagrams show all rows in pattern seen from RS. 1st row = RS.

INCREASE TIP:
Inc 1 st by making 1 YO inside the outermost st. On next row K YO twisted to avoid holes.

DECREASE TIP (applies to neckline):
Dec for neck inside all sts in garter st (i.e. band + inc sts for collar). All dec are done from RS!
Dec as follows AFTER sts in garter st: Slip 1 st as if to K, K 1, psso.
Dec as follows BEFORE sts in garter st: K 2 tog.

BUTTONHOLES:
Dec for buttonholes on right band. 1 buttonhole = K tog third and fourth st from edge and make 1 YO.
Dec for buttonholes when piece measures:
SIZE S: 35 and 43 cm
SIZE M: 36 and 44 cm
SIZE L: 37 and 45 cm
SIZE XL: 38 and 46 cm
SIZE XXL: 39 and 47 cm
SIZE XXXL: 40 and 48 cm.
----------------------------------------------------------

JACKET:

BODY:
Worked back and forth on circular needle from mid front.
Cast on 234-249-264-294-324-354 sts (incl 16 band sts in each side towards mid front) on circular needle size 4.5 mm with 1 strand of each yarn (= 2 strands). P 1 row from WS, then work next row as follows from RS: 16 band sts in GARTER ST - see explanation above - * K 2, P 3 *, repeat from *-* until 18 sts remain and finish with K 2 and 16 band sts in garter st. Continue rib like this. When piece measures 4 cm, work next row as follows from RS: 16 band sts as before, * K 2, P 3, K 2, P 2 tog, P 1, K 2, P 2 tog, P 1 *, repeat from *-* until 23 sts remain, K 2, P 3, K 2 and 16 band sts as before = 208-221-234-260-286-312 sts. Work 1 row with K over K and P over P and bands in garter st. Switch to circular needle size 5 mm and work pattern as follows from RS: 16 band sts, * 7 sts in stocking st, diagram A.1 (= 6 sts) *, repeat from *-* until 23 sts remain and finish with 7 sts in stocking st and 16 band sts (= 14-15-16-18-20-22 sections in stocking st and 13-14-15-17-19-21 of A.1). Continue pattern like this. REMEMBER KNITTING TENSION AND READ KNITTING TIP. When piece measures 7-8-9-10-11-12 cm, dec in 1st section in stocking st, then dec in every other section in stocking st from 7 K sts to 6 K sts by working the first 2 sts in every other K section K twisted tog (from RS) = 201-213-226-251-276-301 sts on needle on 1st row in A.1 (i.e. 7-8-8-9-10-11 sts dec). NOTE! Sts depends on where you are in A.1.

When piece measures 15-16-17-18-19-20 cm, dec the remaining 7 K sts to 6 K sts by working the last 2 sts in the remaining K sections K tog (from RS) = 194-206-218-242-266-290 sts on 1st row in A.1 (i.e. 7-7-8-9-10-11 sts dec). NOTE! Sts depends on where you are in A.1. Repeat dec in every other section when piece measures 23-24-25-26-27-28 and 31-32-33-34-35-36 cm = 180-191-202-224-246-268 sts on 1st row in A.1. Continue the pattern (there are now 5 sts in stocking st between every repetition with A.1). When piece measures 32-33-34-35-36-37 cm, work A.2 instead of A.1 (work the other sts as before). When piece measures 35-36-37-38-39-40 cm, beg BUTTONHOLES - see explanation above.

When A.2 has been worked 1 time vertically, there are 167-177-187-207-227-247 sts on needle. Work next row as follows from RS: 16 band sts, 2 sts in stocking st, work pattern according to diagram A.3 until 19 sts remain and finish with 3 sts in stocking st and 16 band sts. Continue pattern like this until A.3 has been worked 3 times in total vertically. Insert 1 markers 46-49-50-56-60-65 sts in from each side (= 75-79-87-95-107-117 sts between markers on back piece) and work in stocking st (continue bands in garter st as before). AT THE SAME TIME when piece measures 48-50-52-54-56-58 cm, inc 1 st in the side towards mid front for collar - SEE INCREASE TIP. Repeat inc every 2½ cm 7-7-9-9-11-11 more times = 8-8-10-10-12-12 inc sts for collar and = 24-24-26-26-28-28 sts in garter st in total. AT THE SAME TIME 2 cm after inc for collar beg, dec 1 st for neck on front piece – SEE DECREASE TIP. Repeat dec every 6th row 0-1-0-2-0-1 more time.

When piece measures 53-55-57-59-61-63 cm, finish each part separately. Divide piece at the markers.

RIGHT FRONT PIECE:
Cast on 7 sts for sleeve at the end of row. Work the new sts in garter st until finished measurements. Work in stocking st with 7 edge sts in garter st for sleeve AT THE SAME TIME continue inc for collar and dec for neck as before. When piece measures 72-75-78-81-84-87 cm, cast off the outermost 36-38-40-44-50-54 sts on shoulder on next row from WS = 24-24-26-26-28-28 collar sts remain on needle. Work the rest of row. Then work in garter st over these sts, beg from RS as follows: * 1 ridge over all sts, 1 ridge over only the outermost 16-16-18-18-20-20 sts *, repeat from *-* until collar measures approx. 7-7-8-8-8-9 cm inside on the most narrow and 14-14-16-16-16-18 cm at the edge on the widest. Cast off.

BACK PIECE:
Cast on 7 sts at the end of the next two rows = 89-93-101-109-121-131 sts. Work in stocking st with 7 edge sts in garter st in each side. When piece measures 70-73-76-79-82-85 cm, cast off the middle 15-15-19-19-19-21 sts for neck and finish each shoulder separately. Continue to cast off 1 st on next row from neck = 36-38-40-44-50-54 sts remain on the shoulder. Continue until piece measures 72-75-78-81-84-87 cm and cast off. Repeat on the other shoulder.

LEFT FRONT PIECE:
Work as right but reversed. Cast off shoulder sts from RS and beg short rows on collar from WS.


ASSEMBLY:
Sew the shoulder seams. Sew the collar tog mid back and sew it to the neckline. Sew tog under sleeves. Sew the buttons on to left band.

Diagram

symbols = K from RS, P from WS
symbols = P from RS, K from WS
symbols = 1 YO between 2 sts
symbols = K 2 tog
symbols = slip 1 st as if to K, K 1, psso
symbols = K 3, pass first st worked over the other 2 so that this st is around the last 2 sts on right needle (= 1 st dec)
symbols = slip 1 st as if to K, K 2 tog, psso
diagram
diagram

Each of our patterns has specific tutorial videos to help you.

Do you have a question? See a list of frequently asked questions (FAQ)

Knitting tension is what determines the final measurements of your work, and is usually measured per 10 x 10 cm. It is provided like so: number of stitches in width x number of rows in height - eg: 19 stitches x 26 rows = 10 x 10 cm.

The knitting tension is very individual; some people knit/crochet loosely while others work tightly. You adjust the knitting tension with the needle size, which is why the suggested needle size is only meant as a guide! You need to adjust this (up or down) to ensure that YOUR knitting tension matches the knitting tension provided in the pattern. If you work with a different knitting tension than provided you will have a different yarn consumption, and your work will have different measurements than what the pattern suggests.

The knitting tension also determines which yarns can replace each other. As long as you achieve the same knitting tension you can replace one yarn with another.

See DROPS lesson: How to measure your tension/gauge

See DROPS video: How to make a gauge tension swatch

The required amount of yarn is provided in grams, eg: 450 g. To calculate how many balls you’ll need you first need to know how many grams are in 1 ball (25g, 50g or 100g). This information is available if you click on the individual yarn quality on our pages. Divide the amount required with the amount of each ball. For example, if each ball is 50g (the most common amount), the calculation will be as follows: 450 / 50 = 9 balls.

The important thing when changing from one yarn to another is that the knitting/crochet tension remains the same. This is so that the measurements of the finished piece will be the same as on the sketch provided. It is easier to achieve the same knitting tension using yarns from the same yarn group. It is also possible to work with multiple strands of a thinner yarn to achieve the knitting tension of a thicker one. Please try our yarn converter. We recommend you to always work a test swatch.

Please NOTE: when changing yarn the garment might have a different look and feel to the garment in the photo, due to individual properties and qualities of each yarn.

See DROPS lesson: Can I use a different yarn than the one mentioned in the pattern?

All our yarns are categorised into yarn groups (from A to F) according to thickness and knitting tension – group A contains the thinnest yarns and group F the thickest. This makes it easier for you to find alternative yarns to our patterns, should you wish to switch yarn. All yarns within the same group have a similar knitting tension and can easily replace each other. However, different yarn qualities have different structures and properties which will give the finished work a unique look and feel.

Click here for an overview of the yarns in each yarn group

At the top of all our patterns you’ll find a link to our yarn calculator, which is a helpful tool should you wish to use a different yarn than suggested. By filling in the yarn quality you wish to replace, the amount (in your size) and number of strands, the calculator will present good alternative yarns with the same knitting tension. Additionally it will tell you how much you’ll require in the new qualities and whether you’ll need to work with multiple strands. Most skeins are 50g (some are 25g or 100g).

If the pattern is worked with multiple colours, every colour will have to be calculated separately. Similarly, if the pattern is worked with several strands of different yarns (for example 1 strand Alpaca and 1 strand Kid-Silk) you will have to find alternatives for each, individually.

Click here to see our yarn calculator

Since different yarns have different qualities and textures we have chosen to keep the original yarn in our patterns. However, you can easily find options among our available qualities by using our yarn calculator, or simply pick a yarn from the same yarn group.

It is possible that some retailers still have discontinued yarns in stock, or that someone has a few skeins at home that they would like to find patterns for.

The yarn calculator will provide both alternative yarn as well as required amount in the new quality.

If you think it's hard to decide what size to make, it can be a good idea to measure a garment you own already and like the size of. Then you can pick the size by comparing those measures with the ones available in the pattern's size chart.

You'll find the size chart at the bottom of the pattern.

See DROPS lesson: How to read size chart

The needle size provided in the pattern serves only as a guide, the important thing is to follow the knitting tension. And since knitting tension is very individual, you will have to adjust the needle size to ensure that YOUR tension is the same as in the pattern – maybe you’ll have to adjust 1, or even 2 needle sizes, up or down to achieve the correct tension. For this, we recommend that you work test swatches.

Should you work with a different knitting tension than the one provided, the measurements of the finished garment might deviate from the measurement sketch.

See DROPS lesson: How to measure your tension/gauge

See DROPS video: How to make a tension/gauge swatch

Working a garment top-down provides more flexibility and room for personal adjustment. For example it is easier to try the garment on while working, as well as making adjustments to length of yoke and shoulder caps.

The instructions are carefully explaining every step, in the correct order. Diagrams are adjusted to the knitting direction and are worked as usual.

The diagram depicts all rows/rounds, and every stitch seen from the right side. It is read from bottom to top, from right to left. 1 square = 1 stitch.

When working back and forth, every other row is worked from the right side and every other row is worked from the wrong side. When working from the wrong side, the diagram will have to be worked reversed: from left to right, knit stitches are purled, purl stitches are knit etc.

When working in the round every round is worked from the right side and the diagram are worked from right to left on all rounds.

See DROPS lesson: How to read knitting diagrams

The diagram depicts all rows/rounds, and every stitch seen from the right side. It is worked from bottom to top, from right to left.

When working back and forth every other row is worked from the right side: from right to left and every other row is worked from the wrong side: from left to right.

When working in the round, every row in the diagram are worked from the right side, from right to left.

When working a circular diagram you start in the middle and work your way outwards, counter clockwise, row by row.

The rows usually start with a given number of chain stitches (equivalent to the height of the following stitch), this will either be depicted in the diagram or explained in the pattern.

See DROPS lesson: How to read crochet diagrams

Instructions for working several diagrams after each other on the same row/round, will often be written like so: “work A.1, A.2, A.3 a total of 0-0-2-3-4 times". This means you work A.1 once, then A.2 is worked once, and A.3 is repeated (in width) the number of times provided for your size – in this case like so: S = 0 times, M = 0 times, L=2 times, XL= 3 times and XXL = 4 times.

The diagrams are worked as usual: begin with the first row in A.1, then work the first row in A.2 etc.

See DROPS lesson: How to read knitting diagrams

See DROPS lesson: How to read crochet diagrams

The total width of the garment (from wrist-to-wrist) will be larger in the larger sizes, despite the actual sleeves being shorter. The larger sizes have longer sleeve caps and wider shoulders, so there will be a good fit in all sizes.

The measurement sketch/schematic drawing provides information regarding the full length of the garment. If it’s a jumper or a jacket the length is measured from the highest point on the shoulder closest to the neckline, and straight down to the bottom of the garment. It is NOT measured from the tip of shoulder. Similarly, the length of yoke is measured from the highest point on the shoulder and down to where yoke is split into body and sleeves.

On a jacket measures are never taken along bands, unless specifically stated. Always measure inside band stitches when measuring the length.

See DROPS lesson: How to read a schematic drawing

Diagrams are often repeated on the round or in height. 1 repeat is the diagram the way it appears in the pattern. If it says to work 5 repeats of A.1 in the round, then you work A.1 a total of 5 times after/next to each other in the round. If it says to work 2 repeats of A.1 vertically/in height you work the entire diagram once, then begin again at the start and work the entire diagram one more time.

Chain stitches are slightly narrower than other stitches and to avoid working the cast-on edge too tight, we simply chain more stitches to begin with. The stitch count will be adjusted on the following row to fit the pattern and measurement sketch.

The rib edge is more elastic and will contract slightly compared to, for example, stocking stitch. By increasing before the rib edge, you avoid a visible difference in width between the rib edge and the rest of the body.

It’s very easy to cast off too tightly, and by making yarn overs while casting off (and simultaneously casting these off) you avoid a too tight cast off edge.

See DROPS video: How to bind off with yarn overs (yo)

To achieve an even increase (or decrease) you can increase on, for example: every 3rd and 4th row alternately, like so: work 2 rows and increase on the 3rd row, work 3 rows and increase on the 4th. Repeat this until the increase is complete.

See DROPS lesson: Increase or decrease 1 st on every 3rd and 4th row alternately

Should you prefer to work in the round instead of back and forth, you may of course adjust the pattern. You’ll need to add steeks mid-front (usually 5 stitches), and follow the instructions. When you would normally turn and work from the wrong side, simply work across the steek and continue in the round. At the end you’ll cut the piece open, pick up stitches to work bands, and cover the cut edges.

See DROPS video: How to knit steeks and cut open

Should you prefer to work back and forth instead of in the round, you may of course adjust the pattern so you work the pieces separately and then assemble them at the end. Divide the stitches for the body in 2, add 1 edge stitch in each side (for sewing) and work the front and back pieces separately.

See DROPS lesson: Can I adapt a pattern for circular needles into straight needles?

Pattern repeats can vary slightly in the different sizes, in order to get the correct proportions. If you’re not working the exact same size as the garment in the photo, yours might deviate slightly. This has been carefully developed and adjusted so that the complete impression of the garment is the same in all sizes.

Make sure to follow instructions and diagrams for your size!

If you have found a pattern you like which is available in women’s size it’s not very difficult to convert it to men’s size. The biggest difference will be the length of sleeves and body. Start working on the women size that you think would fit across the chest. The additional length will be worked right before you cast off for the armhole/sleeve cap. If the pattern is worked top-down you can add the length right after the armhole or before the first decrease on sleeve.

Regarding additional yarn amount, this will depend on how much length you add, but it is better with a skein too many than too few.

All yarns will have excess fibres (from production) that might come off as lint or shedding. Brushed yarns (ie hairier yarns) have more of these loose, excess fibres, causing more shedding.

Shedding also depends on what is worn under or over the garment, and whether this pulls at the yarn fibres. It’s therefore not possible to guarantee that there will be no shedding

Below are some tips on how to get the best result when working with hairier yarns:

1. When the garment is finished (before you wash it) shake it vigorously so the looser hairs come off. NOTE: do NOT use a lint roller, brush or any method that pulls at the yarn.

2. Place the garment in a plastic bag and put it in your freezer - the temperature will cause the fibres to become less attached to each other, and excess fibres will come off easier.

3. Leave in the freezer for a few hours before taking it out and shaking it again.

4. Wash the garment according to the instructions on the yarn label.

Pilling is a natural process that happens to even the most exclusive of fibers. It's a natural sign of wear and tear that is hard to avoid, and that is most visible in high friction areas of your garment like a sweater's arms and cuffs.

You can make your garment look as new by removing the pilling, using a fabric comb or a pill/lint remover.

Still can't find the answer you need? Then scroll down and leave your question so one of our experts can try to help you. This will be done normally within 5 to 10 working days.
In the meantime, you can read the questions and answers that others have left to this pattern or join the DROPS Workshop on Facebook to get help from fellow knitters/crocheters!

You might also like...

Post a comment to pattern DROPS 152-11

We would love to hear what you have to say about this pattern!

If you want to leave a question, please make sure you select the correct category in the form below, to speed up the answering process. Required fields are marked *.

Comments / Questions (36)

country flag Allinson Sherratt wrote:

I would like to knit this in yarn C alpaca silk. To calculate the quantity, do I add the length of the 2 original yarnbs together & divide by yarn C? Or do I use the length of the longervyarn A & divide by yarn C? Thanks

03.06.2014 - 23:55

DROPS Design answered:

Dear Mrs Sherratt, please click here to know how to calculate the amount of yarn in an alternative yarn, and remember your store can help you if required. Happy knitting!

04.06.2014 - 09:06

country flag Allinson Sherratt wrote:

I would like to knit this in yarn C alpaca silk. To calculate the quantity do I add the length of the 2 original yarns together & divide by yarn C? Or do I use the length of the longer yarn A & divide by yarn C? Thanks

29.05.2014 - 15:56

country flag Susanne wrote:

Hallo, die Jacke ist wirklich sehr schön. Ich stricke sie gerade in L. Ist es richtig, dass ich dann insgesamt nur 2 Maschen (eine auf der linken und eine auf der rechten Seite) für den Halsausschnitt abnehme? Wie kommen dann die 12 cm für den Ausschnitt zustande? Vielen Dank schon mal.

26.02.2014 - 11:45

DROPS Design answered:

Liebe Susanne, Sie ketten am Rückenteil ja zuerst 19 M ab und stricken jede Schulter einzeln weiter. Sie nehmen dann jeweils noch 1 M ab, insgesamt hat der Halsausschnitt also eine Öffnung von 21 M, das passt dann zu 12 cm. Bei den Vorderteilen nehmen Sie in Ihrer Größe tatsächlich nur je 1 M ab, die Öffnung ergibt sich dann durch das Umschlagen des Schalkragens, wie auf dem Foto zu sehen. Gutes Gelingen!

26.02.2014 - 13:41

country flag Alicja wrote:

Proszę o opis w języku polskim tego modelu.

14.02.2014 - 15:27

country flag Nita Sands wrote:

Another fantastic piece! all your things are really really great. and your models are drop dead gorgeous! still having a hard time finding yarn though. patterns are perfect.

29.01.2014 - 07:03

country flag Elisabeth wrote:

Cette veste est très accueillante et légère : idéale pour flaner sur la plage. Merci de nous donner bientôt les explications.

19.01.2014 - 14:27

country flag Ornella wrote:

Molto femminile ed elegante

12.01.2014 - 15:05

country flag Rosa wrote:

Lækker - har allerede garn og kan næsten ikke vente...

12.01.2014 - 12:40

country flag LORETTA wrote:

Molto fine ed elegante

12.01.2014 - 08:42

country flag Ilaria wrote:

Mi piace!! Elegante e raffinato. Non vedo l'ora di realizzarlo

06.01.2014 - 21:19