
Popular categories
Looking for a yarn?


|
|||||||||||||
DROPS 73-6 |
|||||||||||||
|
|
|||||||||||||
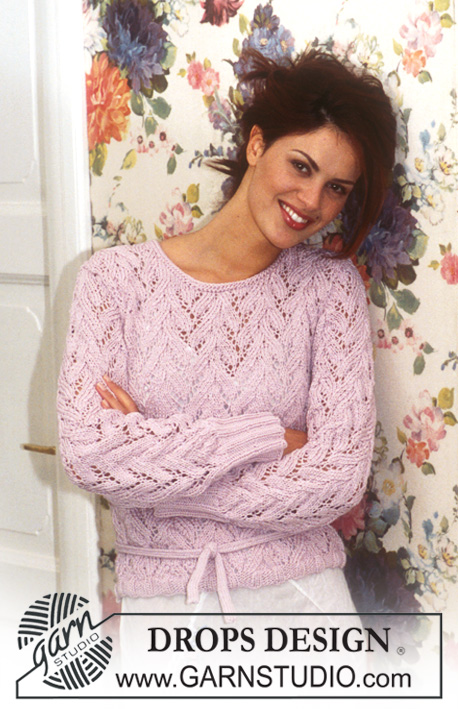
DROPS Top in Muskat
DROPS 73-6 |
|||||||||||||
|
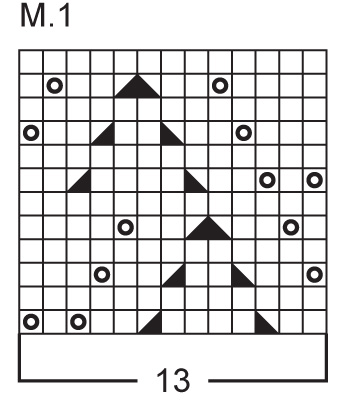
Gauge: 20 sts x 26 rows = 10 x 10 cm on larger needles in pattern. 1 repeat of Pattern 1 = 7 cm wide. Garter st, when knitting flat: Knit all sts, all rows. Pattern: See diagrams M.1, M.4 and M.5. The pattern is seen from the right side. NB: On the garment, the lace pattern (by mistake) is shown with a couple of holes too small, but follow the diagram and possibly see DROPS Design Model no. 73-5 to see how the pattern will look when the diagram is worked. Knitting tips (for armhole): All decs are made on right side rows. Dec 1 st inside 3 edge sts knit in garter st as follows: After 3 sts: Slip 1 as if to knit, K 1, psso. Before 3 sts: K 2 tog. Buttonhole: Make buttonholes along right button band. 1 buttonhole = bind off the center st of buttonband and yo over the bound off st on the next row. Make buttonhole when the piece measures (for all sizes): 2 cm, 6.5 cm, 11 cm, 15.5 cm and 20 cm. ---------------------------------------------------------------------- Back: Cast on 72-80-88-96 sts on smaller needles. Knit 6 rows garter st. Change to larger needles and continue as follows: K 1 (edge st), 9-13-17-21 sts stockinette st, Pattern 1 over 52 sts (4 repeats), 9-13-17-21 sts stockinette st, K 1 (edge st). When the piece measures 5 cm inc 1 st at each side every 2 cm a total of 5 times = 82-90-98-106 sts - knit the increased sts in stockinette st. When the piece measures 17 cm knit 4 rows garter st over 6-6-7-8 sts at each side (knit the remaining sts as before). On the next row bind off the outermost 3-3-4-5 sts at each side for armhole. Then dec 1 st at armholes inside 3 garter st edge sts every other row 2-5-7-9 times - see knitting tips = 72-74-76-78 sts remain. Continue with 3 sts garter st and 7-8-9-10 sts stockinette st at each side of Pattern 1. When the piece measures 35-36-37-38 cm knit 4 rows garter st over the center 32 sts - knit the remaining sts as before. Then bind off the center 26 sts for the neck = 23-24-25-26 sts remain on each shoulder. Knit pattern as before with 3 sts in garter st at each neck edge. Bind off when the piece measures approx. 37-38-39-40 cm. Right front: Cast on 39-43-47-51 sts on smaller needles. Knit 6 rows garter st, change to larger needles and knit the next row as follows from center front edge: K 3 (buttonband sts knit in garter st throughout), Pattern 1 over 26 sts (2 repeats), 9-13-17-21 sts stockinette st and K 1 (edge st). Make buttonholes along buttonband - see instructions above. When the piece measures 5 cm inc at the side as on back = 44-48-52-56 sts (knit the increased sts in stockinette st). When the piece measures 17 cm knit 4 rows garter st over 6-6-7-8 sts at the side (knit the remaining sts as before). On the next row bind off the outermost 3-3-4-5 sts at the side for armhole. Then shape armhole as on back. At the same time when the piece measures approx. 20 cm - adjust to end after a complete repeat of Pattern 1 - knit and bind off for the neck following Pattern 4A - dec for neck inside 3 button band sts knit in garter st. Knit the remaining sts in each row as before. After all armhole and neck shaping is complete 23-24-25-26 sts remain on shoulder. Continue with Pattern 4B and remaining sts in stockinette st and garter st until piece measures approx. 37-38-39-40 (match back). Bind off. Left front: Cast on as right front and knit 6 rows garter st, change to larger needles. Knit the next row as follows from side: K 1 (edge st), 9-13-17-21 sts stockinette st, Pattern 1 over 26 sts (2 repeats) and 3 sts in garter st (buttonband). Inc at the side and shape armhole as on right front. For neck shaping follow Pattern 5A, then continue with Pattern 5B. Bind off when piece matches right front. Assembly: Sew shoulder- and side seams using edge sts as seam allowance. Sew on buttons. |
|||||||||||||
Diagram explanations |
|||||||||||||
|
|||||||||||||
|
|||||||||||||

|
|||||||||||||

|
|||||||||||||
|
Have you made this or any other of our designs? Tag your pictures in social media with #dropsdesign so we can see them! Do you need help with this pattern?You'll find tutorial videos, a Comments/Questions area and more by visiting the pattern on garnstudio.com. © 1982-2024 DROPS Design A/S. We reserve all rights. This document, including all its sub-sections, has copyrights. Read more about what you can do with our patterns at the bottom of each pattern on our site. |
|||||||||||||


With over 40 years in knitting and crochet design, DROPS Design offers one of the most extensive collections of free patterns on the internet - translated to 17 languages. As of today we count 304 catalogues and 11422 patterns - 11422 of which are translated into English (UK/cm).
We work hard to bring you the best knitting and crochet have to offer, inspiration and advice as well as great quality yarns at incredible prices! Would you like to use our patterns for other than personal use? You can read what you are allowed to do in the Copyright text at the bottom of all our patterns. Happy crafting!
Comments / Questions (47)
Bonjour, je n’arrive pas à tricoter le point fantaisie. Au rang 5 le motif se décale. Je ne comprends pas ce que je ne fais pas correctement. Merci d’avance pour votre aide.
05.03.2022 - 22:33DROPS Design answered:
Bonjour Mme Gorecki, placez des marqueurs entre chaque motif à répéter pour que vous puissiez plus facilement repérer chaque motif et compter que vous avez bien le bon nombre de mailles à chaque fois (pour que chaque jeté soit bien compensé par 1 diminution). N'hésitez pas à apporter votre ouvrage à votre magasin / à envoyer une photo par mail, ils pourront ainsi plus facilement vous aider en voyant ce que vous faites. Bonne continuation!
07.03.2022 - 08:39Hi! This is my first time attempting lace work, so perhaps I\'m just making a really novice mistake but I can\'t seem to figure out the pattern. I\'m following it (Pattern 1) to a T, but i always end up with 15 stitches instead of 13, which means at the end of the row I only have 8 stitches left when I sould have 14. I showed this to a friend who also had the same issue. What are we doing wrong? Are we misinterpreting the chart?\r\n Thank you
29.08.2020 - 06:47DROPS Design answered:
Dear Lina, diagram M.1 is worked over 13 sts, every decrease will be compensate with one yarn over on the same row, this means you should always keep 13 sts, for ex. work row 1 like this: K2, K2 tog, K4, slip 1, K1, psso, K2, YO, K1, YO. Happy knitting!
31.08.2020 - 10:46Owszem, po przerobieniu 1-szego rzędu schematu M4A wychodzi 26 oczek, ale do wykonania tego rzędu potrzebne jest 27 oczek, a tylu oczek nie mamy na drucie.
03.08.2020 - 14:53DROPS Design answered:
Witaj Basiu, ostatnie 2 oczka razem przerób z 1 o. obszycia przodu. Pozdrawiamy!
03.08.2020 - 18:34Witam, mam pytanie odnośnie schematu 4A oraz 4B. Po odjęciu oczek na podkrój rękawa w rozmiarze S pozostaje 39 oczek. 3 o. ściegiem francuskim, 7 oczek ściegiem dżersejowym, 26 o. ściegiem fantazyjnym i 3 oczka ściegiem francuskim. Mam wrażenie, że schematy 4A oraz 4B angażują 27, a nie 26 oczek z drutu: 2 prawe, 2 razem, 4 prawe, 2 razem, 2 prawe, narzut, 1 prawe, narzut, 2 prawe, 7 prawych, narzut, 1 prawe, 2 razem. Czy ostatnie 2 razem trzeba przerobić z 1 o. obszycia przodu?
30.07.2020 - 20:28DROPS Design answered:
Witaj Basiu! Przeliczyłam ile powinno być oczek po przerobieniu 1-szego rzędu schematu M4A i wychodzi mi 26, zobacz raz jeszcze. W razie czego pisz. Pozdrawiamy!
03.08.2020 - 10:58Hallo, ich stricke sehr gerne mit Rundstricknadeln, komme bei der Erklärung nicht klar, was gemeint ist mit Ndl1 und 2 . Kann man das mit Rundstricknadeln stricken? Würde mich über eine Antwort freuen. Übrigens stricke ich das 1. mal mit Drops Wolle. Sowas von toll. Danke im voraus. Angela
15.06.2020 - 12:14DROPS Design answered:
Liebe Frau Bidlingmaier, bei der Erklärung zur Krausrippe sind bei 1. Ndl und 2. Ndl 1. Reihe bzw 2. Reihe gemeint. Viel Spaß beim stricken!
15.06.2020 - 16:16Dzień dobry. Bardzo prosze o wytłumaczenie jak zamykać podkroje rękawów na prawym przodzie. Robiąc to naprawej stronie przez przerabianie dwoch o. na prawo mam nadal oczka niezamkniete chyba ze zamkne je na lewej stronie robotki. Prosze o pomoc.
26.05.2020 - 18:05DROPS Design answered:
Ulu, nie zapomnij że po przerobieniu 4 rzędów ściegiem francuskim ponad 6-6-7-8 o. z boku (na wys. 17 cm), zamykasz na podkrój rękawa najpierw 3-3-4-5 o. (tak jakbyś zakańczała robótkę ponad tymi oczkami), dopiero w kolejnym rzędzie na prawej stronie robótki zaczynasz zamykać po 1 o. przerabiając 2 o. razem na prawo i powtarzasz to tyle razy ile jest zaznaczone dla twojego rozmiaru. Pozdrawiamy!
27.05.2020 - 15:25Dzień dobry. Mam też inny problem. Musialam 'dorobic' kilka rzedow aby spasować z pierwszym rzedem w ktorym maja byc odejmowane rzedy na dekolt. Czy odejmujemy po 3 oczkach sciegu francuskiego? Odejmujac na poczatku,zgodnie ze wzorem, brakuje mi jednego oczka z konca schematu. Moje wczesnieksze pytanie nadal jest aktualne. Dziurki w odleglosci 2cm nie 'spasowaly' z górą robótki. Prosze o pomoc.
25.05.2020 - 12:47DROPS Design answered:
Witaj Ulu, napisz mi o jaki fragment sweterka chodzi, tył, lewy czy prawy przód?
27.05.2020 - 15:27Witam serdecznie. Mam pytanie dotyczace dziurek na guziki. W jakich odleglosciach nalezy je robic? Opis : 2-6, 5-11-15,5 i 20cm, nie jest dla mnie jasny. Czy nie powinny byc w rownych odleglosciach? Poza tym, czy oczko srodkowe wykonczenia nalezy zamknac przekladajac na prawy drut, przerobic nastepne, potenm pieresze przelozyc nad nim? Proszę o pomoc i z gory dziekuje
23.05.2020 - 00:40DROPS Design answered:
Witaj Ulu, wykonujesz dziurki na guziki co 4,5 cm, na wys. 2 cm - 6, 5 cm -11 cm -15,5 cm i 20 cm (mierząc od dołu robótki). Co do zamykania oczek na dekolt, to zamykasz oczka wg schematu M4.A czyli na początku rzędu masz: zdjąć 1 o. jak do przerobienia na prawo, 1 o.p., przełożyć oczko zdjęte nad przerobionym oczkiem i dalej przerabiasz dalszą część schematu. Pozdrawiamy!
23.05.2020 - 08:33I am ready to finish the back but can't understand a detail. On neckline, how i knit the chart on sts after the edges? I knit the half sts of a row on diagram then 32 garter sts in the middle and the other half sts of the row after?
30.04.2020 - 19:24DROPS Design answered:
Dear Jenny, for the next 4 rows you will work the stitches on each side of the 32 middle stitches as before and work the middle 32 stitches in garter stitch. After these 4 rows have been worked, you will cast off the middle 26 sts for neck and continue each shoulder separately with 3 sts in garter stitch towards neck. Happy knitting!
04.05.2020 - 09:45Is it possible to explain step by step the decreases on right front piece? What do i do exactly after the 3 outermost sts bind off? Thank you very much.
22.04.2020 - 12:33DROPS Design answered:
Dear Jenny, on right front piece you cast off the 3 outermost stitches = the first 3 stitches at the beg of row from the wrong side. Then decrease for armhole as explained under knitting tips (for armhole). Happy knitting!
22.04.2020 - 13:18