
Popular categories
Looking for a yarn?


|
||||||||||||||||
Glimpse of Spring |
||||||||||||||||
|
|
||||||||||||||||
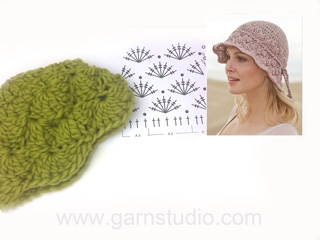
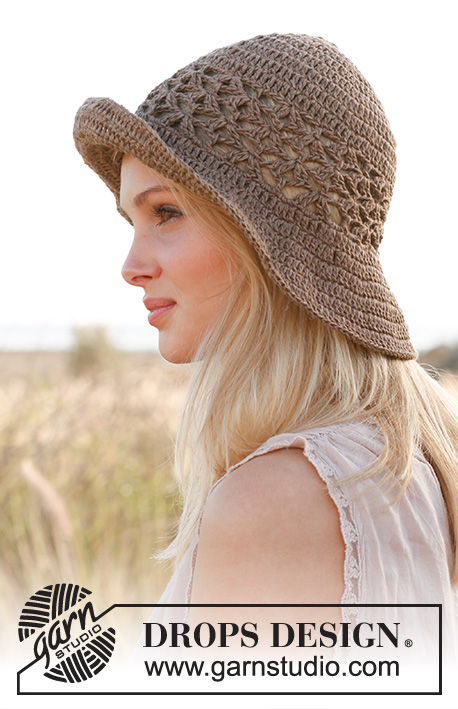
Crochet DROPS hat in "Muskat".
DROPS 153-36 |
||||||||||||||||
|
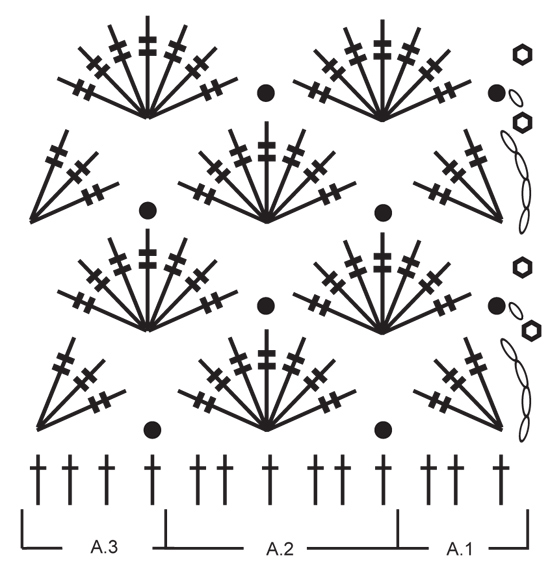
CROCHET INFO: Replace first tr at beg of a tr round with 3 ch. Finish every tr round with 1 sl st in 3rd ch from beg of round (= in first tr). Replace first dc at beg of a dc round with 1 ch. Finish every dc round with 1 sl st in ch from beg of round. INCREASE TIP: Inc 1 tr or 1 dc by working 2 tr/dc in same st. PATTERN: See diagrams A.1 to A.3. ---------------------------------------------------------- HAT: Crochet 5 ch on hook size 4 mm with 1 strand Muskat and form a ring with 1 sl st in first ch. READ CROCHET INFO! ROUND 1: Work 10 (10) tr in ch-ring. ROUND 2: Work 2 tr in every tr = 20 (20) tr. ROUND 3: * 1 tr in first tr, 2 tr in next tr *, repeat from *-* = 30 (30) tr. ROUND 4: * 1 tr in each of the first 2 tr, 2 tr in next tr *, repeat from *-* = 40 (40) tr. ROUND 5-8 (5-9): Continue inc the same way, i.e. inc 10 tr on every round, inc the same place as on previous round, i.e. 1 tr more between every inc on every round. Inc as before by working 2 tr in 1 tr, AT THE SAME TIME on round 8 (9) inc in addition 5 (1) tr evenly – READ INCREASE TIP = 85 (91) tr. Piece measures 9 (10) cm. ROUND 9-10 (10-11): Then work PATTERN as follows: Work A.1, then work A.2 13 (14) times in total, and finish with A.3. On next round work as follows: ROUND 1: Work 1 dc in first dc from previous round, skip 1 dtr, 1 dc in each of the next 2 dtr, * 1 dc in each of the next 3 dtr, skip 1 dtr, 1 dc in next dc, skip 1 dtr, 1 dc in each of the next 2 dtr*, repeat from *-* until 4 dtr remain on round, 1 dc in each of the last 4 dtr = 85 (91) dc on round. ROUND 2: Work 1 ch, * 1 dc in next dc, 1 ch, skip 1 dc *, repeat from *-* the entire round and finish with 1 sl st in 1st ch from beg of round. ROUND 3: Work 1 dc in next ch, * 1 dc in next dc, 1 dc in next ch *, repeat from *-* the entire round, at the same time inc 6 (12) dc evenly on round = 91 (103) dc. Finish with 1 sl st in 1 dc from beg of round. BRIM: Continue to crochet the brim as follows: ROUND 1: Then work PATTERN as follows: Work A.1, then work A.2 14 (16) times in total, and finish with A.3. ROUND 2-5: Continue with pattern A.1, A.2 and A.3, AT THE SAME TIME inc 1 dtr in every dtr-group (i.e. on 2nd round work 8 dtr in dtr-groups). Continue the same way and inc 1 dtr in every dtr-group on every round. When 5th round of brim has been worked, work 1 dc in every dtr from previous round. Fasten off. TWINED STRING: Cut 8 lengths of 3 metres each. Twine the strands tog until they resist, fold the string double so that it twines again. Tie a knot in one end, thread the string without knot up and down between the small holes worked on 2nd round after first section with tr-groups. Adjust the length of string to desired length and tie a knot in other end. |
||||||||||||||||
Diagram explanations |
||||||||||||||||
|
||||||||||||||||
|
||||||||||||||||
|
Have you made this or any other of our designs? Tag your pictures in social media with #dropsdesign so we can see them! Do you need help with this pattern?You'll find tutorial videos, a Comments/Questions area and more by visiting the pattern on garnstudio.com. © 1982-2024 DROPS Design A/S. We reserve all rights. This document, including all its sub-sections, has copyrights. Read more about what you can do with our patterns at the bottom of each pattern on our site. |
||||||||||||||||


With over 40 years in knitting and crochet design, DROPS Design offers one of the most extensive collections of free patterns on the internet - translated to 17 languages. As of today we count 304 catalogues and 11422 patterns - 11422 of which are translated into English (UK/cm).
We work hard to bring you the best knitting and crochet have to offer, inspiration and advice as well as great quality yarns at incredible prices! Would you like to use our patterns for other than personal use? You can read what you are allowed to do in the Copyright text at the bottom of all our patterns. Happy crafting!
Comments / Questions (82)
I always struggle with the diagrams and last time on a poncho the bottom was for visual as in dbls on bottom go from right to left and insert the triple on top but now this one is twisted? Ouch So a explanation as per the dbls and als they appear to be missing a dbl? Help plz
30.05.2016 - 02:17DROPS Design answered:
Dear Cindy, diagram is read from the right towards the left on every round, work first A.1 (replace 1st tr with 4 ch on round 1), then repeat A.2 and finish round with A.3. Finish each round with 1 sl st (= 4th symbol under legend), ie in 4th ch at beg on 1st round then start 2nd round with 1 ch, 1 sc in the 4th ch from beg of previous round - the sc (black dot) should be worked in A.2 in the mid tr (tr - see here) from previous fan. Happy crocheting!
30.05.2016 - 10:28Hej. När jag följer diagrammet för mönstret, dvs *7dst, hoppa över 2, fm, hoppa över 2* så blir det 17grupper (skulle bli 14 enl mönstret). Är det jag som gör något fel eller? Tack på förhand för svar:-) //Tina
25.02.2016 - 06:21DROPS Design answered:
Hej Tina, Du har 85 st, rapporten går över 6 m om du delar 85/6 får du 14 grupper + 1 m. Kolla så du har 85 m Innan du börjar med diagrammet. Lycka till!
11.03.2016 - 10:48Jag har svårt att läsa detta mönster. Har kommit ner till brättet och får helt fel form på hatten. I diagrammet är det tre rader. Ska man öka med en dst efter tre rader eller, som det står, varje rad? Då blir det ju väldigt många dst på sista varvet. Har kommit till andra varvet med stolpgrupper och det ser väldigt märkligt ut med 8dst i varje grupp.
24.02.2016 - 22:30DROPS Design answered:
Hej, du virkar 7 dst enligt mönster, men du måste öka med 1 dst i varje grupp på varje varv. Lycka till!
25.02.2016 - 15:38Thank you for your answer on 1/5/16. I am still confused.Starting at right hand bottom corner& going left doing A.1, A2 and A.3, then do you go back to the right hand side on the next line up, zig zag L to Rt or repeat what you just did. This is first experience w/a diagram. I understand to put stitches and what they are.just not sure which way to read the diagram. Also, what is the symbol that is like a hollowed out single crochet symbol on the right hand side of the chart.Thanks,Karen
12.01.2016 - 20:23DROPS Design answered:
Dear Mrs Freeze, when you have finished the round, sl st in st at beg of round (= either 4th ch or 1st ch, ie 4th symbol under legend - at the beg of round 2, beg with 1 ch, 1 sc in 4ch ch from previous round, then *7 tr in sc from previous round, 1 sc in 4th tr from previous round*, and repeat around. Happy crocheting!
13.01.2016 - 09:46I love this hat pattern and have worked it through round 7. I am not sure about how to do round #8. Also I don't understand how to work by looking at the pattern. could you possibley give me some guidance. I understand I would be working single crochets and triple crochet but not sure exactly where to put them. thanks so much for your help. Karen
04.01.2016 - 18:58DROPS Design answered:
Dear Mrs Freeze, on round 8 on height, inc 10 dc as before, but increase 5 dc extra (1st size) so that you get 85 dc at the end of this round. In the diagram each symbol represent 1 stitch. When sts are pointing tog on one st, these sts have to be worked in the same st on previous round. Start reading at the bottom corner on the right side and work towards the left every round. Happy crocheting!
05.01.2016 - 09:14Bonjour, c'est encore moi... Est-ce normal que les groupes de brides du point fantaisie forment des "bosses" ? Elles ressortent au lieu d'être à plat comme sur le modèle. Est-ce parce que je crochète trop serré peut-être ?
13.05.2015 - 15:30DROPS Design answered:
Bonjour Mme Barthelemi, les groupes de double-brides du point fantaisie ne doivent pas resserrer l'ouvrage, vérifiez bien votre tension et que le point ne resserre pas le chapeau, essayez avec un crochet plus gros si nécessaire. Bon crochet!
13.05.2015 - 16:21Bonjour, Faut-il toujours lire chaque ligne du diagramme de la droite vers la gauche, donc toujours A.1 puis x fois A.2 et terminer par A.3 ? Et répéter ça à la 2ème, 3ème ligne ? Il ne faut pas tourner le travail ? Le symbole représentant la maille coulée correspond à la maille coulée qui sert à fermer le tour ? Merci d'avance pour votre réponse. Rachel
11.05.2015 - 10:50DROPS Design answered:
Bonjour Mme Barthelemi, c'est tout à fait exact. On crochète en rond en commençant par A.1 (début du tour), on répète A.2 jusqu'à ce qu'il reste 4 m et on crochète A.3 sur les 4 dernière m, on ferme le tour par 1 mc dans la 4ème/1ère ml du début du tour. Bon crochet!
11.05.2015 - 11:14Förstår ej hur jag läser mönstret diagrammet. Läser man från höger till vänster ..eller börjar man läsa från höger och följer mönstret uppåt? Mycket tacksam för svar. Med vänlig hälsning, Anita
08.04.2015 - 15:31DROPS Design answered:
Hej Anita, du börjar nederst till höger i diagrammet, när du är klar med första varvet fortsätter du runt på andra varvet. Lycka till!
13.05.2015 - 15:58Hej, jag som flera andra sitter helt förbryllad över diagramet. Jag förstår inte hur jag ska läsa/tyda den. Ni svarade att man börjar läsa den från nedre höger hörn...ok, fortsätter jag då rakt upp..eller från höger till vänster? Dessutom hur jag än försöker ( vilket jag har gjort) så ligger vissa direktiv både inom ruta 1 och 2. Jag behöver verkligen hjälp med denna. Kanske är det så att jag är för ny...men jag älskar verkligen hatten och vill hemskt gärna få den gjord. mvh Noomie
09.01.2015 - 21:43DROPS Design answered:
Hej Noomie, Jo du virkar runt enligt beskrivningen, men börjar først diagrammet när arb mäter 9 (10 cm), du börjar nederst i höger hörn och virkar runt, när du har virkat 1:a varv fortsätter du med nästa. Du ser i höger sida på diag hur du "kommer upp" till nästa varv. Fråga gärna i butiken där du har köpt garnet. Lycka till!
02.02.2015 - 15:31Bonjour je ne comprends pas comment lire le diagramme, pourriez vous me l'expliquer merci
31.08.2014 - 13:55