
Popular categories
Looking for a yarn?


|
|||||||||||||
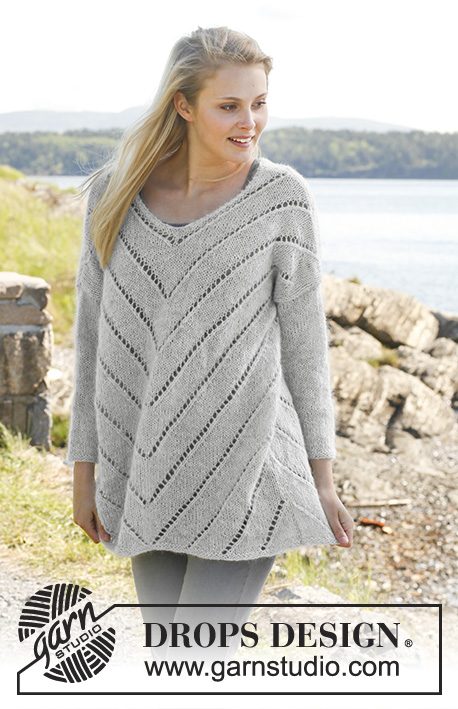
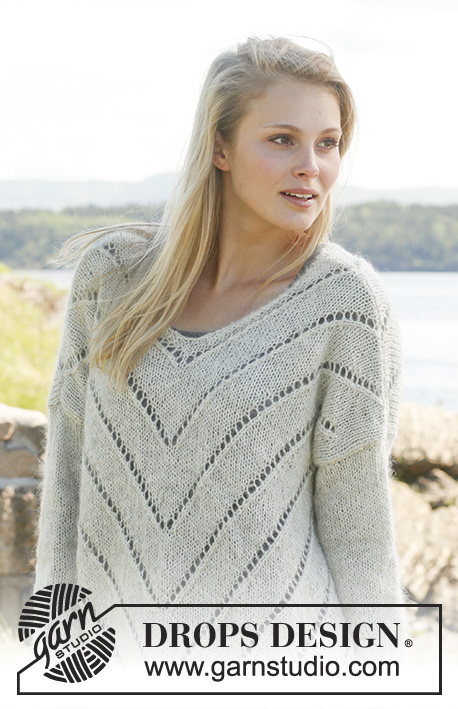
Eva Sweater |
|||||||||||||
 |
 |
||||||||||||
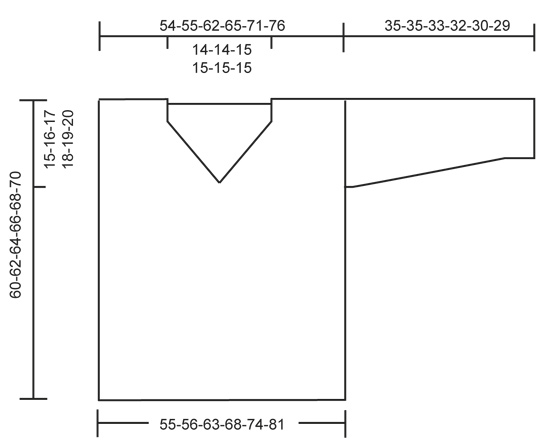
Knitted DROPS jumper with lace pattern and ¾ sleeves in "Alpaca" and "Kid-Silk". Size: S - XXXL.
DROPS 149-3 |
|||||||||||||
|
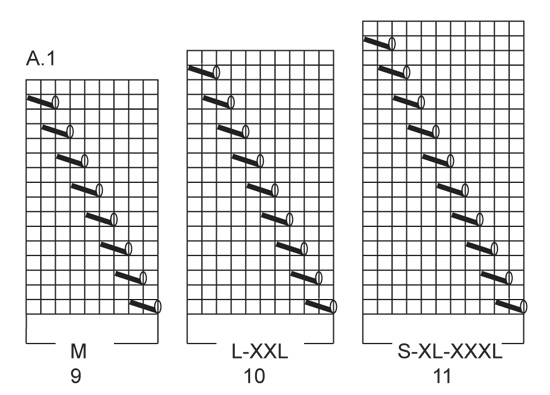
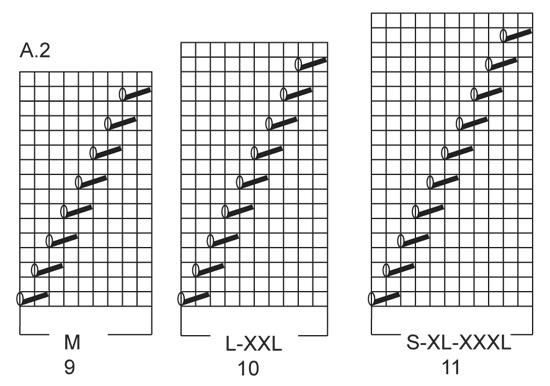
GARTER ST (back and forth on circular needle): K all rows. 1 ridge = 2 rows K. PATTERN: See diagrams A.1 and A.2. The diagrams show all rows in pattern seen from RS. NOTE! See diagram for size! KNITTING TIP: When neck dec beg, continue lines with holes that have been started, but do not beg new lines with holes. NOTE: Adjust to not dec for neck on the first 4 rows of diagram A.1/A.2. DECREASE TIP (applies to neck dec): Dec inside 2 sts in garter st. All dec are done from RS! Dec before 2 sts as follows: K 2 tog. Dec after 2 sts as follows: Slip 1 st as if to K, K 1, psso. ---------------------------------------------------------- BACK PIECE: Worked back and forth on circular needle. Cast on 93-95-107-115-125-137 sts on circular needle size 4 mm with 1 strand of each yarn (= 2 strands). Work 2 ridges in GARTER ST - see explanation above. Switch to circular needle size 5 mm. Work as follows from RS: 2-2-3-2-2-2 sts in stocking st, diagram A.2 - see explanation above - over the next 44-45-50-55-60-66 sts (= 4-5-5-5-6-6 repetitions in width), 1 st in stocking st, diagram A.1 over the next 44-45-50-55-60-66 sts (= 4-5-5-5-6-6 repetitions in width) and finish with 2-2-3-2-2-2 sts in stocking st. Pattern A.1/A.2 is displaced out to the 2-2-3-2-2-2 sts in the side worked in stocking st until finished measurements. Work 1 new repetition of A.1/A.2 vertically every 22nd-18th-20th-22nd-20th-22nd row. Work like this until piece measures 45-46-47-48-49-50 cm. Then cast off 1-1-1-2-2-4 sts for armhole in each side = 91-93-105-111-121-129 sts. Continue pattern but work the outermost 5 sts in each side in stocking st until finished measurements. When piece measures 57-59-61-63-65-67 cm – read KNITTING TIP, work 1 ridge in garter st over the middle 27-27-29-29-29-29 sts (= 32-33-38-41-46-50 sts on each side), work the other sts as before. Then cast off the middle 23-23-25-25-25-25 sts for neck = 34-35-40-43-48-52 sts remaining on each shoulder. Now finish each shoulder separately. Continue with garter st over the 2 outermost sts towards neck, pattern and 5 sts in stocking st. When piece measures 59-61-63-65-67-69 cm, work 2 rows in stocking st with 2 sts in garter st in each side of neck. Cast off. Piece measures 60-62-64-66-68-70 cm. FRONT PIECE: Worked back and forth on circular needle. Cast on and work as back piece. When piece measures 47-49-50-52-54-55 cm, work 1 ridge in garter st over the middle 5 sts (= 43-44-50-53-58-62 sts on each side), work the other sts as before. Then cast off the middle st in garter st and finish each shoulder separately - Remember Knitting tip. Continue to work in garter st over the 2 outermost sts towards the neck, pattern and 5 sts in stocking st, AT THE SAME TIME on next row from RS dec 1 st for neck inside the 2 sts in garter st - read DECREASE TIP, repeat dec on every row from RS 10-10-11-11-11-11 more times (= 11-11-12-12-12-12 times in total) = 34-35-40-43-48-52 sts remain on the shoulder. Cast off when piece measures 60-62-64-66-68-70 cm. SLEEVE: Worked back and forth on circular needle. Cast on 42-42-44-48-48-50 sts on circular needle size 4 mm with 1 strand of each yarn (= 2 strands). Work 2 ridges in garter st. Switch to circular needle size 5 mm and work in stocking st. When piece measures 3 cm, inc 1 st in each side, repeat inc every 7-6-4-4-3-3 cm 4-5-6-6-8-8 more times (= 5-6-7-7-9-9 times in total) = 52-54-58-62-66-68 sts. Work in stocking st until piece measures 35-35-33-32-30-29 cm. Cast off. Knit another sleeve. ASSEMBLY: Sew the shoulder seams. Sew in sleeves. Sew sleeve and side seam in front loop of outermost sts. |
|||||||||||||
Diagram explanations |
|||||||||||||
|
|||||||||||||
|
|||||||||||||
|
|||||||||||||
|
|||||||||||||
|
Have you made this or any other of our designs? Tag your pictures in social media with #dropsdesign so we can see them! Do you need help with this pattern?You'll find tutorial videos, a Comments/Questions area and more by visiting the pattern on garnstudio.com. © 1982-2024 DROPS Design A/S. We reserve all rights. This document, including all its sub-sections, has copyrights. Read more about what you can do with our patterns at the bottom of each pattern on our site. |
|||||||||||||


With over 40 years in knitting and crochet design, DROPS Design offers one of the most extensive collections of free patterns on the internet - translated to 17 languages. As of today we count 304 catalogues and 11422 patterns - 11422 of which are translated into English (UK/cm).
We work hard to bring you the best knitting and crochet have to offer, inspiration and advice as well as great quality yarns at incredible prices! Would you like to use our patterns for other than personal use? You can read what you are allowed to do in the Copyright text at the bottom of all our patterns. Happy crafting!
Comments / Questions (95)
Liebes Drops-Team, ich verstehe leider den Abschnitt zu den Abnahmen am Kragen nicht. Wenn ich 2 M kraus re stricke, dann 2 re zusammen, 1 M abnehme und wieder 1 M über die re gestrickt ziehe, habe ich ja im Endeffekt 3 M weniger und nicht nur eine? Wenn ich das dann 11x wiederhole habe ich ja gar keine M mehr für die Schulter...Oder ist es so gemeint, dass ich in der einen Hin-R 2 re zus stricke, dies als Abnahme gilt und in der nä Hin-R in eine abgehobene über die re gestrickte M ziehe?
17.08.2015 - 09:23DROPS Design answered:
Sie nehmen pro Seite am Halsausschnitt nur 1 M ab. Sie beginnen am Halsausschnitt mit 2 M kraus re, dann stricken Sie 2 M überzogen zusammen (d.h. 1 M abheben, 1 M re, die abgehobene überziehen), dann stricken Sie die R weiter bis zu den letzten 4 M, davon stricken Sie die nächsten 2 M re zusammen und dann wieder 2 M kraus re. Dann wenden Sie und stricken die Rück-R ohne Abnahmen. In der nächsten Hin-R machen Sie dann wieder die Abnahmen ebenso.
01.09.2015 - 23:12Ich stehe auf dem Schlauch. Wenn ich A2 und A1 in Größe XXL einmal in der Höhe gestrickt habe, muss ich schon in der 19. Reihe mit der nächsten Folge A2/A1 beginnen, nicht in der 20. Wenn ich das tue verschiebt sich allerdings das Lochmuster nach rechts und bildet keine Linie. Um das zu vermeiden müsste ich entweder vor A2 eine Masche rechts stricken, die fehlt mir dann allerdings in der Mitte. Oder ich müsste die zweite der zwei Krausmaschen mit der darauf folgenden rechts zusammen stricken.
27.07.2015 - 07:08DROPS Design answered:
Am besten orientieren Sie sich an der M-Zahl zwischen den Umschlägen. Bei A.1 haben Sie ja 1 Umschlag, dann 2 zusammengestrickte M und dann 8 M re, bevor der nächste Umschlag gestrickt wird. So muss das Muster stets weiterlaufen, d.h. Sie müssen immer 8 M re nach den 2 zusammengestrickten M und dem nächsten Umschlag haben und fangen in diesem Rhythmus dann mit einem neuen Mustersatz an. Sie können sich die Mustersätze auch einzeln mit kurzen Hilfsfäden markieren, um einen besseren Überblick zu behalten.
28.07.2015 - 13:25Bonjour, j'ai un doute : lit-on le diagramme de gauche à droite? Merci d'avance de votre réponse. Christine
20.01.2015 - 21:02DROPS Design answered:
Bonjour Mme Jouffroy, dans chaque diagramme 1 case = 1 m x 1 rang, on commence en bas à droite et on lit de droite à gauche sur l'endroit et de gauche à droite sur l'envers (1er rang = sur l'endroit). Bon tricot!
21.01.2015 - 13:20Mille merci pour votre réponse
30.10.2014 - 19:14Je ne comprends pas comment il faut tricoter le dos du modèle Drops 149-3 - comment disposer mes mailles ?? pour faire ce point fantaisie au vu des diagrammes A1 A2- Pourriez vous m'aider ? Merci de votre réponse si possible en français
29.10.2014 - 20:28DROPS Design answered:
Chère Madame Berger, pour le dos, on tricote d'abord 2-3 m jersey (cf taille), puis on répète le diagramme A.2 4 à 6 fois en largeur sur les 44-66 m suivantes, on tricote 1 m en jersey (m centrale) et on répète ensuite A.1 4 à 6 fois en largeur, et on termine par 2 m jersey. Les motifs vont partir ainsi en diagonale de chaque côté au fur et à mesure qu'on les tricote, on a toujours 1 m jersey au milieu. Bon tricot!
30.10.2014 - 09:55Ich möchte den Ewa Sweater mit langem Arm stricken -können Sie mir da Tipps geben zur Ärmelllänge- ich trage gr. S.das wäre super!
25.06.2014 - 22:43DROPS Design answered:
Liebe Janet, leider können wir an dieser Stelle keine Anleitungen für längere Ärmel geben. Am besten kontaktieren Sie Ihr Dropswollegeschäft, um sich dort genauer beraten zu lassen.
29.06.2014 - 14:13Renée wrote:
Bonjour, je crois qu'il y a 1 faute dans les explications pou la taille S. Ne faut-il pas commencer par 1 seule maille jersey, au lieu de 2, sinon le motif ne se trouve pas au milieu et à la fin de la rangéee on n'a plus de mailles (Randmaschen), après le dernier rapport? Merci de vérifier
07.02.2014 - 10:26DROPS Design answered:
Bonjour Renée, en S, on a 93 m = 2 m jersey (dont 1 m lis), 4x 11 m de A.2, 1 m jersey, 4 x 11 m de A.1, 2 m jersey (dont 1 m lis). Bon tricot!
07.02.2014 - 10:55Renee wrote:
Bonjour, Je voudrais tricoter ce pull en S, mais pas si large, en fait je voudrais tricoter le rapport de 9 mailles seulement 8 fois au lieu de 10 fois. Combien me faudra-t-il de mailles pour débuter? merci
06.02.2014 - 18:15DROPS Design answered:
Bonjour Renée, pour l'ajuster à la largeur souhaitée, vous pouvez recalculer à l'aide du schéma de mesures en bas de page et les explications relatives aux motifs. En taille S, on répète 4 fois A1 et 4 fois A2, en supprimant 2 motifs, vous "perdez" 10 cm environ. N'hésitez pas à demander de l'aide à votre magasin. Bon tricot!
07.02.2014 - 09:00Jeg tror det mangler 2 rekker på mønsteret. Det er nevnt i kommentarene tidligere; mønsteret viser bare 20 rekker og ikke 22 som det burde være (og som det står i teksten). Dermed forskyver hullrekken seg, og det er jo ikke poenget vel?!
01.11.2013 - 18:35DROPS Design answered:
Ja det stemmer, men det er rettet i opskriften. Se rettelse!
04.11.2013 - 11:30Rigt sød model som jeg har lyst til at strikke men jeg kan se der er en der ikke syntes den svarer størrelses mæssig efter billedet kan det være rigtig. Så har jeg prøvet at se på rettelserne om det var dem hun ikke havde set, og jeg kan ikke se at der er forskel fra opskriften til rettelserne
13.09.2013 - 09:23DROPS Design answered:
Hej Jette. Nederst paa billedet ser du maalenen i cm per störrelse. Vaelg den störrelse som passer dig. Strikker du med den rette strikkefasthed (17 m x 22 p = 10 x 10 cm), saa passer maalene ogsaa.
13.09.2013 - 10:39