
Popular categories
Looking for a yarn?


|
||||||||||
Snips and Snails |
||||||||||
 |
 |
|||||||||
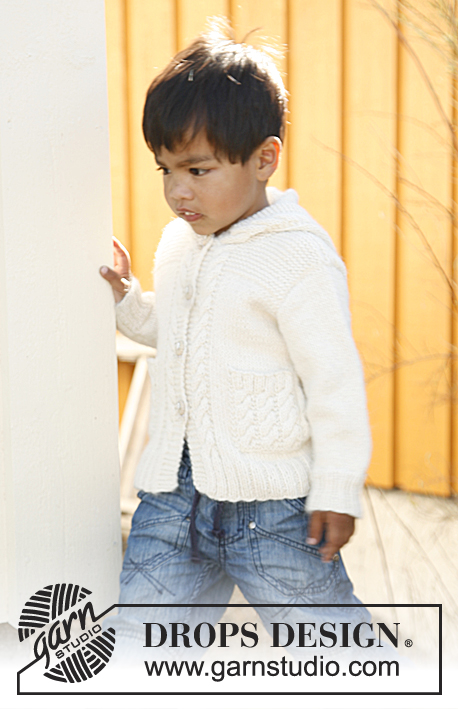
Knitted DROPS jacket with cables, hood and pockets in ”Karisma”. Size 3 - 12 years.
DROPS Children 22-21 |
||||||||||
|
GARTER ST (back and forth on needle): K all rows. PATTERN: See diagrams M.1 and M.2 – diagrams show pattern from RS. BUTTON HOLES: Bind off for button hole on right band from RS by K tog 2nd and 3rd st from mid front and then make 1 YO. Bind off for button holes when piece measures: SIZE 3/4 years: 14, 21, 28 and 35 cm / 5½",8¼",11" and 13¾". SIZE 5/6 years: 14, 20, 26, 32 and 38 cm / 5½",8",10¼",12½" and 15". SIZE 7/8 years: 14, 21, 27, 34 and 40 cm / 5½",8¼",10⅝",13⅜" and 15¾". SIZE 9/10 years: 14, 20, 26, 32, 38 and 43 cm / 5½",8",10¼",12½",15" and 17". SIZE 11/12 years: 14, 21, 27, 33, 39 and 45 cm / 5½",8¼",10⅝", 13",15¼" and 17¾". --------------------------------------------------------- BODY: Worked back and forth on circular needle from mid front. Cast on 176-184-196-204-212 sts (includes 5 band sts in each side towards mid front) on circular needle size 3 mm / US 2or3 with Karisma. Work rib as follows (from RS): 5 band sts in GARTER ST - see explanation above - * K 2, P 2 *, repeat from *-* until 7 sts remain, K 2 and 5 band sts in garter st. When rib measures approx. 5 cm / 2" (adjust so that next row is worked from RS), switch to circular needle size 4 mm / US 6. Work next row as follows: SIZE 3/4 YEARS: 5 band sts in garter st, diagram M.1 (= 6 sts), 2 sts in garter st, K 6, * K 2 tog, K 6 *, repeat from *-* until 13 sts remain, work 2 sts in garter st, diagram M.2 (= 6 sts) and 5 band sts in garter st = 158 sts. SIZE 5/6 YEARS: 5 band sts in garter st, diagram M.1 (= 6 sts), 2 sts in garter st, K 5, * K 2 tog, K 6, K 2 tog, K 7 *, repeat from *-* until 13 sts remain, work 2 sts in garter st, diagram M.2 (= 6 sts) and 5 band sts in garter st = 166 sts. SIZE 7/8 YEARS: 5 band sts in garter st, diagram M.1 (= 6 sts), 2 sts in garter st, * K 2 tog, K 6, K 2 tog, K 7 *, repeat from *-* until 13 sts remain, work 2 sts in garter st, diagram M.2 (= 6 sts) and 5 band sts in garter st = 176 sts. SIZE 9/10 YEARS: 5 band sts in garter st, diagram M.1 (= 6 sts), 2 sts in garter st, K 8, * K 2 tog, K 6, K 2 tog, K 7 *, repeat from *-* until 13 sts remain, work 2 sts in garter st, diagram M.2 (= 6 sts) and 5 band sts in garter st = 184 sts. SIZE 11/12 YEARS: 5 band sts in garter st, diagram M.1 (= 6 sts), 2 sts in garter st, K 6, * K 2 tog, K 7 *, repeat from *-* until 13 sts remain, work 2 sts in garter st, diagram M.2 (= 6 sts) and 5 band sts in garter st = 192 sts. ALL SIZES: Continue with diagrams M.1 and M.2, front bands and 2 garter sts on the outside of diagrams M.1 and M.2 and work the remaining sts in stockinette st. REMEMBER THE GAUGE! When piece measures 14 cm / 5½", beg to bind off for BUTTON HOLES – see explanation above. When piece measures 26-28-30-32-34 cm / 10¼"-11"-11¾"-12½"-13⅜", work next row as follows (from RS): Work 40-42-45-47-49 sts as before (= right front piece), bind off 6 sts for armhole, work 66-70-74-78-82 sts in stockinette st (= back piece), bind off 6 sts for armhole and work 40-42-45-47-49 sts as before (= left front piece). Finish each part separately. LEFT FRONT PIECE: = 40-42-45-47-49 sts. Continue pattern as before – AT THE SAME TIME bind off for armhole at beg of every row from the side: 2 sts 1-1-1-1-1 time and 1 st 2-2-2-3-3 times = 36-38-41-42-44 sts. When piece measures 32-34-37-39-42 cm / 12½"-13⅜"-14½"-15¼"-16½", work all the sts in stockinette st in garter st until finished measurements, work the remaining sts as before. When piece measures 36-39-41-44-46 cm / 14¼"-15¼"-16⅛"-17¼"-18", slip the outermost 13-14-16-17-18 sts on a stitch holder for neck. Then bind off at beg of every row from neck: 2 sts 2 times and 1 st 3 times = 16-17-18-18-19 sts remain on shoulder. Bind off when piece measures 40-43-46-49-52 cm / 15¾"-17"-18"-19¼"-20½". RIGHT FRONT PIECE: Work as left front piece but reversed – remember button holes. BACK PIECE: = 66-70-74-78-82 sts. Continue in stockinette st, at the same time bind off for armholes in each side as on front piece = 58-62-66-68-72 sts. When piece measures 32-34-37-39-42 cm / 12½"-13⅜"-14½"-15¼"-16½", work in garter st over all sts until finished measurements. When piece measures 38-41-44-47-50 cm / 15"-16⅛"-17¼"-18½"-19¾", bind off the middle 24-26-28-30-32 sts for neck and finish each shoulder separately. Then bind off 1 st on next row towards the neck = 16-17-18-18-19 sts remain on the shoulder. Bind off when piece measures 40-43-46-49-52 cm / 15¾"-17"-18"-19¼"-20½". SLEEVE: Worked in the round on double pointed needles. Cast on 40-44-44-48-48 sts on double pointed needles size 3 mm / US 2or3 with Karisma. Work rib = K 2/P 2 for 5 cm / 2". Switch to double pointed needles size 4 mm / US 6 and continue in stockinette st. Insert a marker at beg of round (= mid under sleeve). When piece measures 8-8-9-9-10 cm / 3⅛"-3⅛"-3½"-3½"-4", inc 1 st on each side of marker. Repeat inc every 3-3½-3-3½-3 cm / 1⅛"-1¼"-1⅛"-1¼"-1⅛" a total of 7-7-9-9-11 times = 54-58-62-66-70 sts. When piece measures 29-32-36-40-45 cm / 11⅜"-12½"-14¼"-15¾"-17¾", bind off 6 sts mid under sleeve and work back and forth until finished measurements. Then bind off for sleeve cap at beg of every row in each side: 2 sts 2-2-2-3-3 times and 1 st 1-2-2-3-3 times. Then bind off 2 sts in each side until piece measures 33-37-41-46-51 cm / 13"-14½"-16"-18"-20". Then bind off 3 sts 1 time in each side. Bind off the remaining sts, piece measures approx. 34-38-42-47-52 cm / 13½"-15"-16½"-18½"-20½". ASSEMBLY: Sew the shoulder seams. HOOD: Cast on 5 sts on circular needle size 4 mm / US 6, then pick up approx. 76 to 96 sts around the neck (including sts on stitch holders at the front) and cast on 5 new sts at the end of row = 86 to 106 sts. Work as follows (1st row = WS): The 5 new sts + 5 band sts in garter st, diagram M.2 as before, K until 16 sts remain, work diagram M.1 as before and the last 10 sts in garter st. When 3 rows have been worked this way, work next row as follows (= from RS): 10 sts in garter st, diagram M.1, 2 sts in garter st, stockinette st until 18 sts remain, 2 sts in garter st, diagram M.2 and 10 sts in garter st. Continue like this – AT THE SAME TIME on next row, inc evenly over the sts in stockinette st so that there are 96-100-104-108-112 sts on needle in total. When hood measures 23-25-27-28-30 cm / 9"-9¾"-10⅝"-11"-11¾", bind off the middle 12-12-12-16-16 sts. Work each side separately for 3-3-3-4-4 cm / 1⅛"-1⅛"-1⅛"-1½"-1½" as before. Bind off or slip sts on a stitch holder. POCKET: Worked back and forth on 2 double pointed needles. Cast on 17-17-22-22-22 sts on 1 double pointed needle size 4 mm / US 6 with Karisma. K 1 row from WS. Work next row as follows (= RS): * 2 sts in garter st, K 2 sts in each of the next 3 sts (i.e. 3 sts become 6 sts) *, repeat from *-* a total of 3-3-4-4-4 times, finish with 2 sts in garter st = 26-26-34-34-34 sts. Work next row as follows: * 2 sts in garter st, P 6 *, repeat from *-* a total of 3-3-4-4-4 times and finish with 2 sts in garter st. Continue as follows: * 2 sts in garter st, diagram M.1 *, repeat from *-* a total of 3-3-4-4-4 times and finish with 2 sts in garter st. When pocket measures 7-8-9-10-11 cm / 2¾"-3"-3½"-4"-4½", switch to needles size 3 mm / US 2or3. Then work rib as follows (seen from from RS): 2 sts in garter st, *K 2, P 2*, repeat from *-* until 4 sts remain, K 2 and 2 sts in garter st. When rib has been worked for 1½ cm / ½", bind off with K over K and P over P. Work another pocket the same way but work diagram M.2 instead of diagram M.1. ASSEMBLY: Sew or use grafting/kitchener sts to work the hood tog at the top, then sew the 12-12-12-16-16 sts mid back to the top of the hood. Fold the sts in garter st along the opening of the hood double towards WS and fasten with stitches. Sew in sleeves. Sew on pockets so that they approx. 6-7-7-8-9 cm / 2½"-2¾"-2¾"-3"-3½" from mid front and 7-8-9-10-11 cm / 2¾"-3"-3½"-4"-4½" from bottom edge. Sew the pocket with diagram M.1 on right front piece and the pocket with diagram M.2 on left front piece. Sew on buttons. |
||||||||||
Diagram explanations |
||||||||||
|
||||||||||

|
||||||||||
|
Have you made this or any other of our designs? Tag your pictures in social media with #dropsdesign so we can see them! Do you need help with this pattern?You'll find tutorial videos, a Comments/Questions area and more by visiting the pattern on garnstudio.com. © 1982-2024 DROPS Design A/S. We reserve all rights. This document, including all its sub-sections, has copyrights. Read more about what you can do with our patterns at the bottom of each pattern on our site. |
||||||||||


With over 40 years in knitting and crochet design, DROPS Design offers one of the most extensive collections of free patterns on the internet - translated to 17 languages. As of today we count 304 catalogs and 11422 patterns - 11417 of which are translated into English (US/in).
We work hard to bring you the best knitting and crochet have to offer, inspiration and advice as well as great quality yarns at incredible prices! Would you like to use our patterns for other than personal use? You can read what you are allowed to do in the Copyright text at the bottom of all our patterns. Happy crafting!
Comments / Questions (34)
In pattern for left front piece when measures 36 cm for size 3-4:\r\nWhat does it mean slip outermost 13 sts to holder? Is this at sleeve edge? What happens to these sts? Please explain these steps.\r\nThank you!!
14.12.2018 - 19:24DROPS Design answered:
Dear Sheila, these sts are for the neck and the hood and they will be used later, under the paragraph "hood". Happy crafting!
15.12.2018 - 18:23Hi - could you please include a "with collar" or hood-free option (and pics) in future when making hooded sweaters? Many kids simply can't handle them. It would make things so much easier for us mums - please?
10.08.2018 - 01:57DROPS Design answered:
Hello, Thank you so much for your suggestion, Jenny. We do see your point of view and will take it into consideration in the future. Happy Knitting!
30.08.2018 - 11:27Bonjour, J'arrive enfin aux manches, et je lis qu'elles sont tricotées avec des aiguilles doubles pointes en rond. Je n'ai aucune idée de la manière de faire et je ne trouve pas sur votre site des vidéos qui l'expliquent. Merci de me guider et aussi pour tous les merveilleux modèles.
04.07.2018 - 12:31DROPS Design answered:
Bonjour Mme Laustiat, cette vidéo montre comment monter et tricoter en jersey en rond sur les aiguilles doubles pointes. Bon tricot!
04.07.2018 - 16:40J'ai pas compris les ex de la capuche avec M1 ou M2 Merci
23.01.2016 - 14:55DROPS Design answered:
Bonjour Mme Moique, pour la capuche, on continue les torsades des devants comme avant: montez 5 m et reprenez les mailles en attente/relevez les maille autour de l'encolure et montez 5 m, puis tricotez (1er rang = sur l'envers) 10 m point mousse, M.2 (devant gauche), tricotez à l'endroit jusqu'aux mailles de M.1 du devant droit, tricotez M.1 et 10 m point mousse. Tricotez encore 2 rangs ainsi et continuez ainsi: 10 m point mousse, M.1 (torsade du devant droit), jersey, M.2 (torsade du devant gauche), 10 m point mousse. Bon tricot!
25.01.2016 - 11:28Vanda wrote:
Hallo, ich kann mir nicht vorstellen was mit den mittleren Maschen von der Kapuze passiert: wird da ein Absatz von 3 bis 4 cm? Wofuer soll das sein? "Nach 23-25-27-28-30 cm die mittleren 12-12-12-16-16 M. abk. und die Teile separat fertig stricken. Nach 3-3-3-4-4 cm abk. oder auf einen Hilfsfaden legen. " Danke.
17.07.2015 - 12:19DROPS Design answered:
Ja, es gibt zunächst einen Absatz. Die beiden Abkettkanten der beiden Seitenteile, also der Teile, die Sie 3 bzw. 4 cm länger gestrickt haben, werden aneinandergenäht, und dann werden die senkrechten Kanten dieser beiden Seitenstücke an die abgeketteten 12 bzw. 16 M genäht. Dadurch wird die Kaputze nicht spitz, sondern etwas abgerundet.
28.07.2015 - 15:47POCHE: "La lettre "m" est en trop ou manque t-il une explication ? " : *2 m au point mousse, 2 m end m dans chacune des 3 m suiv (c'est-à-dire qu'on a désormais 6 m au lieu de 3 m)*, répéter de *-* 3-3-4-4-4 fois au total, terminer par 2 m au point mousse = 26-26-34-34-34 m. Cordialement, M-A Fredrich
18.02.2015 - 15:36DROPS Design answered:
Bonjour Mme Fredrich, c'était effectivement juste une faute de frappe. On tricote ici 2 fois chacune des 3 m suivantes (alternativement dans le brin avant et le brin arrière). Bon tricot!
18.02.2015 - 17:18Linda Gagnon wrote:
J'ai fait le cardigan et j'ai trouvé les instructions très bien expliquées. C'est presque une oeuvre d'art.
09.01.2014 - 17:12Zuzana wrote:
Hello, I think I found a mistake in the czech wording of this pattern. It is the left body piece, concerning the replacement of stockinette by garter stitch. In the american english version the pattern says: replace the sts in stockinette by garter sts. But the czech version says the opposite: replace all sts in garter by stockinette. Thank you.
15.10.2013 - 22:49DROPS Design answered:
Dobrý den, děkujeme za připomínku - návod je nyní kompletně zrevidovaný a opravený. Hodně zdaru při jeho pletení!
03.03.2014 - 18:13Danke genau das habe ich anscheinend überlesen,das Rücken und seitenteile einstück ist.Ach und noc was ic hwürde mich ja gerne an den Laden wenden wo ich das garn unda das heft her habe wenn die nette Dame nicht vor kurzem Ihren Laden geschlossen hätte. Natürlich tut es mir leid sie Mit meinen "dummen" fragen gestört zu haben,ich werde Sie weiter empfehlen.
11.09.2012 - 14:07Also wird auf dem Rücken auch ein Zopf gestrickt oder nur glatt recht und dann ab Armloch Kraus oder was hat es mit den nur 74M aufsich sich habe ja für den Rücken 196M aufgenommen
10.09.2012 - 19:18DROPS Design answered:
Die 196 M ist die Gesamtmaschenzahl für Vorder- und Rückenteil. Dürfen wir Sie nun bitten, sich für weitere individuelle Strickhilfe an den Laden zu wenden, in dem Sie die Wolle gekauft haben? Die Anleitung haben wir überprüft. Vielen Dank für Ihr Verständnis!
11.09.2012 - 07:45