DROPS Fabel
DROPS Fabel
75% Wool, 25% Polyamide
from 1.60 £ /50g
DROPS Delight
DROPS Delight
75% Wool, 25% Polyamide
Discontinued
find alternatives
DROPS Super Sale

Moorland

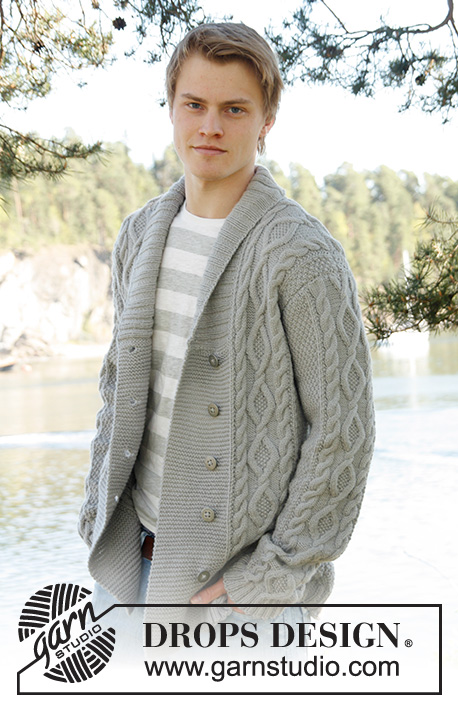
Men's knitted cardigan with rounded neckline in DROPS Fabel and DROPS Delight. Size: S - XXXL.

DROPS 135-9
DROPS design: Pattern no DE-074
Yarn group A
--------------------------------------------------------
Size: S - M - L - XL - XXL - XXXL

Materials: DROPS FABEL from Garnstudio
Colour no 905, salt and pepper:
300-300-300-350-350-350 g

And use: DROPS DELIGHT from Garnstudio
Colour no 01, grey mix:
350-350-350-400-400-400 g


DROPS CIRCULAR NEEDLE SIZE 5 mm (80 cm) - or size needed to get 17 sts x 22 rows in stocking st with 1 thread Fabel and 1 thread Delight = 10 x 10 cm.
DROPS ANGULAR BUFFELHORN BUTTONS NO 537 (20 mm): 6 pieces for all sizes

-------------------------------------------------------

Alternative Yarn – See how to change yarns here
Yarn Groups A to F – Use the same pattern and change the yarn here
Yarn usage using an alternative yarn – Use our yarn converter here

-------------------------------------------------------

DROPS Fabel
DROPS Fabel
75% Wool, 25% Polyamide
from 1.60 £ /50g
DROPS Delight
DROPS Delight
75% Wool, 25% Polyamide
Discontinued
find alternatives

Pattern instructions

NOTE: This pattern is written in British English. All measurements in charts are in cm. For conversion from cm to inches - click here. There are different terms for crocheting in British and American English. If this pattern includes crochet, click for "crochet terms" here. For this pattern in American English, please click here.
GARTER ST (back and forth on needle): K all rows.

BUTTON HOLES:
Cast off for 6 button holes on left front band.
1 BUTTON HOLE = cast off 5th and 6th st from edge and cast on 2 new sts on next row over these sts.
Cast off for button holes when piece measures approx.:
SIZE S: 3, 12, 21, 30, 39, 47 cm
SIZE M: 3, 13, 22, 31, 40, 49 cm
SIZE L: 3, 13, 23, 33, 42, 51 cm
SIZE XL: 3, 13, 23, 33, 43, 52 cm
SIZE XXL: 3, 14, 24, 34, 44, 54 cm
SIZE XXXL: 3, 14, 25, 36, 46, 56 cm
Approx. 1 cm remains up to neck edge after last button hole.

INCREASE TIP:
Inc 1 st by making 1 YO. On next row K YO twisted, i.e. work in back loop of st instead of front, to avoid holes.
--------------------------------------------------------

BODY:
Worked back and forth on needle. Cast on 176-188-204-220-236-256 sts (incl 6 band sts in garter st in each side) on circular needle size 5 mm with 1 thread Fabel and 1 thread Delight. Work in garter st - see explanation above - for 2 cm, then work in stocking st with 6 band sts in garter st in each side of piece. REMEMBER THE KNITTING TENSION!
When piece measures 3 cm in all sizes, cast off for 1st button hole on left front band - See BUTTON HOLES above. Continue in stocking st and band sts in each side of piece. When piece measures 42-43-44-45-46-47 cm, insert 2 markers in the piece; 47-50-54-58-62-67 sts (= front piece) in from each side. Now divide the piece at the markers and finish each part separately.

BACK PIECE:
= 82-88-96-104-112-122 sts. On next row from RS work as follows: Cast on 1 edge st (worked in garter st until finished measurements), * K 1, P 1 *, repeat from *-* a total of 3-3-3-3-4-4 times, K 1 (= 7-7-7-7-9-9 sts in rib), work in stocking st until 7-7-7-7-9-9 sts remain, repeat from *-* a total of 3-3-3-3-4-4 times, K 1 (= 7-7-7-7-9-9 sts in rib), cast on 1 edge st (worked in garter st until finished measurements) = 84-90-98-106-114-124 sts. On next row from RS inc for sleeve as follows: Inc 1 st inside rib in each side - Read INCREASE TIP above = 2 new sts. Repeat inc like this every 3-4-5-7-9-12 rows a total of 10-9-7-6-5-4 times = 104-108-112-118-124-132 sts. Continue in stocking st and rib until piece measures 58-60-62-64-66-68 cm, then cast off the middle 28-30-32-34-36-36 sts for neck and finish each shoulder separately. Cast off 2 sts on next row from neck = 36-37-38-40-42-46 sts remain on each shoulder. Loosely cast off all sts when piece measures 60-62-64-66-68-70 cm.

RIGHT FRONT PIECE:
= 47-50-54-58-62-67 sts. Work rib over the last 7-7-7-7-9-9 sts and cast on 1 edge st (worked in garter st until finished measurements) in the side for sleeve as on back piece. Continue with rib in the side while at the same time inc as on back piece. When piece measures 48-50-52-53-55-57 cm, cast off for neck as follows: On next row from WS work until 6 sts (= band sts) remain, slip the 6 sts on a stitch holder, turn piece. Then cast off for neck at the beg of every row from RS as follows:
Cast off 3 sts a total of 2-2-3-3-3-3 times, 2 sts a total of 3 times, and 1 st a total of 4-5-3-4-5-5 times = 36-37-38-40-42-46 sts remain on shoulder. Loosely cast off all sts when piece measures 60-62-64-66-68-70 cm.

LEFT FRONT PIECE:
Work as right front piece but reversed.

SLEEVE:
Worked back and forth on circular needle. Cast on 40-42-44-46-46-48 sts (incl 1 edge st in garter st in each side) on circular needle size 5 mm. Work in garter st for 2 cm, then work in stocking st with 1 edge st in each side of piece. When piece measures 8-8-8-7-6-6 cm, inc 1 st from RS inside 1 edge st in each side of piece. Repeat inc every 4½-4-4-3½-3-2½ cm a total of 10-11-11-12-14-16 times = 60-64-66-70-74-80 sts. Continue until piece measures 53-53-53-52-51-50 cm (shorter measurements in the larger sizes because of broader shoulder width). Then loosely cast off all sts. Knit another sleeve.

ASSEMBLY:
Sew the shoulder seams. Sew sleeves tog inside 1 edge st and sew in sleeves.

NECK EDGE:
The neck edge is worked from RS on circular needle size 5 mm as follows: Start on the right front band, slip sts from stitch holder back on needle and work these sts, knit up approx. 70-90 sts along the neck edge inside 1 edge st, slip sts on left band from stitch holder back on needle and work these sts. On next row, adjust no sts around the neck (do not inc/dec over band sts) to 72-76-80-84-88-88 = 84-88-92-96-100-100 sts on needle. Work in garter st for 2 cm, then loosely cast off all sts. Sew the buttons on to the right front band.

Diagram

diagram measurements

Each of our patterns has specific tutorial videos to help you.

Do you have a question? See a list of frequently asked questions (FAQ)

Knitting tension is what determines the final measurements of your work, and is usually measured per 10 x 10 cm. It is provided like so: number of stitches in width x number of rows in height - eg: 19 stitches x 26 rows = 10 x 10 cm.

The knitting tension is very individual; some people knit/crochet loosely while others work tightly. You adjust the knitting tension with the needle size, which is why the suggested needle size is only meant as a guide! You need to adjust this (up or down) to ensure that YOUR knitting tension matches the knitting tension provided in the pattern. If you work with a different knitting tension than provided you will have a different yarn consumption, and your work will have different measurements than what the pattern suggests.

The knitting tension also determines which yarns can replace each other. As long as you achieve the same knitting tension you can replace one yarn with another.

See DROPS lesson: How to measure your tension/gauge

See DROPS video: How to make a gauge tension swatch

The required amount of yarn is provided in grams, eg: 450 g. To calculate how many balls you’ll need you first need to know how many grams are in 1 ball (25g, 50g or 100g). This information is available if you click on the individual yarn quality on our pages. Divide the amount required with the amount of each ball. For example, if each ball is 50g (the most common amount), the calculation will be as follows: 450 / 50 = 9 balls.

The important thing when changing from one yarn to another is that the knitting/crochet tension remains the same. This is so that the measurements of the finished piece will be the same as on the sketch provided. It is easier to achieve the same knitting tension using yarns from the same yarn group. It is also possible to work with multiple strands of a thinner yarn to achieve the knitting tension of a thicker one. Please try our yarn converter. We recommend you to always work a test swatch.

Please NOTE: when changing yarn the garment might have a different look and feel to the garment in the photo, due to individual properties and qualities of each yarn.

See DROPS lesson: Can I use a different yarn than the one mentioned in the pattern?

All our yarns are categorised into yarn groups (from A to F) according to thickness and knitting tension – group A contains the thinnest yarns and group F the thickest. This makes it easier for you to find alternative yarns to our patterns, should you wish to switch yarn. All yarns within the same group have a similar knitting tension and can easily replace each other. However, different yarn qualities have different structures and properties which will give the finished work a unique look and feel.

Click here for an overview of the yarns in each yarn group

At the top of all our patterns you’ll find a link to our yarn calculator, which is a helpful tool should you wish to use a different yarn than suggested. By filling in the yarn quality you wish to replace, the amount (in your size) and number of strands, the calculator will present good alternative yarns with the same knitting tension. Additionally it will tell you how much you’ll require in the new qualities and whether you’ll need to work with multiple strands. Most skeins are 50g (some are 25g or 100g).

If the pattern is worked with multiple colours, every colour will have to be calculated separately. Similarly, if the pattern is worked with several strands of different yarns (for example 1 strand Alpaca and 1 strand Kid-Silk) you will have to find alternatives for each, individually.

Click here to see our yarn calculator

Since different yarns have different qualities and textures we have chosen to keep the original yarn in our patterns. However, you can easily find options among our available qualities by using our yarn calculator, or simply pick a yarn from the same yarn group.

It is possible that some retailers still have discontinued yarns in stock, or that someone has a few skeins at home that they would like to find patterns for.

The yarn calculator will provide both alternative yarn as well as required amount in the new quality.

If you think it's hard to decide what size to make, it can be a good idea to measure a garment you own already and like the size of. Then you can pick the size by comparing those measures with the ones available in the pattern's size chart.

You'll find the size chart at the bottom of the pattern.

See DROPS lesson: How to read size chart

The needle size provided in the pattern serves only as a guide, the important thing is to follow the knitting tension. And since knitting tension is very individual, you will have to adjust the needle size to ensure that YOUR tension is the same as in the pattern – maybe you’ll have to adjust 1, or even 2 needle sizes, up or down to achieve the correct tension. For this, we recommend that you work test swatches.

Should you work with a different knitting tension than the one provided, the measurements of the finished garment might deviate from the measurement sketch.

See DROPS lesson: How to measure your tension/gauge

See DROPS video: How to make a tension/gauge swatch

Working a garment top-down provides more flexibility and room for personal adjustment. For example it is easier to try the garment on while working, as well as making adjustments to length of yoke and shoulder caps.

The instructions are carefully explaining every step, in the correct order. Diagrams are adjusted to the knitting direction and are worked as usual.

The diagram depicts all rows/rounds, and every stitch seen from the right side. It is read from bottom to top, from right to left. 1 square = 1 stitch.

When working back and forth, every other row is worked from the right side and every other row is worked from the wrong side. When working from the wrong side, the diagram will have to be worked reversed: from left to right, knit stitches are purled, purl stitches are knit etc.

When working in the round every round is worked from the right side and the diagram are worked from right to left on all rounds.

See DROPS lesson: How to read knitting diagrams

The diagram depicts all rows/rounds, and every stitch seen from the right side. It is worked from bottom to top, from right to left.

When working back and forth every other row is worked from the right side: from right to left and every other row is worked from the wrong side: from left to right.

When working in the round, every row in the diagram are worked from the right side, from right to left.

When working a circular diagram you start in the middle and work your way outwards, counter clockwise, row by row.

The rows usually start with a given number of chain stitches (equivalent to the height of the following stitch), this will either be depicted in the diagram or explained in the pattern.

See DROPS lesson: How to read crochet diagrams

Instructions for working several diagrams after each other on the same row/round, will often be written like so: “work A.1, A.2, A.3 a total of 0-0-2-3-4 times". This means you work A.1 once, then A.2 is worked once, and A.3 is repeated (in width) the number of times provided for your size – in this case like so: S = 0 times, M = 0 times, L=2 times, XL= 3 times and XXL = 4 times.

The diagrams are worked as usual: begin with the first row in A.1, then work the first row in A.2 etc.

See DROPS lesson: How to read knitting diagrams

See DROPS lesson: How to read crochet diagrams

The total width of the garment (from wrist-to-wrist) will be larger in the larger sizes, despite the actual sleeves being shorter. The larger sizes have longer sleeve caps and wider shoulders, so there will be a good fit in all sizes.

The measurement sketch/schematic drawing provides information regarding the full length of the garment. If it’s a jumper or a jacket the length is measured from the highest point on the shoulder closest to the neckline, and straight down to the bottom of the garment. It is NOT measured from the tip of shoulder. Similarly, the length of yoke is measured from the highest point on the shoulder and down to where yoke is split into body and sleeves.

On a jacket measures are never taken along bands, unless specifically stated. Always measure inside band stitches when measuring the length.

See DROPS lesson: How to read a schematic drawing

Diagrams are often repeated on the round or in height. 1 repeat is the diagram the way it appears in the pattern. If it says to work 5 repeats of A.1 in the round, then you work A.1 a total of 5 times after/next to each other in the round. If it says to work 2 repeats of A.1 vertically/in height you work the entire diagram once, then begin again at the start and work the entire diagram one more time.

Chain stitches are slightly narrower than other stitches and to avoid working the cast-on edge too tight, we simply chain more stitches to begin with. The stitch count will be adjusted on the following row to fit the pattern and measurement sketch.

The rib edge is more elastic and will contract slightly compared to, for example, stocking stitch. By increasing before the rib edge, you avoid a visible difference in width between the rib edge and the rest of the body.

It’s very easy to cast off too tightly, and by making yarn overs while casting off (and simultaneously casting these off) you avoid a too tight cast off edge.

See DROPS video: How to bind off with yarn overs (yo)

To achieve an even increase (or decrease) you can increase on, for example: every 3rd and 4th row alternately, like so: work 2 rows and increase on the 3rd row, work 3 rows and increase on the 4th. Repeat this until the increase is complete.

See DROPS lesson: Increase or decrease 1 st on every 3rd and 4th row alternately

Should you prefer to work in the round instead of back and forth, you may of course adjust the pattern. You’ll need to add steeks mid-front (usually 5 stitches), and follow the instructions. When you would normally turn and work from the wrong side, simply work across the steek and continue in the round. At the end you’ll cut the piece open, pick up stitches to work bands, and cover the cut edges.

See DROPS video: How to knit steeks and cut open

Should you prefer to work back and forth instead of in the round, you may of course adjust the pattern so you work the pieces separately and then assemble them at the end. Divide the stitches for the body in 2, add 1 edge stitch in each side (for sewing) and work the front and back pieces separately.

See DROPS lesson: Can I adapt a pattern for circular needles into straight needles?

Pattern repeats can vary slightly in the different sizes, in order to get the correct proportions. If you’re not working the exact same size as the garment in the photo, yours might deviate slightly. This has been carefully developed and adjusted so that the complete impression of the garment is the same in all sizes.

Make sure to follow instructions and diagrams for your size!

If you have found a pattern you like which is available in women’s size it’s not very difficult to convert it to men’s size. The biggest difference will be the length of sleeves and body. Start working on the women size that you think would fit across the chest. The additional length will be worked right before you cast off for the armhole/sleeve cap. If the pattern is worked top-down you can add the length right after the armhole or before the first decrease on sleeve.

Regarding additional yarn amount, this will depend on how much length you add, but it is better with a skein too many than too few.

All yarns will have excess fibres (from production) that might come off as lint or shedding. Brushed yarns (ie hairier yarns) have more of these loose, excess fibres, causing more shedding.

Shedding also depends on what is worn under or over the garment, and whether this pulls at the yarn fibres. It’s therefore not possible to guarantee that there will be no shedding

Below are some tips on how to get the best result when working with hairier yarns:

1. When the garment is finished (before you wash it) shake it vigorously so the looser hairs come off. NOTE: do NOT use a lint roller, brush or any method that pulls at the yarn.

2. Place the garment in a plastic bag and put it in your freezer - the temperature will cause the fibres to become less attached to each other, and excess fibres will come off easier.

3. Leave in the freezer for a few hours before taking it out and shaking it again.

4. Wash the garment according to the instructions on the yarn label.

Pilling is a natural process that happens to even the most exclusive of fibers. It's a natural sign of wear and tear that is hard to avoid, and that is most visible in high friction areas of your garment like a sweater's arms and cuffs.

You can make your garment look as new by removing the pilling, using a fabric comb or a pill/lint remover.

Still can't find the answer you need? Then scroll down and leave your question so one of our experts can try to help you. This will be done normally within 5 to 10 working days.
In the meantime, you can read the questions and answers that others have left to this pattern or join the DROPS Workshop on Facebook to get help from fellow knitters/crocheters!

You might also like...

Post a comment to pattern DROPS 135-9

We would love to hear what you have to say about this pattern!

If you want to leave a question, please make sure you select the correct category in the form below, to speed up the answering process. Required fields are marked *.

Comments / Questions (20)

country flag Mw. Aendekerk wrote:

De voorbies valt door de ribbelsteek korter uit dan hetzelfde stuk in tricotsteek. Hierdoor trekken de voorpanden en lijken ze korter bij de voorbies. Wat kan ik hier tegen doen? Kan daarnaast ook het antwoord op de vraag van Iris in het Nederlands gepost worden?

24.09.2015 - 21:59

DROPS Design answered:

Beste. Je kan met verkorte toeren het gedeelte in ribbelsteken wat langer breien dan de tricotsteken, dwz, je breit meer naalden over de ribbelsteken dan de tricotsteken. Zie deze video met verkorte toeren hier. Ik kan je helaas niet helpen met vertalen van onze Duitse opmerkingen en vragen.

25.09.2015 - 10:58

country flag Carol Isaac wrote:

Thank you Thank you. I was doing it correctly. Just needed reassurance. Carol.

18.05.2015 - 13:55

country flag Carol Isaac wrote:

I am at the back section and have separated for this piece - knitted the 1st row with a cast on edge st on each side and the K!,P1 for the 7 rib st.On next row from RS inc for sleeve as follows. Inc 1 st inside rib on each side. Do you do this increase after the edge st. and before the ribbing or after the ribbing and before the stockinette st. for the back piece. Help please. I am stuck. Need to finish this for my grandson. who is graduating from high school. Thanks in advance. Carol

17.05.2015 - 21:38

DROPS Design answered:

Dear Carol, inc for sleeves are done after the sts in rib at beg of row (from RS) and before the sts in rib at the end of row. Happy knitting!

18.05.2015 - 10:21

country flag Elaine wrote:

Hallo! Ich würde dieses Modell gerne nur mit einer Farbe bzw. einer Wollsorte stricken! z.B. Drops Alaska Uni, Wie viel gramm Wolle bzw. wie viel Laufmeter benötigt man dann? MFG Elaine

20.02.2015 - 11:26

DROPS Design answered:

Bei dieser Anleitung werden zwei Fäden der Garngruppe A verwendet. Sie können dies ersetzen, indem Sie dafür 1 Faden der Garngruppe C verwenden (2 Fäden A = 1 Faden C). Bei der Lauflänge orientieren Sie sich an Delight ODER Fabel, es wird also berechnet, wie viele Meter von einem der Garne benötigt werden, anhand Delight (= 175m pro 50g): Größe S-L: 1225m, Größe XL-XXXL: 1400m. Diese Menge müssen Sie auf die Lauflänge des Ersatzgarnes umrechnen, für Alaska (= 70m pro 50g): 18 Knäuel bzw. 20 Knäuel.

21.02.2015 - 10:04

country flag Elaine wrote:

Hallo! Ich würde dieses Modell gerne nur mit einer Farbe bzw. einer Wollsorte stricken! z.B. Drops Alaska Uni, Wie viel gramm Wolle bzw. wie viel Laufmeter benötigt man dann? MFG Elaine

20.02.2015 - 11:24

DROPS Design answered:

Antwort siehe oben! :-)

21.02.2015 - 10:04

country flag Lis Nielsen wrote:

Jeg påtænker at lave denne model. Stolpen ned foran skal laves i retstrik og resten af pinden i glatstrik. Jeg syntes at når jeg laver de strikarten på den samme pind, så bliver retstrikningen ligesom for kort. Er der et triks for det. På forhånd tak MVH Lis Nielsen

02.09.2014 - 10:07

DROPS Design answered:

Hej Lis. Retstrik traekker sig mere sammen en glat. Du kan strikke en ekstra pind (forkortet pind) et par gange eller efter behov over stolpen, saa den bliver lidt "höjere" end resten af forstk. Paa den maade kan du undgaa stolpen traekker op og bliver kortere.

02.09.2014 - 16:27

country flag Elli wrote:

Dann wird für den Hals abgenommen: 2x3M = 6M 3x2M = 6M 4x1M = 4M insgesamt werden somit 16M abgenommen. Wenn aber von den restlichen 41M noch 16M abgenommen werden, bleiben nur 25M übrig und keine 36M. Wo ist hier der Fehler? Bei mir oder in der Anleitung?? Liebe Grüße Elli

16.12.2013 - 14:08

DROPS Design answered:

Liebe Eli, Sie haben die Maschen von der Aufnahme am Ärmel nicht mitgezählt.

17.12.2013 - 09:32

country flag Elli wrote:

Beim Stricken dieses Modells ist mir ein Fehler beim rechten Vorderteilaufgefallen oder ich verstehe es nicht richtig. Bei der Abnahme für den Halsauschnitt hat man für die kleinste Größe 47 Maschen auf der Nadel. Die 6 Blendmaschen werden auf den Hilfsfaden gelegt. 47-6= 41M auf der Nadel.

16.12.2013 - 14:08

DROPS Design answered:

Liebe Eli, siehe Antwort zu Ihrer zweiten Frage.

17.12.2013 - 09:33

country flag Marina wrote:

Buenos días, tengo una duda de terminología: En este caso el patrón me pide "Repetir los aum de esta manera cada 3-4-5-7-9-12 vtas un total de 10-9-7-6-5-4 veces = 104-108-112-118-124-132 pts." Y mi pregunta és: Se entiende como vuelta cada vez que tejemos de un extremo al otro de la labor o cada vez que tejemos una vuelta del derecho y una del revés? Según este patrón, para la talla S algunos augmentos se tendrían que hacer por el lado revés? Muchas gracias

18.03.2013 - 11:42

DROPS Design answered:

Hola Marina, 1 vuelta en este patrón = 1 fila (del derecho o del revés), los aum se trabajan tanto por el LD como por el LR.

26.05.2013 - 19:22

country flag Iris wrote:

Hallo, Ich bin fast fertig mit diesem Modell. Leider habe ich das Problem, dass sich der Krausrippenrand von Vorder- und Rückenteil nach oben klappt. Was kann ich da tun, beziehungsweise wie kann ich dies vermeiden? Viele Grüße, Iris

08.03.2013 - 11:46

DROPS Design answered:

Liebe Iris, wir haben Ihre Frage gerade im Team besprochen: der beste Tipp scheint zu sein, dass Sie das Stück anfeuchten und spannen (und evtl. nach jedem Waschen wieder). Eine Kollegin hat hartnäckige Fälle schon durch anstricken in die andere Richtung (also nach unten) behoben: 2-3 zusätzliche Krausrippen aus der Anschlagskante nach unten stricken und dann relativ fest abketten.

11.03.2013 - 10:14