
Popular categories
Looking for a yarn?


|
||||||||||||||||
Giselle |
||||||||||||||||
 |
 |
|||||||||||||||
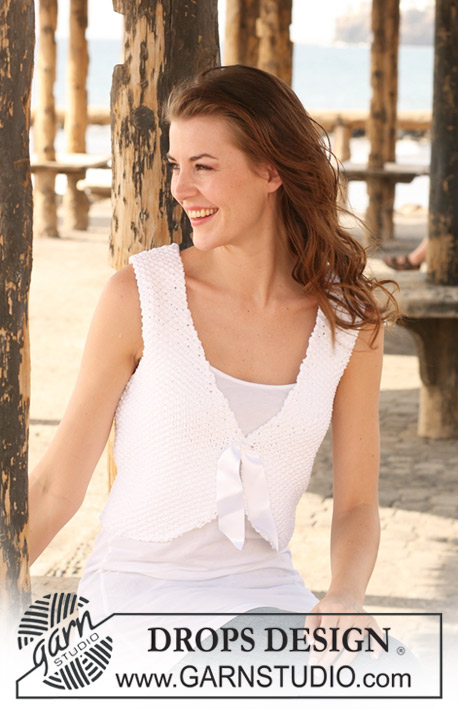
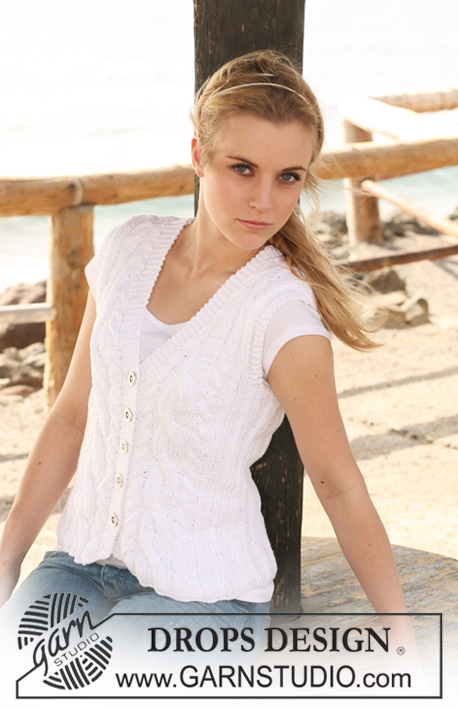
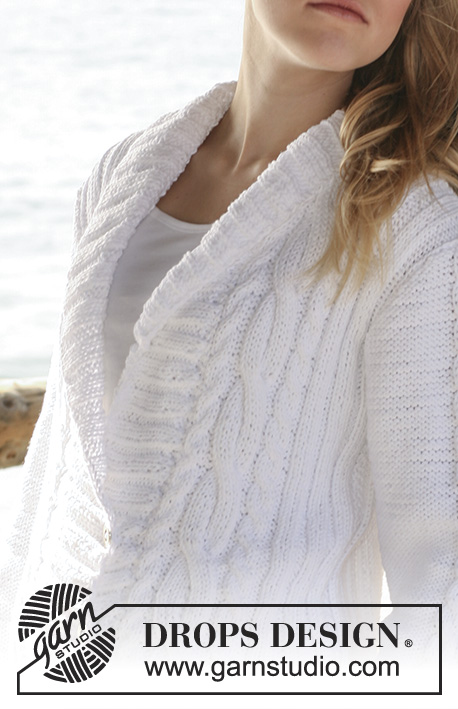
Knitted DROPS jacket with rib and cables in ”Paris”. Size XS to XXXL.
DROPS 120-18 |
||||||||||||||||
|
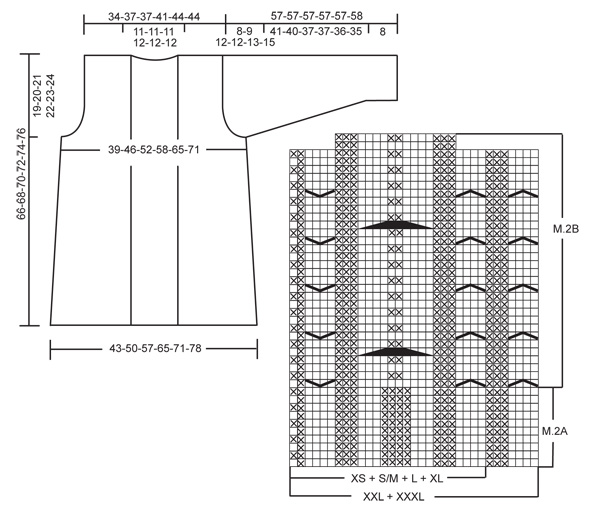
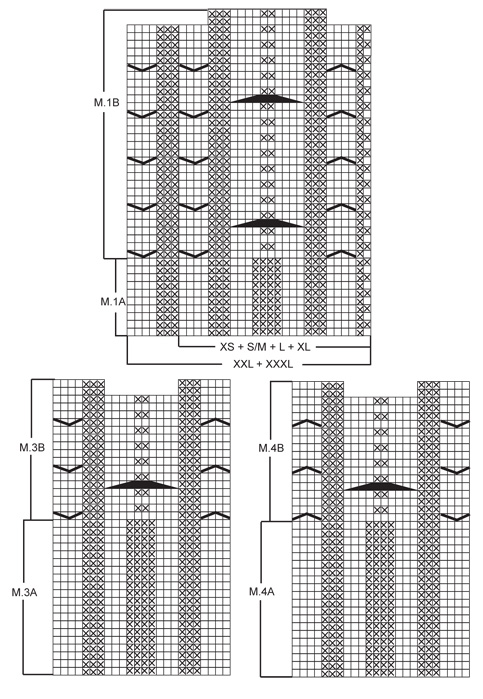
GARTER ST (back and forth on needle): K all rows. PATTERN: See diagram M.1 to M.4. Diagrams show the pattern from RS. INCREASING TIP (applies to sleeve): Make all inc from RS! Inc inside 1 edge st in garter st each side by making 1 YO, on next row K YO into back of loop to avoid a hole. BUTTONHOLES: Make 2 buttonholes on right front band approx 37-39-41-43-45-47 and 45-47-49-51-53-55 cm from shoulder. 1 BUTTONHOLE = cast off 1 st and cast on 1 new st on next row (for neatest result make buttonhole in P-section, as seen from RS). --------------------------------------------------------- --------------------------------------------------------- JACKET: All parts worked back and forth on circular needle. BACK PIECE: Cast on 81-95-109-123-135-149 sts on circular needle size 4 mm with Paris. P 1 row from WS and continue in rib as follows (first row = RS): 1 edge st in GARTER ST - see above, K2, * P4/K3 *, repeat from *-* a total of 1-2-3-4-4-5 times, * P3/K3 *, repeat from *-* a total of 3-3-3-3-4-4 times, * P4/K3 *, repeat from *-* a total of 3 times, P4, * K3/P3 *, repeat from *-* a total of 3-3-3-3-4-4 times, * K3/P4 *, repeat from *-* a total of 1-2-3-4-4-5 times, K2 and 1 edge st in GARTER ST. When piece measures 6 cm work next row as follows from RS: 1 edge st in garter st, rib as before on the next 6-13-20-27-27-34 sts, stocking st on the next 21-21-21-21-27-27 sts, rib as before on the next 25 sts, stocking st on the next 21-21-21-21-27-27 sts, rib as before on the next 6-13-20-27-27-34 sts and 1 edge st. Continue like this with K over K, P over P and edge sts in garter st. REMEMBER THE KNITTING TENSION! When piece measures 34 cm dec on next row from RS as follows: dec all P4 (= 6-8-10-12-12-14 P-sections) to P3 by P tog the first 2 P sts in each P-section = 75-87-99-111-123-135 sts. When piece measures 47-48-49-50-51-52 cm cast off for armhole each side at beg of every row: 4 sts 1 time for all sizes, 4 sts 0-0-0-0-1-1 time, 2 sts 0-1-3-4-4-6 times and 1 st 1-2-4-5-4-6 times = 65-71-71-77-83-83 sts. Continue with K over K, P over P and 1 garter st each side towards armhole. When piece measures 64-66-68-70-72-74 cm cast off the middle 19-19-19-21-21-21 sts for neck and complete each shoulder separately. Cast off 1 st on neckline on next row = 22-25-25-27-30-30 sts left on shoulder. Cast of loosely with K over K and P over P when piece measures 66-68-70-72-74-76 cm. RIGHT FRONT PIECE: Cast on 33-40-47-54-61-68 sts on circular needle size 4 mm with Paris. P 1 row from WS and continue in rib as follows from mid front (first row = RS): Size XS: M.1A (= 26 sts), P4/K2 and 1 edge st in GARTER ST. Size S/M + L + XL + XXL + XXXL: M.1A (= 26-26-26-33-33) sts, * P4/K3 *, repeat from *-* a total of 1-2-3-3-4 times, P4, K2 and 1 edge st in GARTER ST. ALL SIZES: When piece measures 6 cm work M.1B instead of M.1A until finished measurements (work remaining sts as before). AT THE SAME TIME when piece measures 34 cm dec on next row from RS as follows: dec all P4 (= 1-2-3-4-4-5 P-sections) to P3 by P tog the first 2 sts in each P-section = 32-38-44-50-57-63 sts. When piece measures 47-48-49-50-51-52 cm cast off 4 sts for armhole at beg of row from WS and now cast off to shape the armhole at beg of every row from WS: 4 sts 0-0-0-0-1-1 time, 2 sts 0-1-3-4-4-6 times and 1 st 1-2-4-5-4-6 times = 27-30-30-33-37-37 sts left on needle. Continue with K over K, P over P and 1 garter st towards armhole. When piece measures 65-67-69-71-73-75 cm dec 5-5-5-6-7-7 sts evenly on M.1 = 22-25-25-27-30-30 sts left on shoulder. On next row cast off all sts of with K over K and P over P. LEFT FRONT PIECE: Like right front piece, but mirrored, i.e. work M.2 instead of M.1. When casting off for armhole at the side cast off at beg of row from RS (instead of WS). RIGHT SLEEVE: Worked back and forth on needle. Cast on 52-52-52-52-56-56 sts on circular needle size 4 mm with Paris. P 1 row from WS and continue in rib back and forth on needle as follows (first row = RS): Size XS + S/M + L + XL: 1 edge st in garter st, P1, * K3/P3 *, repeat from *-* a total of 2 times, M.3A (= 24 sts), * P3/K3 *, repeat from *-* a total of 2 times, P1 and 1 edge st in garter st. Size XXL + XXXL: 1 edge st in garter st, P1, * K3/P4 *, repeat from *-* a total of 2 times, M.3A (= 24 sts), * P4/K3 *, repeat from *-* a total of 2 times, P1 and 1 edge st in garter st. ALL SIZES: Continue like this until piece measures approx 8 cm. Now work next row as follows from RS: 1 edge st in garter st, 13-13-13-13-15-15 sts in reverse stocking st (i.e. P on RS and K on WS), M.3B, 13-13-13-13-15-15 sts in reverse stocking st and 1 edge st in garter st. Continue like this (M.3B repeated vertically). AT THE SAME TIME when piece measures 9-9-9-9-11-13 cm inc 1 st each side - see INCREASING TIP, and repeat the inc on every 6-4-3-2.5-2-1.5 cm a total of 7-10-12-14-15-18 times = 66-72-76-80-86-92 sts. When piece measures 49-48-45-45-44-43 cm - NOTE! Less for the larger sizes because of longer sleeve cap and wider shoulder- cast off for sleeve cap each side at beg of every row: 4 sts 1 time, 2 sts 3-3-2-2-2-2 times and 1 st 2-3-9-9-10-12 times, then cast off 2 sts each side until piece measures 56-56-56-56-56-57 cm. On next row cast off 3 sts at beg of row, and now dec 6 sts evenly on M.3. Cast off 3 sts at beg of next row and work remaining sts on row, P sts from M.3. Cast off all sts. LEFT SLEEVE: Like right sleeve, but work M.4 instead of M.3. ASSEMBLY: Sew shoulder seams. FRONT BAND: Pick up from RS approx 149-155-161-167-173-179 sts (divisible by 6 + 5) along left front piece from mid back to bottom edge on circular needle size 4 mm with Paris. K 1 row from WS and continue in rib as follows from RS: 2 garter sts, * P3/K3 *, repeat from *-* until 3 sts remain and finish with 3 garter sts. Continue like this until front band measures 4 cm. Now insert a marker after 32-32-32-38-38-38 sts from mid back. Continue in rib as before, AT THE SAME TIME inc 1 st in each P-section (as seen from RS) on the 32-32-32-38-38-38 sts = 5-5-5-6-6-6 inc sts (to make collar wide enough round neckline). Repeat the inc when front band measures 7 and 10 cm. When front band measures 11-11-11-12-12-12 cm cast off all sts with K over K and P over P. Repeat along right front piece from bottom edge to mid back (first row rib worked as follows from RS: 3 garter sts, * K3/P3 *, repeat from *-* until 2 sts remain and finish with 2 garter sts mid back). When front band measures 9-9-9-10-10-10 cm make 2 BUTTONHOLES – see above. ASSEMBLY: Sew front bands tog mid back in outer loops of sts. When folding collar towards RS there will be 4 garter sts mid back with K6 each side. Set in sleeves inside 1 edge st. Sew sleeve and side seams in outer loop of sts. Sew buttons on left front band. |
||||||||||||||||
Diagram explanations |
||||||||||||||||
|
||||||||||||||||
|
||||||||||||||||
|
||||||||||||||||
|
Have you made this or any other of our designs? Tag your pictures in social media with #dropsdesign so we can see them! Do you need help with this pattern?You'll find tutorial videos, a Comments/Questions area and more by visiting the pattern on garnstudio.com. © 1982-2024 DROPS Design A/S. We reserve all rights. This document, including all its sub-sections, has copyrights. Read more about what you can do with our patterns at the bottom of each pattern on our site. |
||||||||||||||||


With over 40 years in knitting and crochet design, DROPS Design offers one of the most extensive collections of free patterns on the internet - translated to 17 languages. As of today we count 304 catalogues and 11422 patterns - 11422 of which are translated into English (UK/cm).
We work hard to bring you the best knitting and crochet have to offer, inspiration and advice as well as great quality yarns at incredible prices! Would you like to use our patterns for other than personal use? You can read what you are allowed to do in the Copyright text at the bottom of all our patterns. Happy crafting!
Comments / Questions (31)
Stuck at the back armholes. Working the XXL size, 4 stitches have been cast off at the beginning of rows 1,2,3 and 4 of the armhole. Now I need to decrease 2 stitches 4 times, followed by 1 stitch 4 times. From the number of stitches remaining it appears that I need to actually double these workings. I want a neat effect so please explain (stitch by stitch) exactly how to work the decreases in both right side and wrong side rows.
04.01.2019 - 19:13DROPS Design answered:
Dear Chris, you cast off 4 sts at the beg of next 4 rows (= from both RS and WS = 4 sts 2 times on each side), then cast off 2 sts at the beg of next 8 rows (= 2 sts 4 times on each side), then cast off 1 st at the beg of next 8 rows (= 1 st 4 times on each side). Cast off the sts K over K and P over P and continue working them as before, K over K and P over P. Happy knitting!
07.01.2019 - 08:35I would like to knit Giselle (120-18) in Air, which is in the same yarn group as Paris. I am worried, however, that it wouldn\'t turn out well when worked in the much lighter yarn. What do you think? Thank you.
10.10.2018 - 23:41DROPS Design answered:
Dear Charlene, since Paris and Air both belong to same yarn group you could use here Air instead of Paris, but texture will be different since both yarns are different. You may like to choose another yarn less "fluffy" just as Nepal or Alaska. Your DROPS store can help you choosing the yarn suiting you - even per mail or telephone. Happy knitting!
11.10.2018 - 10:24Splendido modello, chiare le istruzioni, grazie a voi ho fatto un bellissimo cardigan. Ho usato bomull lin uni colour unico difetto molti gomitoli del filato erano aggiunti anche più volte.......
09.05.2015 - 19:08Ik heb een paar dagen geleden een vraag gesteld over de rechtermouw. (zie onder) Is het mogelijk dat u daar voor mij misschien nog een antwoord op heeft? Alvast (weer) bedankt! :-)
26.11.2014 - 16:42DROPS Design answered:
Hoi Inge. Het is erg druk, maar ik zal zsm reageren. Kunt u niet wachten, dan kunt u ook altijd vragen bij uw DROPS verkooppunt. :-)
27.11.2014 - 13:40Allereerst bedankt voor de hulp! Nog een vraagje: bij de rechtermouw moet er bij een hoogte van 48 cm (maat S/M)geminderd worden aan iedere kant aan het begin van iedere naald 1x4, 3x2,3x1 etc Moet bv de 1x4 aan iedere kant 1x afgekant worden zodat het werk aan beide zijden gelijkmatig afgekant wordt of is het 1x4 en de naald erna gelijk 2?
22.11.2014 - 20:53DROPS Design answered:
Hoi Inge. Je moet 1 keer 4 st afkanten aan iedere kant aan het begin van iedere nld. Dwz, je kant 4 st 1 keer af aan beide zijkanten, 2 st 3 keer aan beide zijkanten enzovoort.
02.12.2014 - 16:39Het achterpand is af en ik ben nu aan het rechter voorpand begonnen. Ik lees net nog even goed de instructies door en ik vraag mij af of ik , wanneer er nog 30 steken over zijn, nog steeds patroon moet breien? (er staat re boven re en av boven av, maar niet of het nog in patroon moet)
18.11.2014 - 19:14DROPS Design answered:
Hoi Inge. Er staat in het patroon: "ALLE MATEN: Brei bij een hoogte van 6 cm M.1B in plaats van M.1A tot het werk klaar is (brei de overige st als hiervoor)". Dus je breit M.1B (patroon) tot het werk klaar is (en overige st zoals eerst beschreven.
19.11.2014 - 14:42Bij het doorlezen van de aanwijzingen voor het achterpand, vraag ik mij af of de eerste 6 cm boordsteek (na de averechtse nld) gebreid moeten worden zoals de steken zich voordoen? Of moeten zowel de naalden aan de goede als aan de verkeerde kant in het gegeven patroon worden gebreid? Bij het 2e gedeelte staat het er namelijk expliciet bij vermeld en op de foto van het vest kan ik de achterkant niet zien
12.11.2014 - 19:05DROPS Design answered:
Hoi Inge. Ja, je breit boordsteek met op de goede kant 4 st av/ 3 r enzovoort. Dat wordt dus op de verkeerde kant 3 st av/4 st r.
13.11.2014 - 15:42Hallo ich habe eine Frage, in der Anleitung steht: "Nach 34 cm von der Vorderseite wie folgt abn.: alle 4 li. (= 6-8-10-12-12-14 li.-Partien) auf 3 li. abn. indem man die 2 ersten li.-Maschen zusammenstrickt = 75-87-99-111-123-135 M. " Bezieht sich die cm-Angabe auf die Gesamtlänge des Teils oder bezieht sich die cm-Angabe auf den Punkt NACH dem Bündchen, sprich die 6 cm werden abgezogen. Vielen Dank.
02.10.2014 - 16:03DROPS Design answered:
Liebe Petra, es ist die Gesamtlänge gemeint. Das ist bei unseren Anleitungen immer der Fall, es sei denn, es steht dort ausdrücklich etwas anderes. Weiterhin gutes Gelingen!
06.10.2014 - 10:18Bei der Anleitung für die Blende steht bei der rechten Seite " Nach 9-9-9-10-10-10 cm 2 Krausrippen einstricken". Könnten Sie das bitte genauer erklären? Bedeutet es 4 Reihen Rechts und nicht das Bündchenmuster? Vielen Dank
02.02.2014 - 20:07DROPS Design answered:
Liebe Gesine, tatsächlich ist unserer damaligen Übersetzerin wohl ein Fehler passiert, für den wir uns entschuldigen, es muss "Knpflöcher" heissen, nicht "Krausrippen". Wir werden das sofort korrigieren.
03.02.2014 - 09:02Tere Tahaksin küsida,kui hakkan hõlma tegema kas peab arvestama ääresilmused mustrisse sisse alguses või mitte? Kuidas teha VP rida mustri järgi,kuidagi ei hakka muster klappima mingil põhjusel. Seletage palun veidi lahti. Tänan
29.04.2012 - 17:41DROPS Design answered:
Ääresilmuseid on arvestatud silmuste loomisel juba sisse ja tavaliselt on tekstis selle kohta ka öeldud.
13.08.2012 - 20:39