DROPS Fabel
DROPS Fabel
75% Wool, 25% Polyamide
from 1.60 £ /50g
Get the yarn to make this pattern from 14.40£.

The yarn cost is calculated from the pattern’s smallest size and the yarn’s cheapest product type. Looking for an even better price? You might find it on the DROPS Deals!

DROPS Super Sale

Harmony

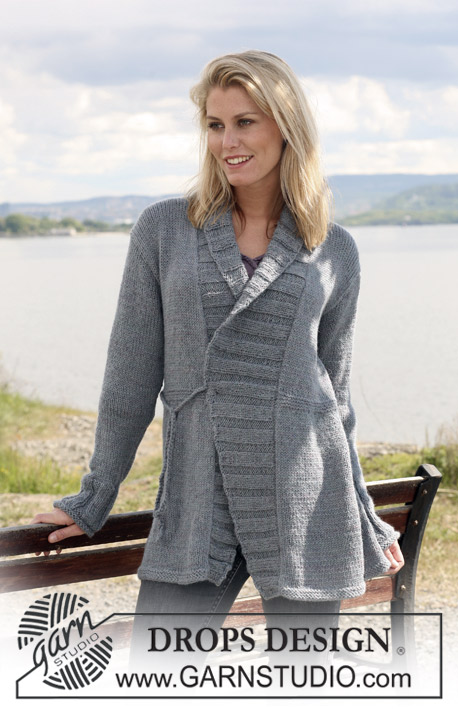
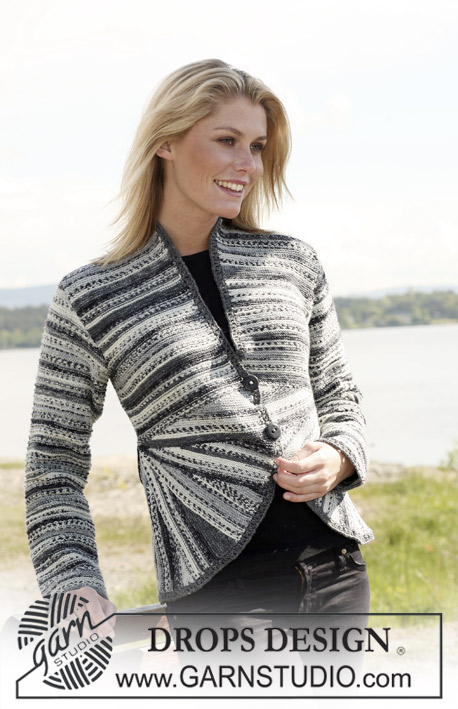
DROPS jacket in garter st with curved front pieces in ”Fabel”. Size S to XXXL.

DROPS 108-1
Size: S - M - L - XL - XXL - XXXL
Materials: DROPS Fabel
400-400-450-500-550-600 g, colour no 905 black/white mix
50-50-50-50-100-100 g colour no 200, grey

DROPS pointed needles size 3 mm – or size needed to get 24 sts x 48 rows in garter st = 10 x 10 cm.
DROPS crochet hook size 4 mm – for crochet borders.
DROPS Buffalo horn button, nr 536: 2 pcs

-------------------------------------------------------

Alternative Yarn – See how to change yarns here
Yarn Groups A to F – Use the same pattern and change the yarn here
Yarn usage using an alternative yarn – Use our yarn converter here

-------------------------------------------------------

DROPS Fabel
DROPS Fabel
75% Wool, 25% Polyamide
from 1.60 £ /50g
Get the yarn to make this pattern from 14.40£.

The yarn cost is calculated from the pattern’s smallest size and the yarn’s cheapest product type. Looking for an even better price? You might find it on the DROPS Deals!

Pattern instructions

NOTE: This pattern is written in British English. All measurements in charts are in cm. For conversion from cm to inches - click here. There are different terms for crocheting in British and American English. If this pattern includes crochet, click for "crochet terms" here. For this pattern in American English, please click here.
Turns: Work turns to create curves on front pieces as follows:
Row 1/2: work 50-55-60-65-70-78 sts, turn piece and work return row.
Row 3/4: work 47-52-57-62-67-75 sts, turn piece and work return row.
Row 5/6: work 45-50-55-60-65-73 sts, turn piece and work return row.
Row 7/8: work 42-47-52-57-62-70 sts, turn piece and work return row.
Row 9/10: work 40-45-50-55-60-68 sts, turn piece and work return row.
Continue like this with 2 and 3 less sts alternately each time until:
Size S: Row 39/40: K 2 sts, turn piece and work return row.
Row 41/42: K all 52 sts, turn piece and work return row.
Repeat from row 1.
Size M: Row 43/44: K 2 sts, turn piece and work return row.
Row 45/46: K all 57 sts, turn piece and work return row.
Repeat from row 1.
Size L: Row 47/48: K 2 sts, turn piece and work return row.
Row 49/50: K all 62 sts, turn piece and work return row.
Repeat from row 1.
Size XL: Row 51/52: K 2 sts, turn piece and work return row.
Row 53/54: K all 67 sts, turn piece and work return row.
Repeat from row 1.
Size XXL: Row 55/56: K 2 sts, turn piece and work return row.
Row 57/58: K all 72 sts, turn piece and work return row.
Repeat from row 1.
Size XXXL: Row 61/62: K 3 sts, turn piece and work return row.
Row 63/64: K all 80 sts, turn piece and work return row.
Repeat from row 1.
Garter st pattern (applies to upper part of sleeve):
Row 1 (= RS): K
Row 2 (= WS): K
Row 3: K
Row 4: P
Repeat row 1 to 4.

Back piece: Worked in garter st, i.e. K all rows. Back piece is worked in 2 parts.
Lower part: Cast on 52-57-62-67-72-80 sts on needle size 3 mm with Fabel black/white mix. Work garter st back and forth on needle until piece measures 40-44-48-53-58-65 cm. Remember the knitting tension! Cast off loosely.

Upper part: Pick up 1 st in approx every other garter st row along 1 side of bottom piece. On next row adjust no of sts to 98-108-118-130-142-158 sts (includes 1 edge st each side). Continue in garter st on all sts. When piece measures 2 cm from where sts were picked up inc 1 st each side, repeat when work measures 5 cm = 102-112-122-134-146-162 sts. When piece measures a total of 35-36-37-38-39-40 cm (measured at side from bottom edge of jacket) cast off for armhole each side at the beg of every row: 4 sts 1-1-1-1-2-2 times, 2 sts 1-3-5-7-8-11 times and 1 st 1-0-0-1-0-1 time = 88-92-94-96-98-100 sts.
When piece measures 52-54-56-58-60-62 cm cast off the middle 22-22-22-24-26-26 sts for neck and dec 1 st on neckline on next row = 32-34-35-35-35-36 sts left on each shoulder. Cast off loosely when piece measures 54-56-58-60-62-64 cm.

Right front piece: Worked in garter st, i.e. K all rows. .
Cast on 52-57-62-67-72-80 sts on needle size 3 mm with Fabel black/white mix. Continue with Turns – see above (row 1 = RS). Work Turns (row 1 to 42-46-50-54-58-64) a total of 5 times, curve should now measure approx 44-48-52-56-60-67 cm round the front. Insert a Marking Thread (MT) in piece and now continue back and forth on all sts. When piece measures 2 cm and 5 cm from MT inc 1 st at side as described for back piece = 54-59-64-69-74-82 sts. When piece measures 35-36-37-38-39-40 cm (measured at side from bottom edge of jacket) – adjust so that next row is from WS – cast off for armhole at side as described for back piece = 47-49-50-50-50-51 sts. Continue until piece measures 54-56-58-60-62-64 cm. Now cast off the outermost 32-34-35-35-35-36 sts at side for shoulder and work remaining 15 sts on row = 15 sts for collar. Work shortened rows as follows (row 1 = RS): * 2 rows on all sts, 2 rows on 8 sts towards mid front only *, repeat from *-* until collar measures approx 6-6-6-7-7-7 cm (measured on the shorter side) from shoulder. Cast off.
Left front piece: Cast on 52-57-62-67-72-80 sts on needle size 3 mm with Fabel black/white mix. K 1 row and now continue as described for right front piece.

Sleeve: Cast on 64-66-70-72-74-76 sts (includes 1 edge st each side) on needle size 3 mm with Fabel black/white mix. Continue in garter st, i.e. K all rows. When piece measures 8-8-10-10-10-6 cm inc 1 st each side on every 4.5-3.5-3-2.5-2-2 cm a total of 9-11-12-14-16-18 times = 82-88-94-100-106-112 sts. At the same time when piece measures 12-12-13-13-14-14 cm continue in Garter st pattern – see above. When piece measures 49-48-48-46-45-43 cm (Note! Less on the larger sizes because of longer sleeve cap and wider shoulder) cast off for armhole each side at the beg of every row as follows: 3 sts 1 time, 2 sts 4-3-3-2-0-0 times and then 1 st each side until piece measures 54-54-56-56-57-58 cm. Now cast off 2 sts each side 3-3-2-1-0-0 times and 3 sts 1-1-1-1-1-0 times. Cast off remaining sts.

Assembly: Sew shoulder seam. Set in sleeves and sew side and sleeve seams inside 1 edge st. Sew collar tog mid back and sew to back piece. Sew on buttons to left front piece approx 1 cm in from front edge. Place the first button in transition between the last 2 repeats of turns and the top button in transition between turns and garter st.
Crochet border: Beg mid back with grey Fabel and crochet hook size 4 mm. Crochet round the neck, down along left front piece, along bottom edge, up along right front piece and round neck as follows:
Round 1: 1 dc, * 3 ch, skip approx 1 cm, 1 dc in next st *, repeat from *-*. Finish with 1 sl st in dc from beg of round.
Round 2: 4 ch, 1tr in first ch-loop, * 1 tr in next ch-loop, 1 ch, 1 tr in the same ch-loop *, repeat from *-* and finish with 1 sl st in 3rd ch from beg of round.
Use border as buttonholes.
Crochet border sleeves: Crochet a similar border round sleeve edges.

www.garnstudio.com

This pattern has been corrected.

Updated online: 30.07.2008
Upper part: .... When piece measures 2 cm from where sts were picked up inc 1 st each side, repeat when work measures 5 cm....

Diagram

diagram measurements

Each of our patterns has specific tutorial videos to help you.

Do you have a question? See a list of frequently asked questions (FAQ)

Knitting tension is what determines the final measurements of your work, and is usually measured per 10 x 10 cm. It is provided like so: number of stitches in width x number of rows in height - eg: 19 stitches x 26 rows = 10 x 10 cm.

The knitting tension is very individual; some people knit/crochet loosely while others work tightly. You adjust the knitting tension with the needle size, which is why the suggested needle size is only meant as a guide! You need to adjust this (up or down) to ensure that YOUR knitting tension matches the knitting tension provided in the pattern. If you work with a different knitting tension than provided you will have a different yarn consumption, and your work will have different measurements than what the pattern suggests.

The knitting tension also determines which yarns can replace each other. As long as you achieve the same knitting tension you can replace one yarn with another.

See DROPS lesson: How to measure your tension/gauge

See DROPS video: How to make a gauge tension swatch

The required amount of yarn is provided in grams, eg: 450 g. To calculate how many balls you’ll need you first need to know how many grams are in 1 ball (25g, 50g or 100g). This information is available if you click on the individual yarn quality on our pages. Divide the amount required with the amount of each ball. For example, if each ball is 50g (the most common amount), the calculation will be as follows: 450 / 50 = 9 balls.

The important thing when changing from one yarn to another is that the knitting/crochet tension remains the same. This is so that the measurements of the finished piece will be the same as on the sketch provided. It is easier to achieve the same knitting tension using yarns from the same yarn group. It is also possible to work with multiple strands of a thinner yarn to achieve the knitting tension of a thicker one. Please try our yarn converter. We recommend you to always work a test swatch.

Please NOTE: when changing yarn the garment might have a different look and feel to the garment in the photo, due to individual properties and qualities of each yarn.

See DROPS lesson: Can I use a different yarn than the one mentioned in the pattern?

All our yarns are categorised into yarn groups (from A to F) according to thickness and knitting tension – group A contains the thinnest yarns and group F the thickest. This makes it easier for you to find alternative yarns to our patterns, should you wish to switch yarn. All yarns within the same group have a similar knitting tension and can easily replace each other. However, different yarn qualities have different structures and properties which will give the finished work a unique look and feel.

Click here for an overview of the yarns in each yarn group

At the top of all our patterns you’ll find a link to our yarn calculator, which is a helpful tool should you wish to use a different yarn than suggested. By filling in the yarn quality you wish to replace, the amount (in your size) and number of strands, the calculator will present good alternative yarns with the same knitting tension. Additionally it will tell you how much you’ll require in the new qualities and whether you’ll need to work with multiple strands. Most skeins are 50g (some are 25g or 100g).

If the pattern is worked with multiple colours, every colour will have to be calculated separately. Similarly, if the pattern is worked with several strands of different yarns (for example 1 strand Alpaca and 1 strand Kid-Silk) you will have to find alternatives for each, individually.

Click here to see our yarn calculator

Since different yarns have different qualities and textures we have chosen to keep the original yarn in our patterns. However, you can easily find options among our available qualities by using our yarn calculator, or simply pick a yarn from the same yarn group.

It is possible that some retailers still have discontinued yarns in stock, or that someone has a few skeins at home that they would like to find patterns for.

The yarn calculator will provide both alternative yarn as well as required amount in the new quality.

If you think it's hard to decide what size to make, it can be a good idea to measure a garment you own already and like the size of. Then you can pick the size by comparing those measures with the ones available in the pattern's size chart.

You'll find the size chart at the bottom of the pattern.

See DROPS lesson: How to read size chart

The needle size provided in the pattern serves only as a guide, the important thing is to follow the knitting tension. And since knitting tension is very individual, you will have to adjust the needle size to ensure that YOUR tension is the same as in the pattern – maybe you’ll have to adjust 1, or even 2 needle sizes, up or down to achieve the correct tension. For this, we recommend that you work test swatches.

Should you work with a different knitting tension than the one provided, the measurements of the finished garment might deviate from the measurement sketch.

See DROPS lesson: How to measure your tension/gauge

See DROPS video: How to make a tension/gauge swatch

Working a garment top-down provides more flexibility and room for personal adjustment. For example it is easier to try the garment on while working, as well as making adjustments to length of yoke and shoulder caps.

The instructions are carefully explaining every step, in the correct order. Diagrams are adjusted to the knitting direction and are worked as usual.

The diagram depicts all rows/rounds, and every stitch seen from the right side. It is read from bottom to top, from right to left. 1 square = 1 stitch.

When working back and forth, every other row is worked from the right side and every other row is worked from the wrong side. When working from the wrong side, the diagram will have to be worked reversed: from left to right, knit stitches are purled, purl stitches are knit etc.

When working in the round every round is worked from the right side and the diagram are worked from right to left on all rounds.

See DROPS lesson: How to read knitting diagrams

The diagram depicts all rows/rounds, and every stitch seen from the right side. It is worked from bottom to top, from right to left.

When working back and forth every other row is worked from the right side: from right to left and every other row is worked from the wrong side: from left to right.

When working in the round, every row in the diagram are worked from the right side, from right to left.

When working a circular diagram you start in the middle and work your way outwards, counter clockwise, row by row.

The rows usually start with a given number of chain stitches (equivalent to the height of the following stitch), this will either be depicted in the diagram or explained in the pattern.

See DROPS lesson: How to read crochet diagrams

Instructions for working several diagrams after each other on the same row/round, will often be written like so: “work A.1, A.2, A.3 a total of 0-0-2-3-4 times". This means you work A.1 once, then A.2 is worked once, and A.3 is repeated (in width) the number of times provided for your size – in this case like so: S = 0 times, M = 0 times, L=2 times, XL= 3 times and XXL = 4 times.

The diagrams are worked as usual: begin with the first row in A.1, then work the first row in A.2 etc.

See DROPS lesson: How to read knitting diagrams

See DROPS lesson: How to read crochet diagrams

The total width of the garment (from wrist-to-wrist) will be larger in the larger sizes, despite the actual sleeves being shorter. The larger sizes have longer sleeve caps and wider shoulders, so there will be a good fit in all sizes.

The measurement sketch/schematic drawing provides information regarding the full length of the garment. If it’s a jumper or a jacket the length is measured from the highest point on the shoulder closest to the neckline, and straight down to the bottom of the garment. It is NOT measured from the tip of shoulder. Similarly, the length of yoke is measured from the highest point on the shoulder and down to where yoke is split into body and sleeves.

On a jacket measures are never taken along bands, unless specifically stated. Always measure inside band stitches when measuring the length.

See DROPS lesson: How to read a schematic drawing

Diagrams are often repeated on the round or in height. 1 repeat is the diagram the way it appears in the pattern. If it says to work 5 repeats of A.1 in the round, then you work A.1 a total of 5 times after/next to each other in the round. If it says to work 2 repeats of A.1 vertically/in height you work the entire diagram once, then begin again at the start and work the entire diagram one more time.

Chain stitches are slightly narrower than other stitches and to avoid working the cast-on edge too tight, we simply chain more stitches to begin with. The stitch count will be adjusted on the following row to fit the pattern and measurement sketch.

The rib edge is more elastic and will contract slightly compared to, for example, stocking stitch. By increasing before the rib edge, you avoid a visible difference in width between the rib edge and the rest of the body.

It’s very easy to cast off too tightly, and by making yarn overs while casting off (and simultaneously casting these off) you avoid a too tight cast off edge.

See DROPS video: How to bind off with yarn overs (yo)

To achieve an even increase (or decrease) you can increase on, for example: every 3rd and 4th row alternately, like so: work 2 rows and increase on the 3rd row, work 3 rows and increase on the 4th. Repeat this until the increase is complete.

See DROPS lesson: Increase or decrease 1 st on every 3rd and 4th row alternately

Should you prefer to work in the round instead of back and forth, you may of course adjust the pattern. You’ll need to add steeks mid-front (usually 5 stitches), and follow the instructions. When you would normally turn and work from the wrong side, simply work across the steek and continue in the round. At the end you’ll cut the piece open, pick up stitches to work bands, and cover the cut edges.

See DROPS video: How to knit steeks and cut open

Should you prefer to work back and forth instead of in the round, you may of course adjust the pattern so you work the pieces separately and then assemble them at the end. Divide the stitches for the body in 2, add 1 edge stitch in each side (for sewing) and work the front and back pieces separately.

See DROPS lesson: Can I adapt a pattern for circular needles into straight needles?

Pattern repeats can vary slightly in the different sizes, in order to get the correct proportions. If you’re not working the exact same size as the garment in the photo, yours might deviate slightly. This has been carefully developed and adjusted so that the complete impression of the garment is the same in all sizes.

Make sure to follow instructions and diagrams for your size!

If you have found a pattern you like which is available in women’s size it’s not very difficult to convert it to men’s size. The biggest difference will be the length of sleeves and body. Start working on the women size that you think would fit across the chest. The additional length will be worked right before you cast off for the armhole/sleeve cap. If the pattern is worked top-down you can add the length right after the armhole or before the first decrease on sleeve.

Regarding additional yarn amount, this will depend on how much length you add, but it is better with a skein too many than too few.

All yarns will have excess fibres (from production) that might come off as lint or shedding. Brushed yarns (ie hairier yarns) have more of these loose, excess fibres, causing more shedding.

Shedding also depends on what is worn under or over the garment, and whether this pulls at the yarn fibres. It’s therefore not possible to guarantee that there will be no shedding

Below are some tips on how to get the best result when working with hairier yarns:

1. When the garment is finished (before you wash it) shake it vigorously so the looser hairs come off. NOTE: do NOT use a lint roller, brush or any method that pulls at the yarn.

2. Place the garment in a plastic bag and put it in your freezer - the temperature will cause the fibres to become less attached to each other, and excess fibres will come off easier.

3. Leave in the freezer for a few hours before taking it out and shaking it again.

4. Wash the garment according to the instructions on the yarn label.

Pilling is a natural process that happens to even the most exclusive of fibers. It's a natural sign of wear and tear that is hard to avoid, and that is most visible in high friction areas of your garment like a sweater's arms and cuffs.

You can make your garment look as new by removing the pilling, using a fabric comb or a pill/lint remover.

Still can't find the answer you need? Then scroll down and leave your question so one of our experts can try to help you. This will be done normally within 5 to 10 working days.
In the meantime, you can read the questions and answers that others have left to this pattern or join the DROPS Workshop on Facebook to get help from fellow knitters/crocheters!

You might also like...

Post a comment to pattern DROPS 108-1

We would love to hear what you have to say about this pattern!

If you want to leave a question, please make sure you select the correct category in the form below, to speed up the answering process. Required fields are marked *.

Comments / Questions (131)

country flag Anne-claude wrote:

C'est a dire que je fais les diminutions comme cela est dit et ensuite je tricote toutes mailles et entre les diminutions et le rang fait cela fait un trait mais pas pour la partie gauche puisque l' on se retrouve sur l'envers cela peut peu être venir que je travail avec une couleur uni, la solution que j'ai trouvé pour l'instant c 'est que quand je tricote la rangé entière je la tricote sur l'envers pour commencer.

25.01.2014 - 18:35

DROPS Design answered:

Bonjour Anne-Claude, pour tricoter le devant gauche, commencez d'abord par 1 rang end puis tricotez les rangs raccourcis comme pour le devant droit, ils seront automatiquement en vis-à-vis. Bon tricot!

27.01.2014 - 11:04

country flag Anne-Claude wrote:

Bonjour, j' ai un petit souci je suis a faire la partie gauche et je n' ai pas la démarquation de mon évantail sur la partie gauche comme sur la droite

24.01.2014 - 20:58

DROPS Design answered:

Bonjour Anne-Claude, je ne suis pas sûre de comprendre votre question. N'hésitez pas à demander conseil au magasin où vous avez acheté votre laine ou sur le forum DROPS. Bon tricot!

25.01.2014 - 16:48

Adrien Ryenolds wrote:

I am having problems with the turns on this pattern. Have started again 4 times and checked tension. The turns are resulting in a pouch effect and a hole from the beginning, knit 2 turn etc and not knitting complete row until after the completion of the first turn therefore leaving a gap between beginning of first turn and next turn. Please can you help.

30.11.2013 - 16:07

DROPS Design answered:

Dear Mr Reynolds, the video below will help you to avoid holes at transition - short rows with wrap. Happy knitting!

30.11.2013 - 17:37

country flag Frida Arvidsson wrote:

Hej, är det jag som är blind eller var står det hur avigvarven ska stickas på koftan? :)

28.11.2013 - 19:50

DROPS Design answered:

Hela arb rätstickas, dvs alla maskor stickas räta fram och tillbaka.

05.12.2013 - 09:50

country flag Lau wrote:

Je ne comprends pas trop le montage de mailles "à deux fils" au départ, puisqu'on doit ensuite tricoter avec un seul. Deux fils = deux pelotes ? On en fait quoi de ce premier fil ?

27.11.2013 - 10:49

DROPS Design answered:

Bonjour Lau, dans ce modèle, on monte les mailles et on tricote avec 1 seul fil, de couleur noir/blanc (= Fabel n°905). Bon tricot!

27.11.2013 - 11:40

country flag Joanna wrote:

Ik ben aan voorkant bezg maar begrijp de tekst voor het breien van de kraag niet. Wat is betekenis van de verkorte naalden bij de kraag. Moet ik van elke toer een steek niet breien? verwarrende tekst. Graag goede uitleg.

10.10.2013 - 23:16

DROPS Design answered:

Hoi Joanna. Je breit de verkorte toeren om een mooie ronding bij de kraag te maken. De buitenkant wordt breder dan de binnenkant. Je hebt 15 st op de nld voor de kraag. Je breit 2 nld over alle st en dan 2 nld alleen over de eerste 8 st van de nld. Herhaal tot de vermelde hoogte. Zie ook hier:

16.10.2013 - 13:55

country flag Joanna wrote:

Waarom staat er een uitlg van luchtige ribbelsteek terwijl er bij alle panden wordt gezegd dat je alle toeren recht moet breien? Verwarrend.

02.10.2013 - 19:56

DROPS Design answered:

Hoi Joanna. Je breit de luchtige ribbelstek op de mouwen.

03.10.2013 - 10:55

country flag Mette wrote:

Nu har jeg strikket den første vending. Har lavet strikkeprøve og nu efter 5 vending er buen 10 cm for kort. Den skal være 67 men er kun 57. Hva har jeg gjort galt.

25.07.2013 - 19:56

DROPS Design answered:

Hej Mette. Kan de vaere du ikke har strikket vendingerne som beskrevet? Og er du sikker paa din strikkefasthed passer, med den rette skulle du gerne ende paa ca 67 cm. Om muligt kan du ogsaa pröve at tage dit arbejde med til din butik, maaske kan de se hvad der galt. Jeg haaber du kommer godt videre ;-)

25.08.2013 - 19:49

country flag Ines wrote:

Stricke meine 1. Socken und kapiere das Ende nicht: nach 21 cm (6cm zur fertigen Länge) auf beiden Seiten der mittl. M in M6 je 1 M abn, das 10-mal bei jeder Rd. Komme ich also von ursprünglich 64 M auf 24M und laut Maschenprobe bisschen mehr als 3cm voran... Nun "weiter fortlaufend je 2M zusammenstricken, den Faden abschneiden und durch die restlichen M ziehen": Wieviele Rd. sind das denn noch? Und wieviel restliche Maschen? Komme so keine weiteren knapp 3cm (respektive 8 Rd.) vorwärts!?

17.07.2013 - 23:08

DROPS Design answered:

Liebe Ines, wollten Sie diese Frage vielleicht bei einem anderen Modell stellen? Dieses Modell ist eine Jacke.

22.07.2013 - 13:17

Lorinda wrote:

I love this! can't wait to start! I'm going to knit this in double knit wool. Here in South Africa we are limited with wool choices.

22.05.2013 - 15:43

DROPS Design answered:

Dear Lorinda, our Drops Superstore Nordicmart.com ensures a worldwide shipping. Happy knitting!

23.05.2013 - 08:43