
Popular categories
Looking for a yarn?


|
|||||||||||||||||||||||||||||||
Cool Vibes |
|||||||||||||||||||||||||||||||
|
|
|||||||||||||||||||||||||||||||
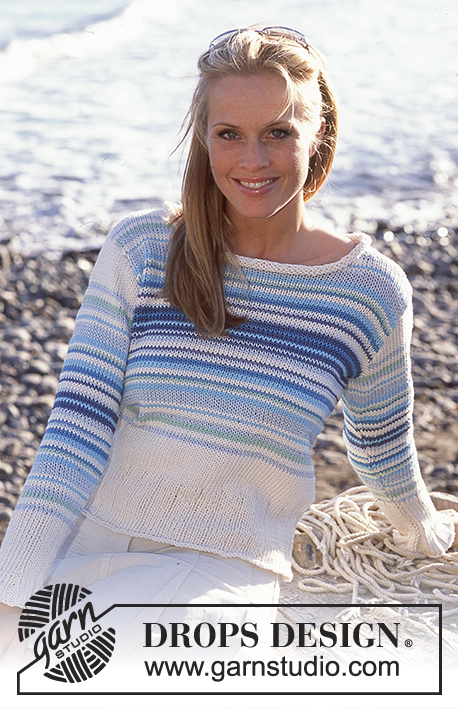
DROPS Top with a striped wave pattern.
DROPS 81-9 |
|||||||||||||||||||||||||||||||
|
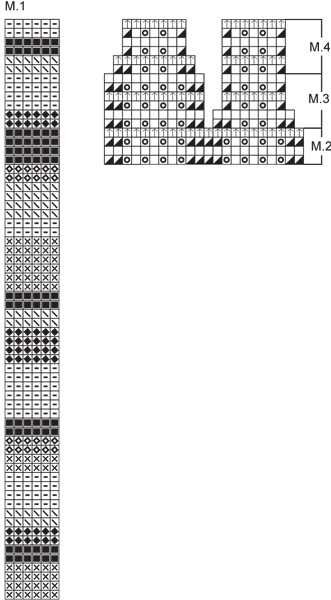
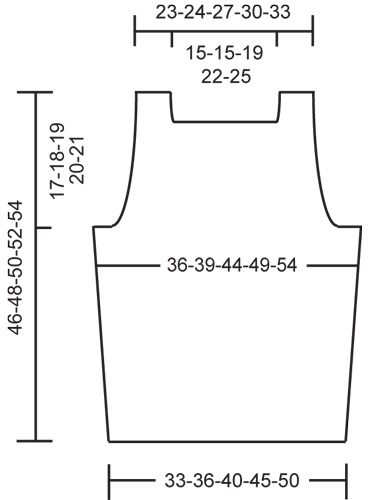
Tension: 22 sts x 34 rows in pattern = 10 x 10 cm. Stripe pattern: See chart. This chart is for COLOR only and follows the chart for Patterns 2, 3 and 4 for STITCH PATTERN. Wave pattern: See chart for Patterns M.2, M.3 and M4. This chart is for STITCH PATTERN only and follows the chart for Pattern M.1 for COLOR. Additional explanation to pattern diagram: On the 3rd row of the 1st part pf M.3 and on the 3rd row of the 2nd part of M.4, K3 tog (instead of K2 tog). Now repeat the 4 rows of M.3 and M.4 as shown in diagram and as explained in pattern. FRONT Loosely cast on 74-80-91-100-111 sts with beige and knit 2 rows garter st. Knit stripes following Pattern M.1 and wave pattern following Pattern M.2 – but keep 4-7-7-6-6 sts at each side in garter st. When the piece measures 10 cm inc 1 st at each side every 5-5-5-4-4 cm a total of 4-4-4-5-5 times – knit the increased sts in garter st = 82-88-99-110-121 sts. When the piece measures 29-30-31-32-33 cm cast off 4-6-6-6-6 sts at each side for armhole, then put the next 4-5-5-5-5 sts in garter st at each side on a st holder (these sts will be knit and joined with front later) = 66-66-77-88-99 sts. Measure the piece from here. Continue in pattern. After 3 cm (adjust to end after 4 rows of Pattern M.2) knit Pattern M.3 = 54-54-61-72-79 sts, then repeat the 4 last rows of Pattern M.3 (the rows without decs). When the piece measures 6 cm from where it was cast off for armholes, knit Pattern M.4 = 42-42-49-56-63 sts on needles, then repeat the 4 last rows of Pattern M.4 (the rows without decs). When the piece measures approx. 8 cm from where it was cast off for armholes, knit 2 rows garter st with natural over all sts and then cast off the center 34-34-41-48-55 sts = 4 sts remain at each side, put these sts on st holders. Put the 4-5-5-5-5 sts from st holders at one side of armhole edge back on needles. Knit garter st with natural for approx. 8 cm or to match top edge of front. Put in the 4 sts from st holder on the same needles = 8-9-9-9-9 sts. Knit garter st for approx. 12-13-14-15-16 cm, cast off – the strap is sewn to back later. Repeat on the other side. BACK Knit the same as the front. Cast off for armhole as on front. When the piece measures 14-15-16-17-18 cm from armhole bind-off knit 2 rows garter st with natural, then cast off all sts. Put sts from st holders at each side back on needles and knit garter st for approx. 14-15-16-17-18 cm, cast off. ASSEMBLY Sew the garter st edges along armhole on front and back and sew straps to back. Sew side seams using edge sts as seam allowance. |
|||||||||||||||||||||||||||||||
Diagram explanations |
|||||||||||||||||||||||||||||||
|
|||||||||||||||||||||||||||||||
|
|||||||||||||||||||||||||||||||
|
|||||||||||||||||||||||||||||||
|
Have you made this or any other of our designs? Tag your pictures in social media with #dropsdesign so we can see them! Do you need help with this pattern?You'll find tutorial videos, a Comments/Questions area and more by visiting the pattern on garnstudio.com. © 1982-2024 DROPS Design A/S. We reserve all rights. This document, including all its sub-sections, has copyrights. Read more about what you can do with our patterns at the bottom of each pattern on our site. |
|||||||||||||||||||||||||||||||


With over 40 years in knitting and crochet design, DROPS Design offers one of the most extensive collections of free patterns on the internet - translated to 17 languages. As of today we count 304 catalogues and 11422 patterns - 11422 of which are translated into English (UK/cm).
We work hard to bring you the best knitting and crochet have to offer, inspiration and advice as well as great quality yarns at incredible prices! Would you like to use our patterns for other than personal use? You can read what you are allowed to do in the Copyright text at the bottom of all our patterns. Happy crafting!
Comments / Questions (51)
Ik heb maat M. Alles gaat goed tot ik op rij 5 ben van het motief. Dan tel ik de steken en heb 72 ipv 80. Ik moet toch altijd dezelfde aantal steken hebben, door het hele motief ? Het wil niet lukken, zo vaak geprobeerd??? Ik hoop dat je mij nogeens kunt uitleggen?! Dank
04.04.2016 - 09:00DROPS Design answered:
Hoi Carmella. Je begint met ALLEEN M.2 herhalen (de eerste 4 nld) en dan blijft het aantal st gelijk. Als je M.3 gaat breien minder je ook zoals beschreven in het patroon (dat is pas na het afkanten voor de armsgaten)
05.04.2016 - 13:18Wat doe ik als er niks op staat op het motief gewoon rechts breien?
23.03.2016 - 19:38DROPS Design answered:
Hoi Carmella. Waar in het patroon/motief ben je? En je kan hier ook lezen hoe je onze telpatronen moet lezen
24.03.2016 - 14:42Goede morgen. Ik heb problemen met het motief. M.2 gaat prima, zodra ik op rij 5 ben (1ste rij van M.3) beginnen de problemen, het lukt mij niet om uit te komen op 22 steken, zo vaak geprobeerd! Wat doe ik verkeerd? Waar niets op staat moet ik dan recht breien? Heel graag jouw hulp. Dank Carmella
22.03.2016 - 07:57DROPS Design answered:
Hoi Carmella. Je moet ook niet uitkomen op 22 st. Je mindert in eerste rij van M.3 2 st. Er zijn 20 st over na eerste nld M.3. Let op, dat je ook mindert in de 3e nld M.3 en 1e en 3e nld M.4
23.03.2016 - 14:04No entiendo en el diagrama el salto que hay entre puntos. Esos que están en blanco. Muchas gracias.
30.07.2015 - 12:03DROPS Design answered:
Hola Mª Engracia. Las partes blancas del diagrama indican que allí no hay pts (se debe a que se han disminuido anteriormente).
13.08.2015 - 12:55Louise Dix wrote:
This is a great pattern. I'm having trouble with the chart where it says use M3 and M4 on the chart. How to decrease. I can't follow the chart ie. on which row do I decrease. Can you help with written instructions. Thank you
24.02.2015 - 23:51DROPS Design answered:
Dear Mrs Dix, when you work M3 the first time (first repeat on row), work K3 tog, K1, yo, K1, yo, K3 tog, then repeat diagram with K2 tog (no K3 tog anymore). Happy knitting!
25.02.2015 - 09:28Zou graag dit model breien en wol bestellen maar patroon is niet volledig in het nederlands
14.06.2014 - 10:36DROPS Design answered:
Hoi. Het patroon is compleet. De vertaling van de symbolen voor de teltekening staat onderaan het patroon.
16.06.2014 - 17:02Uitleg diagram niet in het Nederlands
13.06.2014 - 20:55Jeg mente rad 7,skjønner ingenting,det går ikke opp...Skal jeg strikke etter 4 rillemasker 3 rett sammen eller en rett og 3 rett sammen, 2 kast og 3 rett og 3 rett sammen???? kan dere forklare litt enklere???
12.06.2014 - 20:48DROPS Design answered:
Hej Tina. Du strikker först M.3 naar du har lukket af for ermhul og har sat 5-5 rillem i hver side paa en sikkerhetsnaal, du strikker altsaa ikke rillemasker i siderne mere, men kun mönstret. Og rad 7 (rad 3 i M.3 strikkes): 2 r sammen, 1 r, 1 kast, 1 r, 1 kast, 1 r, 2 r sammen 3 gange, 1 kast, 1 r 3 gange, 1 kast, og 2 r sammen to gange
17.06.2014 - 17:23Skjønner ingenting når jeg kommer til rad nr 5,det er så utrolig dårlig forklart.Er det en annen måte å forklare på??????
12.06.2014 - 20:45Gislaine Beaulieu wrote:
Merci de nous offrir de si beaux patrons et les fils sont très beaux. Je suis Canadienne, Québequoise et j'ai dû commander les fils pour ce magnifique patron en Californie aux U.S. j'étais bloquée à M3 et j'ai trouvé ma réponse ici dans Question/Réponse. Merci pour l'aide que vous donnez sur ce site. Gislaine
29.03.2014 - 23:51