DROPS Alpaca
DROPS Alpaca
100% Alpaca
from 4.85 $ /50g
Get the yarn to make this pattern from 38.80$.

The yarn cost is calculated from the pattern’s smallest size and the yarn’s cheapest product type. Looking for an even better price? You might find it on the DROPS Deals!

DROPS SS24

Dreamy Bluebell

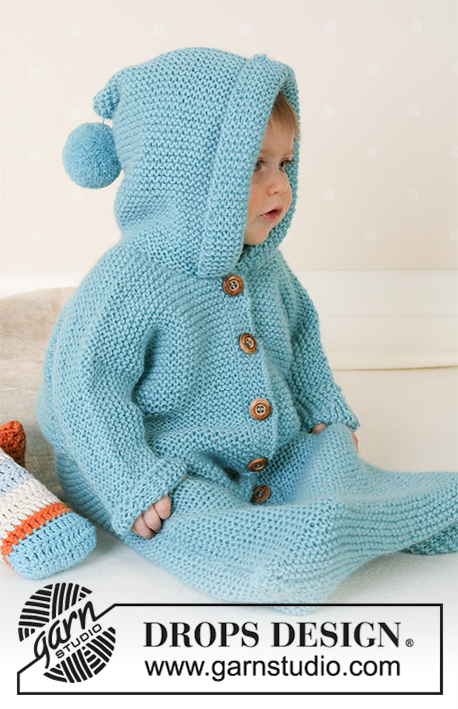
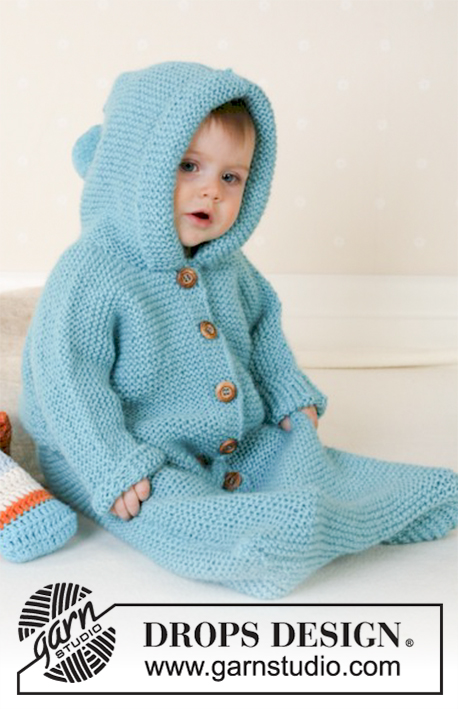
Bunting bag with hood in garter st, knitted in DROPS Alpaca. Sizes baby and children from 1 month to 4 years.

DROPS Baby 14-14
Size: 1/3 – 6/9 – 12/18 months (2 –3/4 years)
All measurements in charts are in cm'.

Materials: DROPS Alpaca from Garnstudio
400-450-500 (600-650) g color no 2917, turquoise

DROPS circular needle size 5 mm / US 8

DROPS wooden button no 511: 6-6-7 (7-7) pcs

Knitting gauge: 17 sts x 34 rows with 2 strands of Alpaca on needle size 5 mm / US 8 in garter sts = 10 x 10 cm / 4" x 4".

-------------------------------------------------------

Alternative Yarn – See how to change yarns here
Yarn Groups A to F – Use the same pattern and change the yarn here
Yarn usage using an alternative yarn – Use our yarn converter here

-------------------------------------------------------

DROPS Alpaca
DROPS Alpaca
100% Alpaca
from 4.85 $ /50g
Get the yarn to make this pattern from 38.80$.

The yarn cost is calculated from the pattern’s smallest size and the yarn’s cheapest product type. Looking for an even better price? You might find it on the DROPS Deals!

Pattern instructions

NOTE: This pattern is written in American English. All measurements in charts are in cm. For conversion from inches to cm - click here. There are different terms for crocheting in American and British English. If this pattern includes crochet, click for "crochet terms" here. For this pattern in British English, please click here.
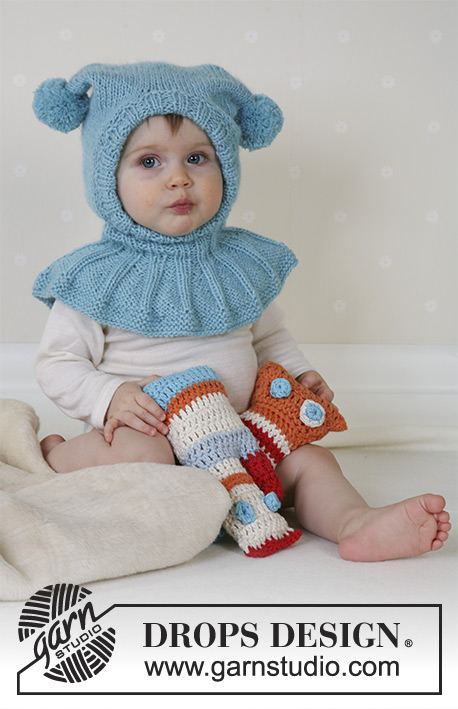
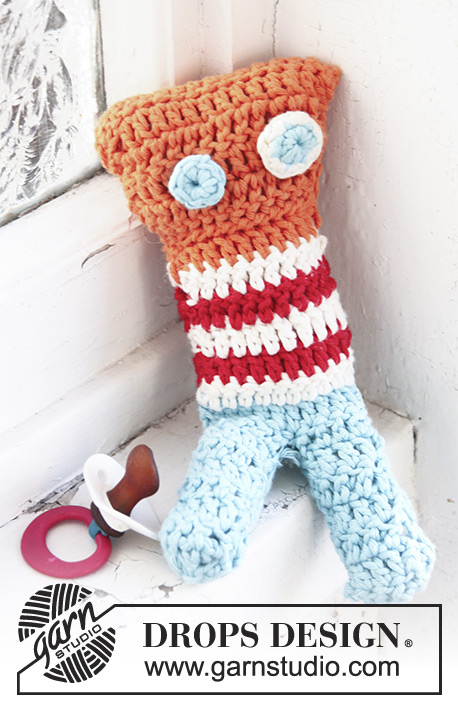
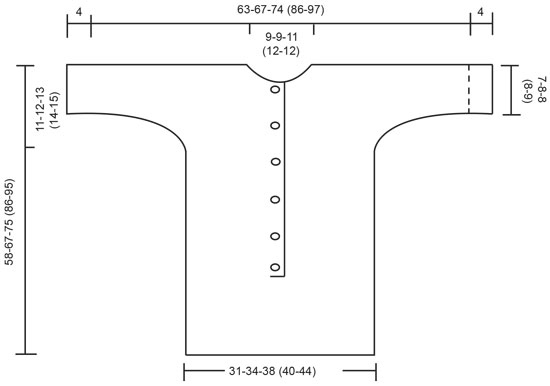
Garter sts: Knit all rows

Measurement tips: Because of the weight of the wool, all measurements should be made whilst piece is hanging.

Buttonhole: Make buttonholes on right front edge from the right side as follows: knit 2nd and 3rd st from edge tog and make a yo. Make buttonholes as follows:
Size 1/3 months: 27, 32, 37, 42, 47 and 52 cm / 10⅝",12½",14½",16½",18½",20½"
Size 6/9 months: 28, 34, 41, 47, 54 and 61 cm / 11",13⅜",16⅛",18½",21¼",24"
Size 12/18 months: 29, 36, 42, 49, 55, 62 and 69 cm / 11⅜",14¼",16½", 19¼",21⅝",24⅜",27⅛"
Size 2 years: 30, 37, 44, 51, 58, 65, 72 and 80 cm / 11¾",14½",17¼",20",22¾",25½",28⅜",31½"
Size 3/4 years: 31, 39, 47, 55, 63, 71, 80 and 89 cm / 12¼",15¼",18½",21⅝",24¾",28",31½",35"
______________________________________________________________

BUNTING BAG:

Front piece: See Measurement tips.
The piece is worked back and forth on a circular needle.
Loosely cast on 54-60-66 (70-76) sts (includes 1 edge st each side) with 2 strands of Alpaca on circular needle size 5 mm / US 8. Knit garter sts back and forth.
When piece measures 24-25-26 (27-28) cm / 9½"-9¾"-10¼" (10⅝"-11") divide the work in two and put half the sts on right front on a holder = 27-30-33 (35-38) sts left on needle.

Left front: = 27-30-33 (35-38) sts. Cast on 3 new sts towards mid front for front band = 30-33-36 (38-41) sts.
Continue in garter sts but purl the 5 sts towards mid front (= front edge) on all rows until finished measurements (to mark the front edge).
When piece measures 47-55-62 (72-80) cm / 18½"-21⅝"-24⅜" (28⅜"-31½") – remember measuring tips – cast on new sts for sleeve at the end of each row towards the side as follows: 3 sts 3-2-3 (3-1) times, 4 sts 2-3-3 (5-5) times, 6 sts 1-1-1 (1-3) times and 10 sts 1 times = 63-67-73 (83-92) sts.
When piece measures 53-62-70 (81-90) cm / 21"-24⅜"-27½" (32"-35½") cast of the 8-8-9 (10-10) sts towards mid front for neck and then dec to shape the neckline on every 4th row: 1 st 3 times = 52-56-61 (70-79) sts (= shoulder + sleeve).
When piece measures 58-67-75 (88-95) cm / 22¾"-26⅜"-29½" (34⅝"-37⅜") – stop after 1 row from wrong side - put sts on a holder.

Right front: Put sts from first holder back on needle and work as left front, but mirrored. Make buttonholes on front band as described above.

Back piece:
The piece is worked back and forth on a circular needle.
Cast on 54-60-66 (70-76) sts (includes 1 edge st each side) with 2 strands of Alpaca on circular needle size 5 mm / US 8.
Knit garter sts back and forth until piece measures 47-55-62 (72-80) cm / 18½"-21⅝"-24⅜" (28⅜"-31½") – remember measuring tips.
Now cast on new sts for sleeves at the end of each row, each side: 3 sts 3-2-3 (3-1) times, 4 sts 2-3-3 (5-5) times, 6 sts 1-1-1 (1-3) times and 10 sts 1 times = 120-128-140 (160-178) sts.
When piece measures 56-65-73 (84-93) cm / 22"-25½"-28⅜" (33"-36⅝") cast of the middle 14-14-16 (18-18) sts for neck and work each side separately. Then dec 1 st in beg of next row from neck to shape the neckline = 52-56-61 (70-79) sts (= shoulder + sleeve). When piece measures 58-67-75 (88-95) cm / 22¾"-26⅜"-29½" (34⅝"-37⅜") – stop after 1 row from wrong side - put sts on a holder.

Assembly: Sew shoulder/upper sleeve seams (sts from holders).
Sew under-sleeve, side seams and bottom seams within 1 edge st.
Sew the edges at the bottom of front bands and fold approx 4 cm / 1½" on both sleeves towards right side and attach with a couple of neat sts.

Hood: Pick up approx 45 to 55 sts from the right side with 2 strands Alpaca and needle size 5 mm / US 8 round the neckline. Knit 3 rows garter sts, at the same time inc to 72-74-76 (78-82) sts evenly on the 2nd row. On next row cast on 7 new sts each side for folding edge = 86-88-90 (92-96) sts.
Knit garter sts until hood measures 21-23-25 (27-28) cm / 8¼"-9"-9¾" (10⅝"-11") and bind off.
Fold hood double and sew seam at top of hood.
Fold 4 cm / 1½" at front edge towards right side and attach with neat sts to neckline.
Make a pompom with a diameter of approx 6-7 cm / 2½" and attach to the top of hood. Sew on buttons.

SOFT TOY: see pattern 14-30

Diagram

All measurements in charts are in cm.

diagram measurements
Do you have a question? See a list of frequently asked questions (FAQ)

Knitting tension is what determines the final measurements of your work, and is usually measured per 10 x 10 cm. It is provided like so: number of stitches in width x number of rows in height - eg: 19 stitches x 26 rows = 10 x 10 cm.

The knitting tension is very individual; some people knit/crochet loosely while others work tightly. You adjust the knitting tension with the needle size, which is why the suggested needle size only serve as a guide! You need to adjust this (up or down) to ensure that YOUR knitting tension matches the knitting tension provided in the pattern. If you work with a different knitting tension than provided you will have a different yarn consumption, and your work will have different measurements than what the pattern suggests.

The knitting tension also determines which yarns can replace each other. As long as you achieve the same knitting tension you can replace one yarn with another.

See DROPS lesson: How to measure your tension/gauge

See DROPS video: How to make a gauge tension swatch

The required amount of yarn is provided in grams, eg: 450 g. To calculate how many balls you’ll need you first need to know how many grams are in 1 ball (25g, 50g or 100g). This information is available if you click on the individual yarn quality on our pages. Divide the amount required with the amount of each ball. For example, if each ball is 50g (the most common amount), the calculation will be as follows: 450 / 50 = 9 balls.

The important thing when changing from one yarn to another is that the knitting/crochet tension remains the same. This is so that the measurements of the finished piece will be the same as on the sketch provided. It is easier to achieve the same knitting tension using yarns from the same yarn group. It is also possible to work with multiple strands of a thinner yarn to achieve the knitting tension of a thicker one. Please try our yarn converter. We recommend you to always work a test swatch.

Please NOTE: when changing yarn the garment might have a different look and feel to the garment in the photo, due to individual properties and qualities of each yarn.

See DROPS lesson: Can I use a different yarn than the one mentioned in the pattern?

All our yarns are categorised into yarn groups (from A to F) according to thickness and knitting tension – group A contains the thinnest yarns and group F the thickest. This makes it easier for you to find alternative yarns to our patterns, should you wish to switch yarn. All yarns within the same group have a similar knitting tension and can easily replace each other. However, different yarn qualities have different structures and properties which will give the finished work a unique look and feel.

Click here for an overview of the yarns in each yarn group

At the top of all our patterns you’ll find a link to our yarn converter, which is a helpful tool should you wish to use a different yarn than suggested. By filling in the yarn quality you wish to replace, the amount (in your size) and number of strands, the converter will present good alternative yarns with the same knitting tension. Additionally it will tell you how much you’ll require in the new qualities and whether you’ll need to work with multiple strands. Most skeins are 50g (some are 25g or 100g).

If the pattern is worked with multiple colours, every colour will have to be converted separately. Similarly, if the pattern is worked with several strands of different yarns (for example 1 strand Alpaca and 1 strand Kid-Silk) you will have to find alternatives for each, individually.

Click here to see our yarn converter

Since different yarns have different qualities and textures we have chosen to keep the original yarn in our patterns. However, you can easily find options among our available qualities by using our yarn converter, or simply pick a yarn from the same yarn group.

It is possible that some retailers still have discontinued yarns in stock, or that someone has a few skeins at home that they would like to find patterns for.

The yarn converter will provide both alternative yarn as well as required amount in the new quality.

If you think it's hard to decide what size to make, it can be a good idea to measure a garment you own already and like the size of. Then you can pick the size by comparing those measures with the ones available in the pattern's size chart.

You'll find the size chart at the bottom of the pattern.

See DROPS lesson: How to read size chart

The needle size provided in the pattern serves only as a guide, the important thing is to follow the knitting tension. And since knitting tension is very individual, you will have to adjust the needle size to ensure that YOUR tension is the same as in the pattern – maybe you’ll have to adjust 1, or even 2 needle sizes, up or down to achieve the correct tension. For this, we recommend that you work test swatches.

Should you work with a different knitting tension than the one provided, the measurements of the finished garment might deviate from the measurement sketch.

See DROPS lesson: How to measure your tension/gauge

See DROPS video: How to make a gauge tension swatch

Working a garment top-down provides more flexibility and room for personal adjustment. For example it is easier to try the garment on while working, as well as making adjustments to length of yoke and shoulder caps.

The instructions are carefully explaining every step, in the correct order. Diagrams are adjusted to the knitting direction and are worked as usual.

The diagram depicts all rows/rounds, and every stitch seen from the right side. It is read from bottom to top, from right to left. 1 square = 1 stitch.

When working back and forth, every other row is worked from the right side and every other row is worked from the wrong side. When working from the wrong side, the diagram will have to be worked reversed: from left to right, knit stitches are purled, purl stitches are knit etc.

When working in the round every round is worked from the right side and the diagram are worked from right to left on all rounds.

See DROPS lesson: How to read knitting diagrams

The diagram depicts all rows/rounds, and every stitch seen from the right side. It is worked from bottom to top, from right to left.

When working back and forth every other row is worked from the right side: from right to left and every other row is worked from the wrong side: from left to right.

When working in the round, every row in the diagram are worked from the right side, from right to left.

When working a circular diagram you start in the middle and work your way outwards, counter clockwise, row by row.

The rows usually start with a given number of chain stitches (equivalent to the height of the following stitch), this will either be depicted in the diagram or explained in the pattern.

See DROPS lesson: How to read crochet diagrams

Instructions for working several diagrams after each other on the same row/round, will often be written like so: “work A.1, A.2, A.3 a total of 0-0-2-3-4 times". This means you work A.1 once, then A.2 is worked once, and A.3 is repeated (in width) the number of times provided for your size – in this case like so: S = 0 times, M = 0 times, L=2 times, XL= 3 times and XXL = 4 times.

The diagrams are worked as usual: begin with the first row in A.1, then work the first row in A.2 etc.

See DROPS lesson: How to read knitting diagrams

See DROPS lesson: How to read crochet diagrams

The total width of the garment (from wrist-to-wrist) will be larger in the larger sizes, despite the actual sleeves being shorter. The larger sizes have longer sleeve caps and wider shoulders, so there will be a good fit in all sizes.

The measurement sketch/schematic drawing provides information regarding the full length of the garment. If it’s a jumper or a jacket the length is measured from the highest point on the shoulder (usually closest to the neckline), and straight down to the bottom of the garment. It is NOT measured from the tip of shoulder. Similarly, the length of yoke is measured from the highest point on the shoulder and down to where yoke is split into body and sleeves.

See DROPS lesson: How to read a schematic drawing

Diagrams are often repeated on the round or in height. 1 repeat is the diagram the way it appears in the pattern. If it says to work 5 repeats of A.1 in the round, then you work A.1 a total of 5 times after/next to each other in the round. If it says to work 2 repeats of A.1 vertically/in height you work the entire diagram once, then begin again at the start and work the entire diagram one more time.

Chain stitches are slightly narrower than other stitches and to avoid working the cast-on edge too tight, we simply chain more stitches to begin with. The stitch count will be adjusted on the following row to fit the pattern and measurement sketch.

The rib edge is more elastic and will contract slightly compared to, for example, stocking stitch. By increasing before the rib edge, you avoid a visible difference in width between the rib edge and the rest of the body.

It’s very easy to cast off too tightly, and by making yarn overs while casting off (and simultaneously casting these off) you avoid a too tight cast off edge.

See DROPS video: How to bind off with yarn overs (yo)

To achieve an even increase (or decrease) you can increase on, for example: every 3rd and 4th row alternately, like so: work 2 rows and increase on the 3rd row, work 3 rows and increase on the 4th. Repeat this until the increase is complete.

See DROPS lesson: Increase or decrease 1 st on every 3rd and 4th row alternately

Should you prefer to work in the round instead of back and forth, you may of course adjust the pattern. You’ll need to add steeks mid-front (usually 5 stitches), and follow the instructions. When you would normally turn and work from the wrong side, simply work across the steek and continue in the round. At the end you’ll cut the piece open, pick up stitches to work bands, and cover the cut edges.

See DROPS video: How to knit steeks and cut open

Should you prefer to work back and forth instead of in the round, you may of course adjust the pattern so you work the pieces separately and then assemble them at the end. Divide the stitches for the body in 2, add 1 edge stitch in each side (for sewing) and work the front and back pieces separately.

See DROPS lesson: Can I adapt a pattern for circular needles into straight needles?

Pattern repeats can vary slightly in the different sizes, in order to get the correct proportions. If you’re not working the exact same size as the garment in the photo, yours might deviate slightly. This has been carefully developed and adjusted so that the complete impression of the garment is the same in all sizes.

Make sure to follow instructions and diagrams for your size!

If you have found a pattern you like which is available in women’s size it’s not very difficult to convert it to men’s size. The biggest difference will be the length of sleeves and body. Start working on the women size that you think would fit across the chest. The additional length will be worked right before you cast off for the armhole/sleeve cap. If the pattern is worked top-down you can add the length right after the armhole or before the first decrease on sleeve.

Regarding additional yarn amount, this will depend on how much length you add, but it is better with a skein too many than too few.

All yarns will have excess fibres (from production) that might come off as lint or shedding. Brushed yarns (ie hairier yarns) have more of these loose, excess fibres, causing more shedding.

Shedding also depends on what is worn under or over the garment, and whether this pulls at the yarn fibres. It’s therefore not possible to guarantee that there will be no shedding

Below are some tips on how to get the best result when working with hairier yarns:

1. When the garment is finished (before you wash it) shake it vigorously so the looser hairs come off. NOTE: do NOT use a lint roller, brush or any method that pulls at the yarn.

2. Place the garment in a plastic bag and put it in your freezer - the temperature will cause the fibres to become less attached to each other, and excess fibres will come off easier.

3. Leave in the freezer for a few hours before taking it out and shaking it again.

4. Wash the garment according to the instructions on the yarn label.

Pilling is a natural process that happens to even the most exclusive of fibers. It's a natural sign of wear and tear that is hard to avoid, and that is most visible in high friction areas of your garment like a sweater's arms and cuffs.

You can make your garment look as new by removing the pilling, using a fabric comb or a pill/lint remover.

Still can't find the answer you need? Then scroll down and leave your question so one of our experts can try to help you. This will be done normally within 5 to 10 working days.
In the meantime, you can read the questions and answers that others have left to this pattern or join the DROPS Workshop on Facebook to get help from fellow knitters/crocheters!

You might also like...

Post a comment to pattern DROPS Baby 14-14

We would love to hear what you have to say about this pattern!

If you want to leave a question, please make sure you select the correct category in the form below, to speed up the answering process. Required fields are marked *.

Comments / Questions (65)

country flag Catherine Chapuis wrote:

Bonjour, Je ne comprends pas les 5 mailles de bordures"tout à l'envers "? la maille envers est "plus haute que le mousse et , du coup, la bande est plus grande, elle gondole et ce n'est pas joli! je défais en attendant votre réponse!Merci d'avance ! Catherine Chapuis

06.07.2018 - 15:49

DROPS Design answered:

Bonjour Mme Chapuis, pour "marquer" la bordure des devants, on la tricote au point mousse en tricotant tous les rangs à l'envers, ainsi, elle va se démarquer légèrement du reste du devant qui, lui se tricote au point mousse "classique" soit tous les rangs à l'endroit. Bon tricot!

06.07.2018 - 16:06

country flag Susi wrote:

Hi Is it possible to use incawool 100% heighland wool. 10X10cm = 18m 100gram = 160m. p4½-5 Thanks

15.03.2018 - 18:35

DROPS Design answered:

Hi Susi, It is the knitting tension which is important so that you get the right size when working. So you will need to adjust the number of stitches to suit the new yarn as the Drops Alpaca uses 17 stitches for 10 cm in width. Happy knitting !

16.03.2018 - 07:51

country flag JOELLE TARNAUD wrote:

Bonjour, J'ai terminé le devant gauche et je ne comprends pas la signification de ajuster après un rang envers? ensuite on met les mailles en attente mais quand les reprend on? je ne trouve pas . Vous dites la meme chose pour devant droit et dos mais quand arrete -t-on le travail? je ne comprends pas non plus comment on sait pour l'assemblage répartir manches épaules et capuche merci de votre aide

01.11.2016 - 12:06

DROPS Design answered:

Bonjour Mme Tarnaud, le dernier rang de chaque devant et du dos doivent être tricotés sur l'envers avant de les mettre en attente. On les assemble ensuite en grafting - cf vidéo ci-dessous. Les mailles des épaules/manches correspondent à celles qui restent de chaque côté quand les diminutions de l'encolure sont faites. Bon tricot!

01.11.2016 - 12:40

country flag Paula wrote:

Jetzt habe ich noch erfahren/festgestellt, dass die Merino-Wolle beim Waschen ausleiert. Nun weiß ich aber nicht wie sehr sich das auf das Endstück auswirkt.. Bei anderen Anleitungen auf garnstudio.com mit Baby-Merino ist davon auch nirgends was geschrieben. Leiert die Wolle nur minimal, so dass es nicht viel ausmacht? Oder teilt das nur keiner mit, dass die Kleidung nach dem Waschen größer ist?...

31.05.2016 - 11:13

DROPS Design answered:

Hallo Paula, Sie müssen sich an die Pflegehinweise halten - vor allem das Kleidungsstück im liegen trocken. Wichtig ist auch, dass nicht zu locker gestrickt wird, also die Maschenprobe beachtet wird.

01.06.2016 - 08:26

country flag Paula wrote:

Ich würde statt Alpaka gerne Baby-Merino-Wolle nehmen, kenn mich aber nicht so gut aus. Mir ist nur aufgefallen, dass das doppelt gestrickte ganz schön dick ist und sich von der Breite her zusammen zieht. Was kann ich da machen? Und ist der Schlafsack wirklich so dick?

30.05.2016 - 16:45

DROPS Design answered:

Liebe Paula, dies ist ein wärmeres Modell und wird mit doppeltem Faden gestrickt. Sie können die Alpaca durch Baby Merino ersetzen (auch doppelt verstrickt).

01.06.2016 - 08:33

country flag Angelique wrote:

Hallo! Ich verstehe nicht in der Anleitung wo und wie die Ärmel gestrickt werden?

11.05.2016 - 21:02

DROPS Design answered:

Hallo Angelique, die Ärmel werden direkt angestrickt. Sie finden es in der Anleitung an dieser Stelle: Nach 47-55-62 (72-80) cm... bei jeder 2. R. (am Schluss jeder R.) für die Ärmel neue M. anschlagen...

12.05.2016 - 07:22

country flag Susan Vegsund wrote:

When casting on additional stitches for the sleeves the instructions are to cast on three stitches at the end of each row. Do you knit a row in between each cast on row. I am having trouble with the idea of casting on three stitches at the end of each row and then casting on an additional 3 stitches on the very next row.

27.01.2016 - 07:26

DROPS Design answered:

Dear Mrs Vegsund, on back piece you will cast on new sts for sleeve at the end of each row, ie work RS row and cast on 3 sts, turn and work next row from WS at the end of this row, cast on 3 sts = you have cast on 3 sts on each side ie 3 sts for each sleeve. Happy knitting!

27.01.2016 - 10:34

Mónica wrote:

Holal! la duda que tengo es en la capucha,,, donde dice "montar aprox. 45-55 pts"....... después dice aum. 72 pts. equitativamente, después 7 pts. de cada lado,,, es igual a tener 86 pts. Qué es lo correcto, aumentar de 45 hasta tener 72 ó aumentar 72, porque si es aumentar 72, más los 45 de inicio, más los 7 de cada lado nos dá 113 pts.,,Gracias! les saludo desde México!,, Moni.

03.12.2015 - 06:55

DROPS Design answered:

Hola Mónica, efectivamente se aumenta hasta 72, que sumados luego los otros 14 (7 a cada lado) nos dan los 86. Voy a cambiar ligeramente el texto para que no de lugar a equivocación. Debería poner "aum hasta tener 72 pts...". Gracias por escribirnos.

03.12.2015 - 10:07

country flag Judy wrote:

Thank you for all the wonderful, easily accessed patterns free of charge. This bunting looks lovely, but it would be more useful with an option for a car seat opening. Would you be able to add instructions for that? I have no idea where to place the opening. Many thanks.

13.03.2015 - 08:55

DROPS Design answered:

Dear Judy, you can get help from other patterns with an opening for seat belt adjusting number of sts with your tension, see here or there for example. Happy knitting!

13.03.2015 - 09:45

Irene Freeman wrote:

I have commence bunting bag back piece, cast on on 66sts and have knitted 62cm so far. NOW, cast on for new sts for sleeves pattern reads...at the end of each row, each side: so to end up with 140 stitches in my reckoning means that I have to increase at beg and end of the next row 3 sts both ends of the row (=6 sts in all for that round x 3) and so on. What is the best way to do this and am I correct. Thank you

09.03.2015 - 10:41

DROPS Design answered:

Dear Mrs Freeman, you cast on new sts at the end of each next row from RS + from WS to inc 3 sts each side, so that cast on 3 sts 3 times will get you 9 sts more each side, you will cast on a total of 37 sts each side. Happy knitting!

09.03.2015 - 10:53