
Popular categories
Looking for a yarn?


|
|||||||||||||||||||||||||||||||||||||
King's Cable |
|||||||||||||||||||||||||||||||||||||
 |
 |
||||||||||||||||||||||||||||||||||||
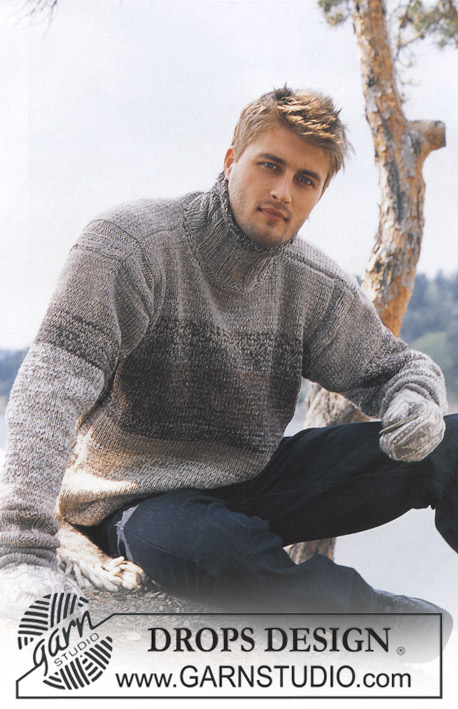
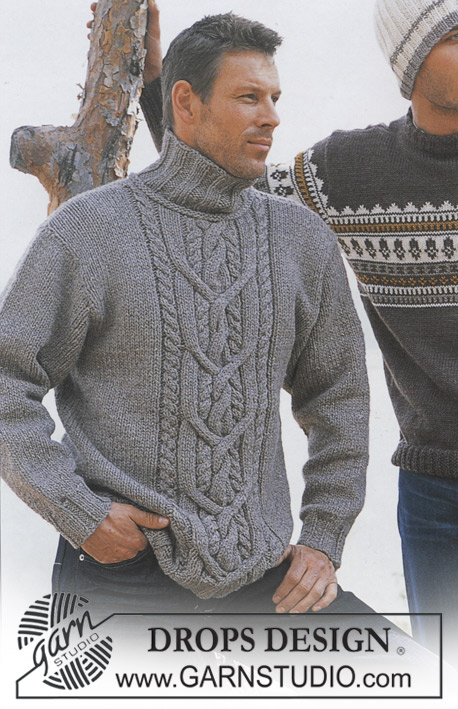
Men's knitted pullover with cables in DROPS Alaska and DROPS Alpaca
DROPS 85-6 |
|||||||||||||||||||||||||||||||||||||
|
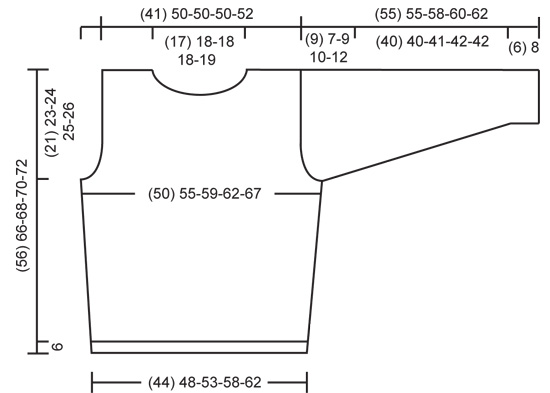
Gauge: 13 sts x 18 rows with 1 strand of each yarn on larger needles in stockinette = 10 x 10 cm. Rib: *K 3, P 3*, repeat from *-*. Pattern: The pattern is seen from the right side. Pattern 1 (M.1) is the first 10 rows of the chart. The black squares in Pattern 1 are NOT sts – skip over these squares. Pattern 2 (M.2) is the top 24 rows of the chart. Front: Cast on 60-66-72-78-84 sts on smaller needles with 1 strand each Alaska + Alpaca and knit rib as follows (row 1 = right side): Size 12/14 years: K 1 (edge st knit in garter st), *P 3, K 3*, repeat *-* a total of 2 times, Pattern 1 (= 34 sts), *K 3, P 3*, repeat *-* a total of 2 times, end with K 1 (edge st knit in garter st). Size S/M: K 1 (edge st knit in garter st), *K 3, P 3*, repeat *-* a total of 2 times, K 3, Pattern 1 (= 34 sts), *K 3, P 3*, repeat *-* a total of 2 times, end with K 3 and K 1 (edge st knit in garter st). Size L: K 1 (edge st knit in garter st), *P 3, K 3*, repeat *-* a total of 3 times, Pattern 1 (= 34 sts), *K 3, P 3*, repeat *-* a total of 3 times, end with K 1 (edge st knit in garter st). Size XL: K 1 (edge st knit in garter st), *K 3, P 3 , repeat *-* a total of 3 times, K 3, Pattern 1 (= 34 sts), *K 3, P 3*, repeat *-* a total of 3 times, end with K 3 and K 1 (edge st knit in garter st). Size XXL: K 1 (edge st knit in garter st), *P 3, K 3*, repeat *-* a total of 4 times, Pattern 1 (= 34 sts), *K 3, P 3*, repeat *-* a total of 4 times, end with K 1 (edge st knit in garter st). When Pattern 1 is complete, (the piece measures approx. 6 cm) change to larger needles – there are now 14 sts incl in Pattern = 74-80-86-92-98 sts. Continue as follows: K 1 (edge st knit in garter st), 12-15-18-21-24 sts stockinette st, Pattern 2 (= 48 sts) and 12-15-18-21-24 sts stockinette st, K 1 (edge st knit in garter st). When the piece measures 12 cm inc 1 st at each side every 5-6-7-12-12 cm a total of 4-4-4-3-3 times = 82-88-94-98-104 sts. When the piece measures 35-43-44-45-46 cm bind off for armhole at each side every other row: 3 sts 1 time, 2 sts 1-0-1-1-2 times and 1 st 2-1-2-4-4 times = (68) 80-80-80-82 sts. When the piece measures 50-59-61-63-65 cm dec 14 sts evenly distributed over the center 48 sts. On the next row bind off the center 14-16-16-16-18 sts for the neck. Then bind off at each neck edge every other row: 2 sts 1 time and 1 st 2 times = 16-21-21-21-21 sts remain on each shoulder. Bind off when the piece measures 56-66-68-70-72 cm. Back: Cast on 59-65-71-77-83 sts on smaller needles with 1 strand each Alaska + Alpaca and knit rib as follows: Sizes 12/14 years + L + XXL: K 1 (edge st knit in garter st), *K 3, P 3*, repeat *-*, end with K 3, K 1 (edge st knit in garter st). Sizes S/M + XL: K 1 (edge st knit in garter st), *P 3, K 3*, repeat *-*, end with P 3 and K 1 (edge st knit in garter st). When the piece measures 6 cm – the same length as Front – change to larger needles and stockinette st. When the piece measures 12 cm inc at each side as on front = 67-73-79-83-89 sts. Bind off for armhole as on front = 53-65-65-65-67 sts. When the piece measures 54-64-66-68-70 cm bind off the center 19-21-21-21-23 sts for the neck. On the next row dec 1 st at each neck edge = 16-21-21-21-21 sts remain on each shoulder. Bind off when the piece measures 56-66-68-70-72 cm. Sleeve: Cast on 32-32-38-38-38 sts on smaller needles with 1 strand each Alaska + Alpaca and knit rib, keeping 1 edge st at each side in garter st. When the piece measures 6-8-8-8-8 cm change to larger needles and stockinette st. When the piece measures 10-12-10-13-14 cm inc 1 st at each side every 3.5-3-3.5-3-2.5 cm a total of 10-12-11-12-14 times = 52-56-60-62-66 sts. When sleeve measures 46-48-49-50-50 cm bind off for sleeve cap at each side every other row: 4 sts 1 time, 3 sts 1 time, 2 sts 1-1-2-2-2 times and 1 st 3-1-1-2-2 times, then bind off 2 sts at each side until the piece measures 54-54-58-59-61 cm, then bind off 3 sts at each side 1 time. Bind off the remaining sts, the piece measures approx. 55-55-58-60-62 cm. Assembly: Sew shoulder seams. Collar with rolled edge: Pick up and knit approx. 60-78 sts (divisible by 6) around the neck on smaller double-pointed needles with 1 strand each Alaska + Alpaca; join and place a marker at the join. Knit rib for 12-12-14-14-14 cm and then bind off in rib. Pick up and knit approx. 56-72 new sts in the 1st row of the rib (at neckline) on smaller double-pointed needles with 1 strand each Alaska + Alpaca; join and knit 3 rows stockinette st (= rolled edge). Bind off – for best results, make a yo every 8 sts at the same time as you bind off. Sew in sleeves. Sew sleeve and side seams using edge sts as a seam allowance. |
|||||||||||||||||||||||||||||||||||||
Diagram explanations |
|||||||||||||||||||||||||||||||||||||
|
|||||||||||||||||||||||||||||||||||||

|
|||||||||||||||||||||||||||||||||||||
|
|||||||||||||||||||||||||||||||||||||
|
Have you made this or any other of our designs? Tag your pictures in social media with #dropsdesign so we can see them! Do you need help with this pattern?You'll find tutorial videos, a Comments/Questions area and more by visiting the pattern on garnstudio.com. © 1982-2024 DROPS Design A/S. We reserve all rights. This document, including all its sub-sections, has copyrights. Read more about what you can do with our patterns at the bottom of each pattern on our site. |
|||||||||||||||||||||||||||||||||||||


With over 40 years in knitting and crochet design, DROPS Design offers one of the most extensive collections of free patterns on the internet - translated to 17 languages. As of today we count 304 catalogues and 11422 patterns - 11422 of which are translated into English (UK/cm).
We work hard to bring you the best knitting and crochet have to offer, inspiration and advice as well as great quality yarns at incredible prices! Would you like to use our patterns for other than personal use? You can read what you are allowed to do in the Copyright text at the bottom of all our patterns. Happy crafting!
Comments / Questions (91)
Størrelse s/m. I vrangborden på forstykket så står det 3 r, 3 vr på første pinne fra retten. Skal jeg strikke 3 r, 3 vr på 2 pinne også? Da blir det isåfall rettmasker over vrangmaskene fra forrige pinne. Syns ikke det ser sånn ut på bildet. Spørsmålet gjelder de maskene som ikke inngår i mønster rapporten.
30.11.2019 - 11:00DROPS Design answered:
Hei Grete! Forstykket strikkes frem og tilbake på pinnen, derfor vil masker som strikkes rett på rettsiden strikkes vrangt på vrangsiden. Så når vrangborden strikkes på vrangsiden skal de vrange maskene strikkes rett, mens de rette maskene strikkes vrangt. Lykke til!
02.12.2019 - 09:33Hallo, Ist die Größe XXL für Männer oder auch Kindergröße....? LG Danny
13.09.2019 - 09:04DROPS Design answered:
Liebe Frau Gens, die Größe S bis XXL sind für Männer, aber um die richtige Größe zu finden, vergleichen Sie einen ähnlichen Pullover mit der Maßskizze - hier lesen Sie mehr über die Grössen. Viel Spaß beim stricken!
13.09.2019 - 11:09Goedemiddag, Ik ben momenteel de mouwen aan het breien (maat L). Als ik de instructies volg, staat er dat er dat ik om de 3,5 cm moet meerderen met 11 steken aan de weerskanten maar als ik dit doe, krijg ik hele brede mouwen. Als ik het goed begrepen heb, is de totale breedte van één mouw, 48 cm ( gedeeld door 2 = 24 cm als je het dubbel vouwt). Ik vraag me af of deze omschrijving wel klopt?
23.05.2019 - 08:43Bonjour, comment faire pour avoir les explications en français. Merci
14.03.2019 - 15:24DROPS Design answered:
Bonjour Laure, changez simplement la langue en cliquant sur la flèche sous la photo et sélectionnez "français". Bon tricot!
14.03.2019 - 16:15Waarom is het zwarte ruitje er? als hij toch niet meetelt
06.02.2019 - 13:58DROPS Design answered:
Dag Esther,
Het hokje is zwart gemaakt om aan te geven dat het geen steek is. De witte hokjes zijn wel een steek. De zwarte hokjes sla je dus gewoon over als of die er niet staat en je gaat verder met het volgende hokje.
08.02.2019 - 16:35Jeg kommet til halsen. Forstår ikke hvordan jeg opprettholder mønster om jeg skal felle hver 4. maske i midten? Når jeg ser på bildet, de ytterste flettene går fin til skuldre. Kan dere forklare det på et bedre måte?
20.01.2019 - 22:25DROPS Design answered:
Hei Natalia. Du feller ikke hver 4. maske i midten. Først feller du 14 masker jevnt fordelt over de 48 maskene i M.2. På neste omgang feller du av de midterste (14) 16-16-16-18 maskene, og du strikker hver skulder ferdig for seg - du strikker fortsatt M.2 over de maskene som er igjen. Du fortsetter å felle av mot halsen (slik at halsåpningen blir rund). Du feller på hver 2.pinne slik: 2 masker 1 gang, 1 maske 2 ganger = 3 masker felt på hver skulder, over 6 pinner. Av de 48 maskene i M.2 har du felt slik: 14 masker jevnt fordelt, (14) 16-16-16-18 masker, 3 masker på hver skulder = 14-12-12-12-10 masker igjen av M.2: (7)-6-6-6-5 masker M.2 på hver skulder. God fornøyelse.
29.01.2019 - 07:54Bonjour, pour une taille L homme combien de pelotes pour alpaga et alaska?
15.11.2018 - 16:53DROPS Design answered:
Bonjour Veronique, dans la taille L il vous faut 15 pelotes de DROPS Alaska et 7 pelotes de DROPS Alpaca. Bon tricot!
15.11.2018 - 20:29Bonjour Si J'ai bien compris les explications du col, 1, je relève des m sur l'encolure, je tricote 14 cm et je rabats 2, je relève à nouveau sur la même encolure des m que je tricote en jersey pendant 3cm, et je rabats Les 3 cms vont rouler sur eux mêmes alors ?
26.10.2018 - 16:57DROPS Design answered:
Bonjour Claudine, c'est tout à fait ainsi que l'on tricote les 2 bordures d'encolure. Bon tricot!
29.10.2018 - 07:31Bonjour je suis à rabattre les mailles pour les emmanchures et je ne comprends pas. Rabattre trois maillesven même temps ? Merci de votre aide
17.10.2018 - 03:42DROPS Design answered:
Bonjour Chantal, quand on doit rabattre 1 fois 3 m pour les emmanchures, on rabat les 3 premières mailles au début de chacun des 2 rangs suivants (= sur l'endroit et sur l'envers = 3 m rabattues de chaque côté) ainsi: tricotez les 2 premières m, passez la 1ère m par-dessus la 2ème (= il reste 1 m sur l'aig. droite), *tricotez la m suivante, passez la 1ère m par-dessus la dernière m*, répétez encore 1 fois de *-* = vous avez rabattu 3 m. Bon tricot!
17.10.2018 - 08:08Bonjour, pouvez vous m'expliquer ce que veux dire la ligne sous le diagramme svp34 m blir......
02.10.2018 - 13:25DROPS Design answered:
Bonjour Chantal B., bien volontiers: on a 34 m dans M.1 puis on va augmenter au dernier rang de M.1 et on aura ainsi 48 m dans M.1. Bon tricot!
02.10.2018 - 15:56