
Popular categories
Looking for a yarn?


|
|||||||
DROPS 92-15 |
|||||||
|
|
|||||||
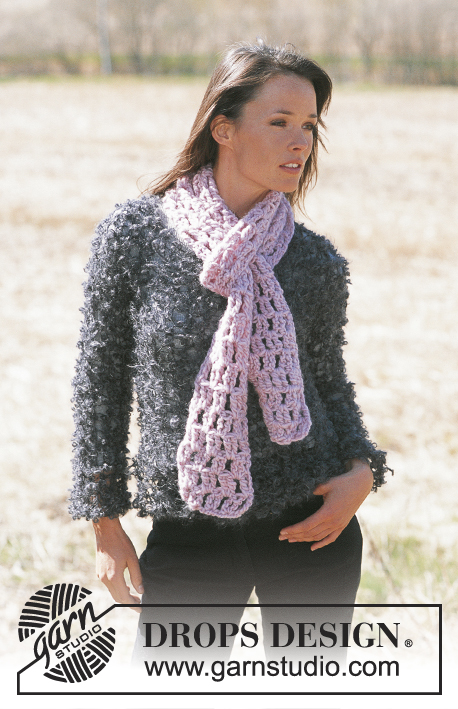
DROPS Garter stitch cardigan in Alpaca
DROPS 92-15 |
|||||||
|
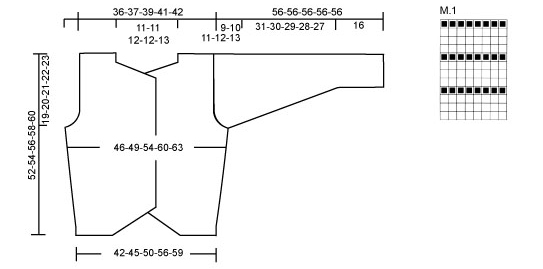
Knitting Gauge: 21 sts x 40 rows on needles size 4 mm in garter sts. = 10 x 10 cm. Garter sts back and forth: Knit on all rows. Patterns: See diagram M.1. Diagram is seen from the right side. English Translations for the wording in the diagram are given at the bottom of this pattern, and they are given in the vertical order in which they appear in the diagram. Rolled edge: K 1, * K 6, roll/twist the edge as follows: put the right needle behind the work, then under the piece and up in front of piece *, repeat * - *, K to end of row. Sloping front edge: Knit as follows from the mid front: 1st row: 1 seam st, inc 1 st as follows: Pick up 1 st from previous row, K this st. Continue to knit in garter st, but K the last 2 sts tog. before the marking thread. 2nd row: K on all sts. Repeat row 1&2. Knitting tips(23-05-07): Knit the 6 front band sts a bit tight so the front band doesn't get to long or to loose. Button hole: Make button holes on right front band edge as follows: K4, make a yo, K2 tog. On next row K the yo. Make button holes when piece measures (measured from mid front bottom edge) Size S: 3, 10, 17, 25 and 32 cm Size M: 3, 11, 18, 26 and 33 cm Size L: 3, 11, 19, 27 and 34 cm Size XL: 3, 11, 19, 27 and 36 cm Size XXL: 3, 12, 21, 29 and 37 cm Back piece: Cast on 90-96-108-120-126 sts loosely (inclusive of 1 seam st each side – all seam sts are knitted in garter sts through out) on needles size 4 mm in Alpaca colour 401-Chocolate and knit in garter sts. (1st row = Right side). At the same time, after 2 rows of garter sts knit “roll over edge”- see explanation above. Continue in garter sts. Remember to check your knitting gauge! When piece measures 2 cm (8 rows) alternate between 2 rows of Alpaca-dusty green and 2 rows of alpaca-chocolate. When changing colours begin from the wrong side (this means knitting 1 extra row of chocolate before starting the dusty green). At the same time, when piece measures 10 cm inc. 1 st each side every 6 cm a total of 4 times = 98-104-116-128-134 sts. When piece measures 29-30-31-32-33 cm continue in garter sts with dusty green until finished measurements. At the same time, when piece measures 33-34-35-36-37 cm cast off for armhole each side on every other row: 4sts 1 time, 3 sts 0-1-1-2-2 times, 2 sts 2-1-3-3-4 times and 1 st 3-4-4-5-5 times = 76-78-82-86-88 sts. When piece measures 50-52-54-56-58 cm cast off the mid 20-20-22-22-24 sts for neck. Continue to cast off on every other row on each neck side as follows: 1 st 2 times = 26-27-28-30-30 sts left on each shoulder. When piece measures 52-54-56-58-60 cm cast off the remaining sts. Right front: Read all of the right front section before knitting it! Cast on 51-54-60-66-69 sts loosely (inclusive of 1 seam st at the side and 6 front band sts mid front) on needles size 4 mm in Alpaca colour 401-Chocolate and knit in garter sts (1st row = Right side). At the same time, after 2 rows of garter sts knit “roll over edge”- as described for back piece. After finishing the “roll over edge” insert a marking thread at the 27-29-32-34-35 st from mid front (24-25-28-32-34 sts left for the side part). Start knitting the sloping front edge – see explanation above- NB: 1st row = right side. At the same time, when piece measures 2 cm (8 rows) alternate between 2 rows of Alpaca-dusty green and 2 rows of alpaca-chocolate as on the back piece (make sure to change colours beginning from the wrong side - this means 1 extra row of chocolate before starting the dusty green). Remember the button holes when piece measures 3 cm. Inc. at the side: When piece measures 10 cm (measured on the side) inc. as described for back piece = 55-58-64-70-73 sts. When piece measures 29-30-31-32-33 cm (measured on the side) continue in garter sts with dusty green until finished measurements. Armhole: When piece measures 33-34-35-36-37 cm (measured on the side) cast off for armhole as described for back piece = 44-45-47-49-50 sts. Neck shaping: At the same time when piece measures 33-34-35-37-38 cm (measured at centre mid front) finish the “sloping front edge” and knit in garter sts until finished measurements. At the same time, put sts on a thread or a stitch holder at the mid front on every other row: 2 sts 5-5-6-6-6 times and 1 st 8-8-7-7-7 times = 26-27-28-30-30 sts. When piece measures 52-54-56-58-60 cm (measured on the side) cast off the remaining sts. Left front: Knit as right front piece, but reverse. For the “sloping front edge” knit to the marking thread, continue to K2 tog. Knit until end of row but inc 1 st in the second but last st on row as follows: Pick up 1 st from previous row, K this st. Knit the seam sts. Sleeve: Cast on 54-54-54-60-60 sts loosely (inclusive of 1 seam st each side) on needles size 4 mm with alpaca-chocolate. Knit 2 rows of garter sts (1st row = right side) and knit the “roll over edge” as done on the back and front pieces. Continue in garter sts and alternate between 2 rows of Alpaca-dusty green and 2 rows of alpaca-chocolate. When changing colours, remember to begin from the wrong side. When sleeve measures 14 cm, knit 8 rows of garter sts in chocolate before continuing in dusty green and pattern M.1 until finished. At the same time, when sleeve measures 16 cm inc. 1 st each side every 12-10-8-8-6 row a total of 10-12-14-14-16 times = 74-78-82-88-92 sts. When sleeve measures 47-46-45-44-43 cm cast off for sleeve cap each side on every other row: 4 sts 1 time, 3 sts 1 time, 2 sts 2 times and 1 st 4-6-7-8-10 times. Continue to cast off 2 sts each side until sleeve measures 55 cm. Then cast off 3 sts each side 1 time. When sleeve measures 56 cm cast off the remaining sts. Knit the other sleeve. Assembly: Sew shoulders seams. Neck: Pick up 80-90 sts around the neck, including the ones on the thread, on needles size 4 mm and knit with 1 thread of each colour of Alpaca. Starting from the wrong side knit 2 rows of garter sts and cast off loosely. Set in the sleeves. Sew the sides and the sleeves together in the seam sts. Sew the buttons on. |
|||||||
Diagram explanations |
|||||||
|
|||||||
|
|||||||
|
Have you made this or any other of our designs? Tag your pictures in social media with #dropsdesign so we can see them! Do you need help with this pattern?You'll find tutorial videos, a Comments/Questions area and more by visiting the pattern on garnstudio.com. © 1982-2024 DROPS Design A/S. We reserve all rights. This document, including all its sub-sections, has copyrights. Read more about what you can do with our patterns at the bottom of each pattern on our site. |
|||||||


With over 40 years in knitting and crochet design, DROPS Design offers one of the most extensive collections of free patterns on the internet - translated to 17 languages. As of today we count 304 catalogues and 11422 patterns - 11422 of which are translated into English (UK/cm).
We work hard to bring you the best knitting and crochet have to offer, inspiration and advice as well as great quality yarns at incredible prices! Would you like to use our patterns for other than personal use? You can read what you are allowed to do in the Copyright text at the bottom of all our patterns. Happy crafting!
Comments / Questions (10)
Min kommentar er som Ulla Jeggesens fra d. 25.06.2010. Halsudskæringen ser helt forkert ud - går op i en spids midt foran og den bliver alt for dyb. Det kan ikke passe, at indtagningen midt på forstykket skal stoppe. Det får halsudskæringen til at 'flappe' Mvh Ilselil
13.04.2014 - 19:53DROPS Design answered:
Sörg for at de 6 kanmasker mod midt foran strikkes fast. Og sörg for at måle i siden af arbejdet (ikke midt foran) samt overholde strikkefastheden!
07.05.2014 - 13:48Min kommentar er som Ulla Jeggesens fra d. 25.06.2010. Halsudskæringen ser helt forkert ud - går op i en spids midt foran og den bliver alt for dyb. Det kan ikke passe, at indtagningen midt på forstykket skal stoppe. Det får halsudskæringen til at 'flappe' Mvh Ilselil
07.03.2014 - 21:00DROPS Design answered:
Opskriften stemmer, men det er vigtigt at overholde strikkefastheden og at kantmaskerne ikke strikkes for løst. God fornøjelse!
30.05.2014 - 07:32Hej! I opskriften står følgende: "Halsudskæring: Samtidig når arb måler 33-34-35-37-38 cm (målt midt foran) afsluttes den skrå forkant på forstk og der strikkes retstrik til færdig mål. Samtidig sættes der m på 1 tråd fra midt foran på hver 2.p ..." Jeg kan ikke få det til at passe at jeg skal lukke af til halsudskæring når arb måler 35 cm målt midt foran (strikker str L)- hverken på mit strikketøj el når jeg ser på model billedet? Mvh Ulla
25.06.2010 - 22:38Forstår ikke drejningen hvem kan forklare det tydeligt.Er det den strikkede eller den der skal strikkes? og hvor stikker jeg pinden ned og op? vh pia
06.06.2007 - 23:17Kryptisk forklaret den rullekant. er garvet strikker men fatter ikke hvordan. Er der en tegning på rullekants masken? for mange muligheder mangler tydelighed
06.06.2007 - 23:11Hej Merete Du gentager denne "drejning" efter hver 6.m, nøjagtig som der står i opskriften. På denne måde får du en lille snoet rullekant nederst på trøjen. God fornøjelse. mvh Charlotte
05.02.2007 - 14:05Hej Vedr.Drops 92-15 Håber i kan hjælpe mig med den rullekant. Er det kun de første 6 r masker der skal drejes - resten 83 m skal de bare strikkes r? Jeg kan ikke rigtig regne ud hvad effekt det får for resten af arbejdet. Med venlig hilsen Merete Larsen
05.02.2007 - 08:30Tack för svaret. Då blir den ganska så tunn. Det som jag begriper inte är att ett annat mönster som jag har är provstickningen ungefär lika mångamaskor men meed dubbelt garn med sticka 4. hos mej blir det förstort med sticka 2,5 så det låter konstigt.
13.01.2007 - 21:46Nej du ska inte sticka med dubbelt garn du börjar med färgen choklad och byter sedan efter några varv til en ny färg
13.01.2007 - 20:04Skall koftan stickas med dubbelt garn???????
12.01.2007 - 16:53