
Popular categories
Looking for a yarn?


|
|||||||||||||||||||
DROPS 83-5 |
|||||||||||||||||||
|
|
|||||||||||||||||||
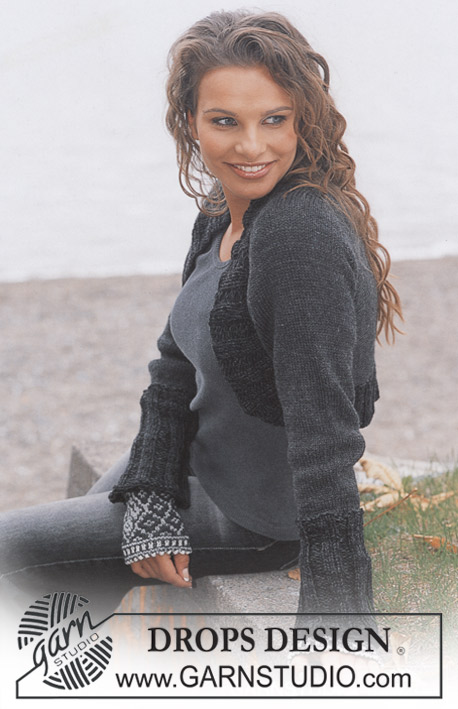
DROPS Pullover and scarf in Karisma Superwash
DROPS 83-5 |
|||||||||||||||||||
|
PULLOVER: Gauge: 21 sts x 28 rows on larger needles in stockinette st = 10 x 10 cm. Rib: * K 4, P 4 *, repeat * - *. Pattern: See charts. The pattern is knit entirely in stockinette st. Body: Cast on 176-192-208-232-248 sts on smaller circular needles with black. Knit 3 rows stockinette st, then knit rib – see instructions above. When the piece measures 5 cm change to larger circular needles, knit 2 rows garter st, then knit stockinette st, adjusting (inc/dec) on the first row to 172-190-210-232-248 sts. Put a marker at each side. When the piece measures 6-6-8-8-8 cm inc 1 st at each side of each marker every 5-5-6-6-6 cm a total of 5-5-4-4-4 times = 192-210-226-248-264 sts. When the piece measures 32-33-34-35-36 cm bind off 10 sts at each side for armhole (5 sts at each side of each marker) = 86-95-103-114-122 sts on body. Lay piece aside and knit the sleeves. Right sleeve: Cast on 66-66-75-75-75 sts on smaller needles with black and knit 3 rows stockinette st (1st row = wrong side). Then knit rib as follows: K 4 (edge sts knit in garter st), * K 4, P 5 *, repeat * - * and finish with K 4 and K 4 (edge sts knit in garter st). On the next row dec all P 5 to P 4 = 60-60-68-68-68 sts. When the rib measures 18 cm place a marker after 30-30-34-34-34 sts and cut yarn. Put cuff together – lay the 4 garter sts on the left side over the 4 garter sts on the right side as when the garment is worn. Divide sts onto 4 larger double-pointed needles and begin row at the marker. Knit 4 rows rib as before, but P the overlapping sts through both layers. Then knit 2 rows garter st over all sts and then knit stockinette st. After the 1st row of stockinette st inc 1 st each side of marker a total of 11-13-11-14-16 times: Sizes S + L: alternately every 5th and 6th rows Size M: every 5 rows Size XL: every 4 rows Size XXL: alternately every 3rd and 4th rows = 78-82-86-92-96 sts. When the piece measures 44-44-44-43-43 cm bind off 5 sts each side of marker = 68-72-76-82-86 sts. Put sts on a st holder and knit a second sleeve, reversing cuff overlap. Yoke: Put the sleeves in on the same circular needles as body where you bound off for armholes = 308-334-358-392-416 sts. Place a marker in each transition between body and the sleeves = 4 markers. Continue with stockinette st over all sts and knit 1-0-2-1-2 rounds before beginning raglan shaping, then: Dec 1 st as follows before markers: K 2 tog. Dec 1 st as follows after markers: Slip 1 st as if to knit, K 1, psso. Dec every other row 9-11-11-13-14 times = 236-246-270-288-304 sts. After raglan dec knit 1 round with black, decreasing evenly distributed across the round to 231-242-264-286-297 sts, then knit and dec following the chart for Pattern 1. After the last dec 126-132-144-156-162 sts remain on needles. Complete Pattern 1. Then knit 1 round with black, decreasing evenly distributed across round to 90-90-90-96-96 sts (divisible by 6). Neckband: Change to smaller double pointed needles and knit Pattern 2 once (the neckband measures approx. 5 cm). Change to coral and knit 1 round, then knit the next round as follows: * K 2 tog, yo *, repeat * - * around round (= folding edge). Continue until edge measures 5 cm from folding edge, change to black, knit 2 rounds and bind off. Fold neckband to wrong side and stitch in place loosely. Assembly: Sew opening under the sleeve. Sew overlap on cuffs from wrong side. Sew on 6 buttons as decoration along each cuff (through both layers). SCARF: Measurements: approx. 18 x 150 cm Materials: Garnstudio SNOW from Garnstudio 150 gr nr 14, charcoal grey DROPS 12 mm needles, or size needed to obtain correct gauge. Gauge: 7 sts in pattern = approx. 10 cm in width Lace pattern: Row 1 (= wrong side): K 1 (edge st knit in garter st), * K 1, yo, sl 1 as if to P *, repeat * - * to last 2 sts, end with K 2. Row 2 (= right side): K 1 (edge st knit in garter st), * yo, sl 1 as if to P, K tog the next st and the yo from previous row *, repeat * - * to last 2 sts and end with yo, sl 1 as if to P, and K 1 (edge st knit in garter st). Row 3 (= wrong side): K 1 (edge st knit in garter st), * K tog the next st and the yo from previous row, yo, sl 1 as if to P *, repeat * - * and end with K tog the next st and the yo from previous row, K 1 (edge st knit in garter st). Repeat rows 2 and 3. Scarf: Loosely cast on 13 sts and knit Lace pattern – see instructions above. Bind off when the piece measures approx. 150 cm. |
|||||||||||||||||||
Diagram explanations |
|||||||||||||||||||
|
|||||||||||||||||||

|
|||||||||||||||||||

|
|||||||||||||||||||
|
Have you made this or any other of our designs? Tag your pictures in social media with #dropsdesign so we can see them! Do you need help with this pattern?You'll find tutorial videos, a Comments/Questions area and more by visiting the pattern on garnstudio.com. © 1982-2024 DROPS Design A/S. We reserve all rights. This document, including all its sub-sections, has copyrights. Read more about what you can do with our patterns at the bottom of each pattern on our site. |
|||||||||||||||||||


With over 40 years in knitting and crochet design, DROPS Design offers one of the most extensive collections of free patterns on the internet - translated to 17 languages. As of today we count 304 catalogues and 11422 patterns - 11422 of which are translated into English (UK/cm).
We work hard to bring you the best knitting and crochet have to offer, inspiration and advice as well as great quality yarns at incredible prices! Would you like to use our patterns for other than personal use? You can read what you are allowed to do in the Copyright text at the bottom of all our patterns. Happy crafting!
Comments / Questions (40)
Hei! Stemmer det at det skal felles for raglan 11 ganger (M) før mønsteret begynner, eller skal mønsteret begynne etter første raglanfelling?
07.01.2018 - 20:27DROPS Design answered:
Hei Unni. Ja det stemmer, du skal først felle 11 ganger raglan, før du begynner med mønstret (da begynner du på rundfelling slik diagrammet viser). God Fornøyelse!
11.01.2018 - 13:17Ik brei maat S. Als ik negen keer de raglantechniek heb toegepast en overga naar het breien op patroon, hoef ik dan bij de markeerders niet meer de raglanminderingen voort te zetten?
01.01.2017 - 21:32DROPS Design answered:
Hoi Gina. Nee, dan brei je door volgens het patroon en hier zijn ook minderingen in de hoogte
10.01.2017 - 14:11Flot trøje. Skal jeg strikke de angivne omgange med raglan, før jeg begynder på mønsteret, eller skal jeg strikke raglan samtidig med mønsterborten?
12.08.2016 - 13:55DROPS Design answered:
Hej Birgitte. Du strikker först de angivne omg med raglan. Herefter gaar du videre med mönster M.1 og her tages der ogsaa ind (se diagram.)
24.08.2016 - 12:59Starter mønsteret så snart man har samlet alle dele. Venligt Liselotte Petersen
10.06.2016 - 09:29DROPS Design answered:
Hej Liselotte. Ja, du strikker först M.1 naar du er igang med baerestk
10.06.2016 - 10:35I opskriften står der ikke noget om, om mønstret skal starte ved en raglandindtagning bag på, eller midt bag?
08.09.2015 - 10:08DROPS Design answered:
Du starter bare i den overgang mellem ärme og ryg/forstk hvor du har tråden. God fornöjelse!
08.09.2015 - 15:42Hallo, wenn ich die Passe =Ärmel und Körperteil auf eine Nadel lege (Grosse L =358 Maschen) und für den Raglanaermel 11×4 Maschen abkette, komme ich nur auf 314 Maschen und nicht auf die von Ihnen angegebenen Maschen von 270 (Größe L). P.s. siehe in der Musterbeschreibung ab "Passe " ff Für Ihre Hilfe und Antwort vielen Dank. Mit freundlichem Gruß Monika
30.03.2015 - 21:01DROPS Design answered:
Sie nehmen nicht 4 M pro Rd ab, sondern 8 M. An jedem Markierer nämlich 2 M, und Sie haben ja 4 Markierer. Sie nehmen vor und nach dem Markierer durch Zusammenstricken bzw. überzogenes Zusammenstricken ab. Dann passt das mit den M: 11 x 8 M abgenommen = 88 Abnahmen = 270 M.
31.03.2015 - 11:44Het is mij niet geheel duidelijk bij de raglan. Je hebt totaal 334 st. en men moet 11 maal 4 maal steken minderen, maar dan blijven er volgens mij 290 steken over en geen 246 steken. Hoe los ik dit op
09.10.2014 - 17:12DROPS Design answered:
U mindert voor en na de merkdraad op 4 punten. Dan mindert u per keer dus 8 steken. U begint met 334 steken, dan mindert u 11 x 8 = 88 st en houdt u 246 st over.
10.10.2014 - 09:09Deze trui wordt echt véél te kort als je het patroon aanhoudt. Meet het maar eens na en brei hem gerust 10 cm langer tot aan de raglan. Ik kwam prima uit met de hoeveelheid garen trouwens.
22.06.2014 - 10:24DROPS Design answered:
Hoi Marielle. Deze trui is 32 tot 36 cm tot aan het armsgat afhankelijk van maat - wat vrij normaal is voor een trui. Maar je mag natuurlijk altijd het model langer breien als het voor jou beter uitkomt. Veel plezier met de trui!
26.06.2014 - 16:19Salve, errore mio, mi correggo...non avevo visto il campione. Il mio campione e' di 16m per 10cm, quindi ho ricalcolato e sto iniziando il lavoro.. Grazie comunque della risposta
30.03.2014 - 17:07Salve, vorrei gentilmente sapere se le misure e le maglie da avviare, sono corrispondenti alle taglie italiane. perché ho realizzato il modello della foto (con ferri circolari 4,5 taglia 44 con 192 maglie avviate)e risulta almeno due taglie sopra.. grazie in anticipo della risposta.
28.03.2014 - 19:03DROPS Design answered:
Buonasera Monica, se il suo campione corrisponde a quello indicato le misure del capo finito corrispondono allo schema in fondo al modello. Com'era il suo campione? Buon lavoro!
28.03.2014 - 20:51