
Categorie popolari
State cercando un filato?


Commenti / Domande (46)
![]() Bonnie ha scritto:
Bonnie ha scritto:
What does « Pick up » Mean? Never seen this term in crochet. Thanks
24.12.2024 - 16:36DROPS Design ha risposto:
Dear Bonnie, you can see how to work this star pattern here, including how to pick up stitches in crochet: https://www.garnstudio.com/video.php?id=572&lang=en. Happy crochetting!
29.12.2024 - 20:36
![]() Claire O'Flaherty ha scritto:
Claire O'Flaherty ha scritto:
Is there any increasing after round 13 or will the circumference of my hat grow as I continue after round 13? It's hard to see how the hat will fit an adult head. My tension is correct.
14.03.2024 - 20:10DROPS Design ha risposto:
Dear Mrs O'Flaherty, after last increase you should have 69 sts in first size, 73 sts in 2nd size, now work without any further increase until piece measures 18-19 cm before starting star pattern. Happy crocheting!
15.03.2024 - 08:31
![]() Chrystelle ha scritto:
Chrystelle ha scritto:
Bonjour, J'ai fait les 3 étoiles en hauteur. Faut-il refaire crocheter encore le 2ème tour et si oui où faut il crocheter les dB ? Merci pour votre réponse
28.01.2024 - 22:33
![]() Steffi ha scritto:
Steffi ha scritto:
Liebes Drops-Team,\r\ndanke für die schöne Anleitung.\r\nIch bin mit unsicher, ob ich ab Runde 14 weiterhin mit einer Luftmasche beginne und die Runde mit einer Kettmasche schließe (Häkelinfo und Video) oder ob ich dann nur noch feste Maschen häkel bis zur Länge von 18cm.\r\nHerzlichen Dank für eure Hilfe!
26.03.2023 - 09:10DROPS Design ha risposto:
Liebe Steffi, ja genauso sollen Sie häkeln, wie unter HÄKELINFO: erklärt. Viel Spaß beim häkeln!
27.03.2023 - 10:01
![]() Debra Jacobson ha scritto:
Debra Jacobson ha scritto:
Hi! The circumference of my hat after completed round 13 73 stitches, is 18 inches. Will this yield me a size L/XL hat for a head that measures about 22" around? Thanks again! Deb
06.03.2023 - 18:26DROPS Design ha risposto:
Dear Mrs Jacobson, do you have correct tension? You should have 14 sc = 4" - and the hat will be then somewhat tigher than the head circumference in order to fit perfectly. Happy crocheting!
07.03.2023 - 10:09
![]() Debra Jacobson ha scritto:
Debra Jacobson ha scritto:
Hi! Ready to start star pattern. Ended round 13 with slip stitch. Is the following correct? Chain 3, pick up 2nd chain from hook, pick 3rd chain from hook. ?Then do I pick up the chain stitch next to the slip stitch in the hat body Or the first genuine single crochet stitch back loop? Thanks for all your help! Deb
04.03.2023 - 19:03DROPS Design ha risposto:
Dear Mrs Jacobsson, finish every round with a slip stitch, then work the star stitch pattern in the round just as shown in this video. Happy crocheting!
06.03.2023 - 09:24
![]() Deb Jacobson ha scritto:
Deb Jacobson ha scritto:
Hi! Finished round 13, size L/XL Hat. Do I measure diameter of hat, or radius-- from center (starting circle) to one edge (half diameter)? Deb j
16.02.2023 - 19:51DROPS Design ha risposto:
Dear Deb, yes, it's measured from the starting circle down towards an edge (the radius of the hat). Happy knitting!
16.02.2023 - 20:51
![]() Debra Jacobson ha scritto:
Debra Jacobson ha scritto:
Want to use magic circle for my first in the round project using DROPS queen of chill pattern. About counting stitches: is the chain stitch used to lock the magic circle counted as stitch? Pattern says substitute a chain stitch for the first single crotchet in every round. So make 5 additional single crochet and count that chain stitch? Or not count that first magic circle chain stitch and make 6 single crochet? Tearing my hair out :-) Deb
01.02.2023 - 19:46
![]() Debra Jacobson ha scritto:
Debra Jacobson ha scritto:
Want to use magic circle (no issue making this) for my first in the round project. Using DROPS queen of chill pattern. Wondering about counting stitches: do I count the chain stitch used to lock the magic circle In a pattern that says to substitute a chain stitch for the first single crotchet in every round? So do I make 5 additional single crochet and count that chain stitch, or not count that first magic circle chain stitch and make 6 single crochet? Tearing my hair out :-) Deb
01.02.2023 - 19:42DROPS Design ha risposto:
Dear Mrs Jacobson, both techniques are possible you can replace the first single crochet with 1 chain (then crochet 1 chain and 5 sc to get 6 sc) or use the first chain just to start the round and do not count this chain as 1st stitch (then crochet 1 chain and 6 sc) - just as you prefer. But then remember to use the same technique all the piece, either counting the first chain as the first stitch or not. Happy crocheting!
02.02.2023 - 09:26
![]() Debra Jacobson ha scritto:
Debra Jacobson ha scritto:
Hi! I love workibg from charts or graphic depiction of pattern. Is that by any chance available for this hat? Best wishes!
28.01.2023 - 19:52DROPS Design ha risposto:
Dear Debra, this pattern is only available as seen online, as full written instructions. Happy crocheting!
29.01.2023 - 20:58
|
|
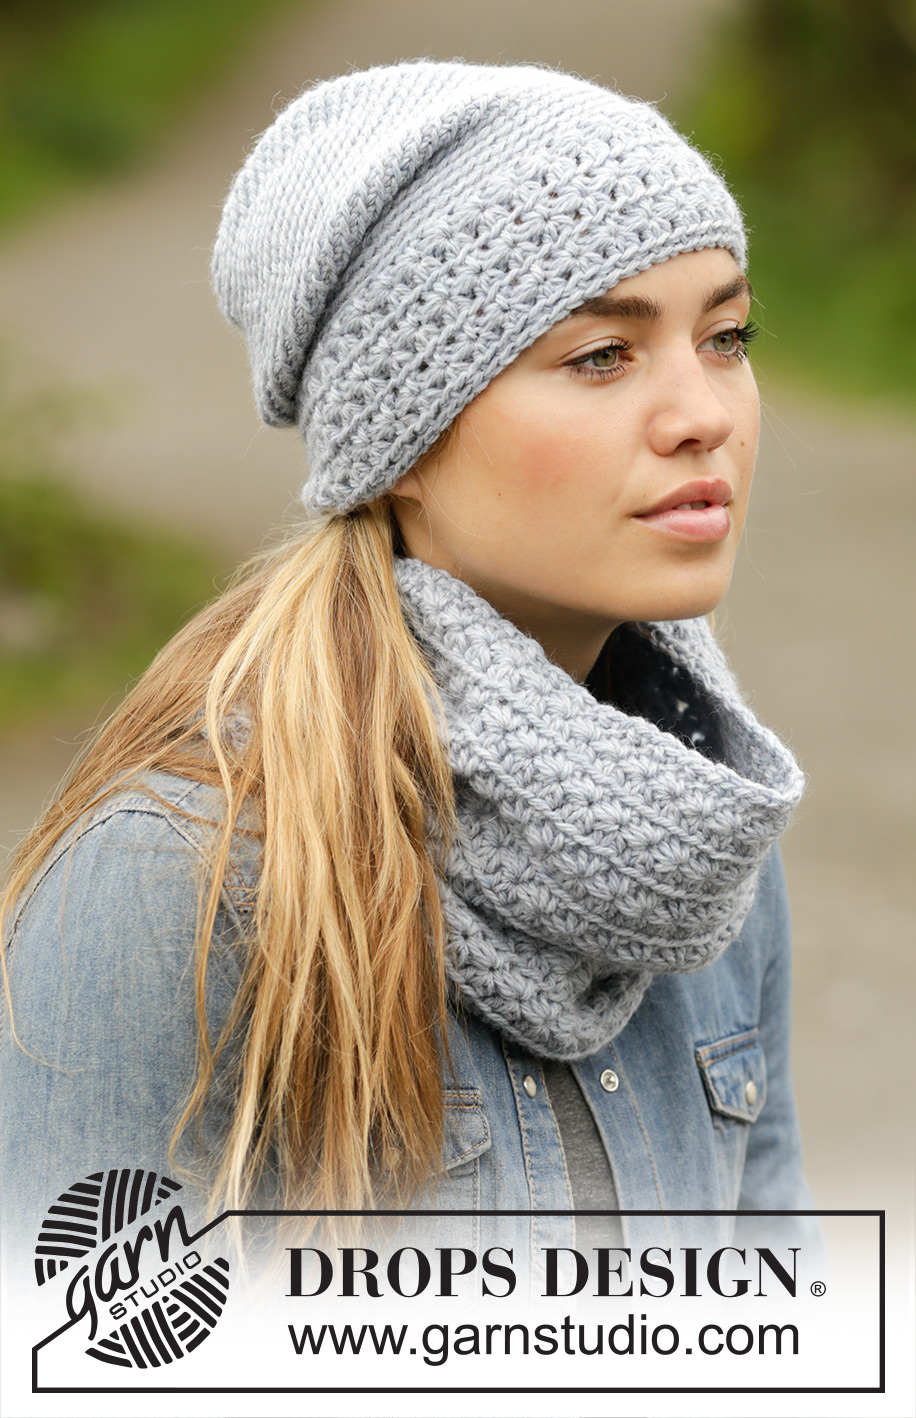
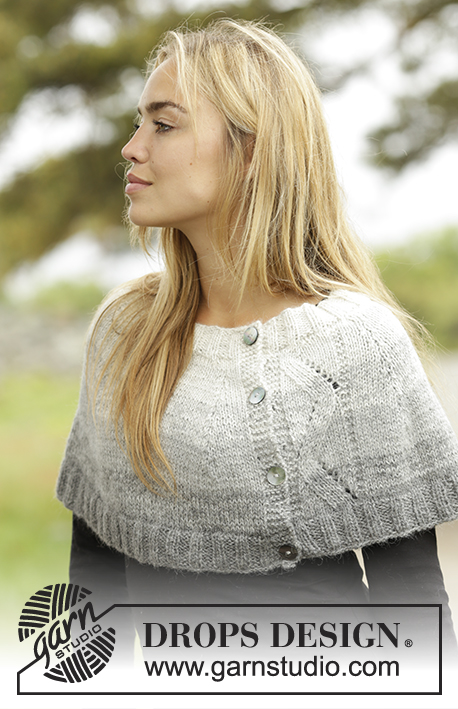
Queen of the Chill#queenofthechillset |
|
|
|
|
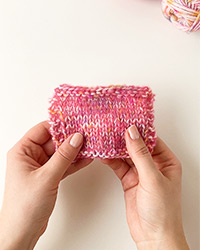
Cappello e scaldacollo DROPS lavorati all’uncinetto con motivo a stella in ”Nepal”.
DROPS 171-45 |
|
|
CAPPELLO: INFORMAZIONI PER IL LAVORO: Sostituire la 1° m.b all’inizio di ogni giro a m.b con 1 cat. Finire ogni giro con 1 m.bss nella 1° cat suo giro. SUGGERIMENTO PER GLI AUMENTI: Aumentare 1 m lavorando 2 m.b nella stessa m. MOTIVO A STELLA (in tondo): GIRO 1: 3 cat, riprendere 5 m, iniziare nella 2° m dall’uncinetto, quando si riprende la m nella m.b riprenderla nel filo dietro (= 6 occhielli sull’uncinetto), fare un gettato e far passare il filo attraverso tutti e 6 gli occhielli, lavorare 1 cat per fare un buco sulle 6 m, * riprendere 1 m nel buco, riprendere 1 m a lato delle ultime 6 m, riprendere 1 m nella stessa cat in cui è stata ripresa l’ultima delle 6 m, 1 m nel filo dietro di ognuna delle 2 cat successive (= 6 occhielli sull’uncinetto), fare 1 gettato e farlo passare attraverso tutti e 6 gli occhielli, 1 cat *, ripetere *-*, finire con 1 m.bss nella 3° cat dall’inizio del giro. GIRO 2: 2 cat, lavorare 2 m.m.a in ogni “buco della stella”, finire il giro con 1 m.bss nella 2° cat dall’inizio del giro = 34-36 stelle. GIRO 3: 3 cat, riprendere 1 m nella 2° e nella 3° cat dall’uncinetto, 1 m nel filo dietro delle prime 3 m.m.a sulla riga (= 6 occhielli sull’uncinetto), fare 1 gettato e farlo passare attraverso tutti e 6 gli occhielli, 1 cat, * riprendere 1 m nel buco, 1 m a lato delle ultime 6 m, 1 m nel filo dietro della stessa m.m.a in cui è stata ripresa l’ultima delle 6 m, 1 m nel filo dietro di ognuna delle 2 m.m.a successive (= 6 occhielli sull’uncinetto), fare 1 gettato e farlo passare attraverso tutti e 6 gli occhielli, 1 cat *, ripetere *-*, finire con 1 m.bss nella 3° cat dall’inizio del giro. Ripetere il 2° e il 3° giro 2 volte in totale, lavorare il 2° giro un’altra volta (= 6 giri in totale in verticale = 3 stelle in verticale). ---------------------------------------------------------- CAPPELLO: Lavorato dall’alto in basso (top down) in tondo. Avviare 4 cat con l’uncinetto n° 5 mm con Nepal e formare un anello con 1 m.bss nella 1° cat. GIRO 1: Lavorare 6 m.b nell’anello di cat – LEGGERE LE INFORMAZIONI PER IL LAVORO! Ora lavorare tutte le m.b nel filo dietro delle m.b del giro precedente. GIRO 2: lavorare 2 m.b in ogni m.b = 12 m.b. GIRO 3: * 1 m.b nella 1° m.b, 2 m.b nella m.b successiva *, ripetere *-* per tutto il giro = 18 m.b. GIRO 4: * 1 m.b in ognuna delle prime 2 m.b, 2 m.b nella m.b successiva *, ripetere *-* per tutto il giro = 24 m.b. FARE ATTENZIONE ALLA TENSIONE DEL LAVORO! GIRO 5: * 1 m.b in ognuna delle prime 3 m.b, 2 m.b nella m.b successiva *, ripetere *-* per tutto il giro = 30 m.b. GIRO 6: * 1 m.b in ognuna delle prime 4 m.b, 2 m.b nella m.b successiva *, ripetere *-* per tutto il giro = 36 m.b. GIRO 7: * 1 m.b in ognuna delle prime 5 m.b, 2 m.b nella m.b successiva *, ripetere *-* per tutto il giro = 42 m.b. GIRO 8: * 1 m.b in ognuna delle prime 6 m.b, 2 m.b nella m.b successiva *, ripetere *-* per tutto il giro = 48 m.b. GIRO 9: * 1 m.b in ognuna delle prime 7 m.b, 2 m.b nella m.b successiva *, ripetere *-* per tutto il giro = 54 m.b. GIRO 10: * 1 m.b in ognuna delle prime 8 m.b, 2 m.b nella m.b successiva *, ripetere *-* per tutto il giro = 60 m.b. GIRO 11: * 1 m.b in ognuna delle prime 9 m.b, 2 m.b nella m.b successiva *, ripetere *-* per tutto il giro = 66 m.b. TAGLIA S/M: GIRO 12: lavorare 1 giro con 1 m.b in ogni m.b e aumentare 3 m.b in modo uniforme – LEGGERE IL SUGGERIMENTO PER GLI AUMENTI = 69 m.b. TAGLIA L/XL: GIRO 12: * 1 m.b in ognuna delle prime 10 m.b, 2 m.b nella m.b successiva *, ripetere *-* per tutto il giro = 72 m.b. GIRO 13: lavorare 1 giro con 1 m.b in ogni m.b e aumentare 1 m.b – LEGGERE IL SUGGERIMENTO PER GLI AUMENTI = 73 m.b. ENTRAMBE LE TAGLIE: Il lavoro misura circa 7-8 cm. Continuare a lavorare 1 m.b nel filo dietro di ogni m.b fino a quando il lavoro misura 18-19 cm. Poi lavorare il MOTIVO A STELLA – leggere la spiegazione sopra. Assicurarsi di non lavorare il motivo a stella in modo troppo stretto! Quando è stato lavorato il motivo a stella, lavorare 1 bordo in tondo come segue: lavorare 1 m.b nel filo dietro della 1° m.m.a, * 1 cat, saltare 1 m.m.a, 1 m.b nella m.m.a successiva *, ripetere *-* per tutto il giro. Chiudere e affrancare. ---------------------------------------------------------- SCALDACOLLO: MOTIVO A STELLA: GIRO 1: 3 cat, riprendere 5 m, iniziare nella 2° m dall’uncinetto, quando si riprende la m nella m.b riprenderla nel filo dietro (= 6 occhielli sull’uncinetto), fare un gettato e far passare il filo attraverso tutti e 6 gli occhielli, lavorare 1 cat per fare un buco sulle 6 m, * riprendere 1 m nel buco, riprendere 1 m a lato delle ultime 6 m, riprendere 1 m nella stessa cat in cui è stata ripresa l’ultima delle 6 m, 1 m nel filo dietro di ognuna delle 2 cat successive (= 6 occhielli sull’uncinetto), fare 1 gettato e farlo passare attraverso tutti e 6 gli occhielli, 1 cat *, ripetere *-*, finire con 1 m.bss nella 3° cat dall’inizio del giro. GIRO 2: 2 cat, lavorare 2 m.m.a in ogni “buco della stella”, finire il giro con 1 m.bss nella 2° cat dall’inizio del giro = 36-39 stelle. GIRO 3: 3 cat, riprendere 1 m nella 2° e nella 3° cat dall’uncinetto, 1 m nel filo dietro delle prime 3 m.m.a sulla riga (= 6 occhielli sull’uncinetto), fare 1 gettato e farlo passare attraverso tutti e 6 gli occhielli, 1 cat, * riprendere 1 m nel buco, 1 m a lato delle ultime 6 m, 1 m nel filo dietro della stessa m.m.a in cui è stata ripresa l’ultima delle 6 m, 1 m nel filo dietro di ognuna delle 2 m.m.a successive (= 6 occhielli sull’uncinetto), fare 1 gettato e farlo passare attraverso tutti e 6 gli occhielli, 1 cat *, ripetere *-*, finire con 1 m.bss nella 3° cat dall’inizio del giro. Ripetere il 2° e il 3° giro. ---------------------------------------------------------- SCALDACOLLO: Avviare 73-79 cat LASSE con l’uncinetto n° 6 mm con il Nepal e formare un anello con 1 m.bss nella 1° cat. Lavorare il MOTIVO A STELLA – leggere la spiegazione sopra. FARE ATTENZIONE ALLA TENSIONE DEL LAVORO! Lo scaldacollo deve misurare circa 61-66 cm in circonferenza, assicurarsi di non lavorare lo scaldacollo in modo troppo stretto. Quando il lavoro misura 24-26 cm, aggiustarlo in modo che l’ultimo giro sia il 2° giro, lavorare 1 bordo attorno allo scaldacollo come segue: lavorare 1 cat (1° m.b), * 1 cat, saltare 1 m.m.a, 1 m.b nella m.m.a successiva *, ripetere *-* per tutto il giro, finire con 1 m.bss nella 1° cat. Chiudere e affrancare. Lavorare lo stesso bordo sul lato opposto del lavoro, cioè nella riga di cat dal diritto del lavoro. Chiudere e affrancare. |
|
Avete terminato questo modello?Allora taggate le vostre foto con #dropspattern #queenofthechillset o inviatele alla #dropsfan gallery. Avete bisogno di aiuto con questo modello?Troverete 8 video tutorial, una sezione per i commenti/domande e molto altro guardando il modello su www.garnstudio.com © 1982-2025 DROPS Design A/S. Ci riserviamo tutti i diritti. Questo documento, compreso tutte le sue sotto-sezioni, è protetto dalle leggi sul copyright. Potete leggere quello che potete fare con i nostri modelli alla fine di ogni modello sul nostro sito. |
Con oltre 40 anni di esperienza nel design di modelli di maglia e uncinetto, DROPS Design offre la più estesa collezione di modelli gratuiti su internet - tradotti in 17 lingue. Ad oggi vi possiamo fornire 314 cataloghi e 11822 modelli - 9094 dei quali sono tradotti in Italiano.
Ci stiamo impegnando molto per darvi il meglio che vi possiamo offrire in termini di maglia e uncinetto, ispirazioni e consigli così come filati di grande qualità ad un prezzo incredibile! Volete utilizzare i nostri modelli per qualcosa d'altro oltre al vostro uso personale? Potete leggere tutto ciò che è consentito nel testo sul Copyright in basso su tutte le pagine dei nostri modelli. Buon lavoro!
Lasciare un commento sul modello DROPS 171-45
Noi saremmo felici di ricevere i tuoi commenti e opinioni su questo modello!
Se vuoi fare una domanda, fai per favore attenzione a selezionare la categoria corretta nella casella qui sotto per velocizzare il processo di risposta. I campi richiesti sono indicati da *.