
Popular categories
Looking for a yarn?


|
|||||||||||||||||||||||||
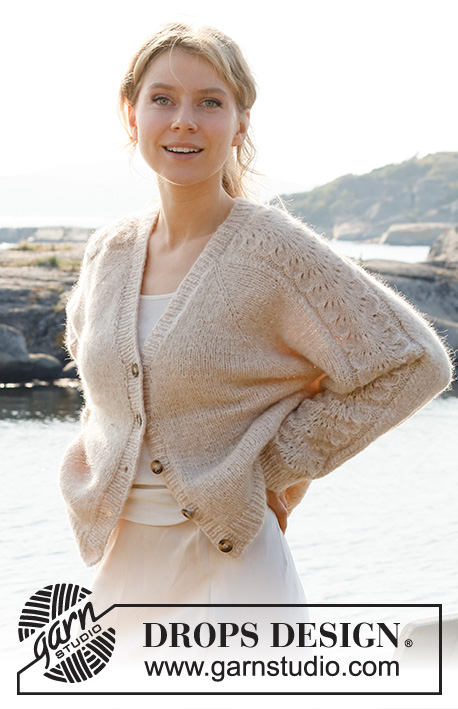
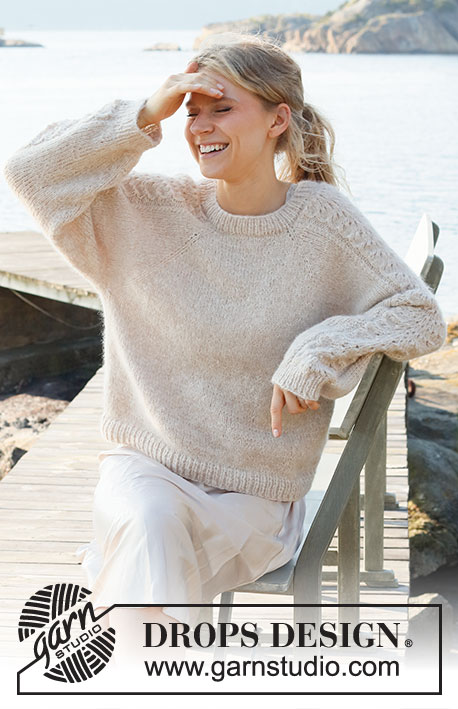
Bronze Summer Sweater |
|||||||||||||||||||||||||
 |
 |
||||||||||||||||||||||||
Knitted jumper in DROPS Air. Piece is knitted top down with raglan and lace pattern on sleeves. Size: S - XXXL
DROPS 221-3 |
|||||||||||||||||||||||||
|
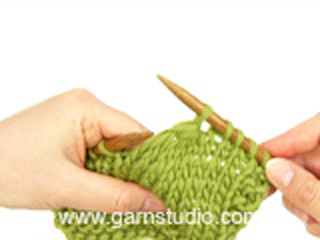
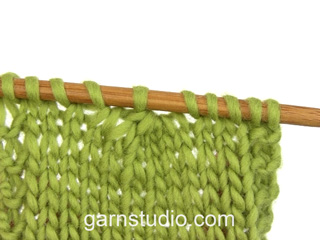
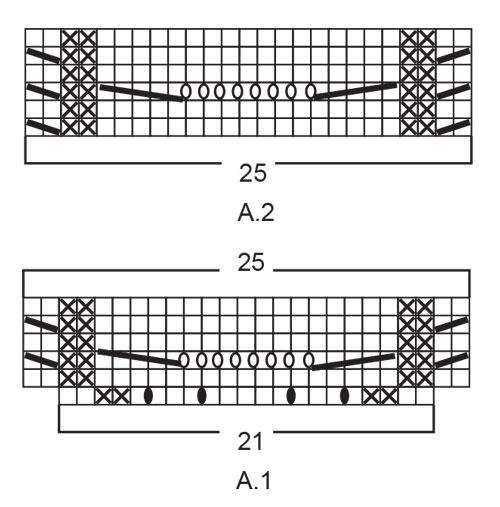
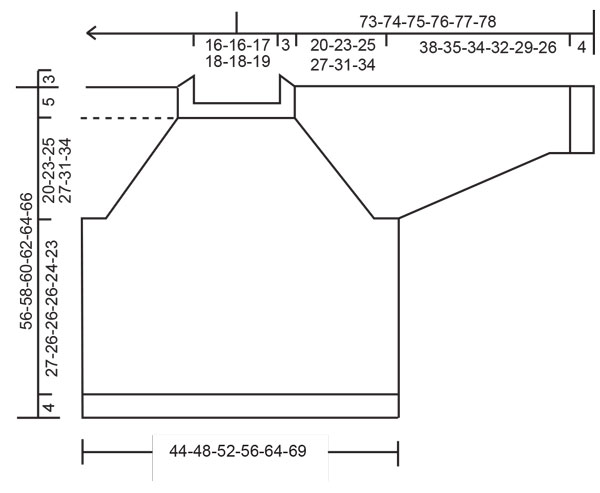
------------------------------------------------------- EXPLANATION FOR THE PATTERN: ------------------------------------------------------- PATTERN: See diagrams A.1 and A.2. RAGLAN: Increase 1 stitch on each side of 1 stitch in stocking stitch (stitch with marker) in every transition between body and sleeves (= 8 stitches increased on round). Increase 1 stitch by making 1 yarn over. On next round work yarn overs twisted to avoid holes. Then work the new stitches in stocking stitch. DECREASE TIP (applies to sleeves): Decrease 1 stitch on each side of marker thread as follows: Work until 3 stitches remain before marker thread and knit 2 together, knit 2 (marker thread is between these stitches), slip 1 stitch knitwise, knit 1, pass slipped stitch over stitch worked. CAST-OFF TIP: To avoid a tight cast-off edge you may use a larger needle size. If this also is too tight, work a 1 yarn over after approx. every 4th stitch while casting off (cast off yarn overs as regular stitches). ------------------------------------------------------- START THE PIECE HERE: ------------------------------------------------------- JUMPER - SHORT OVERVIEW OF THE PIECE: Work yoke in the round on circular needle from mid back, top down. AT THE SAME TIME increase for raglan. Now divide yoke for body and sleeves. Body is worked in the round on circular needle, top down. Work sleeves in the round on double pointed needles/short circular needle, top down. YOKE: Cast on 90-94-98-102-106-110 stitches on circular needle size 4 mm with Air. Knit 1 round. Work rib (= knit 1/purl 1) over all stitches for 3 cm. Switch to circular size 5 mm and insert 1 marker here, now measure piece from here. Insert 4 marker threads in piece as follows (without working the stitches): Count 11-12-13-14-15-16 stitches (= half back piece), insert 1 marker thread in next stitch, count 21 stitches (= sleeve), insert 1 marker thread in next stitch, count 22-24-26-28-30-32 stitches (= front piece), insert 1 marker thread in next stitch, count 21 stitches (= sleeve), insert 1 marker thread in next stitch, 11-12-13-14-15-16 stitches remain on row after last marker thread (= half back piece). Work in stocking stitch over stitches on front piece and on back piece, and A.1 (= 21 stitches) over stitches on each sleeve, AT THE SAME TIME on first round start increase for RAGLAN in every transition between body and sleeves – read explanation above. Continue increases for raglan every other round. When A.1 has been worked 1 time vertically there are 122-126-130-134-138-142 stitches on round. Continue with A.2 (= 25 stitches) over stitches in A.1 with stocking stitch over front piece and back piece, and continue with increase for raglan every other round until increase has been done 22-25-27-29-33-36 times in total on each side of the 4 stitches with marker threads = 274-302-322-342-378-406. REMEMBER THE KNITTING TENSION! After last increase in raglan work without increases until piece measures 20-23-25-27-31-34 cm from marker. Work next round as follows: Work the first 34-38-41-44-49-53 stitches (= half back piece), slip the next 69-75-79-83-91-97 stitches on a stitch holder for sleeve, cast on 6-6-6-8-10-12 new stitches on needle (= in the side under sleeve), work the next 68-76-82-88-98-106 stitches (= front piece), slip the next 69-75-79-83-91-97 stitches on a stitch holder (= sleeve), cast on 6-6-6-8-10-12 new stitches on needle (= in the side under sleeve), work the remaining 34-38-41-44-49-53 stitches (= half back piece). NOW MEASURE PIECE FROM HERE! BODY: = 148-164-176-192-216-236 stitches. Continue in stocking stitch until piece measures 27-26-26-26-24-23 cm from division. Switch to circular needle size 4 mm. Work rib (= purl 1/knit 1) over all stitches. Continue rib like this for 4 cm. Loosely cast off with knit over knit and purl over purl, read CAST-OFF TIP. Jumper measures approx. 56-58-60-62-64-66 cm from shoulder. SLEEVE: Slip the 69-75-79-83-91-97 stitches from stitch holder in one side of piece on a short circular needle/double pointed needles size 5 mm and pick in addition up 1 stitch in each of the 6-6-6-8-10-12 stitches cast on in the side under sleeve = 75-81-85-91-101-109 stitches. Insert 1 marker thread in the middle of the 6-6-6-8-10-12 stitches under sleeve and move the marker thread upwards when working, it is used for decrease later. Begin round at the marker thread and continue with A.2 and stocking stitch in the round. When piece measures 3 cm from division, decrease 2 stitches mid under sleeve - read DECREASE TIP. Decrease like this every 3½-3-2-1½-1-1 cm 10-11-13-16-19-21 times in total = 55-59-59-59-63-67 stitches. Continue until piece measures 38-35-34-32-29-26 cm from division - or desired length (shorter measurements in the larger sizes because of longer yoke). Work 1 round while decreasing 11 stitches evenly over stitches in A.2 = 44-48-48-48-52-56 stitches. Switch to double pointed needles size 4 mm and work rib in the round = knit 1/purl 1 for 4 cm. Cast off with knit over knit and purl over purl (to avoid a tight cast-off edge use double pointed needles size 4 mm). Work the other sleeve the same way. |
|||||||||||||||||||||||||
Diagram explanations |
|||||||||||||||||||||||||
|
|||||||||||||||||||||||||
|
|||||||||||||||||||||||||
|
|||||||||||||||||||||||||
|
Have you made this or any other of our designs? Tag your pictures in social media with #dropsdesign so we can see them! Do you need help with this pattern?You'll find tutorial videos, a Comments/Questions area and more by visiting the pattern on garnstudio.com. © 1982-2024 DROPS Design A/S. We reserve all rights. This document, including all its sub-sections, has copyrights. Read more about what you can do with our patterns at the bottom of each pattern on our site. |
|||||||||||||||||||||||||


With over 40 years in knitting and crochet design, DROPS Design offers one of the most extensive collections of free patterns on the internet - translated to 17 languages. As of today we count 304 catalogues and 11422 patterns - 11422 of which are translated into English (UK/cm).
We work hard to bring you the best knitting and crochet have to offer, inspiration and advice as well as great quality yarns at incredible prices! Would you like to use our patterns for other than personal use? You can read what you are allowed to do in the Copyright text at the bottom of all our patterns. Happy crafting!
Comments / Questions (127)
I would like to knit Bronze Summer Sweater in size large. According to the pattern, using Drops Air I would need 400 grams. If I wanted to use Drops brushed alpaca silk and looking at the Alternative yarn chart, it states I would use 215 grams? Does that mean I would use less yarn (like instead of 8 ball of Drops Air I would use 4 balls of Drops brushed alpaca silk, or would I need twice the amount of Drops Air, or 16 balls of Drops brushed alpaca silk?
11.09.2022 - 21:03DROPS Design answered:
Dear Roxane, you need 400 g DROPS Air in size L (= 1 ball = 50 g / 150 m) this would means 215 g DROPS Brushed Alpaca Silk (= 1 ball =25 g / 140 m) - you would need 9 balls Brushed Alpaca Silk (25 g each) or 8 balls Air (50 g each) in size L. Happy knitting!
12.09.2022 - 11:34Mønster A1 er veldig dårlig designet og forklart. Ikke noe stemmer hverken med antall masker eller bilde av mønsteret. Så her føler jeg at man må dikte litt selv. Jeg har strikka i 50 år, og jeg syntes dette er forvirrende. Tenker da på de som er nybegynnere, de må jo miste motet med en gang.
09.09.2022 - 09:29Minulla on pääntiellä 102 silmukkaa kudottuna ohjeen mukaan. Ohjeessa käsketään kutomaan 14 silmukkaa, laittamaan silmukkamerkki, sitten kudotaan taas 21 ja laitetaan silmukkamerkki, sen jälkeen 28 silmukkaa ja merkki, 21 silmukkaa ja lopuksi 14 silmukkaa. Jos lasken yhteen ohjeessa luetellut silmukat niin yhteismääräksi tulee 98 - mitä tehdään neljälle ylimääräille silmukalle - mihin ne kuuluvat ja mitä niille tehdään?
08.09.2022 - 12:11DROPS Design answered:
Hei, merkit kiinnitetään silmukoihin, ei niiden väliin. Eli nämä 4 ylimääräistä silmukkaa ovat ne silmukat, joihin merkit kiinnitetään.
08.09.2022 - 17:27I am knitting medium and when working A1, row 3, after knitting 5 stitches twisted. I end up with 4 stitches before the purl 2 stitches then the cable, I have done this three times and still have the same problem. Please advise what I happening thank you so much,
30.08.2022 - 03:39DROPS Design answered:
Hi Marnie, On row 3 in A,1 you increase 8 stitches by making 8 yarn overs and decrease 4 stitches on each side of these when you knit/knit twisted together (8 stitches reduced in total). So the number of stitches within A.1 should remain the same. Hope this helps and happy knitting!
30.08.2022 - 06:58Hej jeg er i gang med mønsterdiagram A1. Er det sådan at man kun skal strikke diagrammet på hveranden pind, ligesom udtagning til raglan, eller skal udtagning til raglan være på hver anden og diagrammet fortsætte uafbrudt. Dvs kommer diagram A1, når det er færdigt til at løbe over 6 pinde, eller det dobbelte? Mvh Gitte
31.07.2022 - 22:51DROPS Design answered:
Hej Gitte, du strikker diagrammet uafhængig af raglanudtagningerne. Dvs, du starter med A.1 og tager ud på 1.pind ifølge diagrammet, du strikker hver pind i diagrammet over de midterste 25 masker på hver ærme. Du tager ud til raglan på hver 2.pind og de nye masker strikkes i glatstrik. Du ser raglanovergangen på blusen, den har ikke noget med mønsteret at gøre :) God fornøjelse!
05.08.2022 - 08:46Jeg har ikke tidligere strikket mønster på denne måde og er derfor i tvivl om jeg skal læse A1 og A2 fra højre mod venstre ELLER venstre mod højre ☺️
09.07.2022 - 00:42DROPS Design answered:
Hej Nanna. När du stickar runt (som i denna opskrift) läser du alltid diagrammen fra højre mod venstre. Mvh DROPS Design
11.07.2022 - 14:27Jeg forstår ikke 3.række i A.1. efter de 8 omslag. Der står strik 5 masker drejet ret sammen men at jeg skal strikke 5 ret. Hvor bliver de drejet? Jeg får et stort hul når jeg har taget de 4 masker over. Det er det sidste omslag af de 8 der skaber hullet. Der må være noget jeg gør forkert?
24.05.2022 - 23:54DROPS Design answered:
Hej. I denna video visar vi hur man stickar 5 masker drejet sammen. Mvh DROPS Design
25.05.2022 - 07:07Jeg forstår ikke helt hvornår snoningspinden skal bruges… i diagrammet er det en figur som beskriver en snoning, men der findes ikke en sådan i A1 eller A2…
25.04.2022 - 21:19DROPS Design answered:
Hej Charlotte, jo snoningspinden skal bruges til den skrå streg som går over 2 masker, både den ene vej og den anden vej :)
26.04.2022 - 14:56DROPS Design: Modell ai-314 - Bronze summer sweater Er det korrekt, at når jeg efter de 3 cm rib i halsen har strikket mønster efter diagram A1 én gang, så er det KUN mønster efter A2 der skal strikkes/gentages langs hele ærmet? - Tænker at det ellers vil give udfordringer med de 4 omslag på første pind i A1. Det vil jo øge antal masker igen, hvis jeg både skal gentage A1 og A2. Glæder mig til svar, så jeg kan komme videre med denne smukke sweater. Mvh Marlene Søby Høj
11.03.2022 - 11:20DROPS Design answered:
Hei Marlene. Diagram A.1 strikkes bare 1 gang i høyden, mens diagram A.2 gjentas i høyden (til arbeidet måler 38-35-34-32-29-26 cm fra delingen). mvh DROPS Design
14.03.2022 - 13:33Har strikket første runde i A1. Runde to stemmer ikke i starten. Skal jo være to rett og to vrang,to vrang over de to rette fra første runde. Hva gjør jeg feil?
12.02.2022 - 11:18DROPS Design answered:
Hei Trine. Du økte med 4 masker på 1. omgang i A.1 og når du skal strikke 2. omgang og A.1 starter du med 2 rette (over 2 rette) og 2 vrange (over 2 vrange), slik at mønstret stemmer på plagget, men det ser ikke slik ut på diagrammet. De økte maskene er ikke tegnet inn som en blank firkant, men kun ovale sorte prikker. mvh DROPS Design
14.02.2022 - 13:21