
Popular categories
Looking for a yarn?


|
||||||||||||||||||||||||||||||||||
Color Clash |
||||||||||||||||||||||||||||||||||
 |
 |
|||||||||||||||||||||||||||||||||
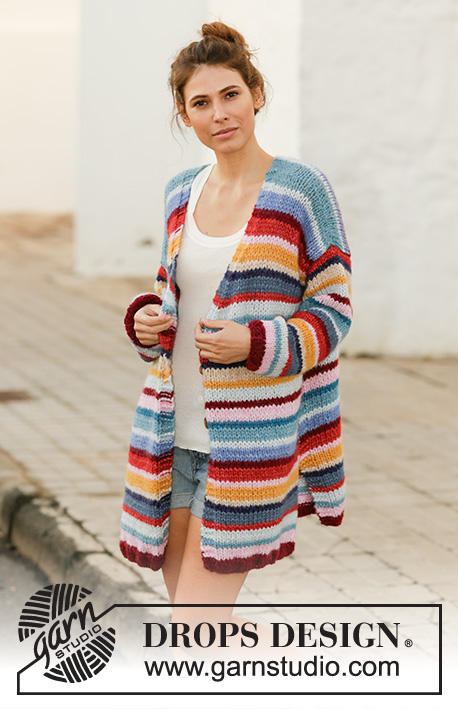
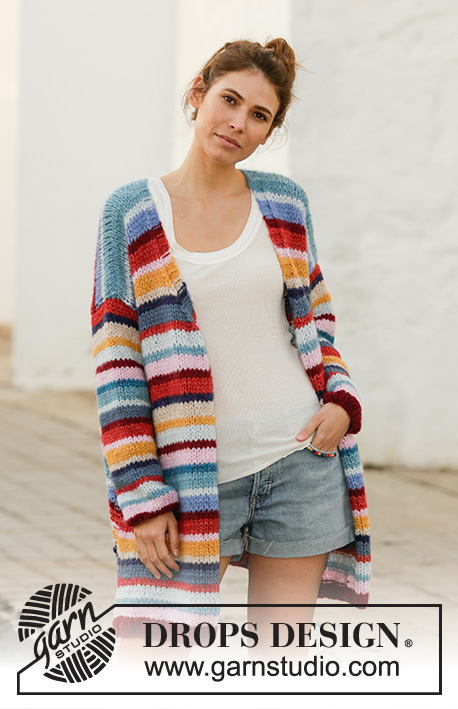
Knitted jacket with stripes in 2 strands DROPS Air. Piece is knitted bottom up with V-neck and vents in the sides. Size: S - XXXL
DROPS 202-2 |
||||||||||||||||||||||||||||||||||
|
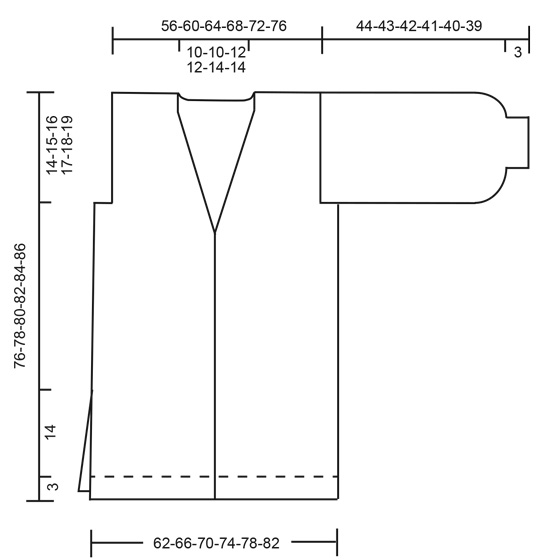
---------------------------------------------------------- EXPLANATION FOR THE PATTERN: ---------------------------------------------------------- GARTER STITCH (back and forth): Knit all rows. 1 ridge vertically = knit 2 rows. STRIPES: Work ribs in ruby red and the rest of piece in stripes and stocking stitch (with edge stitches and band stitches in garter stitch). Stripes are drawn in diagram A.1. Leave a thread of approx. 15-20 cm at colour changes, use the strand to sew side seams and seam on undersides of sleeves. DECREASE TIP-1: To calculate how to decrease evenly, use the total number of stitches on row (e.g. 71 stitches) and divide stitches by number of decreases to be done (e.g. 7) = 10.1. In this example work approx. every 9th and 10th stitch together. DECREASE TIP-2: Decrease for neck inside 4 stitches in garter stitch. All decreases are done from the right side! Decrease as follows before 4 stitches in garter stitch: Knit 2 together. Decrease as follows after 4 stitches in garter stitch: Slip 1 stitch knitwise, knit 1, pass slipped stitch over stitch worked. INCREASE TIP (evenly): To calculate how to increase evenly, use the total number of stitches on row (e.g. 26 stitches), minus edge stitches (e.g. 2 stitches) and divide the remaining stitches by number of increases to be done (e.g. 4) = 6. In this example increase by making 1 yarn over after every 6th stitch. On next row work yarn overs twisted to avoid holes. BUTTONHOLES: Decrease for buttonholes on right band. 1 BUTTONHOLE = knit third and fourth stitch from edge together and make 1 yarn over. On next row knit yarn over = hole. Decrease for buttonholes when piece measures: S: 35-44-53 cm M: 36-45-54 cm L: 37-46-55 cm XL: 38-47-56 cm XXL: 39-48-57 cm XXXL: 40-49-58 cm ---------------------------------------------------------- START THE PIECE HERE: ---------------------------------------------------------- JACKET - SHORT OVERVIEW OF THE PIECE: Work piece back and forth in 2 strands on circular needle. BACK PIECE: Cast on 71-71-77-83-89-95 stitches on circular needle size 8 mm with 2 strands ruby red. Purl 1 row from wrong side. Then work rib from right side as follows: 4 stitches in GARTER STITCH - see explanation above - * knit 3, purl 3 *, repeat from *-* until 7 stitches remain on needle, knit 3 and 4 stitches in garter stitch. Continue like this until rib measures 3 cm, adjust to finish with next row from right side. Switch to circular needle size 9 mm. Now work STRIPES – read explanation above – AT THE SAME TIME on first row decrease stitches as follows: Work 4 stitches in garter stitch, work in stocking stitch and decrease 9-5-7-9-11-13 stitches evenly over the next 63-63-69-75-81-87 stitches – read DECREASE TIP-1 and work 4 stitches in garter stitch. There are 62-66-70-74-78-82 stitches on needle. REMEMBER THE KNITTING TENSION! Continue with stripes, stocking stitch (with 4 stitches in garter stitch in each side) until piece measures 62-63-64-65-66-67 cm from cast-on edge. At the beginning of the next 2 rows cast off 3 stitches in each side for armholes = 56-60-64-68-72-76 stitches. Continue in stocking stitch with 1 edge stitch in garter stitch in each side. When piece measures 73-75-77-79-81-83 cm, work 2 ridges over the middle 16-16-18-18-20-20 stitches (work rest of stitches as before) then cast off the middle 8-8-10-10-12-12 stitches for neckline and finish each shoulder separately. Then cast off 1 stitch inside 4 stitches in garter stitch on next row from neck =23-25-26-28-29-31 stitches remain for shoulder. Cast off when piece measures approx. 76-78-80-82-84-86 cm from cast-on edge. LEFT FRONT PIECE: Cast on 41-41-47-47-53-53 stitches on circular needle size 8 mm with 2 strands ruby red. Purl 1 row from wrong side. Then work rib from right side as follows: 4 stitches in garter stitch (= towards the side), * knit 3, purl 3 *, repeat from *-* until 7 stitches remain on needle, knit 3 and finish with 4 band stitches in garter stitch (= mid front). Continue like this until rib measures 3 cm, adjust to finish with next row from right side. Switch to circular needle size 9 mm. Now work STRIPES – read explanation above – AT THE SAME TIME on first row decrease stitches as follows: Work 4 stitches in garter stitch, work in stocking stitch and decrease 6-4-8-6-10-8 stitches evenly over the next 33-33-39-39-45-45 stitches – read DECREASE TIP-1 and work 4 stitches in garter stitch. There are now 35-37-39-41-43-45 stitches on needle. Continue with stripes, stocking stitch (with 4 stitches in garter stitch in each side) until piece measures 54-55-56-57-58-59 cm. Now begin decrease for V-neck inside the 4 band stitches in garter stitch - read DECREASE TIP-2. Decrease every other row from right side 9-9-10-10-11-11 times in total – AT THE SAME TIME when piece measures 62-63-64-65-66-67 cm cast off 3 stitches at the beginning of row from right side. Then work in stocking stitch with 4 band stitches in garter stitch and 1 edge stitch in garter stitch towards the side until finished measurements. When all decreases are done, 23-25-26-28-29-31 stitches remain for shoulder. When piece measures approx. 76-78-80-82-84-86 cm, make sure to cast off on same colour stripes as on back piece. Cast off. RIGHT FRONT PIECE: Cast on 41-41-47-47-53-53 stitches on circular needle size 8 mm with 2 strands ruby red. Purl 1 row from wrong side. Then work rib from right side as follows: work 4 band stitches in garter stitch (= mid front), * knit 3, purl 3 *, repeat from *-* until 7 stitches remain on needle, knit 3 and finish with 4 stitches in garter stitch (= towards the side). Continue like this until rib measures 3 cm. To get the colour change in the side of piece and not mid front, now work 1 row more in rib on this front piece than on back piece and left front piece, so that the colour change happens in the side automatically. Switch to circular needle size 9 mm. Now work STRIPES – read explanation above – AT THE SAME TIME on first row decrease stitches as follows: Work 4 stitches in garter stitch, work in stocking stitch and decrease 6-4-8-6-10-8 stitches evenly over the next 33-33-39-39-45-45 stitches – read DECREASE TIP-1 and work 4 stitches in garter stitch. There are now 35-37-39-41-43-45 stitches on needle. Continue with stripes, stocking stitch (with 4 stitches in garter stitch in each side) - REMEMBER BUTTONHOLES when piece measures 35-36-37-38-39-40 cm. When piece meausures 54-55-56-57-58-59 cm, begin decrease for V-neck inside the 4 band stitches in garter stitch, decrease 1 stitch inside the 4 stitches in garter stitch – read DECREASE TIP-2. Decrease every other row from right side 9-9-10-10-11-11 times in total – AT THE SAME TIME when piece measures 62-63-64-65-66-67 cm cast off 3 stitches at the beginning of row from wrong side. Then work in stocking stitch with 4 band stitches in garter stitch and 1 edge stitch in garter stitch towards the side until finished measurements. When all decreases are done, 23-25-26-28-29-31 stitches remain for shoulder. When piece measures approx. 76-78-80-82-84-86 cm, make sure to cast off on same colour stripes as on back piece and left front piece. Cast off. SLEEVE: Work sleeve back and forth on circular needle. Cast on 26-26-26-32-32-32 stitches on circular needle size 8 mm with 2 strands ruby red. Purl 1 row from wrong side. Then work rib from right side as follows: 1 edge stitch in garter stitch, * knit 3, purl 3 *, work from *-* and finish with 1 edge stitch in garter stitch. Work until rib measures 3 cm. Switch to circular needle size 9 mm. Now work STRIPES – read explanation above – AT THE SAME TIME on first row increase stitches as follows - read INCREASE TIP: Work 1 edge stitch in garter stitch, work in stocking stitch and increase 4-6-8-4-6-8 stitches evenly over the next 24-24-24-30-30-30 stitches and work 1 edge stitch in garter stitch. There are now 30-32-34-36-38-40 stitches on needle. Continue with stripes until piece measures 44-43-42-41-40-39 cm (shorter measurements in the larger sizes because of wider shoulders). Cast off. Knit another sleeve the same way. ASSEMBLY: Do assembly with 1 strand to avoid chunkcy seams. Use a colour that matches the stripes. Sew shoulder seams with grafting/kitchener stitches inside cast-off-edge, make sure that the seam is even and flat. Sew sleeves in body. Sew seams along under side of sleeves inside 1 edge stitch in garter stitch. Sew side seam in outermost loop of edge stitches down along side of body, begin at armhole and sew until approx. 17 cm remain at the bottom of jacket (= vent). Repeat in the other side. Sew the buttons on to left band. Fasten off. |
||||||||||||||||||||||||||||||||||
Diagram explanations |
||||||||||||||||||||||||||||||||||
|
||||||||||||||||||||||||||||||||||

|
||||||||||||||||||||||||||||||||||
|
||||||||||||||||||||||||||||||||||
|
Have you made this or any other of our designs? Tag your pictures in social media with #dropsdesign so we can see them! Do you need help with this pattern?You'll find tutorial videos, a Comments/Questions area and more by visiting the pattern on garnstudio.com. © 1982-2024 DROPS Design A/S. We reserve all rights. This document, including all its sub-sections, has copyrights. Read more about what you can do with our patterns at the bottom of each pattern on our site. |
||||||||||||||||||||||||||||||||||


With over 40 years in knitting and crochet design, DROPS Design offers one of the most extensive collections of free patterns on the internet - translated to 17 languages. As of today we count 304 catalogues and 11422 patterns - 11422 of which are translated into English (UK/cm).
We work hard to bring you the best knitting and crochet have to offer, inspiration and advice as well as great quality yarns at incredible prices! Would you like to use our patterns for other than personal use? You can read what you are allowed to do in the Copyright text at the bottom of all our patterns. Happy crafting!
Comments / Questions (14)
Pour le modèle 202-2, vous ne précisez pas dans les explications qu il faut tricoter les fentes de côté au point mousse (4 mailles) jusqu'à 17 cm.
30.12.2022 - 16:12DROPS Design answered:
Bonjour Mme Paulissen, en fait, vous tricotez 4 mailles point mousse sur le côté (de chaque côté pour le dos) jusqu'à ce que vous rabattiez les mailles des emmanchures, autrement dit, pas seulement le long des fentes - sur la 1ère photo, on voit légèrement le côté et les mailles point mousse qui continuent après la fente. Bon tricot!
02.01.2023 - 13:21Angående ærmevidje.Der skal tages ud efter ribben og ikke mere opad.Det vil sige at der kun kan blive et halv ærme.Jeg mener at der skal tages ud,for at det kan blive et ærme,som passer til trøjen.
27.11.2021 - 18:10Udtagning til hals: Der står at der skal tages ud på hver 2. Pind fra retsiden. Er det så hver 4. Pind eller er det blot på hver retpind, altså på hver 2. Pind?.Jeg har forsøgt at kigge på billedet, men det er svært at se. På tegningen ser det ud som om det er hver 4. Pind. Hvis det er på hver 2. Pind, så bliver indtagningen færdig meget hurtigere og der er et langt stykke, der er lige op langs med halsen.
12.11.2020 - 00:19DROPS Design answered:
Hej Birgitte, du tager ud på hver 2.pind. God fornøjelse!
18.11.2020 - 13:36Hi, can you please tell me, how much this jacket weight in total? I would like to knit it, but in one color :)
03.09.2020 - 13:05DROPS Design answered:
Dear Weronika, we unfortunately cannot adapt every pattern to every single request and we do not have the jacket anymore - you can get help from another pattern in Air in your size - check measurement charts and/or calculate all colours together to compare with. Your DROPS store might be able to help you, even per mail or telephone. Happy knitting!
03.09.2020 - 13:58Buongiorno, nel modello 202/2 lateralmente, risulterà una striscia di 8 maglie legaccio? Così si evince dalle spiegazioni, ma non si vede dalla foto
22.02.2020 - 06:34DROPS Design answered:
Buongiorno Anna Maria. Sì, una volta cuciti il davanti e il dietro, avrà una striscia di 8 maglie legaccio. Buon lavoro!
23.02.2020 - 08:24Ik snap het eigenlijk helemaal niet,is er geen video waar je dit kledingstuk in maakt met uitleg en traag voorgedaan? Dit zou erg handig zijn
14.07.2019 - 23:23DROPS Design answered:
Dag Femke,
Er zijn niet per kledingstuk video's, maar wel voor heel veel technieken die in de verschillende kledingstukken gebruikt worden. Aan de linkerkant van het patroon vind je een link naar video's die van toepassing zijn op dit patroon.
15.07.2019 - 13:54Hei! Ang. overvidde. f.eks 124 cm. er det på kropp eller jakken ferdig strikket? Er man 124 cm så er det vanligvis for lite å strikke S. Tenker heller XL, men det er kanskje annerledes i denne oppskriften?
07.06.2019 - 14:39DROPS Design answered:
Hei Gro. Målene på målskissen referer til det ferdigstrikkede plagget. God fornøyelse
07.06.2019 - 14:56I opskriften er der ingen udtagninger på ærmet udover de masker der tages ud efter ribkanten - er det en fejl i opskriften?
24.04.2019 - 07:57DROPS Design answered:
Hei Helene. Denne genseren har posete ermer, så det stemmer at de er like vide hele veien. Dette kan du også se ermene og ermhullsåpningen på målskissen. God fornøyelse
26.04.2019 - 14:13Jag är ingen van stickare. Betyder "2 trådar" helt enkelt att jag stickar två garntrådar parallellt, som att de vore en garntråd?
04.03.2019 - 06:43DROPS Design answered:
Hej. Ja precis, det är så vi menar (så garnet blir då alltså dubbelt så tjockt jämfört med om du hade stickat med en tråd). Mvh DROPS Design
04.03.2019 - 11:19Kunne tenkt meg å strikke den i en farve, hvor mange nøster trenger jeg til str S
07.02.2019 - 09:09DROPS Design answered:
Hei May Britt. Vi har dessevrre ikke oversikt over garnmengden i ensfarget. Vi runder alltid opp til nærmeste hele nøste når vi oppgit garnmengde. Du kan se om du finner en lignende oppskrift i samme garn og bruke garnmengden der som utgangspunkt. Det er mulig å filtrere søk etter garntype, eller eventuelt etter garngruppe E. God fornøyelse
11.02.2019 - 11:02