
Popular categories
Looking for a yarn?


|
|||||||||||||||||||||||||
Cabled Concerto |
|||||||||||||||||||||||||
 |
 |
||||||||||||||||||||||||
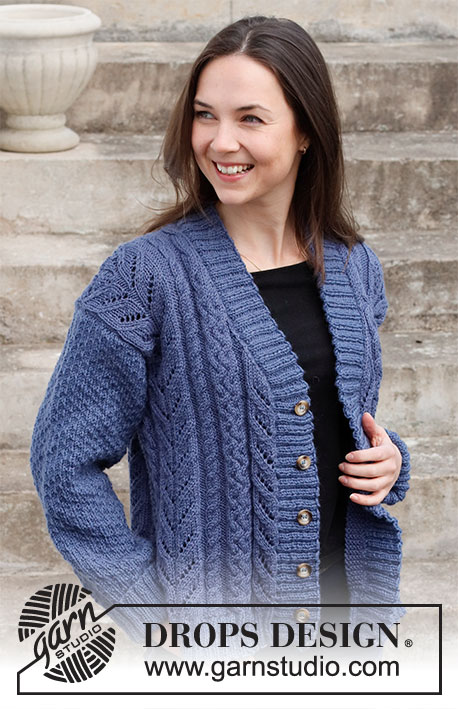
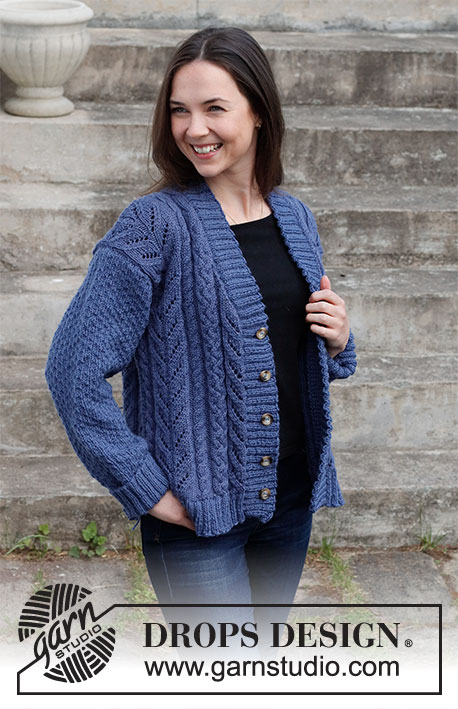
Knitted jacket in DROPS Karisma. Piece is knitted with cables, lace pattern, textured pattern and V-neck. Size: S - XXXL
DROPS 216-38 |
|||||||||||||||||||||||||
|
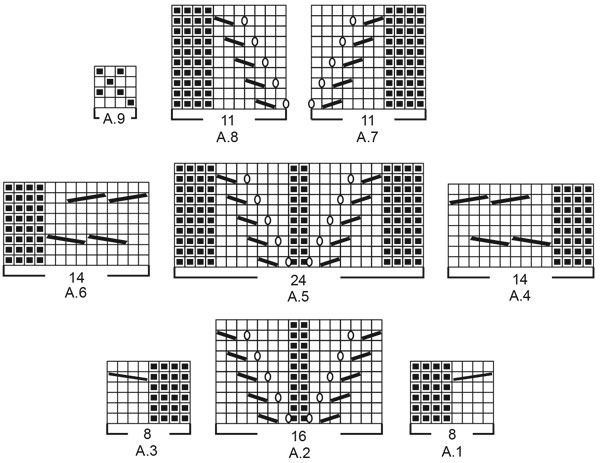
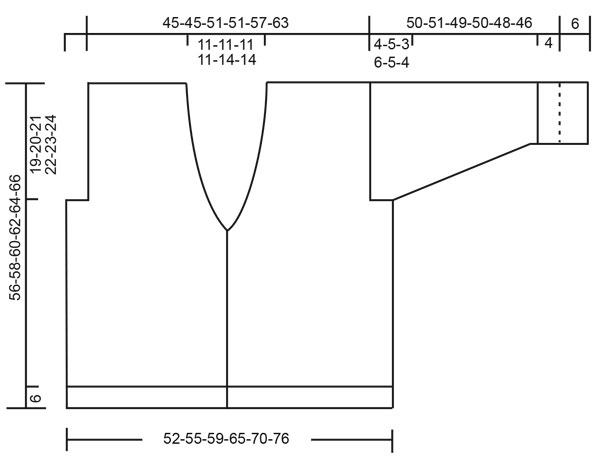
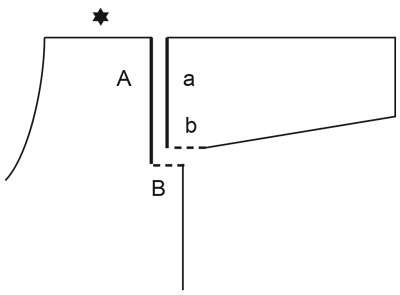
------------------------------------------------------- EXPLANATION FOR THE PATTERN: ------------------------------------------------------- GARTER STITCH (back and forth): Knit all rows. 1 ridge vertically = knit 2 rows. PATTERN: See diagrams A.1 to A.9. Diagrams show all rows in pattern seen from the right side. DECREASE TIP (applies to V-neck): All decreases are done from the right side, and decreases are done inside 1 edge stitch in garter stitch towards mid front! DECREASE AS FOLLOWS AFTER 1 EDGE STITCH IN GARTER STITCH: Slip 1 stitch knitwise, knit 1, pass slipped stitch over stitch worked (= 1 stitch decreased). DECREASE AS FOLLOWS BEFORE 1 EDGE STITCH IN GARTER STITCH: Begin 2 stitches before edge stitch and knit these 2 together (= 1 stitch decreased). INCREASE TIP-1 (applies to mid under sleeves): Increase 1 stitch on each side of marker as follows: Work until stitch with marker mid under sleeve, make 1 yarn over, purl stitch with marker as before, make 1 yarn over (= 2 stitches increased). On next round work yarn over twisted to avoid holes. Then work the new stitches in A.9. INCREASE TIP-2 (applies to increase on collar): Increase 1 stitch by making 1 yarn over between 2 purl stitches (seen from right side). On next row work yarn over twisted to avoid holes CAST-OFF TIP: To avoid a tight cast-off edge you may use a larger needle size. If this also is too tight, work a 1 yarn over after approx. every 8th stitch while casting off (cast off yarn overs as regular stitches). ------------------------------------------------------- START THE PIECE HERE: ------------------------------------------------------- JACKET - SHORT OVERVIEW OF THE PIECE: Work front pieces and back piece back and forth on circular needle in parts, bottom up. Work sleeves in the round on double pointed needles / a short circular needle, from the bottom and up to sleeve cap, then work the rest of sleeve back and forth on circular needle. Sew garment together. Then pick up stitches for band and collar - Work these in rib. BACK PIECE: Cast on 122-130-142-158-170-186 stitches on circular needle size 3.5 mm with Karisma. Purl 1 row (= wrong side). Work next row as follows from right side: 2 edge stitches in GARTER STITCH - read explanation above - * knit 2, purl 2 *, repeat from *-* until 4 stitches remain on needle, knit 2, and finish with 2 edge stitches in garter stitch. Continue rib like this for 6 cm. Purl 1 row from wrong side while decreasing 0-2-2-2-0-0 stitches evenly (work edge stitches in garter stitch) = 122-128-140-156-170-186 stitches. Switch to circular needle size 4.5 mm. Work next row as follows from right side: 2 edge stitches in garter stitch, purl 1-4-2-2-1-1, work A.1 over the next 8-8-16-24-32-40 stitches (= 1-1-2-3-4-5 repetitions of 8 stitches), work A.2 (= 16 stitches), work A.3 (= 8 stitches), work A.4 (= 14 stitches), work A.5 (= 24 stitches), work A.6 (= 14 stitches), work A.1 (= 8 stitches), work A.2 (= 16 stitches), work A.3 over the next 8-8-16-24-32-40 stitches (= 1-1-2-3-4-5 repetitions of 8 stitches), purl 1-4-2-2-1-1 and finish with 2 edge stitches in garter stitch. Continue pattern like this. REMEMBER THE KNITTING TENSION! When 1 row remains before piece measures 37-38-39-40-41-42 cm (and next row is worked from right side), decrease 2-2-2-4-4-4 stitches in each side by working the 4 stitches in each of the outermost 1-1-1-2-2-2 cables in each side knit together 2 by 2 = 118-124-136-148-162-178 stitches remain. On the next 2 rows cast off for armholes by casting off 7-10-8-14-13-13 stitches at the beginning of the next 2 rows = 104-104-120-120-136-152 stitches remain. Continue the pattern as before with 1 purl stitch (sees from right side) and 1 edge stitch in garter stitch in each side. When piece measures 54-56-58-60-62-64 cm, cast off the middle 20-20-20-20-26-26 stitches for neck and finish each shoulder separately. Work and cast off 1 stitch on next row from the neck = 41-41-49-49-54-62 stitches remain. When 2 rows remain before piece measures 56-58-60-62-64-66 cm (and next row is worked from right side), decrease 7-7-9-9-10-12 stitches on shoulder by knitting stitches in each of the cables in A.1/A.3 and A.4/A.6 together 2 by 2 = 34-34-40-40-44-50 stitches remain. Knit 1 row from wrong side. Cast off by knitting from right side - read CAST-OFF TIP! Back piece measures approx. 56-58-60-62-64-66 cm from shoulder and down. Work the other shoulder the same way. LEFT FRONT PIECE (when garment is worn): Cast on 61-65-73-81-89-97 stitches on circular needle size 3.5 mm with Karisma. Purl 1 row (= wrong side). Work next row as follows from the right side (i.e. from the side): 2 edge stitches in garter stitch, * knit 2, purl 2 *, repeat from *-* until 3 stitches remain on needle, knit 2, and finish with 1 edge stitch in garter stitch edge towards mid front. Continue rib like this for 6 cm. Purl 1 row from wrong side while decreasing 0-1-3-3-4-4 stitches evenly (work edge stitches in garter stitch) = 61-64-70-78-85-93 stitches. Switch to circular needle size 4.5 mm. Work next row as follows from the right side (i.e. from the side): 2 edge stitches in garter stitch, purl 1-4-2-2-1-1, work A.1 over the next 8-8-16-24-32-40 stitches (= 1-1-2-3-4-5 repetitions of 8 stitches), work A.2 (= 16 stitches), work A.3 (= 8 stitches), work A.4 (= 14 stitches), work A.7 (= 11 stitches) and finish with 1 edge stitch in garter stitch towards mid front. Continue pattern like this. AT THE SAME TIME decrease for V-neck and armholes as explained below. V-NECK: When piece measures 33-34-35-36-37-38 cm, decrease for V-neck towards mid front - read DECREASE TIP. Decrease for V-neck every 4th row 9-9-9-9-11-11 times in total, and then every 6th row 2-2-2-2-3-3 times in total. ARMHOLE: AT THE SAME TIME when 2 rows before remain piece measures 37-38-39-40-41-42 cm (and next row is worked from right side), decrease 2-2-2-4-4-4 stitches in the side by knitting the 4 stitches in each of the outermost 1-1-1-2-2-2 cables towards the side together 2 by 2. On next row from the side, cast off for armholes by casting off the first 7-10-8-14-13-13 stitches on needle. After all decreases for V-neck and armholes, 41-41-49-49-54-62 stitches remain on needle. Continue the pattern as before with 1 purl stitch (seen from right side) and 1 edge stitch in garter stitch in each side. When 2 rows remain before piece measures 56-58-60-62-64-66 cm (and next row is worked from right side), decrease 7-7-9-9-10-12 stitches on shoulder by knitting stitches in each of the cables in A.1/A.3 and A.4 together 2 by 2 = 34-34-40-40-44-50 stitches remain. Knit 1 row from wrong side. Cast off by knitting from right side - remember CAST-OFF TIP! Front piece measures approx. 56-58-60-62-64-66 cm from shoulder and down. RIGHT FRONT PIECE (when garment is worn): Cast on 61-65-73-81-89-97 stitches on circular needle size 3.5 mm with Karisma. Purl 1 row (= wrong side). Work next row as follows from the right side (i.e. from mid front): 1 edge stitch in garter stitch, * knit 2, purl 2 *, work from *-* until 4 stitches remain on needle, knit 2 and finish with 2 edge stitches in garter stitch. Continue rib like this for 6 cm. Purl 1 row from wrong side while decreasing 0-1-3-3-4-4 stitches evenly (work edge stitches in garter stitch) = 61-64-70-78-85-93 stitches. Switch to circular needle size 4.5 mm. Work next row as follows from the right side (i.e. from mid front): 1 edge stitch in garter stitch, work A.8 (= 11 stitches), work A.6 (= 14 stitches), work A.1 (= 8 stitches), work A.2 (= 16 stitches), work A.3 over the next 8-8-16-24-32-40 stitches (= 1-1-2-3-4-5 repetitions of 8 stitches), purl 1-4-2-2-1-1, and finish with 2 edge stitches in garter stitch towards the side. Continue pattern like this. AT THE SAME TIME decrease for V-neck and armholes as explained below. V-NECK: When piece measures 33-34-35-36-37-38 cm, decrease for V-neck towards mid front - read DECREASE TIP. Decrease for V-neck every 4th row 9-9-9-9-11-11 times in total, and then every 6th row 2-2-2-2-3-3 times in total. ARMHOLE: AT THE SAME TIME when 2 rows before remain piece measures 37-38-39-40-41-42 cm (and next row is worked from right side), decrease 2-2-2-4-4-4 stitches in the side by knitting the 4 stitches in each of the outermost 1-1-1-2-2-2 cables towards the side together 2 by 2. On next row from the side, cast off for armholes by casting off the first 7-10-8-14-13-13 stitches on needle. After all decreases for V-neck and armholes, 41-41-49-49-54-62 stitches remain on needle. Continue the pattern as before with 1 purl stitch (seen from right side) and 1 edge stitch in garter stitch in each side. When 2 rows remain before piece measures 56-58-60-62-64-66 cm (and next row is worked from right side), decrease 7-7-9-9-10-12 stitches on shoulder by knitting stitches in each of the cables in A.1/A.3 and A.6 together 2 by 2 = 34-34-40-40-44-50 stitches remain. Knit 1 row from wrong side. Cast off knitting from right side. SLEEVES: Cast on 40-44-44-48-48-52 stitches on double pointed needles size 3.5 mm with Karisma. Work rib in the round (= knit 2/purl 2). When rib measures 6 cm, insert 1 marker on round. This marks where sleeve should be folded up and measure sleeve from this marker later. When rib measures 10 cm from cast-on edge, knit 1 round while increasing 2 stitches evenly = 42-46-46-50-50-54 stitches. Insert 1 new marker in piece, in the first stitch on round. This marker marks mid under sleeve, and purl stitch with marker on every round onwards. Switch to double pointed needles size 4.5 mm and work first round as follows: Purl stitch with marker, work A.9 until 1 stitch remains on round, and work last stitch as first stitch in A.9 (so that pattern begins and ends the same way on each side of stitch with marker). Continue pattern like this. AT THE SAME TIME when sleeve measures 10-10-8-6-10-10 cm from first marker inserted, increase 2 stitches mid under sleeve – read INCREASE TIP-1. Increase like this every 2-2-2-2-1½-1½ cm 17-17-19-19-21-21 times in total = 76-80-84-88-92-96 stitches. When sleeve measures 46-46-46-44-43-42 cm from first marker, work sleeve cap back and forth on circular needle from mid under sleeve – continue A.9 as before with 1 edge stitch in garter stitch in each side until finished measurements (i.e. work stitch with marker and last stitch on round in garter stitch). Work until sleeve measures 50-51-49-50-48-46 cm from first marker (and approx. 56-57-55-56-54-52 cm from cast-on edge), i.e. There is a vent of approx. 4-5-3-6-5-4 cm at the top of sleeve. Cast off knitting from right side. NOTE! Shorter measurements in the larger sizes because of wider shoulders. Work the other sleeve the same way. ASSEMBLY: Sew shoulder seams inside cast-off edge. Sew side seam on front pieces and back piece from armholes and down to where rib begins, so that there is a vent of approx. 6 cm at the bottom in each side - sew side seams in outer loops of edge stitches , to get a flat seam. Sew sleeve cap to armhole inside 1 edge stitch in garter stitch along armhole. Then sew vent at the top of sleeve to the bottom of armhole – see chart. BAND AND COLLAR ON LEFT FRONT PIECE: Use circular needle size 3.5 mm and Karisma, begin from right side mid back of neck, and pick up approx. 152-156-160-168-172-180 stitches inside 1 edge stitch along neck line in the back of neck and then down along front piece (number of stitches should be divisible by 4). Work first row as follows from wrong side: 1 edge stitch in garter stitch, * purl 2, knit 2 *, repeat from *-* until 3 stitches remain on needle, purl 2, and finish with 1 edge stitch in garter stitch. Continue rib back and forth like with knit over knit, purl over purl and garter stitch over garter stitch. When rib measures 3 cm, insert 1 marker after the first 33-33-33-41-41-41 stitches from mid back. On next row from right side increase every other purl 2 to purl 3 from mid back of neck and down to marker – read INCREASE TIP-2 = 4-4-4-5-5-5 stitches increased. When rib measures 5 cm, increase the remaining purl 2 to purl 3 from mid back and down to marker = 4-4-4-5-5-5 stitches increased. When rib measures 6 cm, cast off with knit over knit and purl over purl - remember CAST-OFF TIP! BAND AND COLLAR ON RIGHT FRONT PIECE: Begin from right side at the bottom of right front piece and pick up the same number of stitches as on left band and collar, from bottom edge to mid back of neck. Work rib the same way as on left front piece, and increase on collar part the same way as on left front piece. AT THE SAME TIME when rib measures 4 cm, decrease for 5-5-5-6-6-6 buttonholes evenly. Place top buttonhole approx. 1 cm below decrease for V-neck began, and bottom buttonhole approx. 6 cm from bottom edge. 1 buttonhole = make 1 yarn over and knit 2 together. NOTE! It will look best if decrease is done in a purl section (seen from right side). When rib is done, cast off with knit over knit and purl over purl. Sew the buttons on to the left band and sew the collar together mid back. |
|||||||||||||||||||||||||
Diagram explanations |
|||||||||||||||||||||||||
|
|||||||||||||||||||||||||
|
|||||||||||||||||||||||||
|
|||||||||||||||||||||||||
|
|||||||||||||||||||||||||
|
Have you made this or any other of our designs? Tag your pictures in social media with #dropsdesign so we can see them! Do you need help with this pattern?You'll find tutorial videos, a Comments/Questions area and more by visiting the pattern on garnstudio.com. © 1982-2024 DROPS Design A/S. We reserve all rights. This document, including all its sub-sections, has copyrights. Read more about what you can do with our patterns at the bottom of each pattern on our site. |
|||||||||||||||||||||||||


With over 40 years in knitting and crochet design, DROPS Design offers one of the most extensive collections of free patterns on the internet - translated to 17 languages. As of today we count 304 catalogues and 11422 patterns - 11422 of which are translated into English (UK/cm).
We work hard to bring you the best knitting and crochet have to offer, inspiration and advice as well as great quality yarns at incredible prices! Would you like to use our patterns for other than personal use? You can read what you are allowed to do in the Copyright text at the bottom of all our patterns. Happy crafting!
Comments / Questions (26)
Ich brauche Hilfe beim Diagramm sind das nur die hinreihen ich verstehe das sonst nicht bitte Hilfe. MfG.Doris Belz
09.12.2023 - 08:01DROPS Design answered:
Liebe Frau Belz, alle Reihen sind im Diagram gezeichnet, die Hin-Reihen lesen Sie rechts nach links und die Rückreihen links nach rechts; die leere Kästchen werden glatt rechts gestrickt und die schwarze Quadraten werden glatt links gestrickt. Viel Spaß beim stricken!
11.12.2023 - 07:52Hallo, ik ben net begonnen met dit patroon maat M. Na de ribbelsteek begint het patroon als volgens: 2 kantsteken, 4 averecht, A1, A2, ….., 4 averecht, 2 kantsteken. De 4 averecht steken moeten ook averecht gebreid worden op de retour naald? (Dus het wordt een soort ribbel steek van af een averecht steek) Of het is de bedoeling om ze recht te breien op de retour naald? Al vast bedankt
12.11.2023 - 10:35DROPS Design answered:
Dag Josee,
Het staat inderdaad niet goed aangegeven, maar die 4 steken brei je recht aan de verkeerde kant.
12.11.2023 - 17:30I'm having an issue with the decreasing on the back for size XL I have 156 sts , I've decreased the 8 sts in the cables (156-8=148 sts) The pattern says to Bind off 12 sts on next two rows (148-24=124 sts) I have 24 sts. Pattern says I should have 120 sts The pattern says Bind off middle 20 sts (124-20 = 104 sts) I have 52 sts each shoulder The pattern says Bind off 1 st (neck edge) 52-1= 51 sts I have 51 sts. The pattern says I should have 49 sts
06.11.2023 - 18:24DROPS Design answered:
Dear Mrs McMillan, you decrease a total of 8 sts (4 sts on each side) = 156-8=148 sts, then cast off the first 14 sts (instead of 12, the US pattens will be edited) at the beg of next 2 rows = 120 sts left. You then cast off the middle 20 sts = 50 sts for each shoulder, cast off 1 st at the beg of next row from neck = 49 sts left. Happy knitting!
07.11.2023 - 08:25Following on from the question about the sleeve increases, I can see you have purl as the midline stitch and before it the first stitch of A.9 and after it also the first stitch of A.9 So it goes purl , purl (the midline one), purl. When the increase comes do you end up with the second stitch of A.9, purl, the last stitch of A.9? If this happened to be on the first row of A.9 this would be knit, purl(midline stitch), knit Have I understood this correctly? Thanks
06.07.2023 - 19:42DROPS Design answered:
Dear Lucy, we have a purl middle stitch, which helps introducing the pattern. We will insert the new stitches before the purl middle stitch (1st, 2nd, 3rd, 4th) and right after it (4th, 3rd, 2nd, 1st). Happy knitting!
10.07.2023 - 15:43I would like to make this jacket for someone but they have a bust sizeof 48 inches. Does this pattern have positive ease? If I was to increase the cast on for the large size to 146 on the back and 75 on each size, what changes would I need to make for the cable patterns?
06.06.2023 - 16:13DROPS Design answered:
Dear Mrs Ali, measure a garment the person has and likes the shape and compare these measurements to the one in the chart, you can than decide the required ease. Read more about chart here. Happy knitting!
07.06.2023 - 08:52Please explain the back decreases. The shoulder decreases occur after the back neck cast off? I do not understand the directions, please help.
05.06.2023 - 19:40DROPS Design answered:
Dear Lorna, you first cast off the middle stitches for neck on back piece, then continue each shoulder separately casting off one stitch at the beg of next row from neck. Then approx. 2 cm after casting off the middle stitch for neck, you will decrease in the cables to keep correct width (you need more stitches for cable than for stocking stitch reason why you have to decrease before casting off). In this video we show how to decrease in cables and cast off at the same time, for this pattern you will first decrease then work 1 extra row and cast off on next row. Happy knitting!
06.06.2023 - 08:57Jag stickar denna kofta i M till min dotterdotter som är mycket smal (höftmått 92cm).Min stickfasthet är normal (19 m per 10 com). Trots detta blir koftan alldeles för smal ca 76 cm inkl kant. Vad göra?
04.03.2023 - 13:41DROPS Design answered:
Hej Elisabeth, Strikker du i DROPS Karisma? Du har 130 m på bagstykket og 64mx2 på forstykkerne = 258 m/20=129 cm (hvor der forsvinder nogle cm til snoningerne) + de 6 cm forkant i hver side.
08.03.2023 - 08:09The bands are done in ribbing and the ribbing pulls up at the bottom so it's shorter than the body. This shows in the pattern pictures too, What can be done to correct this? I'd like the bottom of the band to line up properly with the body of the sweater.
02.03.2023 - 16:33DROPS Design answered:
Dear Marcia, you can block it using pin to let the bands being straight as you'd like them to be. Enjoy!
02.03.2023 - 16:43Ich möchte diese Jacke stricken. Wenn ich mir die Maschenzahl und Maße ansehe, wird das Vorderteil so viel breiter wie die später angestrickte Kante. Ist das richtig?
12.01.2023 - 18:18DROPS Design answered:
Liebe Frau Reich, beachten Sie, daß Ihre Maschenprobe (= 20 Maschen x 26 Reihen glatt rechts mit den grösseren Nadeln = 10 x 10 cm) stimmt, und so wird die Arbeit die richtigen Maßen haben. Beim Rippenmuster (und kleineren Nadeln) sowie für die Zöpfe braucht man mehr Maschen als für glatt rechts. Viel Spaß beim stricken!
13.01.2023 - 08:30A lovely pattern!
02.12.2022 - 17:08