Clicking the ORDER button will redirect you to Wool Warehouse Direct Ltd website
The yarn cost is calculated from the pattern’s smallest size and the yarn’s cheapest product type. Looking for an even better price? You might find it on the DROPS Deals!
-------------------------------------------------------
Alternative Yarn – See how to change yarns here
Yarn Groups A to F – Use the same pattern and change the yarn here
Yarn usage using an alternative yarn – Use our yarn converter here
-------------------------------------------------------
Clicking the ORDER button will redirect you to Wool Warehouse Direct Ltd website
The yarn cost is calculated from the pattern’s smallest size and the yarn’s cheapest product type. Looking for an even better price? You might find it on the DROPS Deals!
This pattern has been corrected. Click here to see the correction/s.
Each of our patterns has specific tutorial videos to help you.
These step-by-step tutorials might also help you:
Why is the knitting/crochet tension so important?
Knitting tension is what determines the final measurements of your work, and is usually measured per 10 x 10 cm. It is provided like so: number of stitches in width x number of rows in height - eg: 19 stitches x 26 rows = 10 x 10 cm.
The knitting tension is very individual; some people knit/crochet loosely while others work tightly. You adjust the knitting tension with the needle size, which is why the suggested needle size is only meant as a guide! You need to adjust this (up or down) to ensure that YOUR knitting tension matches the knitting tension provided in the pattern. If you work with a different knitting tension than provided you will have a different yarn consumption, and your work will have different measurements than what the pattern suggests.
The knitting tension also determines which yarns can replace each other. As long as you achieve the same knitting tension you can replace one yarn with another.
See DROPS lesson: How to measure your tension/gauge
See DROPS video: How to make a gauge tension swatch
How do I know how many balls of yarn I need?
The required amount of yarn is provided in grams, eg: 450 g. To calculate how many balls you’ll need you first need to know how many grams are in 1 ball (25g, 50g or 100g). This information is available if you click on the individual yarn quality on our pages. Divide the amount required with the amount of each ball. For example, if each ball is 50g (the most common amount), the calculation will be as follows: 450 / 50 = 9 balls.
Can I use a different yarn than what the pattern suggests?
The important thing when changing from one yarn to another is that the knitting/crochet tension remains the same. This is so that the measurements of the finished piece will be the same as on the sketch provided. It is easier to achieve the same knitting tension using yarns from the same yarn group. It is also possible to work with multiple strands of a thinner yarn to achieve the knitting tension of a thicker one. Please try our yarn converter. We recommend you to always work a test swatch.
Please NOTE: when changing yarn the garment might have a different look and feel to the garment in the photo, due to individual properties and qualities of each yarn.
See DROPS lesson: Can I use a different yarn than the one mentioned in the pattern?
What are the yarn groups?
All our yarns are categorised into yarn groups (from A to F) according to thickness and knitting tension – group A contains the thinnest yarns and group F the thickest. This makes it easier for you to find alternative yarns to our patterns, should you wish to switch yarn. All yarns within the same group have a similar knitting tension and can easily replace each other. However, different yarn qualities have different structures and properties which will give the finished work a unique look and feel.
How do I use the yarn calculator?
At the top of all our patterns you’ll find a link to our yarn calculator, which is a helpful tool should you wish to use a different yarn than suggested. By filling in the yarn quality you wish to replace, the amount (in your size) and number of strands, the calculator will present good alternative yarns with the same knitting tension. Additionally it will tell you how much you’ll require in the new qualities and whether you’ll need to work with multiple strands. Most skeins are 50g (some are 25g or 100g).
If the pattern is worked with multiple colours, every colour will have to be calculated separately. Similarly, if the pattern is worked with several strands of different yarns (for example 1 strand Alpaca and 1 strand Kid-Silk) you will have to find alternatives for each, individually.
Why do you show discontinued yarns in the patterns?
Since different yarns have different qualities and textures we have chosen to keep the original yarn in our patterns. However, you can easily find options among our available qualities by using our yarn calculator, or simply pick a yarn from the same yarn group.
It is possible that some retailers still have discontinued yarns in stock, or that someone has a few skeins at home that they would like to find patterns for.
The yarn calculator will provide both alternative yarn as well as required amount in the new quality.
What size should I knit?
If you think it's hard to decide what size to make, it can be a good idea to measure a garment you own already and like the size of. Then you can pick the size by comparing those measures with the ones available in the pattern's size chart.
You'll find the size chart at the bottom of the pattern.
See DROPS lesson: How to read size chart
Why do I get the wrong knitting tension with the suggested needle size?
The needle size provided in the pattern serves only as a guide, the important thing is to follow the knitting tension. And since knitting tension is very individual, you will have to adjust the needle size to ensure that YOUR tension is the same as in the pattern – maybe you’ll have to adjust 1, or even 2 needle sizes, up or down to achieve the correct tension. For this, we recommend that you work test swatches.
Should you work with a different knitting tension than the one provided, the measurements of the finished garment might deviate from the measurement sketch.
See DROPS lesson: How to measure your tension/gauge
See DROPS video: How to make a tension/gauge swatch
Why is the pattern worked top-down?
Working a garment top-down provides more flexibility and room for personal adjustment. For example it is easier to try the garment on while working, as well as making adjustments to length of yoke and shoulder caps.
The instructions are carefully explaining every step, in the correct order. Diagrams are adjusted to the knitting direction and are worked as usual.
How do I work according to a knitting diagram?
The diagram depicts all rows/rounds, and every stitch seen from the right side. It is read from bottom to top, from right to left. 1 square = 1 stitch.
When working back and forth, every other row is worked from the right side and every other row is worked from the wrong side. When working from the wrong side, the diagram will have to be worked reversed: from left to right, knit stitches are purled, purl stitches are knit etc.
When working in the round every round is worked from the right side and the diagram are worked from right to left on all rounds.
See DROPS lesson: How to read knitting diagrams
How do I work according to a crochet diagram?
The diagram depicts all rows/rounds, and every stitch seen from the right side. It is worked from bottom to top, from right to left.
When working back and forth every other row is worked from the right side: from right to left and every other row is worked from the wrong side: from left to right.
When working in the round, every row in the diagram are worked from the right side, from right to left.
When working a circular diagram you start in the middle and work your way outwards, counter clockwise, row by row.
The rows usually start with a given number of chain stitches (equivalent to the height of the following stitch), this will either be depicted in the diagram or explained in the pattern.
See DROPS lesson: How to read crochet diagrams
How do I work several diagrams simultaneously on the same row/round?
Instructions for working several diagrams after each other on the same row/round, will often be written like so: “work A.1, A.2, A.3 a total of 0-0-2-3-4 times". This means you work A.1 once, then A.2 is worked once, and A.3 is repeated (in width) the number of times provided for your size – in this case like so: S = 0 times, M = 0 times, L=2 times, XL= 3 times and XXL = 4 times.
The diagrams are worked as usual: begin with the first row in A.1, then work the first row in A.2 etc.
See DROPS lesson: How to read knitting diagrams
See DROPS lesson: How to read crochet diagrams
Why are the sleeves shorter in larger sizes?
The total width of the garment (from wrist-to-wrist) will be larger in the larger sizes, despite the actual sleeves being shorter. The larger sizes have longer sleeve caps and wider shoulders, so there will be a good fit in all sizes.
Where on the garment is the length measured?
The measurement sketch/schematic drawing provides information regarding the full length of the garment. If it’s a jumper or a jacket the length is measured from the highest point on the shoulder closest to the neckline, and straight down to the bottom of the garment. It is NOT measured from the tip of shoulder. Similarly, the length of yoke is measured from the highest point on the shoulder and down to where yoke is split into body and sleeves.
On a jacket measures are never taken along bands, unless specifically stated. Always measure inside band stitches when measuring the length.
See DROPS lesson: How to read a schematic drawing
What is a repeat?
Diagrams are often repeated on the round or in height. 1 repeat is the diagram the way it appears in the pattern. If it says to work 5 repeats of A.1 in the round, then you work A.1 a total of 5 times after/next to each other in the round. If it says to work 2 repeats of A.1 vertically/in height you work the entire diagram once, then begin again at the start and work the entire diagram one more time.
Why does the piece start with more chain stitches than it’s worked with?
Chain stitches are slightly narrower than other stitches and to avoid working the cast-on edge too tight, we simply chain more stitches to begin with. The stitch count will be adjusted on the following row to fit the pattern and measurement sketch.
Why increase before the rib edge when the piece is worked top-down?
The rib edge is more elastic and will contract slightly compared to, for example, stocking stitch. By increasing before the rib edge, you avoid a visible difference in width between the rib edge and the rest of the body.
Why increase in the cast-off edge?
It’s very easy to cast off too tightly, and by making yarn overs while casting off (and simultaneously casting these off) you avoid a too tight cast off edge.
See DROPS video: How to bind off with yarn overs (yo)
How do I increase/decrease on every 3rd and 4th row/round alternately?
To achieve an even increase (or decrease) you can increase on, for example: every 3rd and 4th row alternately, like so: work 2 rows and increase on the 3rd row, work 3 rows and increase on the 4th. Repeat this until the increase is complete.
See DROPS lesson: Increase or decrease 1 st on every 3rd and 4th row alternately
How can I work a jacket in the round instead of back and forth?
Should you prefer to work in the round instead of back and forth, you may of course adjust the pattern. You’ll need to add steeks mid-front (usually 5 stitches), and follow the instructions. When you would normally turn and work from the wrong side, simply work across the steek and continue in the round. At the end you’ll cut the piece open, pick up stitches to work bands, and cover the cut edges.
See DROPS video: How to knit steeks and cut open
Can I work a jumper back and forth instead of in the round?
Should you prefer to work back and forth instead of in the round, you may of course adjust the pattern so you work the pieces separately and then assemble them at the end. Divide the stitches for the body in 2, add 1 edge stitch in each side (for sewing) and work the front and back pieces separately.
See DROPS lesson: Can I adapt a pattern for circular needles into straight needles?
Why is the pattern slightly different than what I see in the photo?
Pattern repeats can vary slightly in the different sizes, in order to get the correct proportions. If you’re not working the exact same size as the garment in the photo, yours might deviate slightly. This has been carefully developed and adjusted so that the complete impression of the garment is the same in all sizes.
Make sure to follow instructions and diagrams for your size!
How do I make a women’s size garment into a men’s size one?
If you have found a pattern you like which is available in women’s size it’s not very difficult to convert it to men’s size. The biggest difference will be the length of sleeves and body. Start working on the women size that you think would fit across the chest. The additional length will be worked right before you cast off for the armhole/sleeve cap. If the pattern is worked top-down you can add the length right after the armhole or before the first decrease on sleeve.
Regarding additional yarn amount, this will depend on how much length you add, but it is better with a skein too many than too few.
How do I prevent a hairy garment from shedding?
All yarns will have excess fibres (from production) that might come off as lint or shedding. Brushed yarns (ie hairier yarns) have more of these loose, excess fibres, causing more shedding.
Shedding also depends on what is worn under or over the garment, and whether this pulls at the yarn fibres. It’s therefore not possible to guarantee that there will be no shedding
Below are some tips on how to get the best result when working with hairier yarns:
1. When the garment is finished (before you wash it) shake it vigorously so the looser hairs come off. NOTE: do NOT use a lint roller, brush or any method that pulls at the yarn.
2. Place the garment in a plastic bag and put it in your freezer - the temperature will cause the fibres to become less attached to each other, and excess fibres will come off easier.
3. Leave in the freezer for a few hours before taking it out and shaking it again.
4. Wash the garment according to the instructions on the yarn label.
Why does my garment pill?
Pilling is a natural process that happens to even the most exclusive of fibers. It's a natural sign of wear and tear that is hard to avoid, and that is most visible in high friction areas of your garment like a sweater's arms and cuffs.
You can make your garment look as new by removing the pilling, using a fabric comb or a pill/lint remover.
Wayfarer |
|
|
|
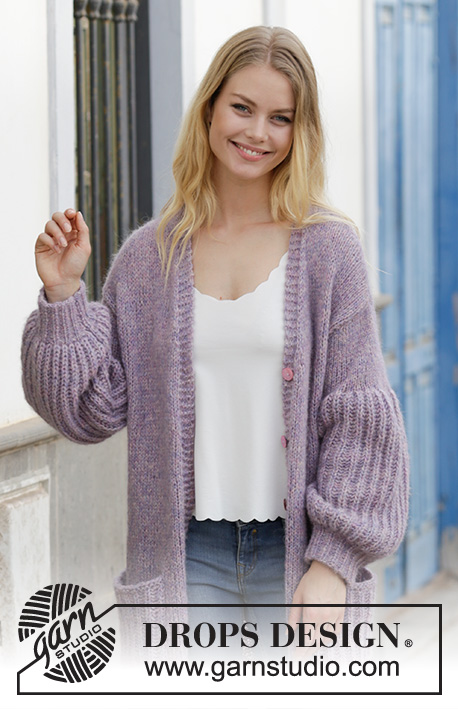
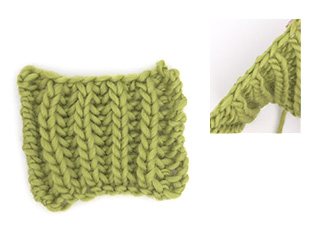
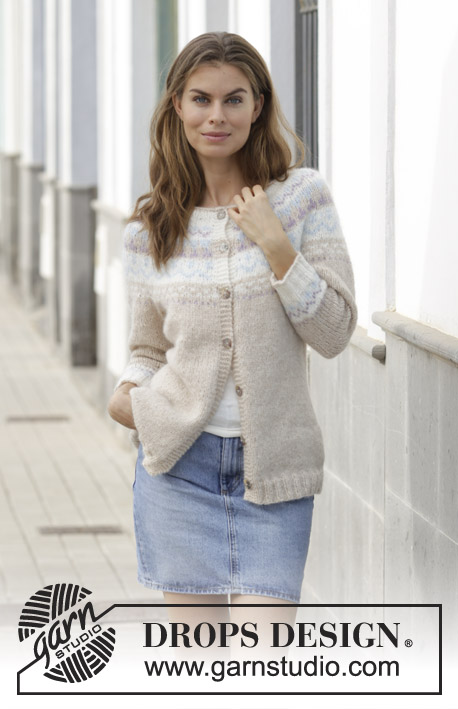
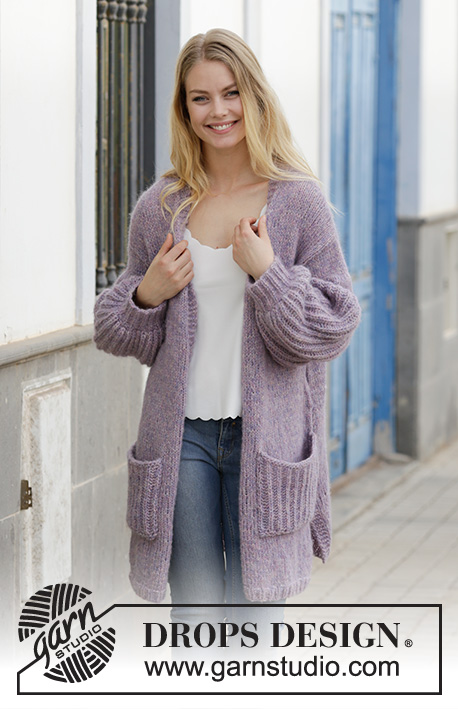
Knitted jacket with English rib, stocking stitch and pockets. Sizes S - XXXL. The piece is worked in DROPS Air.
DROPS 191-18 |
|
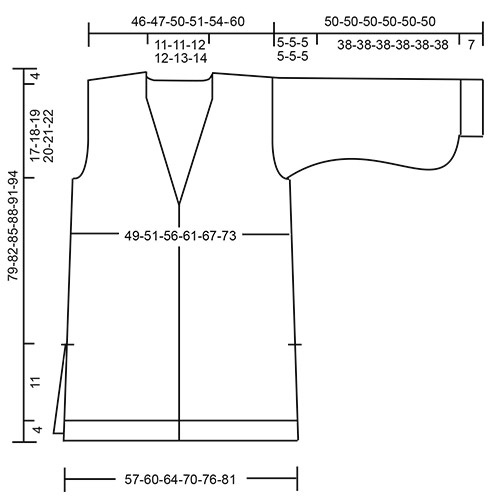
INFORMATION FOR THE PATTERN: RIDGE/GARTER STITCH (worked back and forth): 1 ridge = Knit 2 rows. ENGLISH RIB (back and forth on needle, including 1 edge stitch in each side): ROW 1: 1 stitch garter stitch, * knit 1, 1 yarn over, slip 1 stitch as if to purl *, work from *-* until there are 2 stitches left, finish with knit 1, 1 stitch garter stitch. ROW 2: 1 stitch garter stitch, * 1 yarn over, slip 1 stitch as if to purl, knit the yarn over and the slipped stitch together *, work from *-* until there are 2 stitches left, finish with 1 yarn over, slip 1 stitch as if to purl, 1 stitch garter stitch. ROW 3: 1 stitch garter stitch, * knit the yarn over and the slipped stitch together, 1 yarn over, slip 1 stitch as if to purl *, work from *-* until there are 3 stitches left, knit the yarn over and slipped stitch together, 1 stitch garter stitch. Repeat rows 2 and 3 upwards. DECREASE TIP -1 (= for the sides): All decreases are made from the right side! At the beginning of the row: Decrease 1 stitch after 2 stitches as follows: Slip 1 stitch as if to knit, knit 1, pass the slipped stitch over (= 1 stitch decreased). At the end of the row: Decrease 1 stitch before 2 stitches as follows: Knit 2 together (= 1 stitch decreased). DECREASE TIP -2 (for neck): All decreases are made from the right side! Decrease 1 stitch after the 5 band stitches as follows (applies to right front piece): Work 5 band stitches in garter stitch, slip 1 stitch as if to knit, knit 1, pass the slipped stitch over (= 1 stitch decreased). Decrease 1 stitch before the 5 band stitches as follows (applies to left front piece): Work until there are 7 stitches left, knit 2 together (= 1 stitch decreased), work 5 band stitches in garter stitch. BUTTONHOLES: Work buttonholes on the right band. 1 BUTTONHOLE = knit together the 3rd and 4th stitch from the edge and make 1 yarn over. On the next row knit the yarn over = hole. Work buttonholes when the piece measures: S: 14, 22, 31, 40, 49 and 58 cm M: 14, 23, 32, 41, 50 and 60 cm L: 14, 23, 32, 42, 52 and 62 cm XL: 14, 24, 34, 44, 54 and 64 cm XXL: 14, 24, 34, 44, 54 and 65 cm XXXL: 14, 24, 34, 45, 56 and 67 cm INCREASE TIP: (for sleeves) Increase by making 1 yarn over between 2 stitches; on the next row from the wrong side purl the yarn over twisted to avoid a hole. ---------------------------------------------------------- JACKET: The jacket is worked back and forth with circular needle, bottom up. The back piece and front pieces are worked separately and sewn together to finish. Then the sleeves are worked and sewn to the body. BACK PIECE: The piece is worked back and forth with circular needle. Cast on 81-84-90-99-105-114 stitches with circular needle size 7 mm and Air. Work 4 stitches garter stitch, * knit 1, purl 2 *, work from *-* until there are 5 stitches left, finish with knit 1 and 4 stitches garter stitch. Work 6 rows like this. Then continue in stocking stitch with 4 stitches garter stitch in each side, AT THE SAME TIME on the first row of stocking stitch adjust the number of stitches to 80-84-90-98-106-114 stitches. REMEMBER THE KNITTING TENSION! When the piece measures 14 cm cast on 1 edge stitch at the end of the next 2 rows (= 1 new stitch in each side of the piece) = 82-86-92-100-108-116 stitches. Then continue working stocking stitch with 1 edge stitch in garter stitch in each side of the piece. When the piece measures 15 cm decrease 1 stitch inside the 2 stitches in each side of the piece – read DECREASE TIP-1 = 2 stitches decreased. Decrease like this every 8-8-8½-9-9½-10 cm a total of 6 times = 70-74-80-88-96-104 stitches. When the piece measures 58-60-62-64-66-68 cm cast off 3-4-4-5-5-6 stitches for the armholes at the start of the next 2 rows = 64-66-72-78-86-92 stitches. Then cast off 1 stitch in each side every 2nd row a total of 0-0-1-3-5-7 times = 64-66-70-72-76-78 stitches. When the piece measures 75-78-81-84-87-90 cm cast off the middle 16-18-20-20-22-22 stitches for neck = 24-24-25-26-27-28 stitches left on each shoulder. Then cast off stitches for diagonal shoulders at the beginning of each row towards the neck - i.e. at the beginning of each row from the right side on the right shoulder (when the garment is worn) and the beginning of each row from the wrong side on the left shoulder (when the garment is worn). Cast off for diagonal shoulders as follows: 6 stitches 3 times, then cast off the remaining 6-6-7-8-9-10 stitches. Repeat on the other side. The piece measures a total of 79-82-85-88-91-94 cm. RIGHT FRONT PIECE: Cast on 46-49-49-55-58-61 stitches (including 5 band stitches) with circular needle size 7 mm and Air. Work as follows from the right side: 5 band stitches in garter stitch, * knit 1, purl 2 *, work from *-* until there are 5 stitches left, finish with knit 1 and 4 stitches in garter stitch. Work 6 rows like this. Then continue working from the right side as follows: 5 band stitches in garter stitch, work stocking stitch until there are 4 stitches left, finish with 4 stitches in garter stitch, AT THE SAME TIME on the first row of stocking stitch adjust the number of stitches to 45-47-50-54-58-62 stitches. When the piece measures 14 cm, adjust to match the back piece, cast on 1 edge stitch at the end of the next row from the right side = 46-48-51-55-59-63 stitches. Then continue with stocking stitch and 5 band stitches in garter stitch towards mid front as before and 1 edge stitch in garter stitch towards the side. Work BUTTONHOLES on the band – see description above. When the piece measures 15 cm, decrease 1 stitch inside the 2 stitches in the side at the end of the next row from the right side. Decrease like this every 8-8-8½-9-9½-10 cm a total of 6 times = 40-42-45-49-53-57 stitches. When the piece measures 58-60-62-64-66-68 cm cast off for the armhole in the side as for the back piece = 37-38-40-41-43-44 stitches. AT THE SAME TIME when the piece measures 59-61-63-65-66-68 cm decrease for the neck inside the 5 band stitches – read DECREASE TIP-2. Decrease like this every 4th row a total of 8-9-10-10-11-11 times = 29-29-30-31-32-33 stitches left when the neck decreases are finished. When the piece measures 75-78-81-84-87-90 cm cast off for diagonal shoulder at the beginning of each row from the wrong side as follows: 6 stitches 3 times, 6-6-7-8-9-10 stitches 1 time = 5 band stitches left on the needle. Work garter stitch over the band stitches until the band measures approx. 10-11-11-12-13-13 cm from the last cast off stitch on the shoulder (this will be sewn to the neck on the back piece). LEFT FRONT PIECE: Work as for the right front piece but reversed. Do not work buttonholes. SLEEVES: The sleeves are worked back and forth with circular needle. Cast on 44-47-47-50-50-53 stitches (including 1 edge stitch in each side of the piece) with circular needle size 4 mm and Air. Work rib (= knit 1, purl 2) with 1 edge stitch in garter stitch in each side of the piece. When the rib measures 7-7-7-7-7-7 cm, adjust so that the next row is worked from the right side, work 1 row of rib as before AT THE SAME TIME as you increase 11-12-12-13-13-14 stitches evenly on row – read INCREASE TIP! = 55-59-59-63-63-67 stitches. Purl 1 row. Change to circular needle size 7 mm and work ENGLISH RIB – see description above. Continue until the piece measures 37-37-37-37-37-37 cm and then continue with stocking stitch with 1 edge stitch in garter stitch in each side of the piece AT THE SAME TIME as you decrease 8-9-6-7-4-6 stitches evenly on the first row = 47-50-53-56-59-61 stitches. Continue with stocking stitch until the piece measures 45-45-45-45-45-45 cm. Now cast off 4 stitches in each side every 2nd row a total of 4 times = 15-18-21-24-27-29 stitches. Cast off the remaining stitches, the sleeve measures 50-50-50-50-50-50 cm. Work the other sleeve in the same way. POCKETS: Cast on 25 stitches with circular needle size 7 mm and Air. Work 2 ridges then work ENGLISH RIB with 1 stitch in garter stitch in each side. When the piece measures 16 cm work 1 ridge, then cast off. Work one more pocket in the same way. ASSEMBLY: Sew the side seams inside the 1 edge stitch in garter stitch, sew down to the split (= 14 cm split). Sew shoulder seams and sew the neck from the front pieces together and sew it to the neck on the back piece. Sew the sleeve seams inside the 1 edge stitch in each side, then sew the sleeves to the body. Sew buttons onto the left band. Sew a pocket onto each front piece – approx. 14 cm from the bottom edge and 8 cm from mid front – see photo. |
|
Have you made this or any other of our designs? Tag your pictures in social media with #dropsdesign so we can see them! Do you need help with this pattern?You'll find tutorial videos, a Comments/Questions area and more by visiting the pattern on garnstudio.com. © 1982-2024 DROPS Design A/S. We reserve all rights. This document, including all its sub-sections, has copyrights. Read more about what you can do with our patterns at the bottom of each pattern on our site. |
With over 40 years in knitting and crochet design, DROPS Design offers one of the most extensive collections of free patterns on the internet - translated to 17 languages. As of today we count 304 catalogues and 11428 patterns - 11428 of which are translated into English (UK/cm).
We work hard to bring you the best knitting and crochet have to offer, inspiration and advice as well as great quality yarns at incredible prices! Would you like to use our patterns for other than personal use? You can read what you are allowed to do in the Copyright text at the bottom of all our patterns. Happy crafting!
Comments / Questions (55)
Cathrine wrote:
Hei. Takk for svar, men det jeg ikke forstår er hvordan jeg feller av de fire maskene på hver side på ermet hver andre pinne, 4 ganger ?
20.12.2018 - 14:20DROPS Design answered:
Hei Cathrine. Du feller dem på samme måte som vist i videoen. De skal felles av slik at det blir en kant langs siden oppover ermkuppelen. God fornøyelse
20.12.2018 - 15:11Cathrine wrote:
Hei. Jeg sliter litt med å felle av på ermene når jeg kommer til slutten av pinnen . Hvordan feller jeg av på slutten av arbeidet.
20.12.2018 - 12:51DROPS Design answered:
Hei Cathrine. Du feller av på slutten av ermene på sammen måte som du vanligvis feller av. slik: . God fornøyelse
20.12.2018 - 13:22Sophia wrote:
Wat ik niet begrijp: Aangeraden wordt om rondbreinaald 7 te gebruiken bij dit model, maar de garens die worden aangeraden, worden geadviseerd met breinaald 5. Hoe moet ik dit opvatten? want wordt het breisel dan niet veel te los?!
30.10.2018 - 22:51DROPS Design answered:
Dag Sophia,
Je breit inderdaad in dit geval met een grotere naald om een losser breiwerk te creëren. Maak altijd even een proeflapje en pas evt. de naalddikte aan zodat deze overeenkomt met de stekenverhouding. Veel breiplezier!
31.10.2018 - 19:55Merete wrote:
På erme: før patentstrikk er det 59 masker i str M, etter patentstrikk skal det felles 9 masker til 50. Men, første pinne patent auker med 27 masker, til 86 - korleis kjem eg tilbake til 59 masker etter patentdelen?
16.10.2018 - 20:08DROPS Design answered:
Hej Merete, er det kastene i patentstrik du tæller med? De skal strikkes sammen med den løse maske, så du får 59 m glatstrik, men på første pind tager du 9 masker ind, så du får 50 masker. God fornøjelse!
09.11.2018 - 12:56Kim wrote:
Je voudrais vous envoyer la photo de ce modèle que je viens de tricoter, pourriez-vous m'indiquer comment il faudrait que je procède. Merci
17.08.2018 - 10:14DROPS Design answered:
Bonjour Kim, vous pouvez volontiers partager vos photos dans le groupe DROPS Workshop et/ou taguez-nous sur les réseaux sociaux #dropsfan pour que nous puissions les voir. Bon tricot
17.08.2018 - 10:19Ekaterina wrote:
Es scheint, es gibt einen Fehler hier: "Im PATENTMUSTER stricken – siehe oben. Glatt rechts, mit je 1 Rand-Masche kraus rechts beidseitig, weiterstricken, bis die Arbeit eine Länge von 37-37-37-37-37-37 cm hat\" (d.h., es ist unklar, wie lange im Patentmuster zu stricken). Im Englischen heisst es, dass Patentmuster die Länge von 37-37-37-37-37-37 cm haben muss und dann ist die Arbeit glatt rechts weiterzustricken.
13.07.2018 - 09:12DROPS Design answered:
Liebe Ekaterina, Sie stricken jetzt Patentmuster bis die Arbeit (= bzw der Ärmel von der Anschlagskante) 37 cm misst. Viel Spaß beim stricken!
16.07.2018 - 09:52Griet wrote:
Is een mooie vest!!!!!
12.06.2018 - 13:25Louise wrote:
Pour faire la veste en grandeur Large, combien de laine est-ce que cela prend s.v.p. merci et très beau modèle.
15.04.2018 - 02:29DROPS Design answered:
Bonjour Louise, Vous trouverez la quantité nécessaire pour chaque taille, au poids, sous l'en-tête du modèle, soit en taille L, 500 g en DROPS Air (= à 50 g la pelote Air, il vous faudra 10 pelotes en taille L). Bon tricot!
16.04.2018 - 09:29Aleksandra Karolina Strugacz wrote:
Fin cardigan
01.01.2018 - 21:53Rumpelstiltzchen wrote:
Classic, yet cool and stylish. The colour choice is also really nice
28.12.2017 - 11:29