
Popular categories
Looking for a yarn?


|
||||||||||||||||||||||||||||||||||||||||
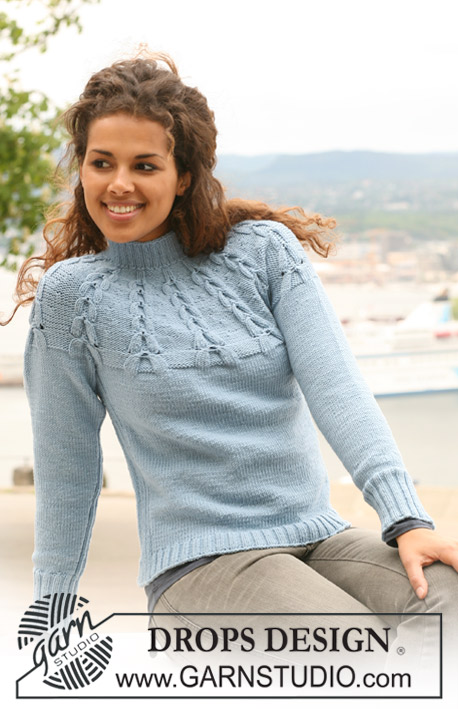
Ice Storm Cardigan |
||||||||||||||||||||||||||||||||||||||||
|
|
||||||||||||||||||||||||||||||||||||||||
Knitted DROPS jacket with round yoke and cables in ”Karisma”. Size S - XXXL.
DROPS 121-29 |
||||||||||||||||||||||||||||||||||||||||
|
GARTER ST (back and forth on needle): K all rows. INCREASING TIP: Inc each side of the rib-section each side on body piece and mid under sleeve. Make all inc from RS! Inc 1 st by picking up st from previous row and K this. PATTERN: See diagram M.1 – see diagram for your size. Diagram shows the pattern from RS and row 1 in diagram = RS. BUTTONHOLES: Make buttonholes on right front band. 1 buttonhole = make 1 YO after 4th st from the edge and then K tog 5th and 6th st. Make buttonholes when piece measures: SIZE S: 4, 12, 20, 28, 36, 45 and 54 cm SIZE M: 4, 13, 21, 30, 38, 47 and 56 cm SIZE L: 4, 13, 22, 31, 40, 49 and 58 cm SIZE XL: 5, 13, 21, 29, 37, 45, 53 and 61 cm SIZE XXL: 5, 13, 22, 30, 39, 47, 55 and 63 cm SIZE XXXL: 5, 14, 23, 32, 41, 49, 57, 65 cm -------------------------------------------------------- JACKET: Worked back and forth on circular needle from mid front. BODY PIECE: Cast on 212-228-260-288-320-352 sts (includes 7 front band sts each side towards front edge) on circular needle size 3.5 mm with Karisma. P 1 row from WS, then continue in rib as follows from RS: 1 GARTER ST - see above, K1, P1, K1, P1, K1, P1, * K2, P2 *, repeat from *-* until 9 sts remain, finish with K2, P1, K1, P1, K1, P1, K1 and 1 GARTER ST. Continue like this until piece measures 4 cm. Now insert 2 markers in piece, 56-60-68-76-84-92 sts in from each side. Change to circular needle size 4 mm and continue in stocking st with 7 front band sts each side as before (= 1 garter st, K1, P1, K1, P1, K1 and P1 as seen from RS) and the 14 middle sts each side (i.e. 7 sts each side of marker) in rib (= P2, K2, P2, K2, P2, K2 and P2). AT THE SAME TIME on first row in stocking st dec 9-9-12-14-16-18 sts evenly on each front piece and 20-20-26-26-30-34 sts evenly on back piece – NOTE: Do not dec on front bands or on the 14 rib sts each side = 174-190-210-234-258-282 sts. REMEMBER THE KNITTING TENSION AND REMEMBER BUTTONHOLES ON RIGHT FRONT BAND! When piece measures 8 cm inc 1 st each side of the 14 rib sts each side – See INCREASING TIP! Repeat the inc on every 7 cm a total of 4 times = 190-206-226-250-274-298 sts. When piece measures 34-35-36-37-38-39 cm work next row as follows from RS: work 44-48-53-59-65-71 sts (= right front piece), cast off the 14 rib sts (i.e. 7 sts each side of marker), work 74-82-92-104-116-128 sts (= back piece), cast off the 14 rib sts (i.e. 7 sts each side of marker) and work the remaining 44-48-53-59-65-71 sts (= left front piece). Put piece aside and knit the sleeves. SLEEVE: Cast on 56-56-60-60-64-64 sts on double pointed needles size 3.5 mm with Karisma. K 1 round, then work rib, K2/ P2. When rib measures 10 cm change to double pointed needles size 4 mm. Work next round as follows: K2, P2, K2, P2, then stocking st until 6 sts remain on round, AT THE SAME TIME dec 6-4-6-6-8-8 sts evenly on these stocking sts, finish with P2, K2 and P2 = 50-52-54-54-56-56 sts. Continue like this with stocking st and 14 rib sts mid under sleeve. When piece measures 13-12-11-12-11-14 cm inc 2 sts mid under sleeve (i.e. 1 st each side of rib section) – See INCREASING TIP! Repeat the inc on every 2.5-2.5-2.5-2-2-1.5 cm a total of 12-13-14-16-17-19 times = 74-78-82-86-90-94 sts. When piece measures 45 cm for all sizes cast off the 14 rib sts mid under sleeve = 60-64-68-72-76-80 sts. Put piece aside and knit the other sleeve. YOKE: Slip sleeves on the same circular needle as body piece where cast off for armhole = 282-306-334-366-398-430 sts. Work 2-3-4-2-3-4 cm stocking st (with front bands as before). AT THE SAME TIME after 1 cm stocking st dec 4-6-6-0-5-10 sts evenly – do not dec on front bands. Repeat the dec in Size L + XXL + XXXL after another 1-1-2 cm stocking st = 278-300-322-366-388-410 sts. Work next row as follows from RS: 7 front band sts as before, work M.1 (= 22 sts – see diagram for your size) a total of 12-13-14-16-17-18 times and finish with 7 front band sts as before. Continue pattern like this AT THE SAME TIME dec as shown in diagram. After M.1 there are 98-105-112-126-133-140 sts left on needle. ELEVATION MID BACK: Insert a marker mid on needle (i.e. in SIZE S + L + XL + XXXL between the 2 middle sts and in SIZE M + XXL in the middle st on needle = mid back). Beg from WS by marker and work K over K and P over P until 18 sts remain on needle (i.e. stop just before P2 as seen from WS), turn piece, slip first st, tighten thread and work row until 19 sts remain on needle (i.e. stop just before K2 as seen from RS). Turn piece, slip first st, tighten thread and work row until 25-25-25-32-32-32 sts remain on needle (i.e. stop just before P2 as seen from WS), turn piece, slip first st, tighten thread and work row until 26-26-26-33-33-33 sts remain (i.e. stop just before K2 as seen from RS). Turn piece, slip first st, tighten thread and work row until 32-32-32-46-46-46 sts remain on needle (i.e. stop just before P2 as seen from WS), turn piece, slip first st, tighten thread and work row until 33-33-33-47-47-47 sts remain ( i.e. stop just before K2 as seen from RS). Turn piece, slip first st, tighten thread and work row until 39-39-39-52-52-52 sts remain on needle (i.e. stop just before P2 as seen from WS), turn piece, slip first st, tighten thread and work row until 40-40-40-53-53-53 sts remain (i.e. stop just before K2 as seen from slip from RS. SIZE S + M + L finish here, cut the thread. SIZE XL + XXL + XXXL: Turn piece, slip first st, tighten thread and work row until 59 sts remain on needle (i.e. stop just before P2 as seen from WS), turn piece, slip first st, tighten thread and work row until 60 sts remain (i.e. stop just before K2 as seen from RS), cut the thread. NECKLINE: Change to circular needle size 3.5 mm. Beg from RS and K 2 rows on all sts (work front bands as before), AT THE SAME TIME on last row inc 11-10-9-4-3-2 sts evenly = 109-115-121-130-136-142 sts. Continue in rib as follows from RS: 7 front band sts as before, * K2, P1 *, repeat from *-* until 9 sts remain, finish with K2 and 7 front band sts as before. Continue like this until neckline measures 4-5 cm. Cast off with K over K and P over P. ASSEMBLY: Sew openings under sleeves. Sew on buttons. |
||||||||||||||||||||||||||||||||||||||||
Diagram explanations |
||||||||||||||||||||||||||||||||||||||||
|
||||||||||||||||||||||||||||||||||||||||

|
||||||||||||||||||||||||||||||||||||||||

|
||||||||||||||||||||||||||||||||||||||||
|
Have you made this or any other of our designs? Tag your pictures in social media with #dropsdesign so we can see them! Do you need help with this pattern?You'll find tutorial videos, a Comments/Questions area and more by visiting the pattern on garnstudio.com. © 1982-2024 DROPS Design A/S. We reserve all rights. This document, including all its sub-sections, has copyrights. Read more about what you can do with our patterns at the bottom of each pattern on our site. |
||||||||||||||||||||||||||||||||||||||||


With over 40 years in knitting and crochet design, DROPS Design offers one of the most extensive collections of free patterns on the internet - translated to 17 languages. As of today we count 304 catalogues and 11422 patterns - 11422 of which are translated into English (UK/cm).
We work hard to bring you the best knitting and crochet have to offer, inspiration and advice as well as great quality yarns at incredible prices! Would you like to use our patterns for other than personal use? You can read what you are allowed to do in the Copyright text at the bottom of all our patterns. Happy crafting!
Comments / Questions (36)
Thanks for getting back.Im sorry my real problem is the first symbol on graph the 4 sts slipped I've tried it's the yarn front and back I dont get .does yarn come back to front after slipping sts leaving loop in front .does this stitch have a name . beautiful cardigan love to finish it .had visions of making 2nd one for a gift .
24.04.2023 - 23:30DROPS Design answered:
Dear Lynette, on the 7th symbol, work as follows from wrong side: place yarn towards you (towards wrong side of piece), slip the next 4 stitches as if to purl (without working them ), place the yarn away from you and knit the next stitches as shown in diagram. Happy knitting!
25.04.2023 - 08:45Pattern graph 4 sts as to purl yarn behind, the jumper version is different do you have visual explanation as to do this
23.04.2023 - 00:03DROPS Design answered:
Dear Lynette, this symbol is different because it's worked on a wrong side row on the jacket (and since jumper is worked in the round, this is worked on a right side row on jumper). Happy knitting!
24.04.2023 - 10:47For the mid elevation do you start knitting from the marker to the end and then turn Do you have to do the elevation ?
24.02.2023 - 20:23DROPS Design answered:
Dear Pat, if you don't want to work an elevation, you can skip it and go to NECKLINE directly. Happy knitting!
26.02.2023 - 22:50If the diagram shows right side stitches only, what stitches do you do on the wrong side
16.02.2023 - 13:55DROPS Design answered:
Dear Pat, the diagrams shows all the rows, seen from RS, this means read them from the bottom corner on the right side towards the left from RS and from the left towards the right from WS - and see symbols to know if you have to K or P the stitches from WS. Happy knitting!
16.02.2023 - 14:02How can I purl wrong side circular needle ,back to start right side pattern 121/29 first row.
18.09.2022 - 08:53DROPS Design answered:
Dear Mrs Bailey, from wrong side read the diagram left towards the right and work as explained by the symbols: x = knit from wrong side, white = purl from wrong side. Happy knitting!
19.09.2022 - 11:43I posted question this morning but scrolled down further & all information was written so thankyou.
04.07.2022 - 02:55Would like to know what size is M as I'm 36 in bust.Is size suitable. PS love yor designs
04.07.2022 - 00:24DROPS Design answered:
Hi Lyne, You can find a measurements chart at the bottom of the pattern showing all the measurements for the different sizes. Happy crafting!
04.07.2022 - 07:03Ronding middenachter moet je draad opnieuw aanhechten of doorgaan met draad waar je mee bezig bent en daar van uit verder breien. Ik vind dit best onduidelijk
17.10.2021 - 15:03DROPS Design answered:
Dag Joke,
Volgens het patroon begin je inderdaad midden achter bij de markeerdraad, dus de draad opnieuw aanhechten.
19.10.2021 - 13:20Önskar sticka en kofta i Kashmir men hittar så få mönster. Kan ni hjälpa mig hitta flera och vad kostar det garnet? Vill sticka enfärgat och är mycket känslig för klåda av ull. (Har stickat av Viking eco Highland wool som jag tycker kliar.)
22.08.2021 - 12:37DROPS Design answered:
Hej Eva. Vi har dessvärre inget garn i kashmir, eller är det något annat garn du tänkte på? Mvh DROPS Design
24.08.2021 - 09:45Hej jeg skal i gang med mønster M1 hvor mange maske er der mellem de 22 mønster masker På forhånd tak Bubbi
06.01.2021 - 11:50DROPS Design answered:
Hej Bubi, for hver gang du har strikket de 22 masker i M.1 starter du forfra i M1 og det gør du hele vejen rundt. God fornøjelse!
11.01.2021 - 13:13