
Popular categories
Looking for a yarn?


Comments / Questions (10)
![]() Jeanette wrote:
Jeanette wrote:
Vedr.: Chess Cardigan 56/11. Kan der bruges noget andet garn end Bomull-Lin .
15.01.2021 - 05:21DROPS Design answered:
Hej Jeanette, ja du kan bruge de andre garner som indgår i garngruppe C. Prøv vores garnomregner, vælg Bomull-Lin, vælg antal gram for din størrelse og vælg 1 tråd, så får du masser af muligheder :)
15.01.2021 - 07:48
![]() Kay Sheils wrote:
Kay Sheils wrote:
I am having trouble understanding how much Yarn I will need to make this garment. For a size medium am I correct that it requires 1000 grams or 1860 yards?
13.01.2018 - 19:28DROPS Design answered:
Dear Kay, to knit this sweater in size M you will need 950 gramms of color no.3 and 50 gramms of the color no.2 of DROPS Bomull Lin yarn. If you want to knit the jacket all in one color, you will need 1000 gramms. Happy Knitting!
13.01.2018 - 21:20
![]() Edith wrote:
Edith wrote:
Jeg kan ikke få indtagning til at passe på str l kan du hjælpe mig tak
25.10.2014 - 12:17DROPS Design answered:
Hej Edith, Hvilke indtagninger? Du lukker af til ærmegab og hals ifølge opskriften. Hvis vi skal kunne hjælpe dig så er du nødt til at skrive nøjagtig hvor du er i opskriften!
28.10.2014 - 09:10
![]() Diana wrote:
Diana wrote:
Ser du pilen vid S+L nederst på diagrammet? Där ska du börja. Och ärmen stickas med strumpstickor, det står i mönstret.
27.07.2014 - 09:13
![]() Edith Pedersen wrote:
Edith Pedersen wrote:
Jeg strikke med 274 maske undskyld alt mit skriverier
26.07.2014 - 20:57
![]() Edith Pedersen wrote:
Edith Pedersen wrote:
Skal ærmet strikkes på rund pind eller frem og til bage tak
26.07.2014 - 20:50DROPS Design answered:
Hej Edith. Se mit svar til dig herunder. God fornøjelse videre.
07.08.2014 - 12:44
![]() Diana wrote:
Diana wrote:
Fråga 2(storlek S): 5 + 13 + 15(14) + 13 + 5 = 246
26.07.2014 - 13:30
![]() Edith Pedersen wrote:
Edith Pedersen wrote:
Tusind tak for den første spørsmål det er bare dejlig at man kan skrive til jer tak
25.07.2014 - 19:32
![]() Edith Pedersen wrote:
Edith Pedersen wrote:
Er der fejl i denne mønster jeg har 3 masker i overskud eller skel jeg slutte en vrang og en ret
25.07.2014 - 19:12DROPS Design answered:
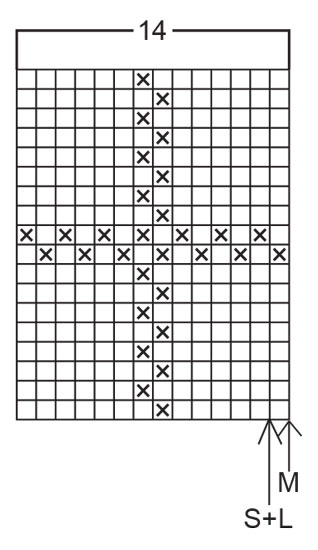
Hej Edith. Mønstret skulle være korrekt. Du skal starte ved pilen i diagrammet for str S+L. Med 274 m og 14 m per gentagelse har du 18 hele gentagelser af diagrammet (252 m) og 2 x 5 m til stolpen. Du strikker også de sidste 12 m som diagrammet og ender derfor ved andensidst maske. Dvs, dine firkanter er nu ens på hver side af stolpen (du starter ved anden maske og ender ved andensidste maske). Du strikker ærmerne på strømpepind - dvs du strikker rundt, men du kan også bruge en kort rundpind (40 cm)
07.08.2014 - 12:37
![]() Edith wrote:
Edith wrote:
Er firkantener ikke ret på retsiden og vrang på vrangsiden
12.07.2014 - 21:13DROPS Design answered:
Hej Edith. Jo, det er korrekt. Og der strikkes perlestrik mellem firkanterne (ret, vrang på retsiden og vrang, ret på vrangsiden)
14.07.2014 - 16:56
|
|||||||
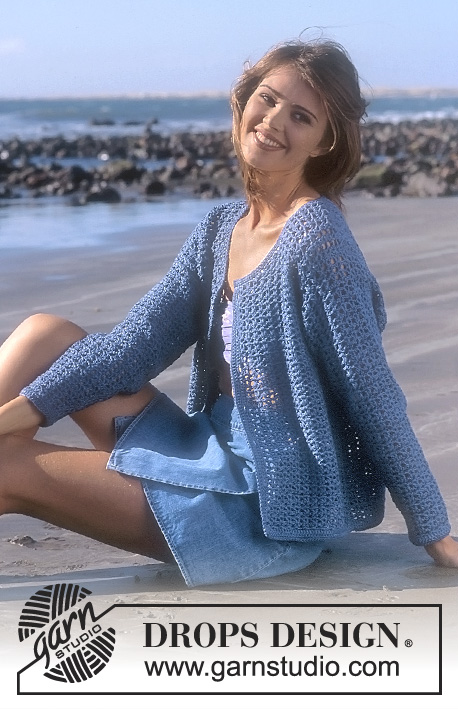
Chess Cardigan |
|||||||
|
|
|||||||
DROPS Cardigan in Bomull-Lin
DROPS 56-11 |
|||||||
|
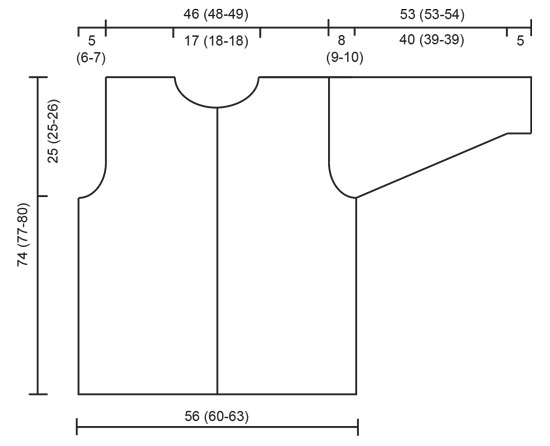
Gauge: 21 sts and 28 rows on larger needles in pattern = 10 x 10 cm [4» x 4»] Buttonholes: When the work measures 1 (1-1) cm, 10.5 (10.5-11) cm, 19.5 (20-21) cm, 28.5 (29.5-31) cm, 37.5 (39.5-41) cm, 46.5 (49-51) cm, 55.5 (58.5-61) cm and 65 (68-71) cm, bind off for buttonholes on the right front as follows: Bind off the 3rd and 4th sts and cast on 2 new sts over the bound-off sts on the next row. Pattern: See chart (1 chart = 1 repeat). The pattern is shown from the right side. Arrows indicate the starting point for different sizes. Seed stitch (knit flat on an uneven number of sts): K 1, *P 1, K 1* every row Seed stitch (worked in the round on an even number of sts): Row 1: *K 1, P 1* Row 2: *P 1, K 1* Garter Stitch, when knitting flat: Knit all sts, all rows. Garter Stitch, when knitting in the round: *Rnd 1, knit. Rnd 2, purl *. Repeat from * - *. Body: Cast on 246 (262-274) sts (including 5 sts at each edge for buttonbands) on smaller circular needles with Col. 3 and knit 4 rows garter st. Change to larger needles and knit Pattern, keeping 5 sts at each edge for buttonband in seed stitch throughout. Start the pattern at the appropriate arrow on the chart after the buttonband sts. Remember to make buttonholes on the right front (see instructions above). When the work measures 49 (52-54) cm, work the next row as follows: 62 (66-69) sts for the front, bind off 4 sts for armhole, 114 (122-128) sts for the back, bind off 4 sts for armhole, 62 (66-69) sts for the front. Knit the rest of each part separately. Front: = 62 (66-69) sts. Bind off for armholes every other row: 3 sts 1 time, 2 sts 2 (3-3) times, dec 1 st 2 (2-4) times = 53 (55-56) sts. When the work measures 66 (69-72) cm, bind off at the neck edge every other row: 10 (11-11) sts 1 time, 3 sts 2 times, 2 sts 2 times, dec 1 st 3 times. Bind off all sts when the work measures 74 (77-80) cm. Back: = 114 (122-128) sts. Shape armholes as for front = 96 (100-102) sts. When the work measures 72 (75-78) cm, bind off the center 32 (34-34) sts for the neck. Then bind off 2 sts at each neck edge on the next row. Bind off all sts when the work measures 74 (77-80) cm. Sleeves: Cast on 50 (52-52) sts on smaller double pointed needles with Col. No. 2; join and place a marker at the join. Work seed stitch for 5 cm. Change to larger double pointed needles and Col. No. 3 and knit pattern, centering the pattern on the sleeve. After the seed stitch border, inc 1 st on each side of marker 28 (27-29) times, alternately every 3rd and 4th row = 106 (106-110) sts. When the work measures 45 (44-44) cm, bind off 2 sts each side of marker and knit the rest back and forth on the needles. Then bind off 3 sts each side every other row 11 (12-13) times, bind off all remaining sts. The work measures approx. 53 (53-54) cm. Assembly: Sew shoulder seams. Pick up approx. 90-110 sts around the neck on smaller double pointed needles with Col. No. 2 and knit 4 rows garter st, bind off. Sew on the sleeves and buttons. |
|||||||
Diagram explanations |
|||||||
|
|||||||
 |
|||||||
 |
|||||||
Have you finished this pattern?Tag your pictures with #dropspattern or submit them to the #dropsfan gallery. Do you need help with this pattern?You'll find 17 tutorial videos, a Comments/Questions area and more by visiting the pattern on garnstudio.com. © 1982-2026 DROPS Design A/S. We reserve all rights. This document, including all its sub-sections, has copyrights. Read more about what you can do with our patterns at the bottom of each pattern on our site. |
|||||||


With over 40 years in knitting and crochet design, DROPS Design offers one of the most extensive collections of free patterns on the internet - translated to 17 languages. As of today we count 324 catalogs and 12290 patterns - 12280 of which are translated into English (US/in).
We work hard to bring you the best knitting and crochet have to offer, inspiration and advice as well as great quality yarns at incredible prices! Would you like to use our patterns for other than personal use? You can read what you are allowed to do in the Copyright text at the bottom of all our patterns. Happy crafting!
Post a comment to pattern DROPS 56-11
We would love to hear what you have to say about this pattern!
If you want to leave a question, please make sure you select the correct category in the form below, to speed up the answering process. Required fields are marked *.