
Popular categories
Looking for a yarn?


Comments / Questions (31)
![]() Gail wrote:
Gail wrote:
I'm struggling to understand the instructions of the very last paragraph on page two. Is there a way to explain this more clearly to me? Thank you
16.04.2026 - 19:08DROPS Design answered:
Dear Gail, do you mean the paragraph when body measures 47-49-51 cm [18.5"-19.25"-20"] ? You will now create neckline on front piece casting off the middle 20-22 sts + the 5 steek sts and work now back and forth from mid front casting off at the beginning of each row on each side (= from both right side and wrong side) for neckline: 2 sts at the beg of next 6 rows (= 2 sts 3 times on each side) and 1 st at the beg of next 8 rows (= 1 st 4 times on each side). When piece meausres 52-54-56 cm [20.5"-21.25"-22"] cast off the middle 33-35 sts for the neck on back piece and continue each side separately casting off at the beg of each from from back piece 2 sts 1 time and 1 st 1 time. Cast off the remaining sts at the requested length and repeat for the 2nd shoulder. Can this help? Happy knitting!
17.04.2026 - 08:24
![]() Giusy wrote:
Giusy wrote:
Buonasera ho visto che il drops cotton viscose non è disponibile. Con quale altro filato potrei sostituirlo? Grazie
10.12.2025 - 17:11DROPS Design answered:
Buonasera Giusy, può sostituire DROPS Viscose con un filato del gruppo A come DROPS Alpaca. Buon lavoro!
10.12.2025 - 18:37
![]() Elisabeth Burtus wrote:
Elisabeth Burtus wrote:
Vad menas med att \"På nästa v ökas det 5 m över de avm ärmhålsm i varje sida (dessa m är till att klippa upp i efteråt och stickas inte in i mönstret)\" Ska man lägga upp 5 maskor över de tolv avmaskade maskorna
27.10.2025 - 11:56DROPS Design answered:
Hi Elisabeth, these 5 stitches will be cut afterwards and you will obtain arms opening. You will cast on 5 new sts over the bound off 12 armhole sts at each side. How to do this you will find HERE. Happy knitting!
06.11.2025 - 08:45
![]() ColetteDundas wrote:
ColetteDundas wrote:
Hi can you recommend an alternative to drops cotton viscose in rust plz. Unfortunately above has been discontinued. Thankyou looking forward to getting started
03.06.2025 - 13:00DROPS Design answered:
Hi, you can use for ex. DROPS Safran 59 - red clay or Alpaca 2925 - rust. Happy knitting!
03.06.2025 - 13:08
![]() Heike wrote:
Heike wrote:
Bin jetzt vor den Ärmelabnahmen (Körper). Habe insgesamt 243 Maschen. Abnahmen Ärmel lt. Anleitung Geöße XL insgesamt 60 Maschen für beide Ärmellöcher. Restmaschen wären dann 183 Maschen. Lt. ihrer Anleitung soll ich aber198 Maschen haben . Wo mache ich den Fehler?
07.04.2025 - 08:42DROPS Design answered:
Liebe Heike, in XL sind es 273 Maschen + 3 Steek (vordere Mitte) = 276 M, dann sind es 5 M für das vordere Mitte + 61 M Vorderteil (- 14 M abketten + 5 M anschlagen für das Armloch), 121 M Rückenteil (- 14 M abketten + 5 M anschlagen für das Armloch), 61 M Vorderteil: 5+61+5+121+5+61=258 M - dann wird man für die Armlöcher: 4 M x 8 Mal + 4 Maschen x 7 Mal abnehmen = (32+28=60) = 258-60=198 Maschen übrig. Kann das Ihnen helfen? Viel Spaß beim Stricken!
07.04.2025 - 14:36
![]() Ilona Zettl-Bassing wrote:
Ilona Zettl-Bassing wrote:
Noch einmal ich, muss ich die 10 M abnehmen, oder zunehmen? In der Anleitung steht nähmlich dass die Maschen zugenommen werden? Liebe Grüße Ilona
02.12.2024 - 18:03DROPS Design answered:
Liebe Ilona, Verzeihung, diese 10 Maschen sollen ja zugenommen werden und nicht abgenommen. Viel Spaß beim Stricken!
03.12.2024 - 08:54
![]() Ilona Zettl-Bassing wrote:
Ilona Zettl-Bassing wrote:
Muss ich die 10 M am Ärmelabschluß über die gesamten Ärmelabschlußmaschen aufnehmen und dann die 2 cm glatt rechts mit den linken Maschen nach außen stricken, oder erst kurz vor dem Abketten?
01.12.2024 - 22:21DROPS Design answered:
Liebe Frau Zettl-Bassing, nach den verkürzten Reihen stricken Sie alle Maschen wieder, dieses Mal aber glattlinks (Hinreihe links, Rückreihe rechts), bei der 1. Reihe von diesen 2 cm glattlinks, nehmen Sie regelmäßig verteilt 10 Maschen ab. nach den 2 cm glattlinks abketten. Viel Spaß beim Stricken!
02.12.2024 - 10:47
![]() Ilona Zettl-Bassing wrote:
Ilona Zettl-Bassing wrote:
Kann mir hier jemand helfen mit dem Aermelabschluß?
01.12.2024 - 22:17DROPS Design answered:
Liebe Frau Zettl-Bassing, die Armkugel wird mit verkürzten Reihen gestrickt, so legen Sie die jeweiligen Maschen beidseitig still, dann stricken Sie 2 cm glatt links über alle Maschen (mit 10 Abnahmen bei der 1. Reihe), dann Maschen abketten. Viel Spaß beim Stricken!
02.12.2024 - 10:45
![]() Gertrud Stiefler wrote:
Gertrud Stiefler wrote:
Hej, Hvorfor er farven rust i Cotton Viscose og ikke i Alpaca? Mvh, Gertrud
28.06.2024 - 23:29DROPS Design answered:
Hei Gertrud. Det var nok for å fremheve de områdene som skulle strikkes i Cotton Viscose. Denne kvaliteten er utgått fra vårt sortiment, så da kan du heller strikke den i en lignende farge i Alpaca. mvh DROPS Design
01.07.2024 - 14:02
![]() Monique wrote:
Monique wrote:
Goedendag, kan ik voor dit patroon ook Fabel garden gebruiken of kom ik dan met de steeks in de problemen met een superwash garen? MVG Monique
19.12.2023 - 19:35DROPS Design answered:
Dag Monique,
DROPS Fabel valt in dezelfde garencategorie (/dikte), dus daar kun je het prima mee vervangen. Maak voor de zekerheid wel even een proeflapje.
20.12.2023 - 18:45
|
|||||||||||||||||||
Tanglewood |
|||||||||||||||||||
 |
 |
||||||||||||||||||
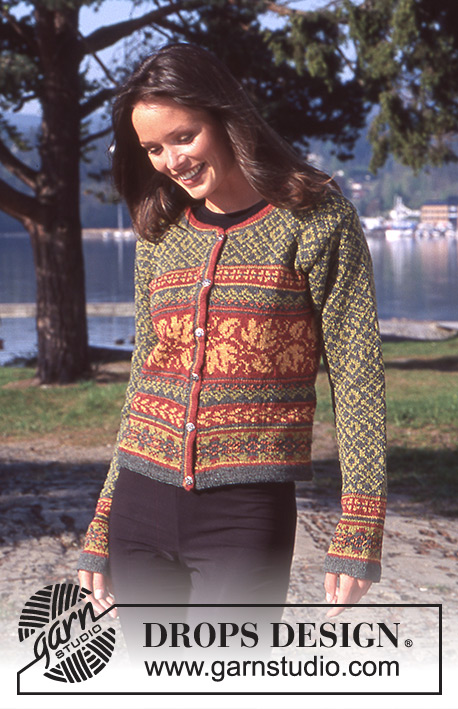
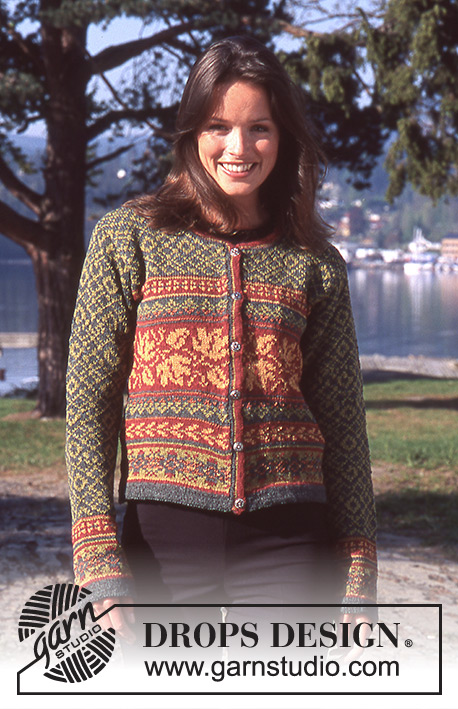
DROPS Fair Isle cardigan in Alpaca
DROPS 67-20 |
|||||||||||||||||||
|
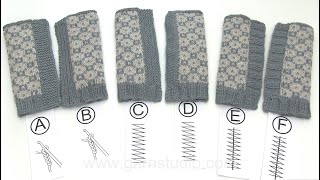
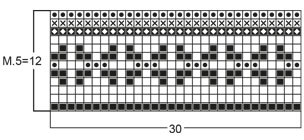
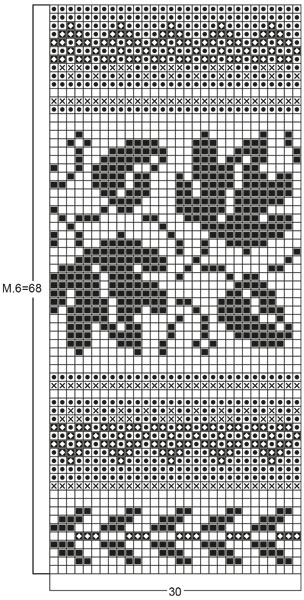
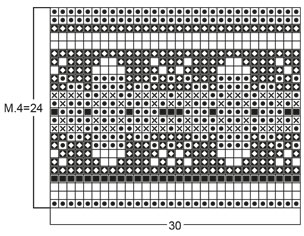
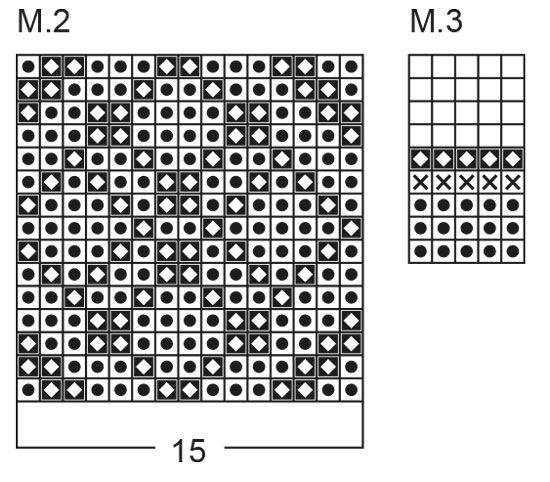
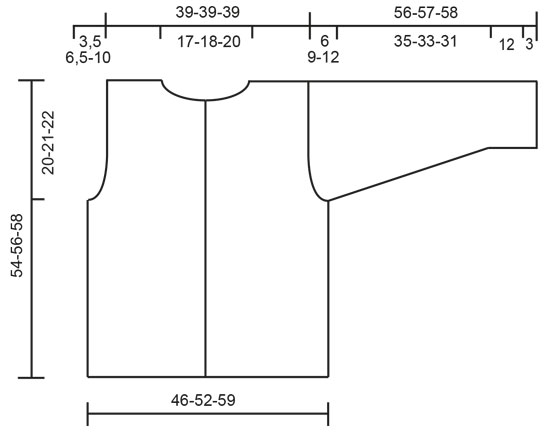
Gauge: 23 sts x 30 rows on larger needles in stockinette st = 10 x 10 cm [4" x 4"] Border: Knit 3 cm [1.25"] stockinette st, 1 row reverse stockinette st (folding edge - measure the work from here), 3 cm [1.25"] stockinette st. Pattern: See charts (1 chart = 1 repeat). The pattern is seen from the right side and is knit entirely in stockinette st. Body: The cardigan is knit in the round after the border with steeks cut for armholes and at center front. Cast on 213-243-273 sts on smaller circular needles with green/turquoise, knit border - see instructions above. Change to larger circular needles; inc 3 sts at center front and join = 216-246-276 sts (the 5 sts at center front are for the steek and are not knit in the pattern). Knit Pattern 1 over all sts (except 5 steek sts) 1 time, then Pattern 2 to finished dimensions. When the piece measures 34-35-36 cm [13⅜"-13.75"-14⅛"] knit the next row as follows: 5 steek sts, 48-54-61 sts for the front, bind off 10-12-14 sts for armhole, 95-109-121 sts for the back, bind off 10-12-14 sts for armhole, 48-54-61 sts for the front. On the next row cast on 5 sts over the bound off armhole sts at each side (these sts are for the armhole steeks and are not knit in pattern). Dec 1 st for armhole at each side of the 5 steek sts as follows: 0-3-8 times every row, then 2-6-7 times every other row = 198-196-198 sts. When the piece measures approx. 47-49-51 cm [18.5"-19.25"-20"] bind off the center 20-20-22 + 5 steek sts for the front neck = 173-171-171 sts and knit the rest back and forth on needles. Bind off at each neck edge every other row: 2 sts 3-3-3 times, 1 st 4-4-4 times = 153-151-151 sts. When the piece measures 52-54-56 cm [20.5"-21.25"-22"] bind off the center 33-35-35 sts for the back neck. Bind off at each back neck edge every other row: 2 sts 1-1-1 time and 1 st 1-1-1 time = 57-55-55 sts each side. Bind off when the piece measures 54-56-58 cm [21.25"-22"-22⅞"]. Sleeve: Cast on 60-60-60 sts on smaller double-pointed needles with green/turquoise; join and place a marker at the join. Knit border - see instructions above. Change to larger double pointed needles and knit Pattern 4 and then Pattern 5. After Pattern 5 is complete, the piece measures approx. 15-15-15 cm [5⅞"]. Knit the rest of the sleeve in Pattern 2. After Pattern 5 inc 1 st each side of marker 14-16-18 times: Size S/M: alternately every 7th and 8th rows Size M/L: every 6 rows, Size Extra Large: every 5 rows = 88-92-96 sts - knit the increased sts in pattern as you go along. When the piece measures 50-48-46 cm [19.75"-18⅞"-18⅛"] separate piece at marker and knit the rest back and forth on needles. When the piece measures 52-50.5-49 cm [20.5"-19⅞"-19.25"] put sts on a st holder at each side every other row as follows: 3 sts 2-2-2 times, 2 sts 1-2-2 times, 1 st 0-2-6 times, 2 sts 1-2-2 times and 3 sts 2-2-2 times. The piece measures approx. 56-57-58 cm [22"-22.5"-22⅞"]. Put all sts back on needles and knit 2-2-2 cm [0.75"] reverse stockinette st in green, increasing 10 sts evenly distributed across the first row. Bind off. Assembly: Sew a marker thread in the center of the steek sts on either side and at the center front. Sew two machine seams around the marker thread, 1st seam = 1/2 st from the marker thread, 2nd seam = 1/2 st from first seam. Cut steeks for armholes and at the center front. Sew shoulder seams. Button band + neckband: Pick up sts along left button band and around neck to center back. Pick up approx. 165 - 180 sts with green/turquoise on smaller circular needles. Knit Pattern 3, increasing 2 sts in the corner between button band and neck on the first row. Repeat the inc every other row. After Pattern 3 knit 1 row reverse stockinette st (seen from the right side) for the folding edge. Then knit 9 rows stockinette st for the facing in Pattern 3 but reverse the colors (start at the top of the chart and work down), decreasing 2 sts in the corner between the button band and neck every other row. Bind off. Repeat along right front and neck, but after 1 cm [⅜"] space 6-6-6 buttonholes evenly distributed along button band (1 buttonhole = bind off 2 sts, cast on 2 new sts over the bound off sts on the next row). Make corresponding buttonholes on the facing. Sew together the neck band at center back. Fold band against the wrong side and stitch down. Fold the borders at the bottom edges of body and sleeves against the wrong side and stitch down. Sew in sleeves, fold the seam allowance over the cut edges on Body and stitch down. Sew in buttons. |
|||||||||||||||||||
Diagram explanations |
|||||||||||||||||||
|
|||||||||||||||||||
 |
|||||||||||||||||||
 |
|||||||||||||||||||
 |
|||||||||||||||||||
 |
|||||||||||||||||||
 |
|||||||||||||||||||
Have you finished this pattern?Tag your pictures with #dropspattern or submit them to the #dropsfan gallery. Do you need help with this pattern?You'll find 21 tutorial videos, a Comments/Questions area and more by visiting the pattern on garnstudio.com. © 1982-2026 DROPS Design A/S. We reserve all rights. This document, including all its sub-sections, has copyrights. Read more about what you can do with our patterns at the bottom of each pattern on our site. |
|||||||||||||||||||


With over 40 years in knitting and crochet design, DROPS Design offers one of the most extensive collections of free patterns on the internet - translated to 17 languages. As of today we count 324 catalogs and 12290 patterns - 12280 of which are translated into English (US/in).
We work hard to bring you the best knitting and crochet have to offer, inspiration and advice as well as great quality yarns at incredible prices! Would you like to use our patterns for other than personal use? You can read what you are allowed to do in the Copyright text at the bottom of all our patterns. Happy crafting!
Post a comment to pattern DROPS 67-20
We would love to hear what you have to say about this pattern!
If you want to leave a question, please make sure you select the correct category in the form below, to speed up the answering process. Required fields are marked *.