DROPS Ribbon
DROPS Ribbon
45% Cotton, 45% Viscose, 10% Linen
Discontinued
find alternatives
DROPS SS24
DROPS 69-21
Sizes: S/M - M/L - XL
Finished measurements: 116-126-138 cm [45-⅝" - 49-⅝" - 54-⅜"]

Materials: DROPS RIBBON,
45% cotton, 45% viscose, 10% linen, 50 g./78 m./85 yards
550-600-650 g. col. no. 04, beige multicolor.

Alternate yarns:
* DROPS PARIS, 100% cotton, 50 g/75 m./82 yards
* DROPS ALASKA, 100% pure new wool, 50 g/75 m./82 yards

DROPS 4.5 mm [US 7] needles, or size needed to obtain correct gauge.

-------------------------------------------------------

Alternative Yarn – See how to change yarns here
Yarn Groups A to F – Use the same pattern and change the yarn here
Yarn usage using an alternative yarn – Use our yarn converter here

-------------------------------------------------------

DROPS Ribbon
DROPS Ribbon
45% Cotton, 45% Viscose, 10% Linen
Discontinued
find alternatives

Pattern instructions

NOTE: This pattern is written in American English. All measurements in charts are in cm. For conversion from inches to cm - click here. There are different terms for crocheting in American and British English. If this pattern includes crochet, click for "crochet terms" here. For this pattern in British English, please click here.
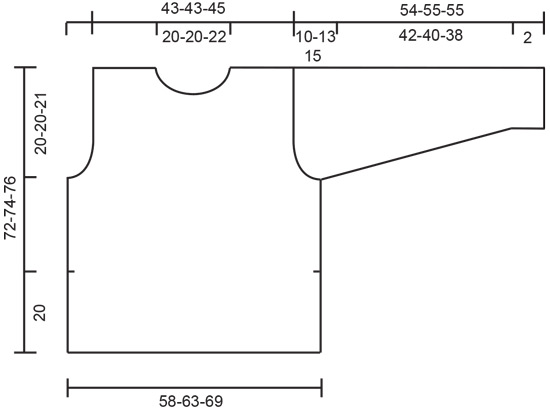
Gauge: 13 sts x 22 rows in pattern = 10 x 10 cm [4" x 4"].

Pattern:
Row 1 (right side): P
Row 2 (wrong side): * P 1, yo *, repeat from * - *.
Row 3: * K 1, let yo from previous row drop *, repeat from * - *.
Row 4: K
Row 5: * K 1, yo *, repeat from * - *.
Row 6: * P 1, let yo from previous row drop *, repeat from * - *.
Repeat rows 1 - 6.

Garter st, when knitting flat: Knit all sts, all rows.
Garter st, when knitting in the round: *Rnd 1, knit. Rnd 2, purl.* Repeat from * - *.

Knitting tip: Ribbon has a tendency to twist when knit. For best results, untwist the yarn as you go along.

NOTE: All measurements in the pattern refer to the garment measured when held up or worn. This is because the pattern pulls in and lengthens.

Front: Cast on 76-82-90 sts on smaller needles and knit 6 rows garter st. Put 5 sts at each side on a st holder (these 5 sts will be knit in garter st and sewn to Body afterwards) = 66-72-80 sts on needles. Continue with pattern - see instructions above. When the piece measures approx. 20 cm [7⅞"] cast on 6 sts at each side = 78-84-92 sts. Continue pattern over all sts.
When the piece measures 52-54-55 cm [20.5" - 21.25" - 21⅝"] bind off for armhole at each side every other row: 3 sts 1-1-1 time, 2 sts 2-4-5 times, 1 st 4-3-4 times = 56-56-58 sts. When the piece measures 65-66-67 cm [25⅝" - 26" - 26⅜"] bind off the center 12 sts for the neck. Then bind off at each neck edge every other row: 2 sts 1-1-1 time and 1 st 5-5-6 times. When the piece measures 71-73-75 cm [28" - 28.75" - 29.5"] knit 2 rows garter st over all sts and then bind off all sts. The piece measures approx. 72-74-76 cm [28.25" - 29⅛" - 29⅞"].

Back: Cast on and knit the same as the front. Bind off for armhole as on front and continue until the piece measures 70-72-74 cm [ 27⅝" - 28.25" - 20⅛"].
Bind off the center 22-22-24 sts for the neck. On the next row bind off 2 sts at each neck edge. Knit 2 rows garter st when the piece measures 71-73-75 cm [28" - 28.75" - 29.5"] and then bind off remaining 15 sts on each shoulder. The piece measures approx. 72-74-76 cm [28.25" - 29⅛" - 29⅞"].

Sleeve: Cast on 30-32-34 sts. Knit 6 rows garter st, then change to pattern. When the piece measures 9 cm [3.5"] inc 1 st at each side 11-10-10 times every 3 cm [1.25"] = 52-52-54 sts. When sleeve measures 44-42-40 cm [17.25" - 16.5" - 15.75"] bind off for sleeve cap at each side every other row: 2 sts 3-2-1 times, 1 st 5-11-14 times, then bind off 2 sts at each side every other row until the piece measures 54-55-55 cm [21.25" - 21⅝" - 21⅝"]. Bind off the remaining sts.

Assembly:
Put the 5 sts from st holders on each side on needles. Knit garter st over all sts for approx. 20 cm [7⅞"] (match length of side slit), bind off. Sew garter st band to Body.
Sew right shoulder. Pick up approx. 75 to 80 sts around the neck. Knit 4 rows garter st, bind off. Sew left shoulder and up along neckband. Sew in sleeves. Sew sleeve and side seams using edge sts as seam allowance – begin side seams above side slit.


CROCHETED HAT IN MUSKAT:

Sizes: S/M - M/L
Head measurement: 55 - 57 cm [21⅝" - 22.5"]

Materials: Garnstudio MUSKAT from Garnstudio
100% mercerized Egyptian cotton, 50 g./100 m./109 yards
200-200 g. col. no. 61, light beige.

DROPS 3 mm [US C] crochet hook, or size needed to obtain correct gauge.

Crochet gauge: 21 sc x 24 rows = 10 x 10 cm [4" x 4"]

Reverse crochet: Crochet sc on right side of work, from left to right without turning work. Crochet 1 sc in every sc from previous row.

Hat: Ch 4 and join into a ring with 1 sl st. Ch 1, 6 sc in the ring, ch 1 to turn.
1st row: 2 sc in every sc from previous row = 12 sc, put a marker at start of row.
2nd row: * 1 sc in first sc, 2 sc in the next sc *, repeat from * - * = 18 sc.
3rd row: * 1 sc in the first 2 sc , 2 sc in the next sc *, repeat from * - * = 24 sc.
4th row: * 1 sc in the first 3 sc, 2 sc in the next sc *, repeat from * - * = 30 sc.
5th row: * 1 sc in the first 4 sc, 2 sc in the next sc *, repeat from * - * = 36 sc.
Continue in this manner, increasing 6 sc per row - work 1 sc more between each inc on successive rows - until the piece measures 9.5-10.5 cm [3.75" - 4⅛"] from ring (the circumference will inc approx. 2 cm [0.75"] every row - continue until circumference = approx. 55-57 cm [21⅝" - 22.5"]). Then continue with sc without increasing until piece measures approx. 19-20 cm [7.5" - 7⅞"] from center. On the next row inc as follows: * 2 sc, 2 sc in the next sc *, repeat from * *. Then work 22 rows without increasing =hat brim. Work 1 row reverse crochet around edge - see instructions above. Cut yarn and fasten off.

Assembly: Make a small double edge (= rolled edge) on the outside of hat at the top as follows: with right side out, at the point you stop increasing make a fold and work a row of sc over the 2 layers. Crochet over 2 rows of sc each side of fold, so that 4 rows sc are worked into the rolled edge.
Fold hat brim (the last 22 rows) double to the right side. Attach edge to hat over 2 rows of sc in the same manner as the rolled edge.

Diagram

All measurements in charts are in cm.

diagram measurements
Do you have a question? See a list of frequently asked questions (FAQ)

Knitting tension is what determines the final measurements of your work, and is usually measured per 10 x 10 cm. It is provided like so: number of stitches in width x number of rows in height - eg: 19 stitches x 26 rows = 10 x 10 cm.

The knitting tension is very individual; some people knit/crochet loosely while others work tightly. You adjust the knitting tension with the needle size, which is why the suggested needle size only serve as a guide! You need to adjust this (up or down) to ensure that YOUR knitting tension matches the knitting tension provided in the pattern. If you work with a different knitting tension than provided you will have a different yarn consumption, and your work will have different measurements than what the pattern suggests.

The knitting tension also determines which yarns can replace each other. As long as you achieve the same knitting tension you can replace one yarn with another.

See DROPS lesson: How to measure your tension/gauge

See DROPS video: How to make a gauge tension swatch

The required amount of yarn is provided in grams, eg: 450 g. To calculate how many balls you’ll need you first need to know how many grams are in 1 ball (25g, 50g or 100g). This information is available if you click on the individual yarn quality on our pages. Divide the amount required with the amount of each ball. For example, if each ball is 50g (the most common amount), the calculation will be as follows: 450 / 50 = 9 balls.

The important thing when changing from one yarn to another is that the knitting/crochet tension remains the same. This is so that the measurements of the finished piece will be the same as on the sketch provided. It is easier to achieve the same knitting tension using yarns from the same yarn group. It is also possible to work with multiple strands of a thinner yarn to achieve the knitting tension of a thicker one. Please try our yarn converter. We recommend you to always work a test swatch.

Please NOTE: when changing yarn the garment might have a different look and feel to the garment in the photo, due to individual properties and qualities of each yarn.

See DROPS lesson: Can I use a different yarn than the one mentioned in the pattern?

All our yarns are categorised into yarn groups (from A to F) according to thickness and knitting tension – group A contains the thinnest yarns and group F the thickest. This makes it easier for you to find alternative yarns to our patterns, should you wish to switch yarn. All yarns within the same group have a similar knitting tension and can easily replace each other. However, different yarn qualities have different structures and properties which will give the finished work a unique look and feel.

Click here for an overview of the yarns in each yarn group

At the top of all our patterns you’ll find a link to our yarn converter, which is a helpful tool should you wish to use a different yarn than suggested. By filling in the yarn quality you wish to replace, the amount (in your size) and number of strands, the converter will present good alternative yarns with the same knitting tension. Additionally it will tell you how much you’ll require in the new qualities and whether you’ll need to work with multiple strands. Most skeins are 50g (some are 25g or 100g).

If the pattern is worked with multiple colours, every colour will have to be converted separately. Similarly, if the pattern is worked with several strands of different yarns (for example 1 strand Alpaca and 1 strand Kid-Silk) you will have to find alternatives for each, individually.

Click here to see our yarn converter

Since different yarns have different qualities and textures we have chosen to keep the original yarn in our patterns. However, you can easily find options among our available qualities by using our yarn converter, or simply pick a yarn from the same yarn group.

It is possible that some retailers still have discontinued yarns in stock, or that someone has a few skeins at home that they would like to find patterns for.

The yarn converter will provide both alternative yarn as well as required amount in the new quality.

If you think it's hard to decide what size to make, it can be a good idea to measure a garment you own already and like the size of. Then you can pick the size by comparing those measures with the ones available in the pattern's size chart.

You'll find the size chart at the bottom of the pattern.

See DROPS lesson: How to read size chart

The needle size provided in the pattern serves only as a guide, the important thing is to follow the knitting tension. And since knitting tension is very individual, you will have to adjust the needle size to ensure that YOUR tension is the same as in the pattern – maybe you’ll have to adjust 1, or even 2 needle sizes, up or down to achieve the correct tension. For this, we recommend that you work test swatches.

Should you work with a different knitting tension than the one provided, the measurements of the finished garment might deviate from the measurement sketch.

See DROPS lesson: How to measure your tension/gauge

See DROPS video: How to make a gauge tension swatch

Working a garment top-down provides more flexibility and room for personal adjustment. For example it is easier to try the garment on while working, as well as making adjustments to length of yoke and shoulder caps.

The instructions are carefully explaining every step, in the correct order. Diagrams are adjusted to the knitting direction and are worked as usual.

The diagram depicts all rows/rounds, and every stitch seen from the right side. It is read from bottom to top, from right to left. 1 square = 1 stitch.

When working back and forth, every other row is worked from the right side and every other row is worked from the wrong side. When working from the wrong side, the diagram will have to be worked reversed: from left to right, knit stitches are purled, purl stitches are knit etc.

When working in the round every round is worked from the right side and the diagram are worked from right to left on all rounds.

See DROPS lesson: How to read knitting diagrams

The diagram depicts all rows/rounds, and every stitch seen from the right side. It is worked from bottom to top, from right to left.

When working back and forth every other row is worked from the right side: from right to left and every other row is worked from the wrong side: from left to right.

When working in the round, every row in the diagram are worked from the right side, from right to left.

When working a circular diagram you start in the middle and work your way outwards, counter clockwise, row by row.

The rows usually start with a given number of chain stitches (equivalent to the height of the following stitch), this will either be depicted in the diagram or explained in the pattern.

See DROPS lesson: How to read crochet diagrams

Instructions for working several diagrams after each other on the same row/round, will often be written like so: “work A.1, A.2, A.3 a total of 0-0-2-3-4 times". This means you work A.1 once, then A.2 is worked once, and A.3 is repeated (in width) the number of times provided for your size – in this case like so: S = 0 times, M = 0 times, L=2 times, XL= 3 times and XXL = 4 times.

The diagrams are worked as usual: begin with the first row in A.1, then work the first row in A.2 etc.

See DROPS lesson: How to read knitting diagrams

See DROPS lesson: How to read crochet diagrams

The total width of the garment (from wrist-to-wrist) will be larger in the larger sizes, despite the actual sleeves being shorter. The larger sizes have longer sleeve caps and wider shoulders, so there will be a good fit in all sizes.

The measurement sketch/schematic drawing provides information regarding the full length of the garment. If it’s a jumper or a jacket the length is measured from the highest point on the shoulder (usually closest to the neckline), and straight down to the bottom of the garment. It is NOT measured from the tip of shoulder. Similarly, the length of yoke is measured from the highest point on the shoulder and down to where yoke is split into body and sleeves.

See DROPS lesson: How to read a schematic drawing

Diagrams are often repeated on the round or in height. 1 repeat is the diagram the way it appears in the pattern. If it says to work 5 repeats of A.1 in the round, then you work A.1 a total of 5 times after/next to each other in the round. If it says to work 2 repeats of A.1 vertically/in height you work the entire diagram once, then begin again at the start and work the entire diagram one more time.

Chain stitches are slightly narrower than other stitches and to avoid working the cast-on edge too tight, we simply chain more stitches to begin with. The stitch count will be adjusted on the following row to fit the pattern and measurement sketch.

The rib edge is more elastic and will contract slightly compared to, for example, stocking stitch. By increasing before the rib edge, you avoid a visible difference in width between the rib edge and the rest of the body.

It’s very easy to cast off too tightly, and by making yarn overs while casting off (and simultaneously casting these off) you avoid a too tight cast off edge.

See DROPS video: How to bind off with yarn overs (yo)

To achieve an even increase (or decrease) you can increase on, for example: every 3rd and 4th row alternately, like so: work 2 rows and increase on the 3rd row, work 3 rows and increase on the 4th. Repeat this until the increase is complete.

See DROPS lesson: Increase or decrease 1 st on every 3rd and 4th row alternately

Should you prefer to work in the round instead of back and forth, you may of course adjust the pattern. You’ll need to add steeks mid-front (usually 5 stitches), and follow the instructions. When you would normally turn and work from the wrong side, simply work across the steek and continue in the round. At the end you’ll cut the piece open, pick up stitches to work bands, and cover the cut edges.

See DROPS video: How to knit steeks and cut open

Should you prefer to work back and forth instead of in the round, you may of course adjust the pattern so you work the pieces separately and then assemble them at the end. Divide the stitches for the body in 2, add 1 edge stitch in each side (for sewing) and work the front and back pieces separately.

See DROPS lesson: Can I adapt a pattern for circular needles into straight needles?

Pattern repeats can vary slightly in the different sizes, in order to get the correct proportions. If you’re not working the exact same size as the garment in the photo, yours might deviate slightly. This has been carefully developed and adjusted so that the complete impression of the garment is the same in all sizes.

Make sure to follow instructions and diagrams for your size!

If you have found a pattern you like which is available in women’s size it’s not very difficult to convert it to men’s size. The biggest difference will be the length of sleeves and body. Start working on the women size that you think would fit across the chest. The additional length will be worked right before you cast off for the armhole/sleeve cap. If the pattern is worked top-down you can add the length right after the armhole or before the first decrease on sleeve.

Regarding additional yarn amount, this will depend on how much length you add, but it is better with a skein too many than too few.

All yarns will have excess fibres (from production) that might come off as lint or shedding. Brushed yarns (ie hairier yarns) have more of these loose, excess fibres, causing more shedding.

Shedding also depends on what is worn under or over the garment, and whether this pulls at the yarn fibres. It’s therefore not possible to guarantee that there will be no shedding

Below are some tips on how to get the best result when working with hairier yarns:

1. When the garment is finished (before you wash it) shake it vigorously so the looser hairs come off. NOTE: do NOT use a lint roller, brush or any method that pulls at the yarn.

2. Place the garment in a plastic bag and put it in your freezer - the temperature will cause the fibres to become less attached to each other, and excess fibres will come off easier.

3. Leave in the freezer for a few hours before taking it out and shaking it again.

4. Wash the garment according to the instructions on the yarn label.

Pilling is a natural process that happens to even the most exclusive of fibers. It's a natural sign of wear and tear that is hard to avoid, and that is most visible in high friction areas of your garment like a sweater's arms and cuffs.

You can make your garment look as new by removing the pilling, using a fabric comb or a pill/lint remover.

Still can't find the answer you need? Then scroll down and leave your question so one of our experts can try to help you. This will be done normally within 5 to 10 working days.
In the meantime, you can read the questions and answers that others have left to this pattern or join the DROPS Workshop on Facebook to get help from fellow knitters/crocheters!

You might also like...

Post a comment to pattern DROPS 69-21

We would love to hear what you have to say about this pattern!

If you want to leave a question, please make sure you select the correct category in the form below, to speed up the answering process. Required fields are marked *.

Comments / Questions (21)

country flag Britt Hagstrand wrote:

Hej, enligt omvandlaren skulle 600 gr räcka i BomullLin. Stämmer det med tanke på att det står 17x22 på det garnet och i mönstret 69-21, Ribbon, 650 gr och 13x22v.?

29.06.2021 - 13:49

DROPS Design answered:

Hej Britt, det skall räcka om du håller samma stickfasthet som det står i mönstret. Mönstret är glest med endast 13 m på 10 cm :)

30.06.2021 - 13:44

country flag Susan Baggaley wrote:

Hi, this pattern calls for DROPS Ribbon with a tension: 13 sts x 22 rows on needle size 4.5 mm, but being discontinued you recommend Paris, which gives a tension of 17 sts x 22 rows on 5mm needles. How do I adjust the pattern?

19.02.2021 - 17:07

DROPS Design answered:

Dear Mrs Baggaley, DROPS Ribbon had almost same tension as Paris (= 16 sts = 10 cm) and was same yarn group C - when using an alternative you should always make a swatch first to check the tension - read more about alternatives here. Happy knitting!

22.02.2021 - 07:12

country flag Maren wrote:

Hallo liebes Team, Ich Häkel gerade den Hut und bin fast fertig. Meine Fragen: was sind Rückwendlichstiche ? Verstehe ich es richtig, dass man die Hutkrempe am Ende (nach dem häkeln) nach außen Klappt und den dann äußeren Rand mit diesen rückwendlichstichen bearbeitet? Dann stößt aber die ursprünglich letzte Reihe (krausrippen) an den äußeren Hutrand und dort ist es offen. 🤔 Bitte um Hilfe. Dankeschön. Herzliche Grüße Maren

24.01.2021 - 08:31

DROPS Design answered:

Liebe Maren, die Anleitung für den Hut wurde noch mal neu übersetzt, vielleicht wird es dadurch klarer. Sie schlagen an der Hutkrempe nur die letzten 2 Rd nach oben um und nähen diese dann im Steppstich fest (mit "Rückwendlingsstichen" in der alten Übersetzung ist der Steppstich gemeint). Gutes Gelingen weiterhin!

25.01.2021 - 10:50

country flag Jan C wrote:

Hi, I am still working on the sweater, I am at the sleeve cap, making a size medium. The directions say to bind off 2 stitches every other row 2 times, which is 8 stitches total, then to bind off 1 stitches every other row 11 times, which is 22 stitches at this point my length is around what you indicate as the total length and I have not bound off the next part(2 stitches every other row) I have 22 stitches left on the needle. I think where the directions say 5-11-14 is confusing? HELP

04.04.2020 - 22:41

DROPS Design answered:

Hi Jan, You bind off 2 stitches x 2 = 4 and 1 stitch x 11 = 11. Then you bind off 2 stitches every other row to the correct length. Happy knitting!

06.04.2020 - 07:57

country flag Christine Sherriffs wrote:

Thank you GarnStudio for all of your answers. Since I had to rip out both the front and the back because of doing the decrease rows incorrectly. I am now knitting with kinky cotton and it is clearly stretched and you can see the difference where I did not have to rip out. Will the kinky cotton relax once the sweater is blocked? Or should I just shelve this project? Thank you for your honesty. I’m working with the Drops Paris 100% cotton. Again. Thank you for your help.

04.03.2020 - 23:09

DROPS Design answered:

Dear Christinge, wet blocking will even out your knitting. Soak the piece into lukewarm water, press the water out and then pull the piece into shape, and let it completely dry. Happy Kntiing!

05.03.2020 - 01:59

country flag Christine Sherriffs wrote:

So sleeve cap decrease. S/b dec 2 stitches at each end of row 3 times and 1 stitch at each end 5 times I’m sorry to be a pain and I truly appreciate your responses.

03.03.2020 - 17:23

DROPS Design answered:

Dear Mrs Sherriffs, if you are working 1st size you will cast off: 2 stitches at the beg of next 6 rows (= 2 sts 3 times on each side), then 1 stitch at the beg of next 10 rows (= 1 st 5 times on each side) then cast off 2 stitches at the beg of every row until sleeve measures 54 cm (number of times will depend on your tension in height, just make sure you cast off the same number of times from RS + from WS). Then cast off remaining stitches. Hope this helps :) Happy knitting!

04.03.2020 - 08:42

country flag Christine Sherriffs wrote:

So really then, the decreases are done at the beginning and end of each row , correct?

03.03.2020 - 16:18

DROPS Design answered:

Hi Christine, Yes the decreases are at the beginning and end of each decrease-row. Happy knitting!

04.03.2020 - 08:19

country flag Christine Sherriffs wrote:

So in reading the other comments when doing the sleeve cap decrease it is suppose to be done every row, not every other row as is written in the pattern? I’m so sadly confused.

03.03.2020 - 03:19

DROPS Design answered:

Dear Mrs Sherrifs, you will decrease at the beginning of every row (= both from RS and from WS), this means you will cast off on each side every other row. Happy knitting!

03.03.2020 - 09:56

country flag Christine Sherriffs wrote:

Hello. I am working on the sleeve decrease. For size small. Where it says dec 1 stitch 5 times is this done on either end every row or 1 stitch 5 times every other row? Thank you.

02.03.2020 - 19:15

DROPS Design answered:

Hi Christine, Each decrease is at both ends of the row, so 1 stitch at each end x 5 (10 stitches decreased). Happy knitting!

03.03.2020 - 09:26

country flag Jan wrote:

Hi, I am going to make your cute sweater 69-21. I am reading the pattern instructions and cannot understand the 5 stitches that you put onto a stitch holder and what you do with them later during assembly. It says to knit in garter for 7+ inches and sew them to the body. I seem to be missing something. Do you have anymore detailed instructions for the assembly of the sweater. Thank you for your help.

28.02.2020 - 22:44

DROPS Design answered:

Dear Jan, these stitches are first slip aside then worked back in garter stitch then sewn to the back/front piece for the edge. They are worked separately since tension is different in garter stitch and in pattern and that way your edge over these 5 stitches will be nicer. Happy knitting!

02.03.2020 - 09:04