
Popular categories
Looking for a yarn?


Comments / Questions (13)
![]() Greet Horemans wrote:
Greet Horemans wrote:
Hallo, de beschrijving van het telpatroon komt niet overeen met de uitleg. Er staat 2stokjes in het boogje en 1 stokje op elk stokje. De tekening toont aan...2 stokjes in het boogje en maar 1 stokje tussen de boogjes. Als je de beschrijving volgt krijg je veel te veel steken. Mvg Greet
23.01.2023 - 14:26
![]() Jette wrote:
Jette wrote:
Er der en sværheds kode på jeres opskrifter?? Kan desværre ikke se om der er. Er vild med jeres side og alle de muligheder der er for hjælp. Men mangler sværhedsgraden
25.07.2020 - 19:36DROPS Design answered:
Hej Jette, Vi har nogle "begynder-opskrifter" hvis man er ny. Ellers vil vi ikke kategorisere i sværhedsgrad, da det er meget individuelt hvad som er svært. Husk at vi har videoer til alle opskrifter og at vi gerne hjælper til her i bloggen. God fornøjelse!
27.07.2020 - 15:55
![]() Maribel wrote:
Maribel wrote:
Hola. Al hacer el escote de la espalda dice: trabajar 1 fila sobre unicamente 24 pts a cada lado (no trabajar sobre los 21 p.a. centrales = escote). ¿Se hacen puntos bajísimos sobre los puntos centrales para pasar al otro lado o bien hago un lado y posteriormente cojo otra hebra y hago el otro lado? Muchas gracias.
17.07.2018 - 22:54DROPS Design answered:
Hola Maribel. Cada hombro se trabaja por separado. Se corta el hilo después de trabajar un hombro y se empieza otro hombro con hilo nuevo.
18.07.2018 - 21:40
![]() Demartin wrote:
Demartin wrote:
Pourquoi faut-il crocheter le dos et les manches avec un crochet 4 et les devants avec un crochet 3 ? Les hauteurs des rangs ne correspondent donc pas pour l’assemblage des pièces. Merci de votre réponse
13.02.2018 - 20:37DROPS Design answered:
Bonjour Mme Demartin, les explications ont été corrigées, on utilise bien un crochet 4 pour les devants, comme pour le dos et les manches. Bon crochet!
14.02.2018 - 08:41Janet Castle wrote:
I like to use an alternative foundation chain when making garments, but I am wondering if the skip 1 chain in the first row will look strange if I don't use the chains to begin with as follows: (Ch 119-133-146-160-178 (incl. ch 3 for turning). Crochet the first row as follows: 1 dc in 4th ch from hook, * skip over 1 ch, 1 dc in each of the following 2 ch *, repeat * - * across row (in sizes S + L end with 1 dc in last ch) = 79-88-97-106-118 dc, turn the work.)
01.08.2016 - 15:58DROPS Design answered:
Dear Mrs Castle, skipping some chains on 1st row as done here allows to get a nice bottom edge, not that tight. Check on a swatch your alternative fundation chain and if it isn't too tight, you can then cast on the number of dc given for each size on 1st row, ie 79-88-97-106-118 dc. Happy crocheting!
02.08.2016 - 09:05
![]() Lopez Christel wrote:
Lopez Christel wrote:
Bonjour,Je ne trouve pas le même nombre de maille pour les diminutions d emmanchures .Je fais la taille M , j'ai 94 brides moins 1 fois 1 B , 3 fois 2 B et 2 fois 1 B .il reste 76 B et pas 72comme dans les explications . Ai je mal compris où es ce une erreur ? Merci
04.06.2016 - 17:43DROPS Design answered:
Bonjour Mme Lopez, une erreur s'était glissée dans la 1ère diminution des emmanchures, on diminue 1 fois 3 B (et non 1B), on a ainsi un total de 11 m diminuée pour chaque emmanchure et un total de 72 B en taille M. Bon crochet!
06.06.2016 - 09:13
![]() Michelle Meyers wrote:
Michelle Meyers wrote:
I'm having trouble interpreting the lace pattern diagram. The symbols and presentation are unusual to me, perhaps a result of different countries. I'm able to produce a lace-like pattern that looks similar, but I don't see where the slip stitch fits in? I am placing two double crochets (separated by two chains) within the same stitch. Advice appreciated!
21.04.2012 - 23:11DROPS Design answered:
1st row: ch 3 + ch 2, 1 dc in first dc, *skip 2 dc, in next dc work 1 dc, ch 2, 1 dc*, repeat til end of row. 2nd row: ch 1, 1 sl st in first ch space, then ch 3 + ch 2, 1 dc in ch space, *in next chain space work 1 dc, ch 2, 1 dc*, repeat til end of row. Repeat row 2 for pattern.
23.04.2012 - 20:05
![]() Drops Design wrote:
Drops Design wrote:
Valerine, I'm guessing you mean the dec for armhole. For smallest size you dec 3 dc 1 time, 2 dc 2 times, 1 dc 1 time. Dec.tips tells you how to dec: replace 1 dc with 1 sl st. Dec as follows at end of row: turn piece when 1 dc remains, then crochet back.
07.12.2009 - 17:45
![]() Valerine wrote:
Valerine wrote:
I am trying to figure out what the instructions mean where the pattern lists the following instructions: "3 dc 1-1-1-2-3 times, 2 dc 2-3-4-4-5 times and 1 dc 1-2-3-3-4 times = 69-72-75-78-78 dc" Does it mean to do 3 dc in a single stitch 1 time, then 2 dc in single stitch twice, etc? Thanks for your help!
06.12.2009 - 08:42
![]() Anette wrote:
Anette wrote:
Hur ska man läsa diagrammet? Vad betyder kjm och km?
28.01.2008 - 21:08
|
||||||||||
DROPS 89-15 |
||||||||||
|
|
||||||||||
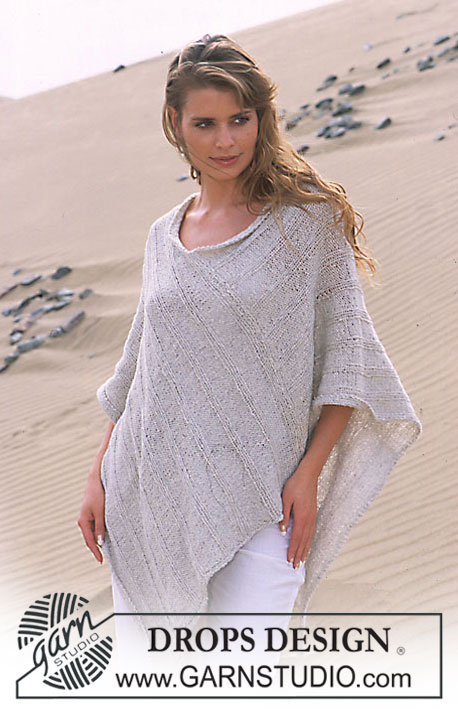
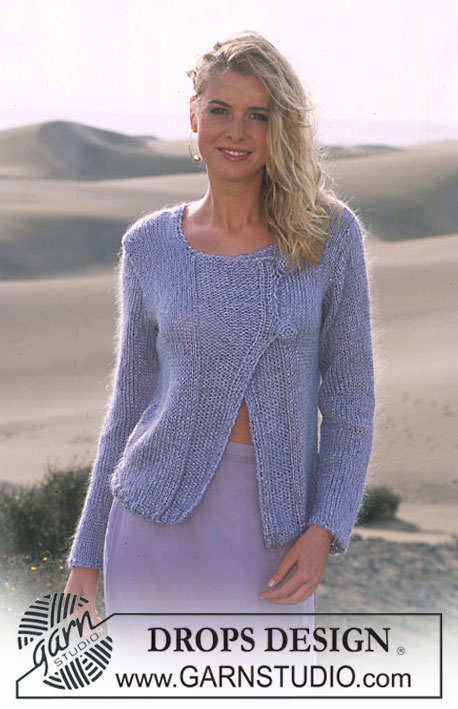
DROPS Crocheted Cardigan in Muskat
DROPS 89-15 |
||||||||||
|
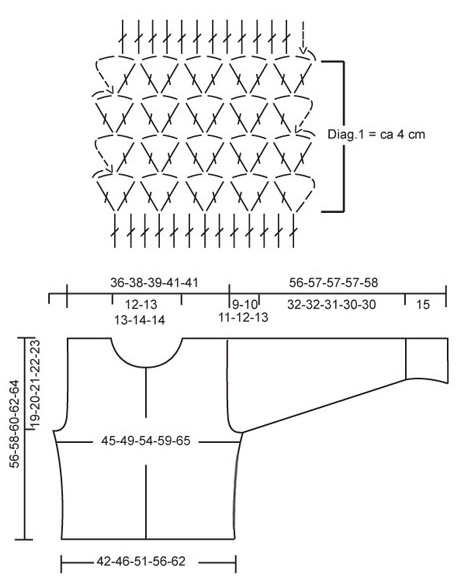
Crochet gauge: 19 dc in width and approx. 8 rows in height = 10 x 10 cm. Crochet info: Replace the first dc of each row with a ch 3 and end every row with 1 dc in the ch 3 from previous row. Lace Pattern: See Diagram. The pattern is seen from the right side. Structure Pattern: Crochet only in the front of each st, that is, not through the entire st. This forms the stripe effect. Decreasing tips (for armhole and neck): Dec as follows at start of row: replace 1 dc with 1 sl st. Dec as follows at end of row: turn piece when 1 dc remains, then crochet back. Back: Ch 119-133-146-160-178 (incl. ch 3 for turning). Crochet the first row as follows: 1 dc in 4th ch from hook, * skip over 1 ch, 1 dc in each of the following 2 ch *, repeat * - * across row (in sizes S + L end with 1 dc in last ch) = 79-88-97-106-118 dc, turn the work. Now crochet Structure Pattern – see instructions above – with 1 dc in each dc. When the piece measures 8-8-8-9-9 cm crochet Lace Pattern following chart (Diag.1), and then continue with dc in Structure Pattern as before (crochet 2 dc in each ch-loop and 1 dc between each dc-group – see chart – be sure that you have 79-88-97-106-118 dc). On 2nd row after Diagr.1 inc at each side by crocheting 1 extra dc in the next to outermost dc at each side. Repeat inc when the piece measures 22 and 30 cm = 85-94-103-112-124 dc. When the piece measures 31-31-32-32-33 cm crochet Lace Pattern again, and then continue with dc in Structure Pattern to finished measurements. At the same time when the piece measures 37-38-39-40-41 cm bind off for armhole at each side every row – see decreasing tips above: 3 dc 1-1-1-2-3 times, 2 dc 2-3-4-4-5 times and 1 dc 1-2-3-3-4 times = 69-72-75-78-78 dc. When the piece measures 54-56-58-60-62 cm (2 rows remain), crochet 1 row over only 24-25-26-27-27 st at each side (do not crochet over the center 21-22-23-24-24 dc = neck). On the next row (last row) dec 1 dc at neck edge = 23-24-25-26-26 dc remain on each shoulder. Cut yarn and fasten, the piece measures approx. 56-58-60-62-64 cm. Left front: Ch 61-65-74-79-88 (incl. 3 ch to turn with). Crochet the first row as follows: 1 dc in 4th ch from hook, * skip over 1 ch, 1 in each of the 2 following ch *, repeat * - * across row (I Sizes M + L finish with 1 dc in last ch) = 40-43-49-52-58 dc, turn the work. Now crochet Structure Pattern and Lace Pattern as on back. On the 2nd row after Lace Pattern is crocheted the first time inc at the side as on back = 43-46-52-55-61 dc. When the piece measures 37-38-39-40-41 cm bind off for armhole at the side as on back = 35-35-38-38-38 dc. When the piece measures 49-51-52-54-56 cm bind off the outermost 8-7-9-8-8 dc at center front edge for neck – see decreasing tips above. Continue to bind off for the neck every row: 2 dc 1 time and 1 dc 2 times = 23-24-25-26-26 st remain on shoulder. Continue until piece is the same length as back. Cut yarn and fasten. Right front: Crochet the same as the left, reversing shaping. Sleeve: Ch 63-63-71-71-75 loosely (incl. 6 ch for turning with). Crochet the first row as follows: 1 dc in 7th ch from hook, * skip over 3 ch, 1 dc in the next ch, ch 3, 1 dc in the same ch *, repeat * - * = 15-15-17-17-18 dc-groups, turn the work. Crochet the 2 following rows as follows: ch 1, 1 sl st in first ch-loop, ch 6, 1 dc in same ch-loop, in each of the following 14-14-16-16-17 ch-loops crochet 1 dc, ch 3 and 1 dc. After these 3 rows are crocheted, continue in the same manner, but now with only ch 2 between dc instead of ch 3. When the piece measures 15 cm continue with dc in Structure Pattern (2 dc in each ch-loop and 1 dc between each dc-group but in the last ch-loop crochet only 1 dc – see chart) = 43-43-49-49-52 dc. When the piece measures 16 cm inc at each side by crocheting 1 extra dc in the next to outermost dc at each side. Repeat inc when the piece measures 18 and 21 cm = 49-49-55-55-58 dc. When the piece measures 22 cm crochet Lace Pattern, then continue with dc in Structure Pattern. When the piece measures 27 cm inc at each side again in the same way as before. Repeat inc every 2.5-1.5-1.5-1-1 cm (in Sizes XL + XXL this will be every row) 5-8-8-11-11 times more = 61-67-73-79-82 dc. When the piece measures 42-42-41-40-40 cm crochet Lace Pattern again, then continue with dc in Structure Pattern to finished measurements. When the piece measures 47-47-46-45-45 cm bind off for sleeve cap at each side every row: 4 dc 1 time and 3 dc 1 time, then bind off 2 dc at each side until the piece measures approx. 55-56-56-56-57 cm, and then bind off 3 dc 1 time at each side. Cut yarn and fasten, the piece measures approx. 56-57-57-57-58 cm. Assembly: Sew shoulder seams edge to edge with small sts. Sew in sleeves. Sew sleeve and side seams in one. Crocheted edge around sleeves: Crochet 1 row around lower edge of each sleeve as follows: 1 sc in first ch-loop, * ch 5, 1 sc in the next ch-loop *, repeat * - * and finish with ch 5 and 1 sl st in 1st sc at start of row. Left buttonband: Crochet 4 rows sc along left front (there should be approx. 2 to 3 sc in each dc) = approx. 78-135 sc (turn each row with ch 1) – see that the buttonband is not too tight or too loose. Right buttonband: Crochet the same as the left, but after the 2nd row make 6 buttonholes evenly spaced. The bottom buttonhole should be approx. 10 cm from lower edge and the top one 2 sc from top edge. 1 buttonhole = ch 2, skip over 2 sc, 1 sc in the next sc. On the next row crochet 2 sc in ch-loop. Collar: Crochet approx. 64-76 sc (divisible by 3 + 1) around the neck (not over buttonbands). Start on wrong side so that the edge is concealed when the collar folds out. Crochet Lace Pattern. After 1st row of chart inc at each side by crocheting 1 extra dc-group in the next to outermost ch-loop at each side every other row. At the same time inc 3 extra dc-groups evenly distributed from shoulder to shoulder on back neck every other row. When the collar measures approx. 8-9-9-10-10 cm crochet 1 row with ch-loops in the same manner as sleeves. |
||||||||||
Diagram explanations |
||||||||||
|
||||||||||
 |
||||||||||
Have you finished this pattern?Tag your pictures with #dropspattern or submit them to the #dropsfan gallery. Do you need help with this pattern?You'll find 9 tutorial videos, a Comments/Questions area and more by visiting the pattern on garnstudio.com. © 1982-2026 DROPS Design A/S. We reserve all rights. This document, including all its sub-sections, has copyrights. Read more about what you can do with our patterns at the bottom of each pattern on our site. |
||||||||||


With over 40 years in knitting and crochet design, DROPS Design offers one of the most extensive collections of free patterns on the internet - translated to 17 languages. As of today we count 325 catalogs and 12298 patterns - 12288 of which are translated into English (US/in).
We work hard to bring you the best knitting and crochet have to offer, inspiration and advice as well as great quality yarns at incredible prices! Would you like to use our patterns for other than personal use? You can read what you are allowed to do in the Copyright text at the bottom of all our patterns. Happy crafting!
Post a comment to pattern DROPS 89-15
We would love to hear what you have to say about this pattern!
If you want to leave a question, please make sure you select the correct category in the form below, to speed up the answering process. Required fields are marked *.