
Popular categories
Looking for a yarn?


Comments / Questions (83)
![]() Senay wrote:
Senay wrote:
Your website is very nice . but I do not know English. I would be very grateful if you could add Turkish to the language options so I can work on your beautiful designs. thank you
02.02.2026 - 14:18
![]() Sabrina wrote:
Sabrina wrote:
Molto bello e veloce. A mia figlia è piaciuto molto e le sta benissimo!
02.10.2025 - 07:35
![]() Zsuzsa wrote:
Zsuzsa wrote:
Hey, a beginner crocheter here. The pattern is indeed poorly written, but just ask AI if something is not clear. It helped me a lot and I managed to finish the top today.
24.08.2025 - 16:26
![]() Yasmina wrote:
Yasmina wrote:
Comment dois m’y prendre pour faire ce modèle avec un bonnet D Merci
22.08.2025 - 21:07DROPS Design answered:
Bonjour Yasmina, nous ne sommes malhreuseument pas en mesure de pouvoir adapter chacun de nos modèles à chaque demande. Merci de bien vouloir contacter votre magasin / un forum spécialisé pour toute assistance personnelle individuelle. Merci pour votre compréhension. Bon crochet!
25.08.2025 - 09:16
![]() VIDAL-MICHEL VALERIE wrote:
VIDAL-MICHEL VALERIE wrote:
Bonjour, j'ai juste un problème j'ai fait le bas + les 2 bonnets séparément et je ne comprend pas comment relier les 2 bonnets (avez vous un diagram ?)
30.07.2025 - 19:14DROPS Design answered:
Bonjour Mme Vidal-Michel, crochetez d'abord une chaînette de 37-41 ml (cf taille), puis crocheter le long du bas de l'un des bonnet 35-43 mc, crocheter ensuite 1 ml, puis 35-43 mc le long de l'autre bonnet et terminez par 37-41 ml = vous avez crocheté les côtés = les mailles en l'air et vous avez relié les 2 bonnets ensemble. Tournez et crochetez 1 maille serrée dans chaque maille en l'air et chaque maille coulée, puis continuez en allers et retours, d'abord avec des groupes de brides puis crochetez le diagramme. Bon crochet!
31.07.2025 - 09:15
![]() Fanny wrote:
Fanny wrote:
Bonjour, auriez vous une vidéo de ce modèle ? Je commence tout juste le projet et j’ai (malheureusement) déjà des difficultés. Soit je ne comprends pas toutes les informations soit il en manque. Il me semble que je dois commencer par la coque, sauf que le schema commence par le bas …
22.06.2025 - 18:34DROPS Design answered:
Bonjour Fanny, vous crochetez d'abord les 2 bonnets séparément, puis vous crochetez la bordure du bas qui va relier les 2 bonnets dès le premier rang. les bonnets sont composés de brides: on crochète le long d'un côté de la chaînette, on augmente dans la dernière maille en l'air et on crochète de l'autre côté de la chaînette, on continue ainsi en. allers et retours en augmentant au milieu du bonnet (pour la partie du haut). La bordure se crochète de haut en bas, d'abord en mailles coulées/serrée, puis en brides, puis en suivant le diagramme. N'hésitez pas à préciser la partie que vous ne comprenez pas si besoin. Bon crochet!
23.06.2025 - 07:21
![]() Cindy Baker wrote:
Cindy Baker wrote:
Is there written pattern for the blossom?
08.03.2025 - 00:25DROPS Design answered:
Dear Cindy, the top explanations are entirely written; the diagram is only used for the skirt's crochet edge. Happy crochetting!
09.03.2025 - 17:58
![]() Emelie wrote:
Emelie wrote:
I am confused with the top section and how i'm supposed to connect the cups to the top?
16.01.2025 - 17:20DROPS Design answered:
Dear Emelie, the both cups will be sewn together over the bottom 5 cm / 2"- see Assembly. Happy crocheting!
16.01.2025 - 17:49
![]() María Angeles wrote:
María Angeles wrote:
Buenos días, tengo hechas las 2 copas, pero para unirlas no indicáis si los puntos enanos se hacen por lado derecho o por revés. ¿Cómo las coloco para que luego la flor quede bien?
16.01.2025 - 12:37DROPS Design answered:
Hola María Angeles, normalmente se unen en filas por el lado derecho. Puedes mirar a la foto para ver cómo deberían estar colocadas las copas del top cuando unas ambas partes. Para calcular bien cómo trabajar las flores puedes contar el número de puntos que tienes y ver si en el centro de la unión de las dos copas te quedará una repetición de la flor (calculando primero los puntos que tendrás por cada flor y centrando correctamente el patrón). Así puedes asegurar que el patrón te quede bien centrado. Las instrucciones del patrón están ya ajustadas para que las flores queden bien.
19.01.2025 - 14:00
![]() Shay Lefevre wrote:
Shay Lefevre wrote:
Je ne comprends pas comment faire le rang 6, vous dites qu'il faut faire des trucs dans l'arceau de 5ml mais j'ai pas compris
28.10.2024 - 18:53DROPS Design answered:
Bonjour Mme Lefevre, au 5ème rang vous avez fait des arceaux de 5 mailles en l'air entre les 2 triple-brides de chaque fleur, au 6ème rang, vous crochetez les pétales des fleurs dans cet arceau ainsi: 2 triple-brides dans l'arceau, 5 mailles en l'air, (1 maille serrée dans l'arceau, 5 mailles en l'air, 1 triple bride dans l'arceau, 5 mailles en l'air) x 3, puis 1 maille serrée dans l'arceau, 5 mailles en l'air, et 2 triple-brides dans l'arceau (+ 1 maille serrée entre les 2 brides du 5ème rang. Bon crochet!
29.10.2024 - 08:55
|
||||||||||||||||||||||
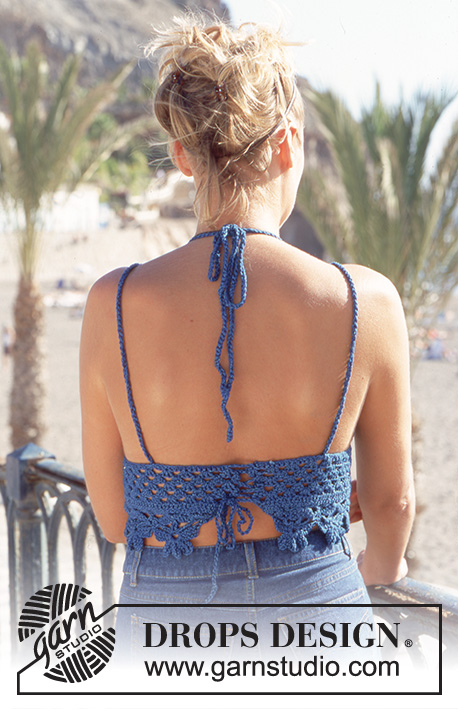
Summer Festival |
||||||||||||||||||||||
 |
 |
|||||||||||||||||||||
Crochet top and bottom edge on skirt in DROPS Den-M-nit or Cotton Light
DROPS 69-3 |
||||||||||||||||||||||
|
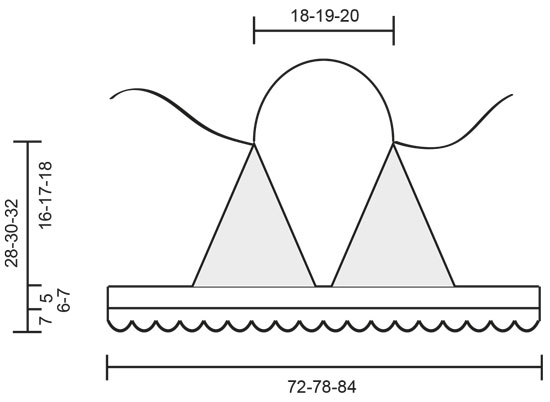
Crochet gauge: 18 dc x 10 rows = 10 x 10 cm [4" x 4"]. 1 repeat of Diag. 1 (1 blossom) measures 6.5 cm [2.5"] in width. Pattern: See diagram for the blossom pattern. «1 rapport» = «1 repeat»; «13 luftm» = «ch 13"; «rad» = «row». Bodice (make 2): Ch 9-11-13. Crochet dc up along one side of chain (first st replaces 2 ch sts) = 7-9-11 dc. In the last ch work 2 dc, ch 1, 2 dc, the continue with dc down the other side of chain. Turn the work, crochet back and forth on each side of center chain - 1 dc in each dc from the previous row and in the ch from previous row at the top, work 2 dc, ch 1 and 2 dc every row. Crochet 6-7-8 rows back and forth. Crochet the next 2 rows as follows: ch 2 + 2 dc in the first dc from previous row, * ch 1, skip over 2 dc, 3 dc in the next dc *, repeat from * - * up to the top, in ch from previous row at the top work 3 dc, ch 1, 2 dc. Repeat from * - * down other side. Top: Place the 2 bodice halves together. Ch 37-39-41 loosely, then sl 35-39-43 along lower edge of one bodice half, ch 1 between halves and sl 35-39-43 along lower edge of the other bodice half, finish with ch 37-39-41. Work 1 row sc in each ch and sl st = 145-157-169 sc. Crochet the next 5-6-7 rows as follows: 3 dc in first sc, * ch 1, skip over 3 sc, 3 dc in the next sc *, repeat from * - * across row (= 36-39-42 times). Then follow Diagr. 1 - start on the 2nd row = 145-157-169 sc. There will be 11-12-13 blossoms on lower edge – each blossom is made on 13 sc of the previous row, therefore on the next row you will need to dec 2-1-0 sts by skipping over 1 sc. Note: on sizes S and L there will be 1 blossom at center front; on size M the space between 2 blossoms will be at center front. Assembly: Sew the 2 bodice halves together at center front for approx. 5 cm [2"]. Make 3 ch-st cords approx. 100 cm [39⅜"] long with 2 strands Den-M-nit. 2 of the cords are used as straps. Sew 1 cord to each side of back, then thread cord through top of bodice halves on front. Tie cords at back of neck. The 3rd cord is used to tie the back together. Start at top and thread cords alternately thought right and left sides of back, cross-crossing cords. CROCHETED BORDER ON SKIRT: The bottom border of the top, (blossoms) can be crocheted to desired length and sewn around bottom edge of skirt or pant leg. Materials: DROPS DEN-M-NIT (disc.) (alternative MUSKAT rom Garnstudio) 50 g of yarn will make approx. 12 flowers. Crocheted border: Measure around bottom edge of skirt and calculate how many blossoms you need - 1 blossom measures approx. 6.5 cm [2.5"] in width. Ch 13 per blossom to start and crochet according to Diagr.1. |
||||||||||||||||||||||
Diagram explanations |
||||||||||||||||||||||
|
||||||||||||||||||||||
 |
||||||||||||||||||||||
 |
||||||||||||||||||||||
Have you finished this pattern?Tag your pictures with #dropspattern or submit them to the #dropsfan gallery. Do you need help with this pattern?You'll find 7 tutorial videos, a Comments/Questions area and more by visiting the pattern on garnstudio.com. © 1982-2026 DROPS Design A/S. We reserve all rights. This document, including all its sub-sections, has copyrights. Read more about what you can do with our patterns at the bottom of each pattern on our site. |
||||||||||||||||||||||


With over 40 years in knitting and crochet design, DROPS Design offers one of the most extensive collections of free patterns on the internet - translated to 17 languages. As of today we count 325 catalogs and 12298 patterns - 12288 of which are translated into English (US/in).
We work hard to bring you the best knitting and crochet have to offer, inspiration and advice as well as great quality yarns at incredible prices! Would you like to use our patterns for other than personal use? You can read what you are allowed to do in the Copyright text at the bottom of all our patterns. Happy crafting!
Post a comment to pattern DROPS 69-3
We would love to hear what you have to say about this pattern!
If you want to leave a question, please make sure you select the correct category in the form below, to speed up the answering process. Required fields are marked *.