
Popular categories
Looking for a yarn?


Comments / Questions (16)
![]() Annica Nilsson wrote:
Annica Nilsson wrote:
Hej. Jag skulle vilja sticka modellen Clementine Stickad DROPS fyrkantskofta i tunnare garn. Man ska använda 2 garner tillsammans. Jag skulle vilja sticka den i garn grupp a eller möjligtvis grupp b. (Tycker att den blir för tjock och varm i det garnet som avses.) Hälsningar Anki Manki
13.11.2019 - 19:11DROPS Design answered:
Hei Annica! Vi har mange andre lignende mønstre i tynnere strikkefasthet, for eksempel:
![]() Carole Rousseaux wrote:
Carole Rousseaux wrote:
Dommage, impossible de convertir le fichier pdf en fichier image
27.02.2018 - 13:49DROPS Design answered:
Bonjour Mme Rousseaux, nos modèles et photos ne sont pas disponibles sous la forme de pdf, vous pouvez les imprimer tels quels en cliquant sur l'icône appropriée, pour les enregistrer en format pdf, il vous faudra utiliser une imprimante virtuelle. Bon tricot!
27.02.2018 - 14:02
![]() Benedetta wrote:
Benedetta wrote:
Buonasera, sono a cm 65 cm,taglia S.Devo aumentare 45 m ma non riesco a capire se devo aumentare sul dir o sul rov. La spiegazione dice che gli aumenti sono sul dir ma non è chiaro dalle indicazioni (aggiustato in modo che l'ultimo f sia sul dir del lavoro).Grazie x il vostro aiuto
13.11.2017 - 20:23DROPS Design answered:
Buongiorno Benedetta. Molto probabilmente le istruzioni sono corrette: quindi si aumentano le 45 m sul rovescio, e al ferro successivo, sul diritto del lavoro, si impostano le coste. Se preferisce, può aumentare le maglie su un ferro sul diritto del lavoro, lavorare il ferro di ritorno sul rovescio e al ferro successivo sul diritto del lavoro, inizia le coste 2 m dir / 2 m rov. Buon lavoro!
14.11.2017 - 09:59
![]() Carola wrote:
Carola wrote:
Annettte: Es sollte heissen " 1 M. links".
06.07.2016 - 17:37
![]() Annette wrote:
Annette wrote:
Hallo, in der ersten Reihe (Rückreihe) werden 8 M Kraus rechts gestrickt, dann 1 Masche rechts, dann folgt das Muster A1, zum Schluss wieder 8 M Kraus rechts. Meine Frage: wie - und wo - wird die einzelne Rechte Masche in den folgenden Reihen gestrickt? Wird diese immer am Anfang einer Reihe gestrickt oder immer an der gleichen Stelle - also einmal am Anfang und in der nächsten Reihe am Ende? Vielen Dank!
06.07.2016 - 16:24DROPS Design answered:
Liebe Annette, die Masche wird immer an dieser Stelle gestrickt und sie dient dazu, dass das Muster symmetrisch wird. Wenn Sie das Diagramm anschauen, sehen Sie, dass am Anfang (rechte Seite) eine Masche mehr ist - diese wird durch die Masche in glatt rechts am Ende des letzten Mustersatzes (oder eben in der Rück-R vor dem ersten Mustersatz) ausgeglichen.
09.07.2016 - 15:04Ann wrote:
When I am binding off the sleeve, do I bind off 4 stitches at the beginning and end of the row or just the beginning? It says to bind off 4sts 4 times in total so that I am left with 18 sts. I have 50 sts now so if I bind off 4 sts 4 times that would leave me with 36 sts not 18. I just can't figure this part out. Please help.
06.06.2016 - 18:10DROPS Design answered:
Dear Ann, you bind off 4 sts at the beg of the row on each side a total of 4 times, you will bind off 4 sts on each side a total of times x 2 sides = 4x4x2= 32 sts bound off. 50-32=18 sts remain. Happy knitting!
07.06.2016 - 08:53
![]() Sandra wrote:
Sandra wrote:
When knitting the jacket part, you have to divide the stitches for the left front, right front, etc. It says to knit 53 stitches in stockinette stitch, 7 sts in garter stitch and so on. I'm assuming that because this is done on the RS, I would need to purl the 7 stitches? These are the stitches for the armholes.
30.05.2016 - 18:38DROPS Design answered:
Dear Sandra, you will work 2 rows in garter sts over the 7 sts under armholes, on 1st row from RS, K the 7 sts, and on next row from WS, K these 7 sts, then on next row from RS the middle of the 7 sts in garter st (K these sts). Happy knitting!
31.05.2016 - 08:52
![]() Sandra wrote:
Sandra wrote:
Hi. When doing the jacket part and it says to work until piece measures 6". Does this mean 6 inches from the beginning of the project or 6 inches from when I start knitting in stockinette stitch? Thank you.
30.05.2016 - 13:27DROPS Design answered:
Dear Sandra, measure the 6" from the beg of work, ie from cast on edge. Happy knitting!
30.05.2016 - 14:10
![]() Mertens Nancy wrote:
Mertens Nancy wrote:
Zou deze vest willen maken met 2 draden drops air garen en met breinaald 10. Hoeveel bollen wol heb ik dan nodig voor de maat S/M?
16.12.2015 - 15:04DROPS Design answered:
Beste Nancy. Ik zou deze niet met 2 draden, maar 1 draad Air breien, of het wordt te strak. Je kan hier lezen hoe je de hoeveelheid kan berekenen
17.12.2015 - 14:30
![]() Solange wrote:
Solange wrote:
Bonjour A l'impression le motif du diagramme (le petit dernier) ne s'imprime pas. Cordialement Solange
29.07.2015 - 15:07DROPS Design answered:
Bonjour Solange, après test, le diagramme A.1 s'est bien imprimé - pensez à bien vérifier vos paramètres pour bien imprimer toutes les pages. Bon tricot!
29.07.2015 - 16:48
|
||||||||||||||||
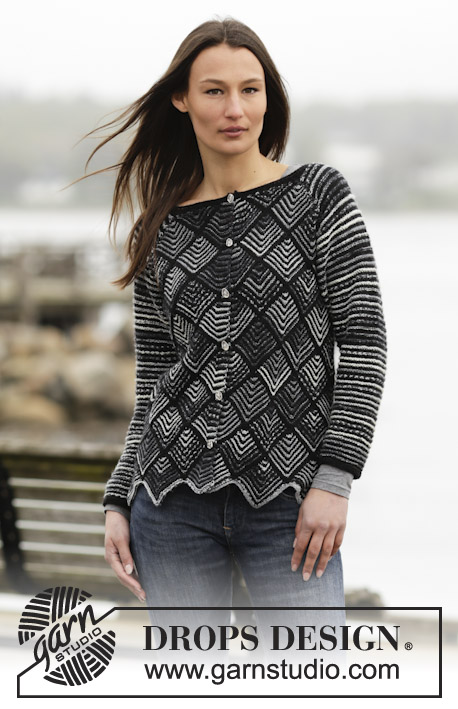
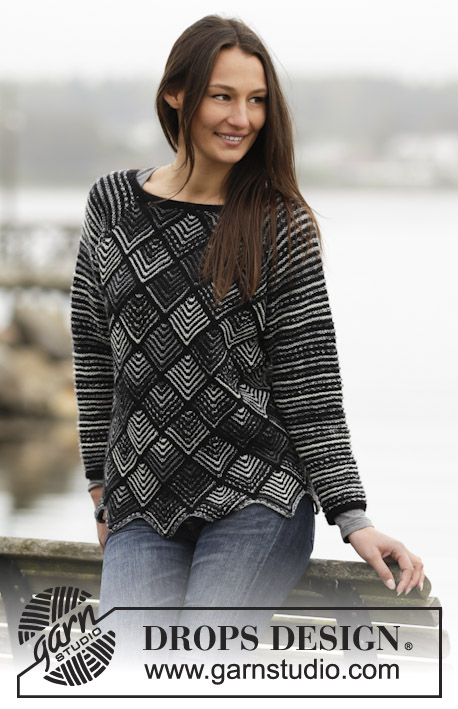
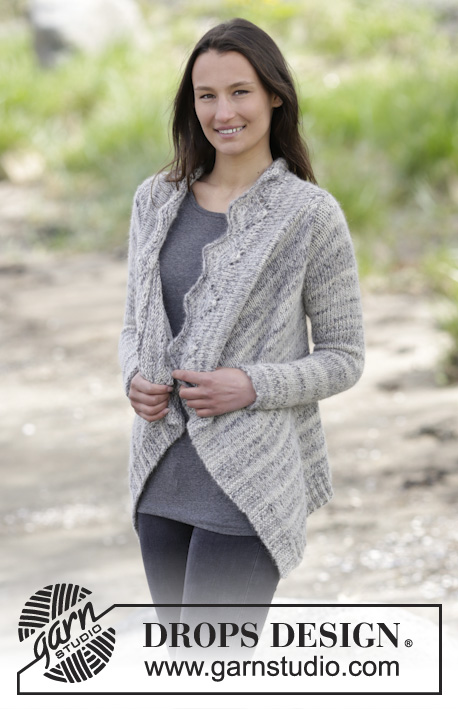
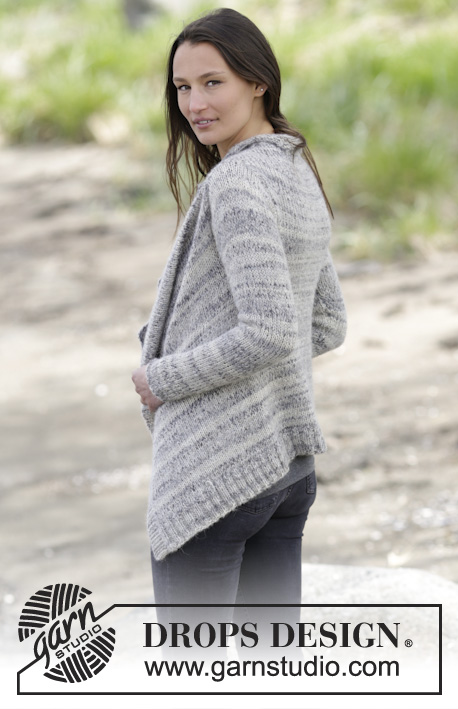
Clementine#clementinecardigan |
||||||||||||||||
 |
 |
|||||||||||||||
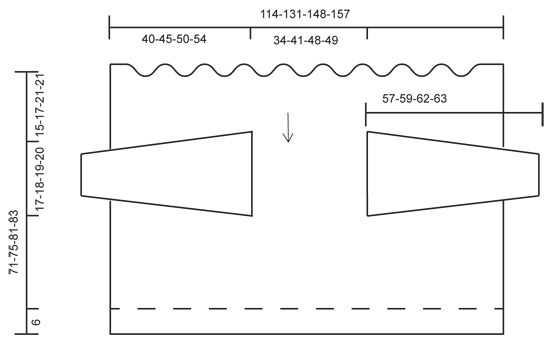
Knitted DROPS jacket with lace pattern in "Brushed Alpaca Silk" and "Fabel". Worked top down. Size: S - XXXL.
DROPS 165-22 |
||||||||||||||||
|
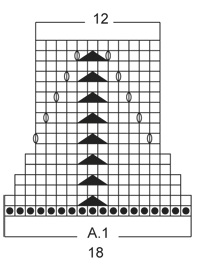
GARTER ST (back and forth): K all rows. 1 ridge = K2 rows. PATTERN: See diagram A.1. The diagram shows all rows in pattern seen from RS. First row in A.1 is worked from WS. INCREASE TIP: All inc are done from RS. Inc with 1 YO between 2 sts, work YO twisted on next row to avoid holes. ---------------------------------------------------------- JACKET: Worked back and forth on circular needle. Cast on 233-269-305-323 sts on circular needle size 6 mm / US 10 with 1 strand Brushed Alpaca Silk and 1 strand Fabel (= 2 strands). Work as follows from WS: Work 8 band sts in GARTER ST - see explanation above, 1 st in stockinette st, A.1 (= 18 sts) over the next 216-252-288-306 sts (= 12-14-16-17 times in width), finish with 8 band sts in garter st. When A.1 has been worked 1 time vertically, there are 161-185-209-221 sts on needle. Then work piece in stockinette st with 8 band sts in garter st in each side of piece. REMEMBER THE KNITTING GAUGE When piece measures 15-17-21-21 cm / 6"-6 ¾"-8¼"-8¼", adjust so that next row is from RS and work as follows: Work as before over the first 53-60-67-72 sts, 7 sts in garter st, 41-51-61-63 sts in stockinette st, 7 sts in garter st, as before over the last 53-60-67-72 sts. Repeat row from WS. On next row from RS bind off the middle of the 7 sts in garter st for armhole = 159-183-207-219 sts. Finish each part separately to make an opening for armhole. LEFT FRONT PIECE: Keep the first 56-63-70-75 sts on needle (seen from RS) and slip the remaining 103-120-137-144 sts on a stitch holder. Work in stockinette st with 3 sts in garter st towards armhole and 8 band sts in garter st towards mid front. Work until piece measures 32-35-40-41 cm / 12½"-13¾"-15¾"-16". Slip sts on a stitch holder and work right front piece. RIGHT FRONT PIECE: Slip the last 56-63-70-75 sts from stitch holder (seen from RS) back on needle, work as left front piece. Adjust measurements and rows according to left front piece. Slip sts on 1 stitch holder and work back piece. BACK PIECE AND BODY: Slip the remaining 47-57-67-69 sts from stitch holder back on needle. Work in stockinette st with 3 sts in garter st in each side. Work until piece measures 32-35-40-41 cm / 12½"-13¾"-15¾"-16". Adjust measurements and row according to left front piece. Cut yarn and slip all three parts back on circular needle size 6 mm / US 10. Work 8 band sts in garter st, 45-52-59-64 sts in stockinette st, 3 sts in garter st, cast on 1 new st, 3 sts in garter st, 41-51-61-63 sts in stockinette st, 3 sts in garter st, cast on 1 new st, 3 sts in garter st, 45-52-59-64 sts in stockinette st, finish with 8 band sts in garter st = 161-185-209-221 sts. Work 1 ridge over the 7 sts in garter st under sleeve, 8 band sts in garter st in each side of piece and stockinette st over the remaining sts. Then work piece in stockinette st with 8 sts in garter st in each side of piece. When piece measures 65-69-75-77 cm / 25½"-27"-29½"-30½" (adjust so that last row is from RS), switch to circular needle size 5 mm / US 8. Work as follows: 8 sts in garter st, stockinette st over the next 145-169-193-205 sts, AT THE SAME TIME inc 45-53-57-61 sts evenly over these sts - read INCREASE TIP, finish with 8 sts in garter st = 206-238-266-282 sts. On next row work as follows: 8 sts in garter st, rib (= K 2/P 2) until 10 sts remain, K 2, finish with 8 sts in garter st. Work rib for 6 cm / 2⅜". Bind off sts with K over K and P over P. SLEEVE: Worked back and forth on circular needle. Cast on 30-32-34-36 sts (includes 1 edge st in each side of piece) on circular needle size 6 mm / US 10 with 1 strand Brushed Alpaca Silk + 1 strand Fabel (= 2 strands). Work in stockinette st with 1 edge st in garter st in each side of piece until finished measurements. When piece measures 10 cm / 4", inc 1 st inside 1 edge st in each side of piece. Repeat inc every 4½ cm / 1¾" 9-9-10-10 more times = 50-52-56-58 sts. When piece measures 54-56-59-60 cm / 21¼"-22"-23¼"-23½", bind off for sleeve cap in each side of piece at beg of every row as follows: bind off 4 sts 4 times in total = 18-20-24-26 sts. Bind off the remaining sts. Piece measures approx. 57-59-62-63 cm / 22½"-23¼"-24½"-24¾". Make another sleeve. ASSEMBLY: Sew in sleeves. Sew underarm seams inside one edge st. |
||||||||||||||||
Diagram explanations |
||||||||||||||||
|
||||||||||||||||
 |
||||||||||||||||
 |
||||||||||||||||
Have you finished this pattern?Tag your pictures with #dropspattern #clementinecardigan or submit them to the #dropsfan gallery. Do you need help with this pattern?You'll find 19 tutorial videos, a Comments/Questions area and more by visiting the pattern on garnstudio.com. © 1982-2026 DROPS Design A/S. We reserve all rights. This document, including all its sub-sections, has copyrights. Read more about what you can do with our patterns at the bottom of each pattern on our site. |
||||||||||||||||


With over 40 years in knitting and crochet design, DROPS Design offers one of the most extensive collections of free patterns on the internet - translated to 17 languages. As of today we count 325 catalogs and 12298 patterns - 12288 of which are translated into English (US/in).
We work hard to bring you the best knitting and crochet have to offer, inspiration and advice as well as great quality yarns at incredible prices! Would you like to use our patterns for other than personal use? You can read what you are allowed to do in the Copyright text at the bottom of all our patterns. Happy crafting!
Post a comment to pattern DROPS 165-22
We would love to hear what you have to say about this pattern!
If you want to leave a question, please make sure you select the correct category in the form below, to speed up the answering process. Required fields are marked *.