
Popular categories
Looking for a yarn?


Comments / Questions (22)
![]() Casalta Martine wrote:
Casalta Martine wrote:
Bonjour Je voudrais réaliser la couverture DROPS 163 - 3 Winter garden. Or certaines pelotes ne sont plus disponibles. Y a t il des des associations de couleurs qui sont proposées à la place et qui sont proches du modèle présenté. MERCI
26.02.2026 - 14:42DROPS Design answered:
Bonjour Mme Casalta, consultez votre magasin DROPS directement par mail ou téléphone, il pourra vous conseiller les variantes possibles en fonction du résultat souhaité. Bon crochet!
27.02.2026 - 07:41
![]() Helen Reijs wrote:
Helen Reijs wrote:
Hej, Jag skulle vilja byta ut garnet mot Drops Muscat och jag vill endast använda 2 färger men förstår inte hur jag räknar om hur många nystan jag behöver.
11.06.2025 - 21:32DROPS Design answered:
Hej Helen, hvis du vil have samme udtryk og hæklefasthed, så skal du hækle med 2 tråde DROPS Muskat og da skal du nok bruge ca 2 kg... så det bliver jo noget tungere hvis du vil have samme størrelse. Du kan gøre det at du køber 2 nøgler (i de farver du vil have) hækler 1 rude og vejer den, så ganger du med det antal ruder du vil bruge, på den måde får du korrekt antal nøgler :)
12.06.2025 - 12:18
![]() Dientje Deunk wrote:
Dientje Deunk wrote:
Dat was het verkeerde nummer het is 162-3 daar snap ik drie en vier niet. Het zijn de toeren Groet Dientje deunk
19.04.2021 - 10:49DROPS Design answered:
Dag Dientje,
Zou je je vraag nog eens kunnen plaatsen bij het juiste patroon? Als ik het goed begrijp heb je een vraag over patroon 162-3. Dat is een trui en er staan geen toeren in beschreven. Wel 2 telpatronen in; A.1 en A.2. Als je aangeeft waar je precies tegenaan loopt, kunnen we je wellicht beter helpen.
19.04.2021 - 20:50
![]() Anne-Marie Børjesson wrote:
Anne-Marie Børjesson wrote:
Hei, Ser ut som Fabel fargene nr. 671 og 674 er gått ut av produksjon. Hvilket garn/farge kan erstatte disse? Hilsen Anne-Marie
15.07.2020 - 12:02DROPS Design answered:
Hei Anne-Marie. Vi har ingen farger som ligner, men kanskje 677 grønn/turkis og solnedgang 310 kan være noe for deg ("skarpe" farger). Eller kanskje litt dusere farger i long print (604/havutsikt og sand 651). Men farger jo personlig, så ta gjerne en titt på fargekartet til DROPS Fabel. mvh DROPS design
15.07.2020 - 14:42
![]() Kateřina Kristýnová wrote:
Kateřina Kristýnová wrote:
Zdravím, úžasná deka! V úvodu je zmíněn potřebný háček č. 9. Dále pak v textu je zmíněn háček č. 8 i 9. Jsem zmatená. Co je prosím správně? Předem děkuji
08.11.2019 - 23:15DROPS Design answered:
Dobrý den, Kateřino, díky za upozornění - správná velikost háčku je č.9 (text je nyní opravený). Příjemné háčkování! Hana
10.11.2019 - 19:29
![]() CARLA CAVALLINI wrote:
CARLA CAVALLINI wrote:
Vorrei fare questo modello, ma ho visto che due filati il 674 e il 671 sono fuori produzione, con quali potrei sostituire per avere lo stesso effetto? Grazie, Carla
21.07.2019 - 11:57DROPS Design answered:
Buongiorno Carla. Le suggeriamo di rivolgersi al suo rivenditore Drops di fiducia (via mail o per telefono) che saprà consigliarla al meglio per la sostituzione dei filati. Buon lavoro!
21.07.2019 - 14:28
![]() Natalie Helling wrote:
Natalie Helling wrote:
Ich möchte mich einfach einmal bedanken für all die tollen Anleitungen hier bei euch :) Ich habe gerade das erste Quadrat zu ende gehäkelt und möchte am liebsten gar nicht mehr aufhören !!! Ich freu mich sehr auf diese wunderschöne Decke. Lieben Gruß aus dem Taunus, Natalie
13.02.2019 - 16:18Anne E wrote:
Hi there I love this pattern and am going to make it with my first Drops purchase :) . I had a question - in the pattern it says there are 5 squares of colour combinations you make 4 times each but I can only see 4 written in the pattern, is there another? Many thanks.
07.03.2017 - 09:11DROPS Design answered:
Dear Anne, Square 5 has been now added, thank you! Happy crocheting!
07.03.2017 - 14:16Tusi S wrote:
The pattern diagram does not come up on my computer. Is it possible to check if it was uploaded correctly? Nothing on screen and prints an empty, blank page. I really like using diagrams when I work. Anybody pls help? Cheers
31.03.2016 - 21:05DROPS Design answered:
Dear Tusi S, some tests have been made and diagram can be seen and print in many languages - maybe you should try on another computer, and/or ask your DROPS store for further help. Happy crocheting!
01.04.2016 - 08:15
![]() Giuliana wrote:
Giuliana wrote:
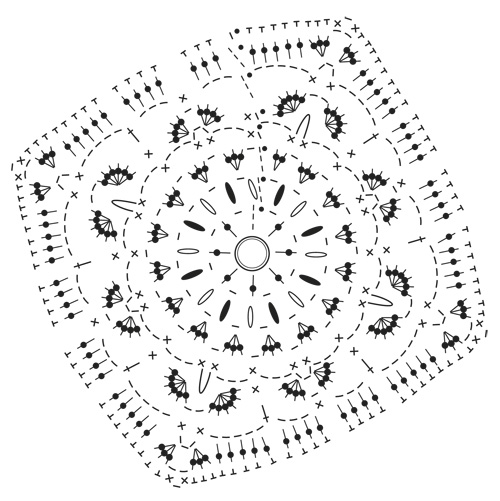
Buongiorno! Ho un dubbio riguardo l'esecuzione del quadrato: al 2° giro le spiegazioni dicono di lavorare i gruppi di maglia sia sulla maglia alta che sulla catenella precedente (senza catenella tra un gruppo e l'altro), mentre sullo schema pubblicato è inserita una catenella tra i vari gruppi di maglia. Qual'è l'esecuzione corretta? Grazie.
23.10.2015 - 14:54DROPS Design answered:
Buonasera Giuliana. È corretto lavorare una cat tra i due gruppi di m.a, come indicato nel diagramma. La ringraziamo della segnalazione. Buon lavoro!
24.10.2015 - 22:04
|
|||||||||||||||||||||||||||||||
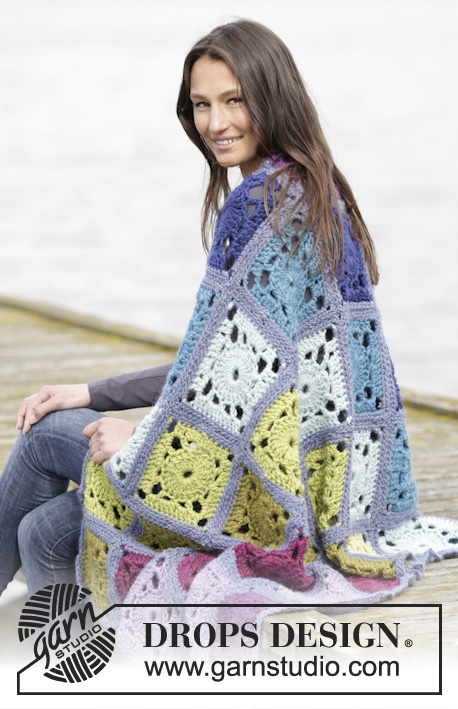
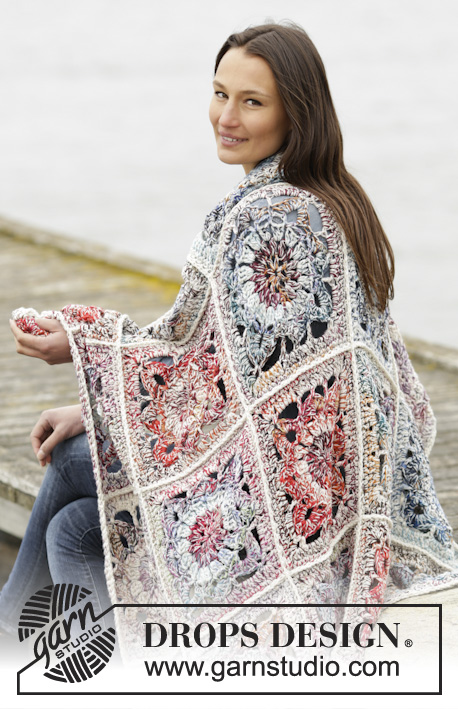
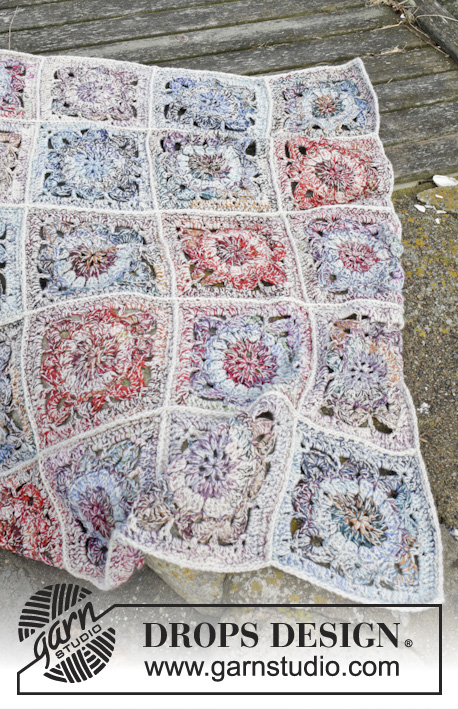
Winter Garden#wintergardenblanket |
|||||||||||||||||||||||||||||||
 |
 |
||||||||||||||||||||||||||||||
Crochet DROPS blanket with crochet squares in 3 strands “Fabel”.
DROPS 163-3 |
|||||||||||||||||||||||||||||||
|
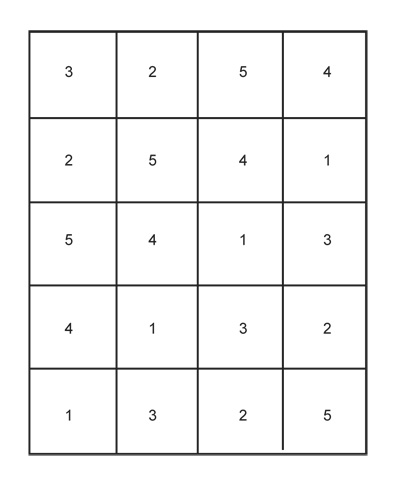
COLOR COMBINATIONS: There are 5 different squares. Work 4 squares with each color combination = 20 squares in total. SQUARE 1: cast on + round 1 - 2: 1 strand off white + 2 strands bourgogne Round 3: 1 strand off white + 1 strand light pearl grey + 1 strand red chilli Round 4 - 5: 1 strand off white + 1 strand red chilli + 1 strand bourgogne Round 6 - 8: 1 strand off white + 1 strand light pearl grey + 1 strand bourgogne SQUARE 2: cast on + round 1 - 2: 1 strand off white + 2 strands lavender Round 3: 1 strand off white + 1 strand light pearl grey + 1 strand heather Round 4 - 5: 1 strand off white + 1 strand heather + 1 strand lavender Round 6 - 8: 1 strand off white + 1 strand light pearl grey + 1 strand lavender SQUARE 3: cast on + round 1 - 2: 1 strand off white + 2 strands fun lilac Round 3: 1 strand off white + 1 strand light pearl grey + 1 strand shoreline Round 4 - 5: 1 strand off white + 1 strand shoreline + 1 strand fun lilac Round 6 - 8: 1 strand off white + 1 strand light pearl grey + 1 strand fun lilac SQUARE 4: cast on + round 1 - 2: 1 strand off white + 2 strands heather Round 3: 1 strand off white + 1 strand light pearl grey + 1 strand shoreline Round 4 - 5: 1 strand off white + 1 strand shoreline + 1 strand heather Round 6 - 8: 1 strand off white + 1 strand light pearl grey + 1 strand heather SQUARE 5: cast on + round 1 - 2: 1 strand off white + 2 strands shoreline Round 3: 1 strand off white + 1 strand light pearl grey + 1 strand blue/brown/mustard Round 4 - 5: 1 strands off white + 1 strand blue/brown/mustard + 1 strand shoreline Round 6 - 8: 1 strand off white + 1 strand light pearl grey + 1 strand shoreline DC-GROUP: 1 dc around/in next ch/sc, but wait with last pull through (= 2 sts on hook), 1 dc around/in same ch/sc but wait with last pull through (= 3 sts on hook), 1 YO, pull hook through 3 sts = 1 st on hook (= 1 dc-group), ---------------------------------------------------------- SQUARE: Crochet 4 ch with 3 strands Fabel - SEE COLOR COMBINATIONS - on hook size 9 mm / M/13 and form a ring with 1 sl st in first ch. See diagram A.1. ROUND 1: 4 ch (= 1 dc and 1 ch), * 1 dc in ch-ring, 1 ch *, repeat from *-* a total of 7 times, finish with 1 sl st in 3rd ch at beg of round = 8 dc. REMEMBER THE CROCHET GAUGE! ROUND 2: 3 ch (= 1 dc), work 1 dc-GROUP – see explanation above - in the first of the ch 3, then work 1 dc-group around every ch and 1 dc-group in every dc = 16 dc-groups. ROUND 3: Switch color. Work ch 4, * 3 dc in next ch, 1 ch *, repeat from *-* and finish with 2 dc in last ch and 1 sl st in 3rd ch from beg of round = 16 dc-groups. ROUND 4: Switch color. ch 1, 1 sc around first ch, * ch 3, 1 sc around next ch, ch 3, 1 sc around same ch, ch 3, 1 sc around next ch, ch 3, 1 sc around next ch, ch 7, 1 sc around same ch, ch 3, 1 sc around next ch *, repeat from *-*, but the last time finish with 1 sl st in 1st sc from beg of round (instead of last sc). ROUND 5: ch 1, 1 sc in first sc from previous round, * skip 1 ch-space, around next ch-space work as follows: 4 dc, ch 1, 4 dc. Skip next ch-space, 1 sc in next sc, skip next ch-space, around next ch-space work as follows: 6 dc, ch 2, 6 dc (= corner). Skip next ch-space, 1 sc in next sc *, repeat from *-*, but last time finish with 1 sl st in 1st sc from beg of round (instead of last sc). ROUND 6: Switch color. * 1 dc (= replaced by 3 ch first time) in first/next sc, ch 3, 1 sc around next ch, ch 3, 1 dc in next sc, ch 5, in corner (around ch-space) work 1 sc + 3 ch + 1 sc, 5 ch *, repeat from *-*, finish with 1 sl st in 3rd ch from beg of round. ROUND 7: Work * 4 dc (= replace 1st dc with 3 ch first time) around first ch-space, 4 dc around next ch-space, 5 dc around next ch-space, in corner (around ch-space) work as follows: 3 dc + 2 ch + 3 dc, work 5 dc around next ch-space *, repeat from *-*, and finish with 1 sl st in 3rd ch from beg of round. ROUND 8: ch 1, 1 sc in each of the next 15 dc, * in corner (around ch-space) work as follows: 1 sc + 1 ch +1 sc, work 1 sc in each of the next 24 dc *, repeat from *-* 2 more times, 1 sc + 1 ch +1 sc around ch-space in corner, work 1 sc in each of the last 8 dc, finish with 1 sl st in 1st ch from beg of round. Cut the yarn. Fasten all strands. ASSEMBLY: Place the squares as shown in diagram. Work squares tog alongside and then across. Place two squares on top of each other and work them tog with 2 strands off white and 1 strand light pearl grey (= 3 strands) on hook size 9 mm / M/13 as follows: Work 1 sc at the top in corner through edge st on both squares, * ch 1, skip approx. 1 cm / 3/8'', 1 sc through edge st on both squares *, repeat from *-*, finish with 1 sc in corner on both squares. NOTE: Make sure that the transitions between every square are pretty when the squares are worked tog alongside. Work 1 edge around the entire blanket with 2 strands off white and 1 strand light pearl grey (= 3 strands) on hook size 9 mm / M/13 as follows: Work 1 sc at the top in corner on blanket, * ch 1, skip approx. 1 cm / 3/8'', 1 sc in next st *, repeat from *-* and finish with 1 sl st in 1st sc. Make sure that the edge is not too tight. |
|||||||||||||||||||||||||||||||
Diagram explanations |
|||||||||||||||||||||||||||||||
|
|||||||||||||||||||||||||||||||
 |
|||||||||||||||||||||||||||||||
 |
|||||||||||||||||||||||||||||||
Have you finished this pattern?Tag your pictures with #dropspattern #wintergardenblanket or submit them to the #dropsfan gallery. Do you need help with this pattern?You'll find 10 tutorial videos, a Comments/Questions area and more by visiting the pattern on garnstudio.com. © 1982-2026 DROPS Design A/S. We reserve all rights. This document, including all its sub-sections, has copyrights. Read more about what you can do with our patterns at the bottom of each pattern on our site. |
|||||||||||||||||||||||||||||||


With over 40 years in knitting and crochet design, DROPS Design offers one of the most extensive collections of free patterns on the internet - translated to 17 languages. As of today we count 325 catalogs and 12298 patterns - 12288 of which are translated into English (US/in).
We work hard to bring you the best knitting and crochet have to offer, inspiration and advice as well as great quality yarns at incredible prices! Would you like to use our patterns for other than personal use? You can read what you are allowed to do in the Copyright text at the bottom of all our patterns. Happy crafting!
Post a comment to pattern DROPS 163-3
We would love to hear what you have to say about this pattern!
If you want to leave a question, please make sure you select the correct category in the form below, to speed up the answering process. Required fields are marked *.