
Popular categories
Looking for a yarn?


Comments / Questions (156)
![]() Ursel wrote:
Ursel wrote:
Die Anleitung ist mittlerweile mehr als 10 Jahre alt, aber der Schnitt ist so zeitlos, originell und gefällt mir so gut, dass ich die Jacke gestrickt und gestern fertig gestellt habe. Ich habe das gleiche Garn verstrickt nur in den Farben Grau und Ocean View, die Kombination sieht auch gut aus. Danke für die tolle Anleitung!
06.01.2026 - 16:45
![]() Kerstin Nordh wrote:
Kerstin Nordh wrote:
Jag undrar om de 60 maskorna till nederkanten stickas tillsammans med de maskor på höger framstycke som man plockar tillbaka från tråden mellan markering 2 och tre? Kerstin Nordh
26.09.2025 - 14:42
![]() Birgitta Mattsson wrote:
Birgitta Mattsson wrote:
Vad är det för svar?? Läs mönstret? Självklart har jag gjort det, men det blir fel! Jag får inte den ökning av antalet maskor över dominorutan som vare sig bilden eller skissen visar! 48 maskor före dominorutan rakt över alla varv ger inte den diagonala överkanten på dominorutan!
07.12.2020 - 15:42DROPS Design answered:
Hej Birgitta, beklager! jeg læste dit spørgsmål som at du var usikker på vinklen og mange ser ikke at vi har en skitse nederst i opskriften. Men jeg kan se på Facebook at du har fundet ud af opskriften. Rigtig god fornøjelse!
08.12.2020 - 08:00
![]() Birgitta wrote:
Birgitta wrote:
Jag tycker att det känns som att mönstret är fel. Jag föl jer XXL och har markören efter 48 m, stickar ökningar för dominorutan och sedan de resterande 48 m. Bilden visar en ruta vars överkant går diagonat nedåt och det ser ut som att antalet maskor från axeln ner till rutan hela tiden ökar. Följer jag mönstret får jag inte denna effekt eftersom det alltid är 48m innan/efter rutan. På mitt arbete blir överkanten i 90 grader mot mitt fram/bak??
28.11.2020 - 18:59DROPS Design answered:
Hej Birgitta, du ser i skitsen nederst i mönstret hvordan de forskellige stykker skal strikkes og du ser alle vinklerne. God fornøjelse!
07.12.2020 - 11:58
![]() Caroline Pyne wrote:
Caroline Pyne wrote:
Thank you for your response, but I don't understand how I incorporate the stitches remaining on the yarn. Are these the stitches I cast on at the beginning? Is there another, more detailed, source I can go to?
26.08.2020 - 22:00DROPS Design answered:
Dear Mrs Pyne, cast on the new stitches for edge (= 52 to 82 sts see size), and work part-5 over these stitches + at the end of the 2nd row knit together the last st of edge (on left needle) with the first 2 stitches from domino (on the thread) = K3 tog = 2 sts from domino are now decreased/attached to 1 st of the bottom edge. Work row 3 to 7 (with short rows to make the bottom edge larger at the bottom) and repeat row 2 on row 8 so that the next 2 sts on thread/domino are worked together with the last stitch on bottom edge. Continue like this until all sts to the tip has been worked together with the last stitch on the edge. Happy knitting!
27.08.2020 - 10:06
![]() Caroline Pyne wrote:
Caroline Pyne wrote:
I am ready to do the jacket edge. I am completely Confused, after cast on. I know i am supposed to start incorporating the stitches on the yarn at this point, but i do not understand at all. Is there a video or written instructions you can point me to that i will make it easier? I consider myself an advanced knitter And in no way would i class this pattern as "intermediate". But as soon as i get help i will carry on. I love this pattern.
26.08.2020 - 04:54DROPS Design answered:
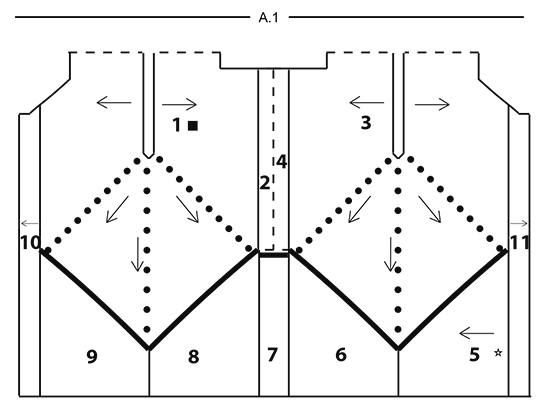
Dear Mrs Pyne, the bottom edge is worked sideways - see A.1 (from part 5 to 9), this means on part 5 you will repeat the 8 rows until you reach the tip of the domino, then work part-6 repeating the 8 rows of this part until mid back, then work part-7 repeating the 8 rows for 8-16 cm (mid back), then work part-8 etc... at the same time, you will either decrease or increase stitches (depending on the side of domino you are working) and working stitches from the domino together with the sts of the edge to attach the edge. Hope this will help, happy knitting!
26.08.2020 - 08:30
![]() Lena Lindberg wrote:
Lena Lindberg wrote:
Jag har precis börjat, och stickat ett antal varv, kanske fem cm på vänster framstycke, när jag inser att jag kanske SAMTIDIGT skulle sticka dominorutan? Eller? Med vilka stickor då? Först har jag trott att jag skall sticka 20cm (XL) med ränder och hålla på med framstycket i lugn och ro, men jag ser inte när dominorutan kommer in . Hur är det tänkt?
13.01.2020 - 19:18DROPS Design answered:
Hei Lena. Ja, du skal strikke DOMINORUTE samtidig (1. pinne fra vrangen). Les under DEL-1 og DOMINORUTE 1.-10. pinne. Du bruker samme pinner. God Fornøyelse!
10.02.2020 - 10:50
![]() Åsa wrote:
Åsa wrote:
Hej igen! Jag har fuktat, blockat, provat olika stickor med 0.25 millimeters skillnad i storlek men får ändå inte till den kombination av mask- och varvantal som det står i mönstret. Har också låtit några vänner sticka provlappar. Resultatet blir för oss alla att 21 maskor ger 44-45 varv för 10 x 10 cm. Hur kan det bli så stor skillnad från vad som anges i mönstret och är det någon idé att försöka sticka efter det här mönstret då?
22.11.2019 - 21:14DROPS Design answered:
Hej Åsa, ja du skall följa antal cm i mönstret, så om du får 21 m på 10 cm i bredden , så vill det fungera. Lycka till :)
03.12.2019 - 13:55
![]() Åsa wrote:
Åsa wrote:
För mig blir 10x10 cm 21 maskor men 44 varv och inte 40 som det ska vara enligt beskrivningen. Ändrar jag storlek på stickorna för att få rätt antal varv så blir maskantalet fel. Eftersom man stickar dominorutor är det kanske extra viktigt att både maskantal och varv stämmer. Hur ska jag tänka?
19.11.2019 - 19:10DROPS Design answered:
Hei Åsa! Har du dampet prøvelappen din? Strikkefastheten kan forandre seg etter man damper arbeidet, om ikke det hjelper kan det hjelpe å stramme tråden mindre mens man strikker. Lykke til!
20.11.2019 - 14:27
![]() Annelie Paulsson wrote:
Annelie Paulsson wrote:
Hej kan ni förklara i dominorutan. ska omslagen vara före markören eller efter??
30.09.2019 - 20:38DROPS Design answered:
Hej Annelie, markören sitter mellan maskorna och omslaget skall göras mellan maskorna, det är kanske enklast om du gör dom efter markören....
01.10.2019 - 15:12
|
||||||||||||||||
Lady Grey#ladygreyjacket |
||||||||||||||||
 |
 |
|||||||||||||||
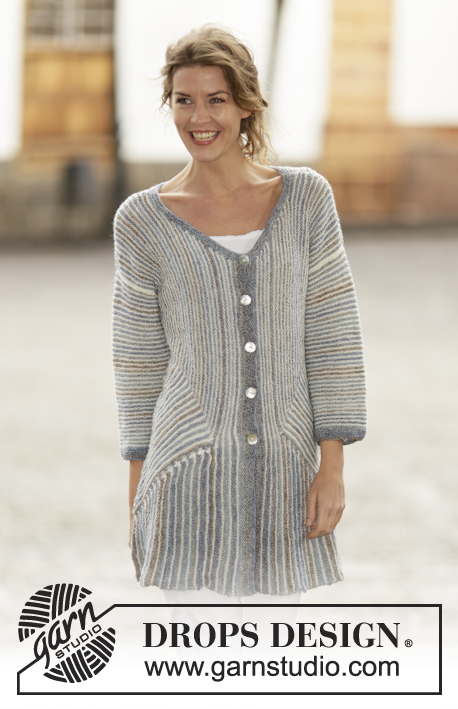
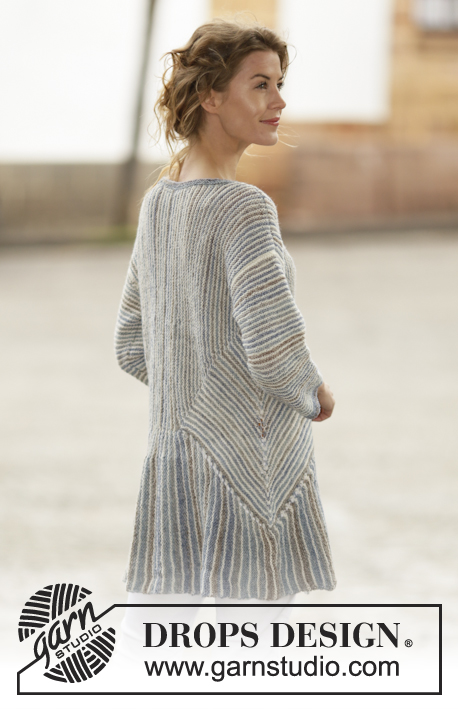
Knitted DROPS jacket in ”Fabel” with stripes, garter stitch and domino squares. Sizes S - XXXL.
DROPS 161-25 |
||||||||||||||||
|
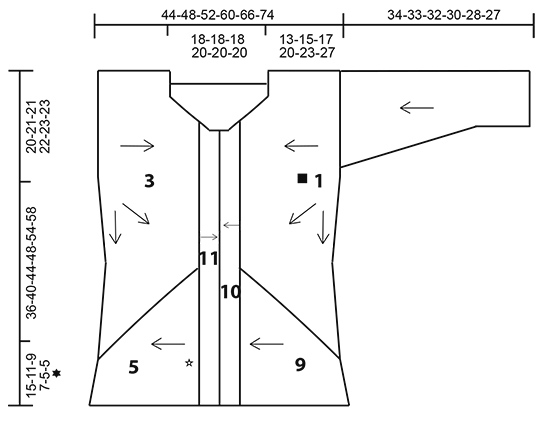
RIDGE/GARTER STITCH (worked back and forth): 1 ridge = knit 2 rows. STRIPES: Work stripes as follows (first row in each stripe = from right side): 1 RIDGE – see description above – with ocean view. 1 ridge with off white. DOMINO SQUARE: ROW 1 AND ALL OTHER ROWS FROM WRONG SIDE: Knit. ROW 2 (= right side): Knit to the stitch with the first marker, 1 yarn over, knit stitch with first marker, knit to stitch with 2nd marker, 1 yarn over, knit stitch with 2nd marker, 1 yarn over, knit to the stitch with the 3rd marker, knit stitch with 3rd marker, 1 yarn over, knit to end of row (= 4 stitches increased). The yarn overs are then knitted to allow holes. ROW 4: Knit and increase as in row 2. ROW 6: Knit to the stitch with the first marker, 1 yarn over, knit the stitch with the first marker, knit to 1 stitch before the stitch with the 2nd marker, 1 yarn over, knit 1, 1 yarn over, knit the stitch with the 2nd marker, 1 yarn over, knit 1, 1 yarn over, knit to the stitch with the 3rd marker, knit the stitch with the 3rd marker, 1 yarn over, knit to end of row (= 6 stitches increased). ROW 8: Knit and increase as for row 2. ROW 10: Knit and increase as for row 2. Repeat rows 1 to 10. BUTTONHOLE: 1 BUTTONHOLE = Knit 2 stitches together and make 1 yarn over. Make 4-4-4-5-5-5 buttonholes on the right band when the band (= part-11) measures 2-2-2-4-4-6 cm / ¾"-¾"-¾"-1½"-1½"-2¼". The first hole is worked 7-7-7-8-8-8 cm / 2¾"-2¾"-2¾"-3⅛"-3⅛"-3⅛" from the neckline, the others with approx. 8-8-8-9-9-9 cm / 3"-3"-3"-3½"-3½"-3½" between them. The 5th-5th-5th-6th-6th-6th buttonhole is worked when working the neckline, make it above the others. ---------------------------------------------------------- JACKET: The jacket is worked as follows (see A.1): Left part (= part-1 and part-2) is worked as one, right part (= part-3 and part-4) is worked as one, then an edge is worked around the whole jacket (= part-5 to part-9). The bands are worked to finish (= part-10 and part-11). The broken lines in A.1 show the seams on the jacket. Then the sleeves are worked separately and sewn onto the jacket. PART-1 (left front piece and back piece): Cast on 87-91-91-95-99-99 stitches with circular needle size 4 mm / US 6 and off white (= the armhole of the garment. The shoulder seam is sewn later). Work STRIPES – see description above. On row 1 (= right side) insert 3 markers in the piece as follows: Work 42-44-44-46-48-48 stitches, work the next stitch and insert the first marker in that stitch, work 1 stitch and insert the 2nd marker in that stitch (= the side of the jacket and the point of the domino), work 1 stitch and insert the 3rd marker in that stitch, work 42-44-44-46-48-48 stitches. The markers sit in the middle 3 stitches in the piece. The markers are to follow the piece as you work. Continue working DOMINO SQUARE – see description above (first row is worked with off white from wrong side). REMEMBER THE GAUGE! Work until the piece measures 13-15-17-20-23-27 cm / 5"-6"-6¾"-8"-9"-10½" measured at the shortest at the end/beginning of the row. The last row should be from wrong side. Bind off for the neck as follows: ROW 1 (= Right side): bind off the first 12-12-14-14-16-16 stitches for the neck on the front piece and work domino to the end of the row as before. ROW 2 (= wrong side): bind off the first 6 stitches for the neck on the back piece and work domino to the end of the row as before. ROW 3: Knit the first 2 stitches twisted together (= 1 stitch decreased for the neck on the front piece), work domino to the end of the row as before. ROW 4: Work domino. Repeat rows 3 and 4 until the piece measures 18-20-22-24-27-29 cm / 7"-8"-8¾"-9½"-10½"-11½" at the shortest – finish with 1 whole stripe with ocean view. Now divide the piece into 4 parts. Work with ocean view from the right side as follows: Knit to and including the stitch with the first marker, place these stitches on 1 thread (= stitches towards mid front – here the band will be worked = part-10), knit to and including the stitch with the 2nd marker, place these stitches on a 2nd thread (= diagonal line on the front piece from mid front to the side, these stitches will be worked together with an edge = part-9), knit to and including the stitch with the 3rd marker, place these stitches on a 3rd thread (= diagonal line on the back piece from the side up to mid back, these stitches will be worked together with an edge = part-8), change to off white and knit to end of the row (= stitches mid back, you will now continue working these stitches back and forth = part-2). There are now stitches on 3 different threads and the remaining stitches are on the needle. Now part-2 is worked back and forth over the stitches on the needle. PART-2 (left mid back): Continue to work stripes (row 1 = wrong side) until the piece measures 22-24-26-30-33-37 cm / 8¾"-9½"-10¼"-11¾"-13"-14½" measured from the cast-on edge and horizontally towards mid back. Finish with 1 whole stripe with ocean view. bind off loosely with ocean view (this is mid back and here part-2 will later be sewn together with part-4). Lay the piece to one side and work the right part of the jacket as follows: PART-3 (right front piece and back piece): Cast on and work as for part-1 until the piece measures 13-15-17-20-23-27 cm / 5"-6"-6¾"-8"-9"-10½"' at the shortest. The last row is from the wrong side. Now bind off for the neck as follows: ROW 1 (= right side): bind off the first 6 stitches for the neck on the back piece and work domino to end of the row as before. ROW 2 (= wrong side): bind off the first 12-12-14-14-16-16 stitches for the neck on the front piece and work domino to end of row as before. ROW 3: Work domino. ROW 4: Knit the first 2 stitches twisted together (= 1 stitch decreased for the neck on the front piece), work domino to end of row as before. Repeat rows 3 and 4 until the piece measures 18-20-22-24-27-29 cm / 7"-8"-8¾"-9½"-10½"-11½" at the shortest – make sure that length and stripes match part-1. Cut the strands. Now divide the piece into 4 parts. Work with off white from the right side as follows: Knit to and including the stitch with the first marker (= stitches mid back, you will continue to work back and forth over these stitches = part-4), change to ocean view, knit to and including the stitch with the 2nd marker, place these stitches on 1 thread (= diagonal line on the back piece from mid back to the side, these stitches will be worked together with an edge = part-6, the marker marks the side of the jacket), knit to and including the stitch with the 3rd marker, place these stitches on a 2nd thread (= diagonal line on the front piece from the side to mid front, these stitches will be worked together with an edge = part-5), knit to end of row and then place these stitches on a 3rd thread (= stitches towards mid front – here you will work a band = part-11). The stitches are now on 3 different threads and the remaining stitches are on the needle. PART-4 (right mid back): Continue working as for part-2. ASSEMBLY: Sew part-2 together with part-4 with ocean view – see the broken line in A.1, in the outermost loop of the outermost stitch. EDGE OF JACKET: The edge at the bottom is started mid front and is worked along the right front piece (part-5), right back piece (part-6) and continued along mid back (part-7), left back piece (part-8) and left front piece (part-9). Cast on 52-54-60-66-72-82 stitches with circular needle size 4 mm / US 6 and off white. PART-5 (edge on right front piece): The edge is worked together with the stitches between the 3rd and 2nd marker on part-3 (i.e. from mid front and down to the tip of the domino). Work as follows: ROW 1 (= right side): Knit 1, 1 yarn over, knit 2 twisted together, knit 2 twisted together and knit to end of row (= 1 stitch decreased). ROW 2 (= wrong side): Knit until there is 1 stitch left on the needle, place the first/next 2 stitches from the thread back on the needle, knit 3 stitches together. The edge is now worked together with the first/next 2 stitches from part-3. Change to ocean view. ROW 3: Work as for row 1. Work short rows over the edge as follows: ROW 4 (= wrong side): Knit until there are 8 stitches left on the needle, turn the piece. ROW 5 (= right side): Knit. ROW 6 (= wrong side): Knit until there are 2 stitches left on the needle, turn the piece. ROW 7 (= right side): Knit. ROW 8: Work as for row 2. Change to off white. Repeat rows 1-8 until all the stitches from mid front and down to the tip have been worked to the edge. PART-6 (edge on right back piece): The edge is worked to the stitches between the 2nd and first markers on part-3 (i.e. from the tip of the domino and up to mid back). Work as follows with off white: ROW 1 (= right side): Knit 1, 1 yarn over, knit to end of row (= 1 stitch increased). ROW 2 (= wrong side): Knit until there is 1 stitch left on the needle, place the first/next 2 stitches from the thread back on the needle and knit 3 stitches together. The edge is now worked together with the first/next 2 stitches from the right back piece. Change to ocean view. ROW 3: Work as for row 1. Work short rows over the edge as follows: ROW 4 (= wrong side): Knit until there are 8 stitches left on the needle, turn the piece. ROW 5 (= right side): Knit. ROW 6 (= wrong side): Knit until there are 2 stitches left on the needle, turn the piece. ROW 7 (= right side): Knit. ROW 8: Work as for row 2. Change to off white. Repeat rows 1-8 until all the stitches from the tip to mid back have been worked together with the edge. PART-7 (edge mid back): Place 1 marker in the piece. THE PIECE IS NOW MEASURED FROM HERE! Now work short rows back and forth over the stitches from the edge as follows (i.e. they are not worked together with stitches from part-1 or part-3): Continue with stripes as before, adjust color according to the stripes. Change to ocean view. ROW 1 (= right side): Knit. Knit short rows over the edge as follows: ROW 2 (= wrong side): Knit until there are 8 stitches left on the needle, turn the piece. ROW 3 (= right side): Knit. ROW 4 (= wrong side): Knit until there are 2 stitches left on the needle, turn the piece. ROW 5 (= right side): Knit. ROW 6: Knit. Change to off white. ROWS 7 AND 8: Knit. Repeat rows 1-8 until the piece measures 8-8-8-12-12-16 cm / 3"-3"-3"-4¾"-4¾"-6¼" at the shortest, adjust the measurement with part-2 and part-4, they will be sewn together later. PART-8 (edge on left back piece): The edge is worked together with the stitches between the 3rd and 2nd marker on part-1 (i.e. from mid back and down to the tip of the domino). Work as for part-5 until all the stitches from mid back and down to the tip of the domino have been worked together with the edge. PART-9 (edge on the left front piece): The edge is worked together with the stitches between the 2nd and first marker on part-1 (i.e. from the tip of the domino and up to mid front). Work as for part-6 until all the stitches from the tip to mid front have been worked together with the edge. PART-10 (rest of left front piece and left band): Place the stitches from the first thread on part-1 (= left front piece mid front) back on the needle (i.e. there are now stitches from the edge and stitches from the thread on the needle). Insert 1 marker in the piece. THE PIECE IS NOW MEASURED FROM HERE! Work band as follows in the different sizes (the jacket in the picture shows size XL): SIZES S-M-L: Work garter stitch with ocean view until the piece measures 4 cm / 1½". Loosely bind off. SIZES XL-XXL-XXXL: Continue with stipes and decrease for the neck (as for part-1) at the beginning of every row from the right side, by knitting the 2 first stitches twisted together. Repeat the decreases until the piece measures 2-2-4 cm / ¾"-¾"-1½". Work garter stitch with ocean view for 4 cm / 1½" (= band). Loosely bind off. PART-11 (the rest of the right front piece and right band): Insert 1 marker in the piece. THE PIECE IS NOW MEASURED FROM HERE! Work stripes as for part-3. Knit up 52-54-60-66-72-82 stitches along part-5 (= the edge on the right front piece) from the right side with ocean view, work the stitches from the thread mid front on part-3 (= right front piece mid front) back onto the needle. Knit 1 row from the wrong side – read BUTTONHOLE. Knit band as follows in the different sizes: SIZES S-M-L: Work as for part-10. SIZES XL-XXL-XXXL: Work as for part-10, but decrease for the neck at the start of each row from the wrong side. SLEEVE: The piece is worked back and forth in garter stitch and stripes. Cast on 54-54-56-56-58-58 stitches with circular needle size 4 mm / US 6 and ocean view (including 1 edge stitch in each side of the piece). When the piece measures 6-5-6-8-6-6 cm / 2½"-2"-2½"-3"-2½"-2½" increase 1 stitch with 1 yarn over inside the 1 edge stitch in each side of the piece. On the next row knit the yarn overs twisted. Increase in this way every 1½-1½-1½-1-1-1 cm / ½"-½"-½"-⅜"-⅜"-⅜" a total of 16-18-17-19-20-20 times = 86-90-90-94-98-98 stitches. Work until the piece measures 34-33-32-30-28-27 cm / 13½"-13"-12½"-11¾"-11"-10½" (shorter measurements in larger sizes due to wider shoulders), adjust so that the last stripe is with off white. Bind off. Work another sleeve. ASSEMBLY: See broken lines in A.1. Sew the shoulder seams. Sew the sleeve seams and sew the sleeves into the armholes. Sew part-7 together with part-2 and part-4 (= 8-8-8-12-12-16 cm / 3"-3"-3"-4¾"-4¾"-6¼" horizontal seam). NECKLINE: Pick up 160-180 stitches with circular needle size 4 mm / US 6 and ocean view. Work 3 ridges back and forth on the needle – remember BUTTONHOLE. Bind off. Sew the buttons onto the left band. |
||||||||||||||||
Diagram explanations |
||||||||||||||||
|
||||||||||||||||
 |
||||||||||||||||
 |
||||||||||||||||
Have you finished this pattern?Tag your pictures with #dropspattern #ladygreyjacket or submit them to the #dropsfan gallery. Do you need help with this pattern?You'll find 19 tutorial videos, a Comments/Questions area and more by visiting the pattern on garnstudio.com. © 1982-2026 DROPS Design A/S. We reserve all rights. This document, including all its sub-sections, has copyrights. Read more about what you can do with our patterns at the bottom of each pattern on our site. |
||||||||||||||||


With over 40 years in knitting and crochet design, DROPS Design offers one of the most extensive collections of free patterns on the internet - translated to 17 languages. As of today we count 324 catalogs and 12290 patterns - 12280 of which are translated into English (US/in).
We work hard to bring you the best knitting and crochet have to offer, inspiration and advice as well as great quality yarns at incredible prices! Would you like to use our patterns for other than personal use? You can read what you are allowed to do in the Copyright text at the bottom of all our patterns. Happy crafting!
Post a comment to pattern DROPS 161-25
We would love to hear what you have to say about this pattern!
If you want to leave a question, please make sure you select the correct category in the form below, to speed up the answering process. Required fields are marked *.