
Popular categories
Looking for a yarn?


Comments / Questions (32)
![]() Yveline Baudouin wrote:
Yveline Baudouin wrote:
Bonjour, j'ai commencé les carrés et j'obtiens bien en effet les mesures 22 cm sur 22 cm - mais avec un blocage énergique. Je me demande : comment la robe une fois cousue se modifiera lors des lavages ? Sera-t-il difficile de la remettre bien en forme ? C'est la première fois que je fais ce genre de modèle alors subitement je doute ! Merci pour votre aide :)
17.05.2025 - 21:53DROPS Design answered:
Bonjour Mme Baudouin, vous pouvez aussi essayer un crochet plus gros pour éviter ce blocage "énergique", vous vous simplifierez probablement la vie par la suite. Bon crochet!
19.05.2025 - 08:17
![]() Steffie wrote:
Steffie wrote:
Hallo! Ich habe jetzt das 1. Quadrat gehäkelt und wenn ich es mit dem Bild des Kleides vergleiche, sieht es so aus als ob nach der 11. Runde (laut Anleitung die letzte Runde) noch mindestens eine Runde kommen müsste. Wenn die 11. Runde wirklich die letzte sein soll, kann man ja auch schlecht zwei Quadrate aneinandernähen ohne dass es komisch aussieht. Es würden dann ja zwei Stäbchen-Loch- Reihen aneinander stossen, was eben auf dem Foto nicht so aussieht. Danke für die Aufklärung!
28.04.2019 - 09:22DROPS Design answered:
Liebe Steffie, die letzte Reihe der Quadrat is die Stäbchen-Loch-Reihe, wenn die Quadrate dann zusammengenäht werden, wird dann zwischen den Loch-Reihen etwas "breiter" aussehen. Viel Spaß beim häkeln!
02.05.2019 - 08:45
![]() Hemery Francette wrote:
Hemery Francette wrote:
Bonjour je suis entrain de realiser ce superbe modèle mais j ai un soucis . lorsque que l on crochete les cotés , faut il accrocher sous la manche avant de tourner ? merci pour votre reponse
16.05.2018 - 16:59DROPS Design answered:
Bonjour Mme Hemery, pas besoin d'accrocher la bordure sous la manche avant de tourner, les coutures seront faites après, vous pourrez alors faire l'assemblage à ce moment-là. Bon crochet!
17.05.2018 - 08:00
![]() Davies wrote:
Davies wrote:
HI Could someone tell me the measurements on the completed square please. Thanks
11.11.2017 - 15:48DROPS Design answered:
Hi Davies, 1 square = 22 cm. If you need further measurements, there is a diagram at the bottom of the page. Happy crocheting!
12.11.2017 - 06:51
![]() Anna wrote:
Anna wrote:
Czy wiadomo ile włóczki potrzeba na jeden kwadrat? Chciałam zrobić krótszą wersję tej sukienki i nie wiem ile odjąć.
07.07.2017 - 11:34DROPS Design answered:
Witaj Anno, na całą sukienkę potrzeba 28 kwadratów, jak podzielisz ilość włóczki potrzebną do wykonania twojego rozmiaru przez 28 to mniej więcej otrzymasz ile włóczki potrzeba na 1 kwadrat. Możesz również wykonać 1 kwadrat i zważyć go. POWODZENIA!
07.07.2017 - 21:40
![]() Pam Shelburne wrote:
Pam Shelburne wrote:
I am unable to find yarn quantities needed for this design. How many skeins should I order for XXXXL size?
21.05.2017 - 00:04DROPS Design answered:
Hi Pam, 950g should be enough for XXXXL. Kind regards, Deirdre
21.05.2017 - 09:56
![]() Sabine wrote:
Sabine wrote:
Also, ich habe das Kleid ja gemacht, und habe es nun teilweise wieder aufgetrennt, weil ich die Jacke 162-21 jetzt draus mache. Das Kleid ist leider voll der Sack..... :-( Ich wollte das mal berichten, falls sich noch wer die Mühe macht und dann auch so enttäuscht ist. Sicher, man kann es durch die Skizze auch sehen, dass es nicht tailliert ist und so, aber das Model steht da schon sehr geschickt...... Ich dachte, ich berichte mal von meinen Erfahrungen....Es grüßt Sabine
30.07.2015 - 14:27DROPS Design answered:
Liebe Sabine, schade, dass Ihnen das Kleid nicht gefällt, es ist Geschmackssache, ob man einen geraden Schnitt mag oder nicht. Eine Möglichkeit, das Kleid etwas zu taillieren, ist, eine Kordel um die Taille zu binden bwz. durch das Muster zu fädeln. Ich hoffe, Sie sind mit der Jacke zufrieden!
01.08.2015 - 09:59
![]() Alexandra wrote:
Alexandra wrote:
Wie nähe ich am besten die einzelnen Quadrate zusammen, damit es möglichst glatt aussieht? ?? Habt ihr da einen Tipp für mich?
08.05.2015 - 11:37DROPS Design answered:
Schauen Sie mal im Kopf neben dem Foto unter Videos, dort gibt es eine Videoanleitung "Häkelquadrate zusammennähen", vielleicht hilft Ihnen das weiter. Es sollte auf diese Weise jedenfalls eine flache Naht ergeben.
08.05.2015 - 11:45
![]() Sabine H. wrote:
Sabine H. wrote:
......ich nochmal. Ich habe wohl das Bild falsch gedeutet: dort sieht es aus, als wenn die Ärmel nochmal extra mit Netzmuster verlängert wurden. Es scheint aber nicht so zu sein.....
13.03.2015 - 16:09DROPS Design answered:
Das Netzmuster gilt für die Schultern, die Ärmel werden nur aus den Quadraten + Blende gebildet. Wenn Sie genau hinschauen, können Sie das Quadrat, das den Ärmel bildet, erahnen.
14.03.2015 - 18:14
![]() Sabine H. wrote:
Sabine H. wrote:
Kann es sein, dass in der Anleitung nicht die Ärmel angegeben sind?? Ich habe Vorder- und Rückenteil fertig und die Schulternähte zusammengenäht. Die Anleitung für die Ärmel finde ich aber nicht........kann mir da bitte einer helfen? Grüße.
13.03.2015 - 15:44DROPS Design answered:
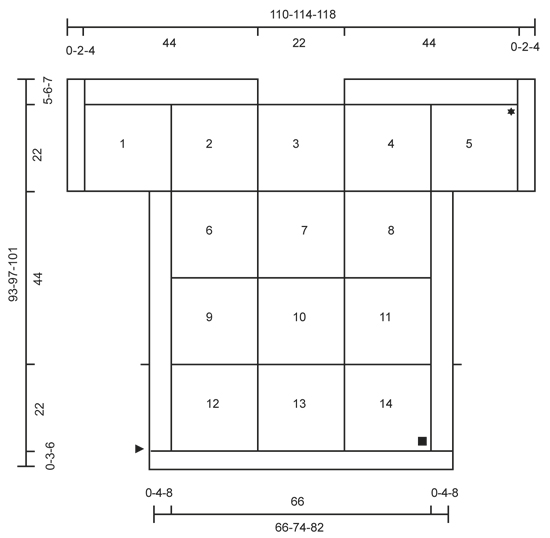
Die Ärmel werden nur aus den Quadraten 1 und 5 gebildet, wie in der Maßskizze ersichtlich. Dann wird noch die Ärmelblende angehäkelt, diese ist aber nicht besonders lang.
14.03.2015 - 18:15
|
|||||||||||||||||||||||||||||||
Morocco Dream#moroccodreamdress |
|||||||||||||||||||||||||||||||
 |
 |
||||||||||||||||||||||||||||||
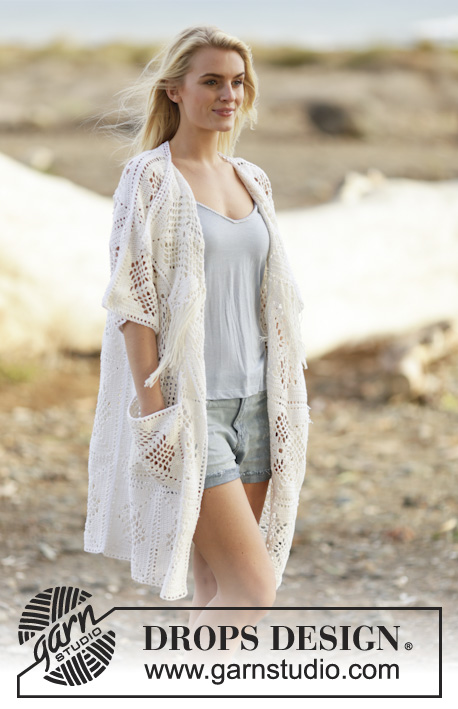
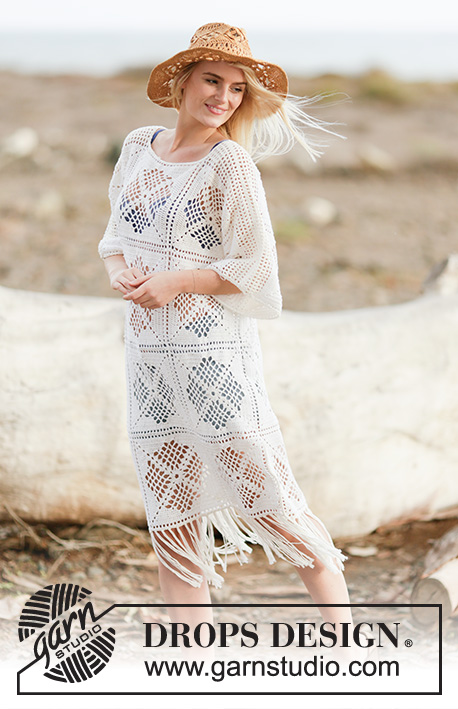
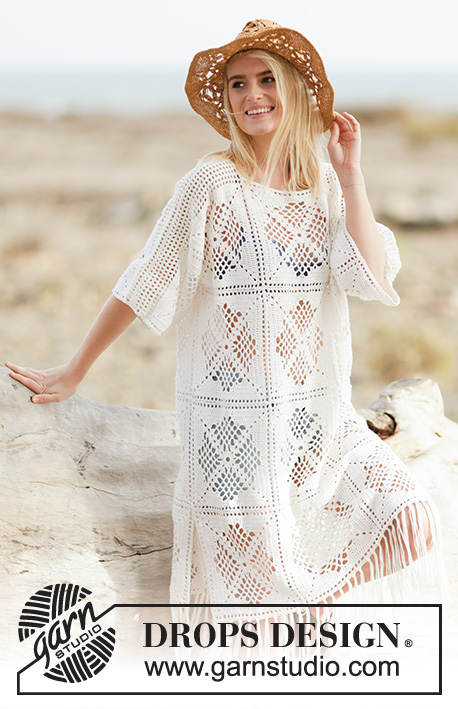
Crochet DROPS dress with lace pattern and fringes in ”Safran”. Size S-XXXL.
DROPS 162-22 |
|||||||||||||||||||||||||||||||
|
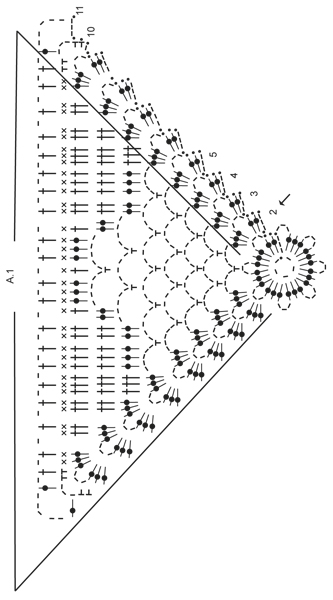
PATTERN: See diagram A.1. CROCHET INFO: Replace first sc at beg of every sc round with 1 ch. Finish every round with 1 sl st in ch from beg of round. Replace first dc at beg of every dc round with 3 ch. Finish round with 1 sl st in 3rd ch at beg of round. FRINGES: 1 FRINGE = Cut 2 lengths of 40 cm / 15¾" each. Fold them double and pull loop through ch-space. Then pull yarn ends through the loop. Cut fringes to a length of approx. 19 cm / 7½". ---------------------------------------------------------- DRESS: Work 28 crochet squares before sewing them tog for front and back piece. Then work mesh pattern in the different sizes. Then work front and back piece tog. CROCHET SQUARE: Work a crochet square as follows - see diagram A.1: Work 5 ch with Safran on hook size 3.5 mm/E/4 and form a ring with 1 sl st. ROUND 1: Work 3 ch (= 1 dc), then work 2 dc in ch-ring, * ch 3, 3 dc in ch-ring *, repeat from *-* 6 more times, ch 3, 1 sl st in 3rd ch at beg of round, 1 sl st in each of the next 3 sts (i.e. 1 sl st in the 2 next dc, 1 sl st in next ch). ROUND 2: 3 ch (= 1 dc), 2 dc in ch-space, ch 3, 3 dc in same ch-space, * ch 4, 1 sc in next ch-space, ch 4, 3 dc in ch-space, ch 3, 3 dc in same ch-space *, repeat from *-* (= A.1) 2 more times, ch 4, 1 sc in next ch-space, ch 4, 1 sl st in 3rd ch at beg of round, 1 sl st in each of the next 3 sts. ROUND 3: 3 ch (= 1 dc), 2 dc in ch-space, ch 3, 3 dc in same ch-space, * ch 5, 1 sc in next ch-space, ch 5, 1 sc in next ch-space, ch 5, 3 dc in ch-space, ch 3, 3 dc in same ch-space *, repeat from *-* (= A.1) 2 more times, ch 5, 1 sc in next ch-space, ch 5, 1 sc in next ch-space, ch 5, 1 sl st in 3rd ch at beg of round, 1 sl st in each of the next 3 sts. REMEMBER THE CROCHET GAUGE! ROUND 4-9: Continue as shown in diagram. Repeat A.1 4 times in total on round but finish as shown in diagram. I.e. do not work last dc-group in corner in A.1 the 4th time A.1 is repeated. Finish every round with 1 sl st in 3rd ch on round and 1 sl st in the next 3 sts. ROUND 10: Work ch 1, 2 sc in ch-space, ch 3, 2 sc in same ch-space, continue as shown in A.1. Finish with 1 sl st in first ch on round, 1 sl st in each of the next 2 sts. ROUND 11: 8 ch (= 1 dc + 5 ch), 1 dc in ch-space, continue as shown in A.1. Finish with 1 sl st in 3rd ch on round. Fasten off. Work another 27 squares the same way (= 28 squares). ASSEMBLY: Sew tog crochet squares as shown in chart. Make sure that to avoid a tight seam. You now have 2 similar parts that consist of 14 squares each. SHOULDER: Now work shoulder in mesh pattern - READ CROCHET INFO. Beg with 1 sl st in ch-space in corner on 5th square - see chart. ROW 1: Work ch 3, * ch 1, 1 dc in next dc *, repeat from *-* over 5th and 4th square. Work 1 dc in seam between the two squares. Finish with 1 ch and 1 dc in seam between 4th and 3rd square. Turn and work like this back and forth until mesh pattern has been worked for 5-6-7 cm / 2"-2⅜"-2¾". Fasten off. Work shoulder the same way but reversed over 2nd and 1st square. Repeat on the other part. Sew shoulder seam neatly tog in one and one st. Make sure that to avoid a tight seam. SIDES: Now work in each side as follows: Beg with 1 sl st in ch-space in corner on 14th square - see chart. S/M: Work ch 1, * ch 1, 1 sc in next ch-space *, repeat from *-* over 14th, 11th and 8th square and continue the same way under sleeve (= 5th square). Work the same way in the other side. Repeat on the other part. L/XL – XXL/XXXL: Work ch 3, * ch 1, skip ch 1, 1 dc in next dc *, repeat over 14th, 11th and 8th square. Turn and work the same way back and forth until mesh pattern has been worked for 4-8 cm / 1½"-3". Work the same way in the other side. Repeat on the other part. EDGE AT THE BOTTOM: Work an edge at the bottom as follows, beg from RS: S/M: Beg with 1 sl st in ch-space in corner. Work like this ch 1, * ch 1, 1 sc in next ch-space *, repeat from *-* along entire bottom edge. L/XL – XXL/XXXL: Beg with 1 sl st in first dc in corner at the bottom edge. Work ch 3, * ch 1, 1 dc in next dc *, repeat from *-* along the entire bottom edge, turn and work the same way back and forth for 3-6 cm / 1"-2½". Repeat on the other part. ASSEMBLY: Sew side and underarm seams neatly tog one by one st but leave 22-25-28 cm / 8¾"-9¾"-11" for vent in each side. Crochet an edge around the neck as follows: Fasten the strand in shoulder seam, work ch 1, * ch 1, 1 sc in next ch-space *, repeat from *-* around the entire neck. Finish with ch 1, 1 sl st in first ch on round. Fasten off. Insert FRINGES - see explanation above, in every other ch-space along bottom edge. SLEEVE EDGE: Crochet along the sleeve edge as follows: Beg with 1 sl st mid under sleeve and work as follows from RS: S/M: ch 1, * ch 1, 1 sc in next ch-space *, repeat from *-* around the entire sleeve edge and finish with ch 1, 1 sl st in 1st ch at beg of round. Repeat around the other sleeve edge. L/XL - XXL/XXXL: ch 3, * ch 1, 1 dc in next dc *, repeat from *-* around the entire sleeve edge. Finish with ch 1, 1 sl st in 3rd ch on round. Continue like this until edge measures 2-4 cm / ¾"-1½". Repeat around the other sleeve edge. |
|||||||||||||||||||||||||||||||
Diagram explanations |
|||||||||||||||||||||||||||||||
|
|||||||||||||||||||||||||||||||
 |
|||||||||||||||||||||||||||||||
 |
|||||||||||||||||||||||||||||||
Have you finished this pattern?Tag your pictures with #dropspattern #moroccodreamdress or submit them to the #dropsfan gallery. Do you need help with this pattern?You'll find 9 tutorial videos, a Comments/Questions area and more by visiting the pattern on garnstudio.com. © 1982-2026 DROPS Design A/S. We reserve all rights. This document, including all its sub-sections, has copyrights. Read more about what you can do with our patterns at the bottom of each pattern on our site. |
|||||||||||||||||||||||||||||||


With over 40 years in knitting and crochet design, DROPS Design offers one of the most extensive collections of free patterns on the internet - translated to 17 languages. As of today we count 324 catalogs and 12290 patterns - 12280 of which are translated into English (US/in).
We work hard to bring you the best knitting and crochet have to offer, inspiration and advice as well as great quality yarns at incredible prices! Would you like to use our patterns for other than personal use? You can read what you are allowed to do in the Copyright text at the bottom of all our patterns. Happy crafting!
Post a comment to pattern DROPS 162-22
We would love to hear what you have to say about this pattern!
If you want to leave a question, please make sure you select the correct category in the form below, to speed up the answering process. Required fields are marked *.