
Popular categories
Looking for a yarn?


Comments / Questions (102)
![]() Julie wrote:
Julie wrote:
There is someone on Etsy charging for this pattern and saying they designed it.
29.05.2026 - 22:53
![]() Adeline wrote:
Adeline wrote:
Bonjour.. le patron ci-dessus me plaît énormément. J'aimerai le monter sur un haut pour en faire une robe .. mais pour une fille en 2 ans .. comment faire
06.05.2026 - 10:46DROPS Design answered:
Bonjour Adeline, vous pouvez vous inspirer d'un modèle de robe crochet en 2 ans (ici pour les nôtres) pour y faire les adaptations souhaitées en fonction de votre tension, et du résultat souhaité. Bon crochet!
06.05.2026 - 16:42
![]() Anette Glasell wrote:
Anette Glasell wrote:
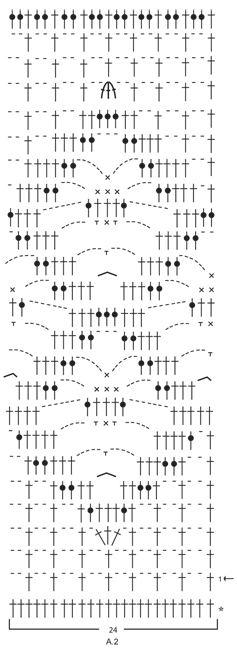
Hej. Hur börjar jag varv 9 i diagram A2 då varvet ska börja med 4 luftmaskor som ska hänga ihop med de 4 luftmaskor som avslutar varvet? Jag har ju avslutat varv 8 med en smygmaska i lm-stolpen?
12.04.2026 - 19:01
![]() Anny Baade Nielsen wrote:
Anny Baade Nielsen wrote:
Hvordan får jeg startet med at hækle rundt ? forstår ikke lige hvad i mener mvh Anny
08.04.2026 - 09:49DROPS Design answered:
Hei Anny. Når det er heklet totalt 12 rader i høyden slutter splitten i siden og arbeidet skal nå hekles rundt. Ikke snu arbeidet , men start med 1 kjedemaske i 3. luftmaske i 1. maske på begynnelsen av forrige rad. Start med å hekle 3 luftmasker, forstsett med 1 stav i hver stav omgangen rundt og avslutt omgangen med 1 kjedemaske i 3.luftmaske på begynnelsen av omgangen. mvh DROPS Design
13.04.2026 - 12:06
![]() Birgit wrote:
Birgit wrote:
Hej Jeg er ved at hækle A1 i diagrammet og er i tvivl om hvad "st i/om m" vil sige? Skal jeg hækle i eller om masken? På forhånd tak. Mvh Birgit
16.02.2026 - 13:07DROPS Design answered:
Hei Birgit. Om du ser på 1. rad i A.1 (med pil) hekles stavene i en stav fra forrige omgang, men om du ser på 5.rad hekles de 2 første stavene i en stav fra forrige omgang, mens de 4 neste stavene hekles om luftmaskebue fra forrige rad. mvh DROPS Design
23.02.2026 - 11:16
![]() Jessica wrote:
Jessica wrote:
Hoeveel bollen garen heb ik nodig voor dit patroon
12.02.2026 - 12:24DROPS Design answered:
Dag Jessica,
Bovenaan bij de materialenlijst staat per maat aangegeven hoeveel gram je nodig hebt. (Het eerste getal geldt voor maat S, het tweede getal voor maat M, enzovoort). 1 bol weegt meestal 50 gram, maar let erop dat dit per garensoort verschillend kan zijn. Dus als er bijvoorbeeld 400 gram staat dan zou je 8 bollen nodig hebben als 1 bol 50 gram weegt.
12.02.2026 - 19:22
![]() Birgit wrote:
Birgit wrote:
Hej Jeg er nået til diagram A1 og er i tvivl om de to "st i/om m" og "fm i/om m". Skal jeg så hækle i eller om masken? Mvh. Birgit
03.02.2026 - 09:17DROPS Design answered:
Hei Birgit. Husk HÆKLEINFO, står øvert i oppskriften (Første st i beg af rækken/omg erstattes med 3 lm. Afslut rækken med 1 st i 3.lm fra forrige række (når arb hækles frem og tilbage) og afslut omg med 1 km i 3.lm i beg af omg (når arb hækles rundt). Første fm i beg af omg erstattes IKKE, men der hækles 1 lm før fm i beg af omg. Afslut med 1 km i første lm på omg. Mvh DROPS Design
09.02.2026 - 08:02
![]() Bettina wrote:
Bettina wrote:
Hallo ich häkle diesen rock aber mach ihn gleich in runden also lasse die knopfleiste weg weil ich einen gummi in einem tunnel ziehe muß ich trotzdem die ersten runden so häkeln wie beschrieben oder ist das nur wegen den knöpfen so?
13.01.2026 - 14:12DROPS Design answered:
Liebe Bettina, Sie können so anfangen wie beschrieben, aber direkt in Runden. Ansonsten ändert sich nichts. Viel Spaß beim Häkeln!
06.02.2026 - 13:45
![]() Zsofia wrote:
Zsofia wrote:
In A.1, specifically A.X middle row, are you sure that the double crochet (US term) should go IN the stitches? If yes, the two sc of previous row? On the pictures it seems that the dc go AROUND the middle chain space.
04.12.2024 - 18:43DROPS Design answered:
Dear Zsofia, the double crochet symbol in the third row is used for working both in or around the stitches, as indicated in the chart key above. In this specific case, the dc are worked around the central chain space. Happy crochetting!
08.12.2024 - 17:58
![]() Diya wrote:
Diya wrote:
In the A3 diagram on row 3,4,5,6 the middle, do I have to DC only in the chain space or also on the previous row DCs and the chain space?
28.08.2024 - 12:09DROPS Design answered:
Dear Diya, the dc (US-English) on rows 3,4,5 and 6 are worked in the chain spaces below. Happy crocheting!
29.08.2024 - 09:31
|
|||||||||||||||||||||||||||||||||||||
Summer Escape#summerescapeskirt |
|||||||||||||||||||||||||||||||||||||
 |
 |
||||||||||||||||||||||||||||||||||||
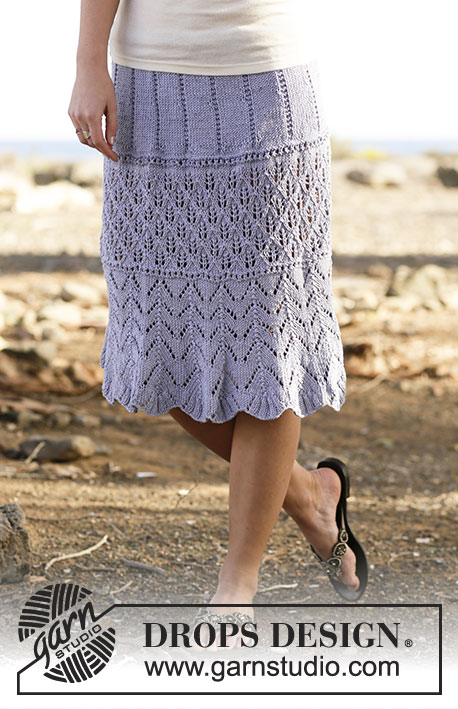
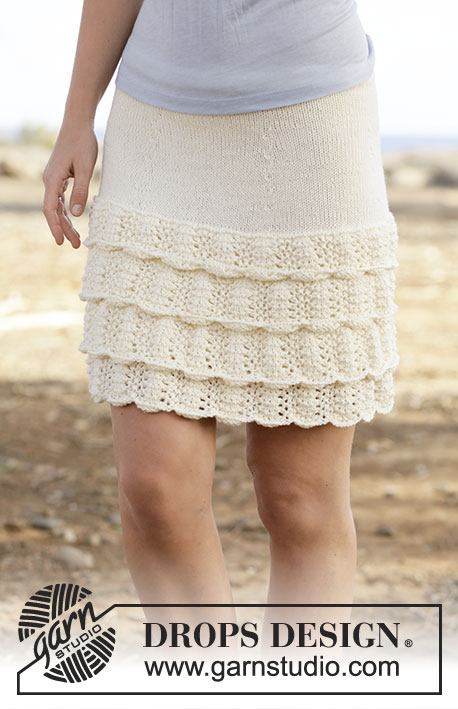
Crochet DROPS skirt with double crochet, lace pattern, worked top down in ”Safran”. Size S-XXXL.
DROPS 162-18 |
|||||||||||||||||||||||||||||||||||||
|
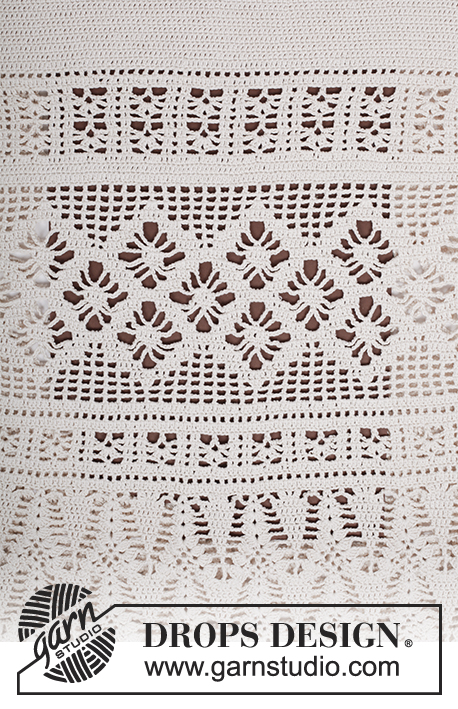
CROCHET INFO: Replace first dc from beg of row/round with 3 ch. Finish row with 1 dc in 3rd ch from previous row (when piece is worked back and forth) and finish round with 1 sl st in 3rd ch from beg of round (when piece is worked in the round). DO NOT replace first sc at beg of round but work 1 ch before sc at beg of round. Finish with 1 sl st in first ch on round. INCREASE TIP: Inc 1 dc by working 2 dc in same dc. DECREASE TIP: Work 1 dc but wait with last pull through (= 2 sts on hook), then work next dc but on last pull through, pull yarn through all 3 sts on hook = 1 st dec. PATTERN: See diagrams A.1 to A.3. ---------------------------------------------------------- SKIRT: Work back and forth, top down to after vent in the side, then work in the round. Work 186-209-232-258-279-305 ch (includes 3 ch to turn with) on hook size 3.5 mm/E/4 with Safran. Work first row as follows: 1 dc in 4th ch from hook, 1 dc in each of the next ch 4, * skip ch 1, 1 dc in each of the next 6 ch *, repeat from *-* until 3-5-7-5-5-3 ch remain, skip 1 ch and finish with 1 dc in each of the last 2-4-6-4-4-2 dc = 158-178-198-220-238-260 dc. Then work back and forth with 1 dc in every dc - READ CROCHET INFO. REMEMBER THE CROCHET GAUGE! When 5 rows have been worked vertically, insert 6 markers in the piece as follows: First marker after 14-14-16-20-21-22 dc, then there should be 26-30-33-36-39-43 dc between every marker, there will be 14-14-17-20-22-23 dc after last marker at the end of row. On next row inc 1 dc before all markers – READ INCREASE TIP! Repeat inc every other row 6-6-7-8-9-10 more times - NOTE: Inc alternately before and after markers = 200-220-246-274-298-326 dc. AT THE SAME TIME when 12 rows in total have been worked vertically, end the vent in the side and continue piece in the round, beg round in the side – READ CROCHET INFO! When piece measures 24-24-25-25-25-26 cm / 9½"-9½"-9¾"-9¾"-9¾"-10¼", inc 28-32-30-26-38-22 st evenly on next round = 228-252-276-300-336-348 sts. Now work pattern as follows: Work from 1st round in A.1 (= 12 dc) 19-21-23-25-28-29 times in width. When A.X has been worked 1 time vertically, repeat A.X 1 more time before continuing with next round in diagram. Then work 1-2-2-1-2-3 rounds with 1 dc in every dc, AT THE SAME TIME on last round inc 36-36-36-36-24-36 sts evenly = 264-288-312-336-360-384 dc. Now work from 1st round in A.2 (= 11-12-13-14-15-16 repetitions), AT THE SAME TIME on last round inc 12 dc evenly in all sizes = 276-300-324-348-372-396 dc. Continue with A.1 (= 23-25-27-29-31-33 repetitions) 1 time vertically, AT THE SAME TIME on last round inc 12-20-12-20-12-20 dc evenly = 288-320-336-368-384-416 dc. Now work A.3 (= 18-20-21-23-24-26 repetitions). When A.3 has been worked vertically, repeat A.Z 1-1-1-2-2-2 more times vertically. Now work as follows: 1 ch (= 1 sc), ** work * ch 4, 1 sc in next ch-space *, repeat from *-* 2 more times, ch 4, skip 3 dc, 1 sc in next dc **, repeat from **-** the entire round, and finish with 1 sl st in first ch on round. BUTTONHOLE LOOPS: Along the opening on front piece work buttonhole loops as follows (beg at the bottom): 2 sc in first dc, ch 3, skip 1 dc, * work 2 sc in each of the next 2 dc, ch 3, skip 1 dc *, repeat from *-* 3 times in total and finish with 2 sc in last dc at the top, turn and work back as follows: 1 sc in every sc and 3 sc in every ch-space. BUTTON BAND: Along the other side of the opening work 5 rows with sc back and forth (on 1st row work 2 sc in every dc = 24 sc), cut the yarn. Sew the buttons on to the button band. EDGE: Work an edge at top of waist on skirt as follows from RS: Fasten the strand with 1 sl st at the edge of button folding edge, ch 1, * ch 1, skip ch 1, 1 sc in next ch *, repeat from *-* along the entire edge of waist. Fasten off. |
|||||||||||||||||||||||||||||||||||||
Diagram explanations |
|||||||||||||||||||||||||||||||||||||
|
|||||||||||||||||||||||||||||||||||||
 |
|||||||||||||||||||||||||||||||||||||
 |
|||||||||||||||||||||||||||||||||||||
 |
|||||||||||||||||||||||||||||||||||||
Have you finished this pattern?Tag your pictures with #dropspattern #summerescapeskirt or submit them to the #dropsfan gallery. Do you need help with this pattern?You'll find 12 tutorial videos, a Comments/Questions area and more by visiting the pattern on garnstudio.com. © 1982-2026 DROPS Design A/S. We reserve all rights. This document, including all its sub-sections, has copyrights. Read more about what you can do with our patterns at the bottom of each pattern on our site. |
|||||||||||||||||||||||||||||||||||||


With over 40 years in knitting and crochet design, DROPS Design offers one of the most extensive collections of free patterns on the internet - translated to 17 languages. As of today we count 325 catalogs and 12298 patterns - 12288 of which are translated into English (US/in).
We work hard to bring you the best knitting and crochet have to offer, inspiration and advice as well as great quality yarns at incredible prices! Would you like to use our patterns for other than personal use? You can read what you are allowed to do in the Copyright text at the bottom of all our patterns. Happy crafting!
Post a comment to pattern DROPS 162-18
We would love to hear what you have to say about this pattern!
If you want to leave a question, please make sure you select the correct category in the form below, to speed up the answering process. Required fields are marked *.