
Popular categories
Looking for a yarn?


Comments / Questions (12)
![]() Renata Groen-Hoogendoorn wrote:
Renata Groen-Hoogendoorn wrote:
Ik wil de polswarmers maken. "Haak 2-3-4 toeren met 1 v in elke v. Herhaal dan de 1e en 2e toer een keer. Plaats 1 markeerder aan de zijkant (haak de st voor de duim hier later). Herhaal de 1e en 2e toer tot het werk ongeveer 18-19-20 cm meet, pas zo aan dat het na toer 1." Mis ik iets hier aan het eind van de zin?
02.12.2022 - 12:08DROPS Design answered:
Dag Renata,
Het is de bedoeling dat je het zo aanpast dat je eindigt na een 'TOER 1', dus een toer met vasten. Het stond inderdaad een beetje ongelukkig omschreven, het is nu aangepast.
04.12.2022 - 16:23
![]() Carla wrote:
Carla wrote:
Hi I am making the headband, but I am unsure of how to do the ribbon part. how do I sew it unto the headband. should i sew it together before adding it to the headband or after. How do i sew it unto the headband. thank you!
14.07.2022 - 23:37DROPS Design answered:
Dear Carla, ribbon is sewn together on its short sides to form a ring. Then, pass the headband inside the ring and sew the headband to the ribbon afterwards . Happy crocheting!
15.07.2022 - 12:56
![]() Mylène wrote:
Mylène wrote:
Bonjour, je suis entrain de faire ce modèle et je ne comprends pas les dimensions car ça ne ressemble pas du tout à la photo ! Ce serait bien d’avoir le modèle à plat ! La pointe est importante par rapport à l’écharpe qui doit faire deux tours de coup (trop serré) Merci pour votre aide 😊
15.11.2020 - 14:11DROPS Design answered:
Bonjour Mylène, le tour de cou se crochète de bas en haut, la petite pointe se voit un peu sur la photo: la partie qui "rebique" un peu en bas - vous augmentez à partir du 3ème rang et ainsi tous les 2 rangs jusqu'à ce que vous ayez 47-53 ms, et montez ensuite les mailles en l'air qui vont faire le tour de cou et continuez ensuite sur toutes les mailles sans augmenter. Vérifiez bien votre tension en largeur et en hauteur pour obtenir le même résultat que sur la photo. Bon crochet!
16.11.2020 - 10:20
![]() Ninna LH wrote:
Ninna LH wrote:
Hej! Mönstret ser fantastiskt ut! Jag undrar om man kan byta ut mot ett garn i merinoull? Ni kanske isf har förslag på ett då? Samt om man då ska ändra virknålsstorlek? Tack på förhand! Mvh, Ninna
13.09.2020 - 12:25DROPS Design answered:
Hej Ninna. Du kan använda DROPS Big Merino till detta mönster. Det är samma rekommenderade storlek på virknål, men se bara till att få den virkfasthet som uppges i mönstret. Tänk bara på att beräkna riktig garnåtgång om du byter garn. Mvh DROPS Design
15.09.2020 - 07:52
![]() Patrizia Vallarani wrote:
Patrizia Vallarani wrote:
Ho acquistato la rivista sulla quale è riportato questo modello che vorrei realizzare ma non ho capito le spiegazioni perché manca uno schema del modello. Soprattutto dopo la 4^ riga quando si dice di avviare a nuovo delle catenelle??? non si capisce come si sviluppa il lavoro. Prima che io inizi mi potete aiutare; grazie?
23.01.2019 - 12:13DROPS Design answered:
Buongiorno Patrizia. Lo scaldacollo presenta una punta al centro sul davanti. Quindi ha una forma di rettangolo con una punta che sporge al centro di uno dei lati lunghi. Questa punta corrisponde alla prima parte lavorata, fino a quando non ottiene 47 o 53 maglie, a seconda della taglia. Avvia poi le catenelle da un lato e dall'altro e lavora la parte rettangolare. Buon lavoro!
23.01.2019 - 13:55
![]() R.D wrote:
R.D wrote:
Oh ! I found these crochet wrist warmer video tutorials : 167-9 , 166-44 , 108-25 . Thank you.
14.03.2018 - 03:50R.D wrote:
Please, do you have a video tutorial for a crocheted wrist warmer?
14.03.2018 - 02:37DROPS Design answered:
Hi RD, If you click on video tutorials, crochet and then search for wristwarmers a number of tutorials come up. I hope this helps and happy crocheting!
14.03.2018 - 07:58Karen wrote:
Please help I am having a problem understanding the pattern for the neck warmer from the do not cut part could you please explain
11.11.2015 - 22:25DROPS Design answered:
Dear Karen, join a new thread in 1st dc on last row made (from WS) and crochet loosely a chain with 23-26 ch, cut this yarn. Take the last st of your last row on neckwarmer and crochet then from RS: 1 tr in every chain (the one you just worked extra with another yarn) + 1 tr in every dc from previous row + 1 tr in every ch worked at the end of last row from WS. You have now increased on each side with a chain. Happy crocheting!
12.11.2015 - 10:09
![]() Terrier wrote:
Terrier wrote:
Cest le modèle que je cherche mais fermé merci
21.04.2015 - 12:27
![]() Gloria Cannon wrote:
Gloria Cannon wrote:
Do you have instructions for your stitches?I have a hard time with your patterns. Thank you
01.10.2014 - 00:50DROPS Design answered:
Dear Mrs Cannon, you will find all relevant videos to the sts used in that pattern under tab "video" at the right side of the picture - take care you are reading US-English patterns since crochet terminology is different in British and American English. Happy crocheting!
01.10.2014 - 09:32
|
|
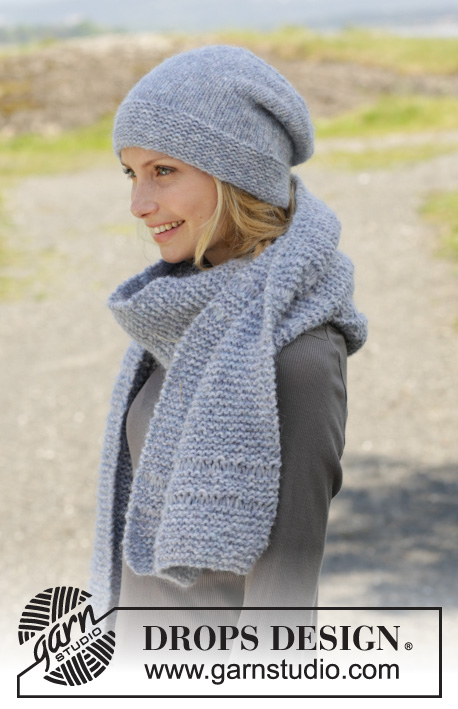
Winter Blues#winterbluesset |
|
|
|
|
Crochet DROPS neck warmer, head band and wrist warmers in ”Big Delight”.
DROPS 158-42 |
|
|
CROCHET INFO: Replace first sc at beg of every sc row with 1 ch. Replace first dc at beg of every dc row with 3 ch. Replace first tr at beg of every tr row (does not apply to neck warmer) with 4 ch. ---------------------------------------------------------- NECK WARMER: Worked back and forth, bottom up. Work 3 ch on hook size 5 mm / H/8 with Big Delight and form 1 ring with 1 sl st in 1st ch. ROW 1 (= RS): Work 3 ch + 4 dc in ch-ring. Turn. ROW 2 (= WS): READ CROCHET INFO! Work 1 sc in every dc. Turn. ROW 3: Work 5 ch + 2 tr + 1 dc in 1st sc, 1 dc in every sc until 1 sc remains, work 1 dc + 2 tr + 1 dtr in last sc. Turn. ROW 4: Work 1 sc in every st. Turn. REMEMBER THE CROCHET GAUGE! Repeat 3rd and 4th row until there are 47-53-53 sc on row – adjust after a row with sc (WS) and work 23-23-26 LOOSE ch at the end of this row * – DO NOT cut the yarn (continue from here later)! Use another strand and work new ch in 1st sc on same row as follows: Work 1 sl st + 23-23-26 LOOSE ch – cut this strand and pull it through last st = 93-99-105 sts on row. NOW MEASURE PIECE FROM HERE! Continue from * as follows: ROW 1 (= RS): Work 1 dc in every ch and sc = 93-99-105 dc. Turn. ROW 2 (= WS): Work 1 sc in every dc. Turn. Repeat 1st and 2nd row until piece measures approx. 18-22-24 cm / 7"-8¾"-9½". Cut the yarn (keep some yarn for assembly). Neck warmer measures approx. 34-40-42 cm / 13½"-15¾"-16½" vertically mid front. ASSEMBLY: Sew tog short sides. ---------------------------------------------------------- HEAD BAND: Worked back and forth and sewn tog when finished. Work 69-72-74 LOOSE ch on hook size 5 mm / H/8 with Big Delight. ROW 1 (= WS): READ CROCHET INFO! Work 1 sc in every ch, turn. ROW 2 (= RS): Work 1 tr in every sc. Repeat these 2 rows 4 times in total - REMEMBER CROCHET GAUGE. Repeat 1st row 1 more time. Piece measures approx. 10.5 cm / 4¼" vertically and 49-51-53 cm / 19¼"-20"-21" in width. Cut the yarn (keep some yarn for assembly). Then work a ribbon as follows: Work 7 ch. Turn and work 1 sc in every st. Continue with 1 sc in every sc until piece measures approx. 10 cm / 4" - keep some yarn for assembly. ASSEMBLY: Sew tog short sides of ribbon to form 1 ring and thread it on to head band. Sew tog short sides on head band to form 1 ring. ---------------------------------------------------------- WRIST WARMER: Work back and forth, bottom up and sew tog in the side, then work thumb. Work 22-24-25 LOOSE ch on hook size 5 mm / H/8 with Big Delight. ROW 1 (= WS): READ CROCHET INFO! Work 1 sc in every ch, turn. ROW 2 (= RS): Work 1 tr in every sc, turn. Repeat 1st and 2nd row 2 times in total - REMEMBER CROCHET GAUGE. Work 2-3-4 rows with 1 sc in every sc. Then repeat 1st and 2nd row 1 time. Insert 1 marker in the side (pick up sts for thumb hole later). Repeat 1st and 2nd row until piece measures approx. 18-19-20 cm / 7"-7½"-8", adjust after row 1. ASSEMBLY: Fold wrist warmer double, sew tog edge to edge along the side through both layers from beg of piece until marker. Fasten the strand. Measure 3-3½-4 cm / 1"-1¼"-1½" (thumb hole) up to marker and sew from here and up to edge. Work around the thumb hole as follows: 1 sl st, * ch 1, 8-10-11 sc around thumb hole, finish with 1 sl st in 1st sc *, repeat from *-* 2 times in total. Then work 1 round while at the same time inc 2 sc evenly by working 2 sc in same sc = 10-12-13 sc. Fasten off. Work another wrist warmer the same way. |
|
Have you finished this pattern?Tag your pictures with #dropspattern #winterbluesset or submit them to the #dropsfan gallery. Do you need help with this pattern?You'll find 8 tutorial videos, a Comments/Questions area and more by visiting the pattern on garnstudio.com. © 1982-2026 DROPS Design A/S. We reserve all rights. This document, including all its sub-sections, has copyrights. Read more about what you can do with our patterns at the bottom of each pattern on our site. |


With over 40 years in knitting and crochet design, DROPS Design offers one of the most extensive collections of free patterns on the internet - translated to 17 languages. As of today we count 325 catalogs and 12298 patterns - 12288 of which are translated into English (US/in).
We work hard to bring you the best knitting and crochet have to offer, inspiration and advice as well as great quality yarns at incredible prices! Would you like to use our patterns for other than personal use? You can read what you are allowed to do in the Copyright text at the bottom of all our patterns. Happy crafting!
Post a comment to pattern DROPS 158-42
We would love to hear what you have to say about this pattern!
If you want to leave a question, please make sure you select the correct category in the form below, to speed up the answering process. Required fields are marked *.