
Popular categories
Looking for a yarn?


Comments / Questions (41)
![]() Diane wrote:
Diane wrote:
Dos et devant: Dois-je faire le dernier rang de A4 avant de faire les augmentations à 14 cm. du marqueur?
19.02.2026 - 19:00DROPS Design answered:
Bonjour Diane, les augmentations sur les côtés doivent se faire en même temps que vous crochetez le dernier rang de A.4 (crochetez quelques rangs en plus ou en moins si besoin mais les augmentations doivent être faites sur ce rang). Bon crochet!
20.02.2026 - 07:49
![]() Diane wrote:
Diane wrote:
Dos et devant: À 14 cm. a partir du marqueur au motif A.4 je ne comprends pas la consigne des augmentations. Je dois faire une augmentations dans le 9 ième motif, ça c'est ok. Ensuite, si je comprends bien, je dois faire 19 augmentations dans LE motif suivant. Je ne peut pas croire que 19 fois le motif A2 est réaliste dans un seul motif. Merci de m'éclairer Diane
17.02.2026 - 01:39DROPS Design answered:
Bonjour Diane, vous allez en fait augmenter 2 fois: 1 fois sur chacun des côtés: crochetez 9 fois A.2, augmentez dans l'arceau au milieu du A.2 suivant, crochetez 19 fois A.2, augmentez dans l'arceau au milieu du A.2 suivant, et crochetez les 9 derniers A.2 = vous avez augmenté 2 arceaux et vous avez maintenant suffisamment de mailles pour crocheter 2 fois A.2 en plus en largeur (37 fois comme avant + 2 augmentations). Notez qu'au rang suivant, les motifs ne seront plus alignés sur les précédents, répétez simplement A.2 en largeur tout le long. Bon crochet!
18.02.2026 - 09:42
![]() Catharina Peltyn wrote:
Catharina Peltyn wrote:
Beste, mooie website doch de patronen vind in wat onduidelijk… Horizontaal haak je A1 om te starten, vervolgens A2,dan A3en dan blijf je deze 3 patronen herhalen tot op het einde van de rij? Op het einde van de 2 de horizontale lijn van A4 ( teruggaande toer) heb je 3 verticale streepjes. Zijn dit lossen? Je kan toch niet eindigen en herbeginnen met enkel lossen? Dank voor je reactie
31.03.2025 - 18:15DROPS Design answered:
Dag Catharina,
Het bovenste deel haak je heen en weer in stokjes. Het onderste deel haak je in patroon, waarbij je aan het begin en einde steeds 6 stokjes haakt voor de bies. Het patroon bestaat uit A.1, dan een aantal (afhankelijk van je maat) herhalingen van A.2 in de breedte en tot slot A.3. Als je alle toeren van het telpatroon hebt gehaakt dan herhaal je dit steeds in de hoogte. (Behalve de toer waar een sterretje naast staat.)
02.04.2025 - 19:49
![]() Merce Bertran Garrido wrote:
Merce Bertran Garrido wrote:
No entiendo la parte de los aumentos y las hileras al principio del patrón. Seria posible un grafico?
28.03.2025 - 12:05DROPS Design answered:
Hola Merce, este patrón no tiene gráficos aparte de los diagramas A.1-A.4 en la parte inferior del patrón. No hacemos patrones personalizados. Primero trabajas puntos altos sobre la cadeneta de montaje. Después insertas marcapuntos (el número de marcadores depende de la talla que estés trabajando) y aumentas trabajando 2 p.a en un lado de cada uno de los marcapuntos (en la siguiente fila con aumentos trabajarás 2 p.a al otro lado de los marcapuntos; irán alternando). Este aumento se trabajará cada 2ª fila (fila recta, 1 fila con aumentos) y luego cada 4ª fila (3 filas rectas, 1 fila con aumentos), el número de veces depende de la talla.
30.03.2025 - 20:58
![]() Maria wrote:
Maria wrote:
Ik heb inmiddels de oplossing voor mijn vraag van 19-12-24 gevonden. Fijne feestdagen gewenst!
21.12.2024 - 15:06
![]() Maria wrote:
Maria wrote:
Ik loop vast bij het lezen van het patroon van de mouw vanaf het plaatsen van de markeerder midden onder de mouw. Ik denk dat ik 13 stokjes moet haken en er daarbij 1 moet minderen. Dan moet ik 1xA1 haken (wat is dat precies?), dan 9x A2 en dan 1xA3 (wat is dat precies?). Daarna eindigt de toer met 12 stokjes. Ik kom er niet uit wat ik moet doen als het A1 en/of A3 betreft. Zou je mij in tekst kunnen uitleggen wat ik moet haken als er staat A1 en wat als er staat A3? Alvast dank voor je hulp!
19.12.2024 - 19:02DROPS Design answered:
Dag Maria,
A.1, A.2 en A.3 zijn de telpatronen. Deze staan onderaan de pagina, onder de beschrijving. Je haakt eerst A.1 in de breedte dan herhaal je A.2 9 keer in de breedte en tot slot haak je 1 keer A.3 in de breedte.
08.01.2025 - 13:24
![]() Maria wrote:
Maria wrote:
Zoals ik het patroon lees, moet ik bij A2 steeds 1 stokje van de vorige toer overslaan. Mijn haakwerk trekt dan samen en is niet meer mooi vlak. Ik doe dus iets verkeerd, maar ik weet niet wat. Is het de bedoeling dat ik op de plaatsen waar een stokje wordt overgeslagen 1 losse haak? Of is het iets anders? Alvast dank voor je reactie!
26.11.2024 - 19:21DROPS Design answered:
Dag Maria,
Je haakt over A.2 steeds 1 stokje, 2 lossen, 1 stokje van de vorige toer overslaan, 1 vaste in het volgende stokje, 2 lossen, 1 stokje van de vorige toer overslaan.
27.11.2024 - 11:29
![]() Enza wrote:
Enza wrote:
Pourqua en englaise?metter traduisee en francee
30.05.2024 - 12:28
![]() Esther Huhn wrote:
Esther Huhn wrote:
The Yesterday Cardigan pattern is written for sizes S-M-L-XL etc. However, I'e like to know what chest and arm measurements these sizes correspond with. The pattern gives stitch counts for each size but not actual measurements in cm of inches. Can you help me?
24.07.2023 - 18:22DROPS Design answered:
Hi Esther, You will find a measurements chart, with all the measurements for each size, at the bottom of the page. Happy knitting!
25.07.2023 - 06:44
![]() Michele wrote:
Michele wrote:
Hi I am having trouble with the following instructions: "When piece measures 14-14-14-15-15-15 cm from marker, adjust so that next row is last row in A.4, inc 1 repetition of A.2 in 8th-9th-9th-10th-11th-13th repetition in ch-space as follows: ....Work 14-16-19-20-22-25 repetitions of A.2" I thought I was supposed to be working A4 until the end? Am I supposed to work a row of A2 at this point? Many thanks
11.05.2023 - 11:24DROPS Design answered:
Dear Michelle, A.4 shows the pattern in height, while in width you read diagrams as follows: start with A.1, repeat A.2 and end with A.3 (seen from RS; from WS you will work: A.3, repeat A.2 and end with A.1). This lesson could help you understanding how to read crochet diagrams. Happy crocheting!
11.05.2023 - 16:35
|
|||||||||||||||||||
Yesterday Cardigan#yesterdaycardigan |
|||||||||||||||||||
 |
 |
||||||||||||||||||
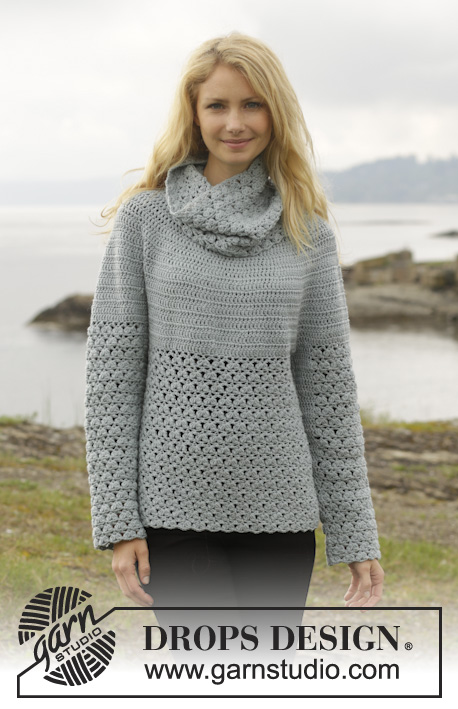
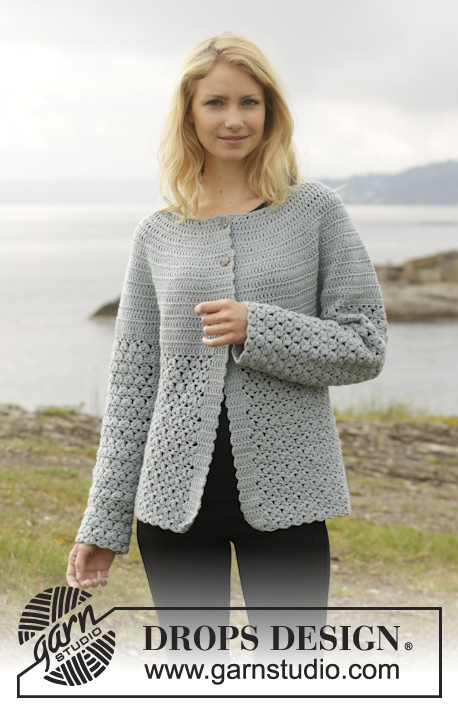
Crochet DROPS jacket with round yoke and lace pattern, worked top down in ”Merino Extra Fine”. Size: S - XXXL.
DROPS 156-17 |
|||||||||||||||||||
|
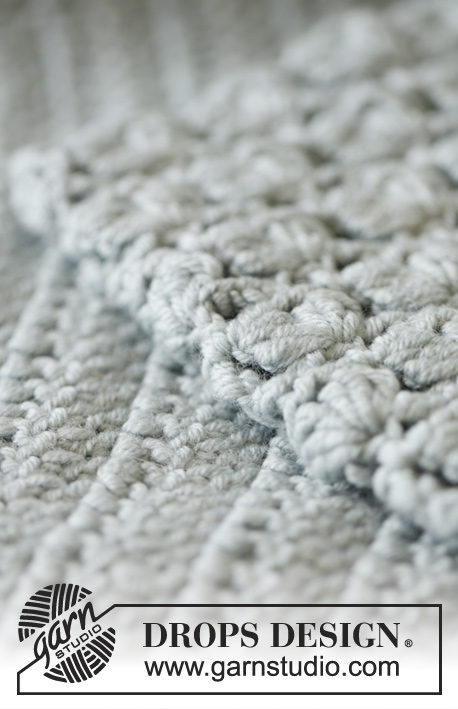
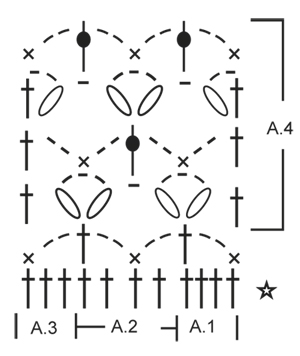
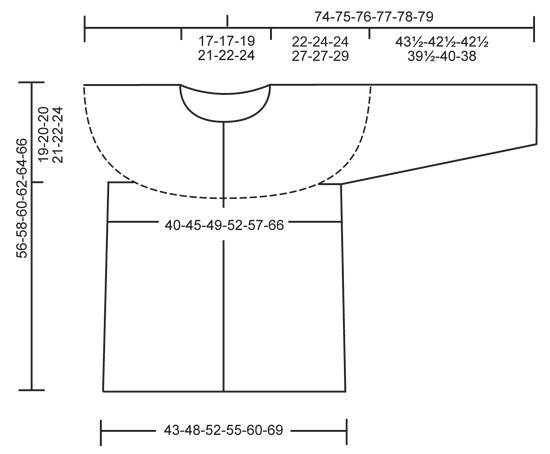
PATTERN: See diagrams A.1-A.4. The diagrams show all rows in pattern seen from RS. CROCHET INFO: Replace first dc on every round/row with 3 ch. Replace first sc on every round/row with 1 ch. Finish every dc round with 1 sl st in 3rd ch from beg of round. Finish every sc round with 1 sl st in 1st ch on round. INCREASE TIP: Inc 1 st by working 2 dc in 1 dc, first on one side of all markers on row, next time on the other side of all markers on row, continue inc like this. DECREASE TIP: Work 1 dc but wait with last pull through (= 2 sts on hook), then work next dc but on last pull through, pull yarn through all sts on hook = 1 st dec. ---------------------------------------------------------- BODY: The piece is worked top down. Worked back and forth from mid front. Work 111-116-121-131-136-146 ch (includes 3 ch to turn with) on hook size 4.5 mm with Merino Extra Fine. Work next row as follows: 1 dc in 4th ch (= 2 dc), 1 dc in each of the next ch 2, * skip ch 1, 1 dc in each of the next 4 ch *, repeat from *-* = 88-92-96-104-108-116 dc - READ CROCHET INFO. Insert 19-20-21-23-24-26 markers in the piece as follows: Insert 1st marker after 8th dc, then insert 18-19-20-22-23-25 markers 4 dc apart, after last marker there are 8 dc. Work back and forth with dc AT THE SAME TIME inc 1 dc at all markers as follows: Inc every other row 5-6-6-5-5-6 times, and every 4th row 2-2-2-3-3-3 times - READ INCREASE TIP = 221-252-264-288-300-350 dc. Work a row and inc 14-7-7-7-19-5 dc evenly (do not inc over the first and last 6 dc = band) = 235-259-271-295-319-355 dc. REMEMBER THE CROCHET GAUGE! On next round work as follows: 36-40-43-47-51-58 dc (front piece), 8 ch (under sleeve), skip 52-56-56-60-64-68 dc from previous row (to be used for sleeve later), 59-67-73-81-89-103 dc (back piece), 8 ch (under sleeve), skip 52-56-56-60-64-68 dc from previous row (to be used for sleeve later) and 36-40-43-47-51-58 dc (front piece). Insert a marker, now measure piece from here! Work 1 dc in every dc/ch AT THE SAME TIME dec 8-8-8-12-12-12 sts evenly – READ DECREASE TIP = 139-155-167-179-195-223 dc. Continue to work as follows: Work 1 dc in each of the first 6 dc (= band), A.1, A.2 30-34-37-40-44-51 repetitions in total in width, finish with A.3 and 1 dc in each of the last 6 dc. Continue pattern like this. When A.1-A.3 have been worked 1 time vertically, repeat A.4 vertically until finished measurements. When piece measures 14-14-14-15-15-15 cm / 5½"-5½"-5½"-6"-6"-6" from marker, adjust so that next row is last row in A.4, inc 1 repetition of A.2 in 8th-9th-9th-10th-11th-13th repetition in ch-space as follows: Work ch 2, 1 sc in ch-space, ch 2, 1 dc in same ch-space, ch 2, 1 sc in same ch-space. Work 14-16-19-20-22-25 repetitions of A.2, in next repetition of A.2 inc the same way. Then continue as before = 32-36-39-42-46-53 repetitions of A.2 in width. Fasten off when piece measures 34-34-36-35-37-37 cm / 13½"-13½"-14¼"-13¾"-14½"-14½" from marker, adjust to finish with next to last row in A.4, piece measures 56-58-60-62-64-66 cm / 22"-22¾"-23⅝"-24⅜"-25¼"-26" in total. SLEEVE: Sleeve is worked in the round, top down. Insert a marker, now measure piece from here! Beg by working mid under sleeve as follows: Work 1 sc in 5th ch of the 8 ch work in armhole on body, 3 ch (= 1 dc), work 1 dc in each of the next ch 3, 1 dc in every dc over sleeve, then work 1 dc in each of the remaining 4 ch under sleeve = 60-64-64-68-72-76 dc. Insert 1 marker mid under sleeve. Continue to work as follows: 1 dc in each of the first 11-11-11-13-13-15 dc AT THE SAME TIME dec 1 dc (= 10-10-10-12-12-14 dc), A.1, A.2 8-9-9-9-10-10 times in width, A.3, work 1 dc in each of the last 10-10-10-12-12-14 dc. Continue with 1 dc in each of the 20-20-20-24-24-28 dc mid under sleeve and A.1-A.3 over sleeve. When A.1-A.3 have been worked 1 time vertically, repeat A.4 vertically until finished measurements. Continue this pattern AT THE SAME TIME when piece measures 4 cm / 1½", dec 1 dc on each side of marker - Remember DECREASE TIP. Repeat dec every 3½-3½-3½-2½-2½-2 cm / 1¼"-1¼"-1¼"-⅞"-⅞"-¾" 9-9-9-11-11-13 more times. Now work only A.1-A.3 over sleeve. Fasten off when sleeve measures 43½-42½-42½-39½-40-38 cm / 17"-16¾"-16¾"-15½"-15¾"-15", adjust to finish with next to last round in A.4 – NOTE – shorter measurements in the larger sizes because of wider neck and shoulders. Work the other the same way. NECK EDGE: Work neck edge in ch-row. Work on hook size 4.5 mm / US 7 with Merino Extra Fine as follows: 1 sc in 1st st, * ch 2, skip 2 sts, 1 sc in next st *, repeat from *-* around the entire neck. Fasten off. ASSEMBLY: Fasten the buttons on left front piece, the top button approx. 1 cm / ⅜" from neck edge, the bottom button in transition between dc and pattern. Button between 2 dc on right front piece. |
|||||||||||||||||||
Diagram explanations |
|||||||||||||||||||
|
|||||||||||||||||||
 |
|||||||||||||||||||
 |
|||||||||||||||||||
Have you finished this pattern?Tag your pictures with #dropspattern #yesterdaycardigan or submit them to the #dropsfan gallery. Do you need help with this pattern?You'll find 11 tutorial videos, a Comments/Questions area and more by visiting the pattern on garnstudio.com. © 1982-2026 DROPS Design A/S. We reserve all rights. This document, including all its sub-sections, has copyrights. Read more about what you can do with our patterns at the bottom of each pattern on our site. |
|||||||||||||||||||


With over 40 years in knitting and crochet design, DROPS Design offers one of the most extensive collections of free patterns on the internet - translated to 17 languages. As of today we count 324 catalogs and 12278 patterns - 12268 of which are translated into English (US/in).
We work hard to bring you the best knitting and crochet have to offer, inspiration and advice as well as great quality yarns at incredible prices! Would you like to use our patterns for other than personal use? You can read what you are allowed to do in the Copyright text at the bottom of all our patterns. Happy crafting!
Post a comment to pattern DROPS 156-17
We would love to hear what you have to say about this pattern!
If you want to leave a question, please make sure you select the correct category in the form below, to speed up the answering process. Required fields are marked *.