
Popular categories
Looking for a yarn?


Comments / Questions (44)
![]() Dzana wrote:
Dzana wrote:
Hvordan settes hette sammen med halsdelen? Jeg finner ikke ut av det Mvh Dzana
18.11.2025 - 13:13DROPS Design answered:
Hei Dzana, Hetta og halsdelen er sydd sammen. Hilsen Drops team.
19.11.2025 - 07:16
![]() Victoria wrote:
Victoria wrote:
Jeg har nu strikket 58cm til skuldrene i str s/m og den er ikke i nærheden af at kunne nå rundt, ikke engang om brystet. Jeg bruger normalt str s/m. Det virker som om der nærmest skal strikkes dobbelt så meget mere for at det kan nå rundt. Hvordan kan det være?
02.08.2025 - 15:45DROPS Design answered:
Hei Victoria. Arbeidet vil strekke seg, men har du nok garn kan du strikke den litt lengre. mvh DROPS Design
25.08.2025 - 13:39
![]() Ivana wrote:
Ivana wrote:
Per lo scaldacollo non ci sono spiegazioni: quali le misure finali?
02.01.2024 - 13:51DROPS Design answered:
Buonasera Ivana, il modello è unico e le misure sono riportate nello schema in fondo alla pagina. Buon lavoro!
02.01.2024 - 19:29
![]() Laura wrote:
Laura wrote:
Non è specificato che nel 2 ferro dopo aver lavorato insieme m gettata e m passata segue 1 maglia a diritto Ferro 2: 1 m dir, * lavorare insieme a rov la m gettata e la m passata *, ripetere da *-* fino alla fine del ferro.
08.11.2021 - 12:10DROPS Design answered:
Buonasera Laura, abbiamo corretto il testo: grazie per la segnalazione. Buon lavoro!
10.11.2021 - 22:52
![]() Maria wrote:
Maria wrote:
La taille pour fille de 8 ans s.v.p. merci
02.11.2021 - 14:45DROPS Design answered:
Bonjour Maria, ce modèle n'est disponible que pour femme, retrouvez ici nos modèles capuche/cagoule enfant. Bon tricot!
03.11.2021 - 08:09
![]() Simone wrote:
Simone wrote:
Jeg er forvirret over størrelserne her - jeg har altid været en XS-S, nogle gange endda XXS. Men jeg synes at 29 cm fra skulder til skulder er meget kort, er det meningen? For jeg tvivler på at jeg kan passe den over skuldrene.
06.01.2021 - 15:13DROPS Design answered:
Hej Simone, jeg synes du skal prøve at måle arbejdet rundt om dine skuldre inden du lukker af, så ser du om du er nødt til at strikke nogle flere cm. God fornøjelse!
08.01.2021 - 10:38
![]() Elisa wrote:
Elisa wrote:
Buongiorno. Cosa si intende per "imbastire un filo" nella confezione del collo? A cosa serve il filo imbastito? Grazie
05.12.2020 - 09:22DROPS Design answered:
Buongiorno Elisa, per imbastire deve passare dentro e fuori il capo con un filo, le può essere di aiuto per la cucitura. Buon lavoro!
05.12.2020 - 20:24
![]() Gabrielle wrote:
Gabrielle wrote:
Me again... Even more confused. I was following the instruction written on the pattern ok. I watched the video on false english ribs and on the video, it is Row 1: 1 edge st in garter st, * K 1, 1 YO, slip 1 st as if to P (with yarn behind piece) *, repeat from *-* until 2 sts remain, finish with K 1 and 1 edge st in garter st. Would that be why I cannot make it go straight as it is a K instead of a P?
16.03.2020 - 08:39DROPS Design answered:
Dear Gabrielle, follow the pattern as explained, ie work on row 1: 1 edge st in garter st, * P 1, 1 YO, slip 1 st as if to P *, repeat from *-* until 1 st remains, finish with P 1, 1 edge st in garter stitch. Row 2: 1 edge stitch in garter stitch, K.1 * P tog YO and slipped st, K 1 *, repeat from *-* until the end of row, 1 edge stitch in garter stitch. Hope this can help, but it might be quite easier for your store to help you when seeing what you worked. Happy knitting!
16.03.2020 - 10:12
![]() Gabrielle wrote:
Gabrielle wrote:
What do you mean when talking about twisting the stitches? When I knit on the WS and purl together the yarn over and the slipped stitch, the slipped stitch comes first... Would that change anything?
16.03.2020 - 08:06
![]() Gabrielle wrote:
Gabrielle wrote:
It seems to me that I am following the pattern to the letter. I start and finish my row with a garter stich and follow the instructions for inbetween but one side of my work is 10 cm longer that the other side.
16.03.2020 - 07:59DROPS Design answered:
Dear Gabrielle, it's a bit tricky to answer you what's going on there, please show your work to your store (even per mail) so that they can see what might happen and help you further. Happy knitting!
16.03.2020 - 10:08
|
|||||||
Maid Marian#maidmarianbalaclava |
|||||||
|
|
|||||||
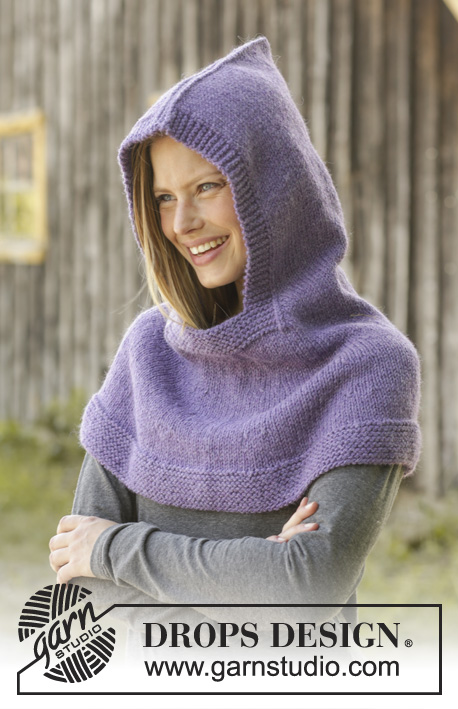
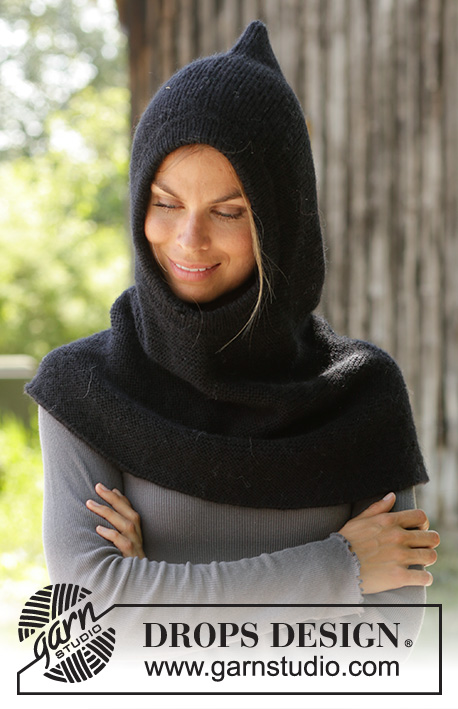
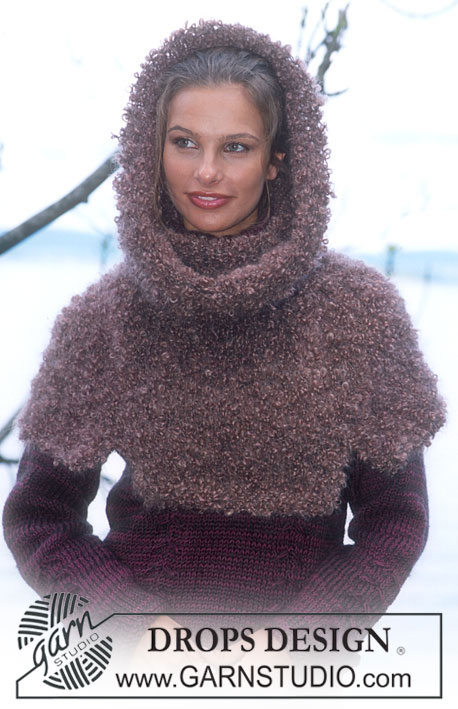
Knitted DROPS neck warmer with hood with fasle English rib in 2 strands ”Brushed Alpaca Silk”. Size: S - XXXL.
DROPS 158-33 |
|||||||
|
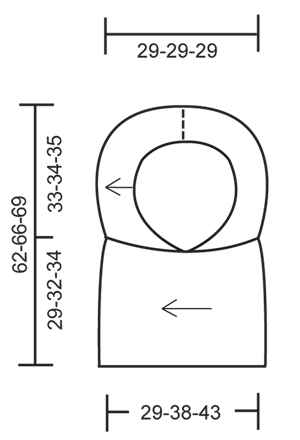
GARTER ST (back and forth on needle): K all rows. 1 ridge = K2 rows. FALSE ENGLISH RIB (back and forth on needle): Row 1: * P 1, 1 YO, slip 1 st as if to P *, repeat from *-* until 1 st remains, finish with P 1. Row 2: K1 * P tog YO and slipped st, K 1 *, repeat from *-* until the end of row.. Repeat 1st and 2nd row upwards. ---------------------------------------------------------- NECK WARMER: Worked in 2 parts that are sewn tog when finished. HOOD PART: Worked back and forth on needle. LOOSELY cast on 35-37-39 sts (includes 1 edge st in each side) on needle size 9 mm / US 13 with 2 strands Brushed Alpaca Silk. Work 2 ridges in GARTER ST - see explanation above. Then work FALSE ENGLISH RIB - see explanation above – with 1 edge st in garter st in each side of piece - REMEMBER THE KNITTING GAUGE. When piece measures 56-56-56 cm / 22"-22"-22", work 2 ridges, LOOSELY bind off. NECK WARMER PART: Worked back and forth on needle. LOOSELY cast on 31-33-35 sts (includes 1 edge st in each side) on needle size 9 mm / US 13 with 2 strands Brushed Alpaca Silk. P 1 row, then work false English rib with 1 edge st in garter st in each side of piece - REMEMBER THE KNITTING GAUGE. When piece measures 58-72-86 cm / 22¾"-28½"-34", P 1 row, LOOSELY bind off. ASSEMBLY: Fold hood double, sew tog along one long side from mid front to mid back - see chart. Fold neck warmer part double and sew short sides tog into 1 ring. For size L/XL and XXL/XXXL: Baste 1 pleat thread along one opening on neck warmer, remove the thread after assembly. Sew hood and neck warmer part (seam on neck warmer part should be on the opposite side of hood opening) tog inside 1 edge st. |
|||||||
Diagram explanations |
|||||||
|
|||||||
 |
|||||||
Have you finished this pattern?Tag your pictures with #dropspattern #maidmarianbalaclava or submit them to the #dropsfan gallery. Do you need help with this pattern?You'll find 11 tutorial videos, a Comments/Questions area and more by visiting the pattern on garnstudio.com. © 1982-2026 DROPS Design A/S. We reserve all rights. This document, including all its sub-sections, has copyrights. Read more about what you can do with our patterns at the bottom of each pattern on our site. |
|||||||


With over 40 years in knitting and crochet design, DROPS Design offers one of the most extensive collections of free patterns on the internet - translated to 17 languages. As of today we count 325 catalogs and 12298 patterns - 12288 of which are translated into English (US/in).
We work hard to bring you the best knitting and crochet have to offer, inspiration and advice as well as great quality yarns at incredible prices! Would you like to use our patterns for other than personal use? You can read what you are allowed to do in the Copyright text at the bottom of all our patterns. Happy crafting!
Post a comment to pattern DROPS 158-33
We would love to hear what you have to say about this pattern!
If you want to leave a question, please make sure you select the correct category in the form below, to speed up the answering process. Required fields are marked *.