
Popular categories
Looking for a yarn?


Comments / Questions (24)
![]() Hess Andrea wrote:
Hess Andrea wrote:
Hallo Offenbar habe ich meine Frage nicht klar gestellt. Ich habe kein Problem mit der Ab- und Zunahme des Ärmels. Es geht darum, wann ist der Ärmel vorne fertig, d.h. was sind es für Maschen bis zum Hals, also wieviele Maschen sind nach dem letzten Loch bis zum Hals und wie geht das genau weiter für den hinteren Teil. Ich hoffe, meine Frage ist jetzt klar. Vielen Dank für eure Hilfe, Andres
29.08.2025 - 14:15
![]() Andrea wrote:
Andrea wrote:
Hallo, Es geht um den Ärmel, den man vom Vorderteil her strickt. Wie sieht die letzte gestrickte Rheihe aus, bevor man den Markierungsfaden einzieht? (Wo ist das Loch und wieviele Maschen sind noch bis zum Hals. Könnt ihr den Teil ganz genau erklären, oder ein Video davon machen? Offenbar bin ich nicht die einzige, die das nicht versteht. Vielen Dank für die Hilfe, ich möchte das schöne Oberteil ja gene zu Ende stricken. Andrea
27.08.2025 - 20:24DROPS Design answered:
Liebe Andrea, schauen Sie unter Tipp zum Abketten-2: hier wird beschrieben, wie man die Löcher für die Maschen (durch Ab- + Zunahmen strickt - die erste Maschen wird krausrechts gestrickt sowie die 2 ersten Abnahmen, dann werden die nächsten Zunahmen Glattrechts gestrickt. Viel Spaß beim Stricken!
29.08.2025 - 07:39
![]() Sneha wrote:
Sneha wrote:
Front After all neck shaping and incs/ decs for sleeve r complete 27 sts remain After this should we knit stockinette stitch on all 27 sts
03.07.2025 - 00:33DROPS Design answered:
Hi Sneha, Once all the increases and decreases are finished, you work stockinette across all stitches, apart from the 3 edge stitches on each side which are worked in garter stitch. Regards, Drops Team.
03.07.2025 - 07:08
![]() Andrea wrote:
Andrea wrote:
Hallo (73-15) Ich habe eine Frage zu M1 vom Diagramm verstehe ich folgende Erklärung nich: 5 M re zusammen: die rechte Nadel von der äussersten M. in die M. stecken die M. werden somit verschränkt gestrickt. Wie ist da der genaue Ablauf für jede der 5 M.? Vielen Dank für eine Erklärung. Liebe Grüsse Andrea
26.05.2025 - 16:05DROPS Design answered:
Liebe Andrea, diese 5 Maschen wird man rechts verschränkt stricken, so im hinteren Glied der 5 ersten Maschen auf der linken Nadel einstechen und so diese 5 Maschen zusammen stricken; oder diese 5 Maschen können Sie auch wie in diesem Video stricken. Viel Spaß beim Stricken!
27.05.2025 - 08:33
![]() Merete wrote:
Merete wrote:
Hei, er det slik at det ikke er raglanfelling og ermeøkning (felletips 2) på bakstykket? Kan dere legge ut bilde av modellen bakfra?
14.07.2023 - 18:28DROPS Design answered:
Hei Merete. Har gått igjennom vårt bildearkiv, men vi hadde dessverre ingen bilder av bakstykket på denne modellen. Det er forskjellige fellinger på forstykket (Felletips-2) og bakstykket (Felletips-1). mvh DROPS Design
26.07.2023 - 09:06
![]() Susanne Baden Weltz wrote:
Susanne Baden Weltz wrote:
Tusinde tak for hjælpen. Jeg kan se nu, hvor det ergået galt 🧶
18.11.2021 - 13:04
![]() Susanne Baden Weltz wrote:
Susanne Baden Weltz wrote:
Jeg har lukket af/taget ud til hals og ærmegab på modellen ud fra lukketips 2. I stedet for 27 m har jeg 42 m tilbage på skulderen. Jeg har læst lukketippet flere gange undervejs for at sikre mig, at jeg strikkede rigtigt, så jeg forstår ikke, hvad jeg kan have gjort galt. Har i fået denne type spørgsmål før?
16.11.2021 - 10:38DROPS Design answered:
Hej Susanne, du starter med 118m lukker 4+9 m af i hver side = 92m, (tager ud og ind 22 gange) stadig 92m, sætter 20m på en tråd og tager ind til hals i hver side 9x2 = 54 = 27 på hver skulder. God fornøjelse!
18.11.2021 - 12:03
![]() Ewa wrote:
Ewa wrote:
Proszę o tłumaczenie wzoru na język polski
26.08.2021 - 13:54DROPS Design answered:
Witaj Ewo, patrz na naszej stronie na początku przyszłego tygodnia. Wzór będzie gotowy. Pozdrawiamy i dziękujemy za zainteresowanie naszymi wzorami!
27.08.2021 - 08:55
![]() Nari wrote:
Nari wrote:
Bonjour Pouvez vous s il vous plait expliquer, dans Astuce tricot, les instructions suivantes : Note : tricoter la m lis et les 2 premières augmentations (3 m de chaque côté) au point mousse tout du long – ces mailles vont se retourner sous la bordure – tricoter les augmentations suivantes en jersey. Merci
24.06.2021 - 21:08DROPS Design answered:
Bonjour Nari, lorsque vous commencez à augmenter/diminuer, vous devez toujours tricoter 3 mailles au point mousse de chaque côté; ces 3 mailles vont se retourner sous l'ouvrage (cf 2ème photo). Les augmentations se tricotent en jersey tout du long. Bon tricot!
25.06.2021 - 07:23
![]() Lala wrote:
Lala wrote:
Bonjour Pensez vous qu on peut tricoter des manches à ce modèle en relevant les mailles sur le tour des emmanchures avec une aiguille circulaire, puis en tricotant vers les poignets ? Merci pour votre avis
01.06.2021 - 22:39DROPS Design answered:
Bonjour Lala, oui, c'est possible. Bon tricot!
01.06.2021 - 23:22
|
||||||||||||||||||||||
That Girl |
||||||||||||||||||||||
 |
 |
|||||||||||||||||||||
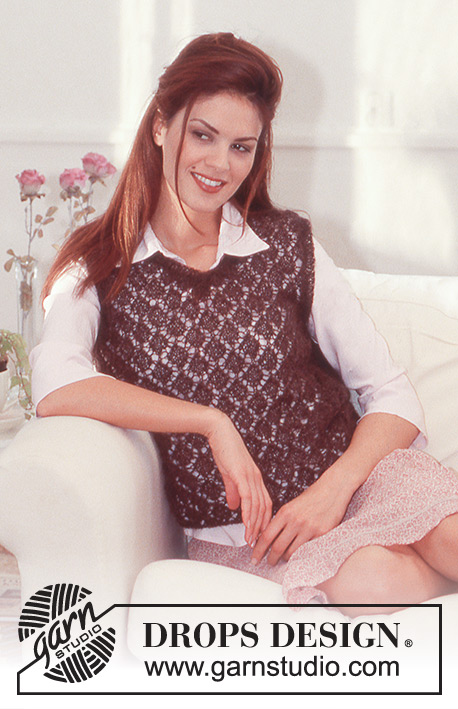
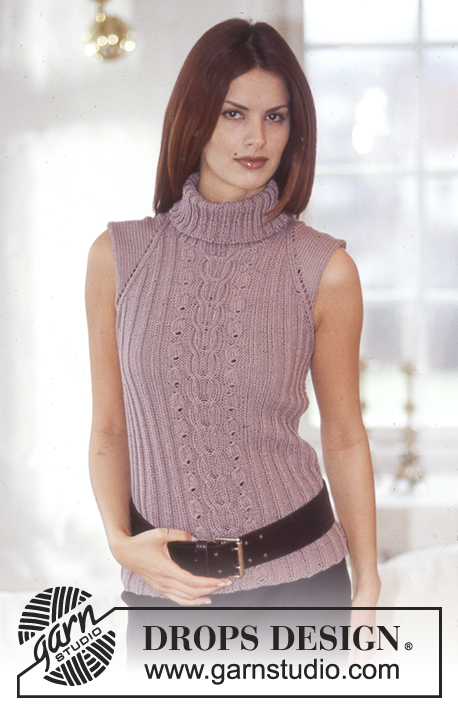
DROPS Top in Muskat.
DROPS 73-15 |
||||||||||||||||||||||
|
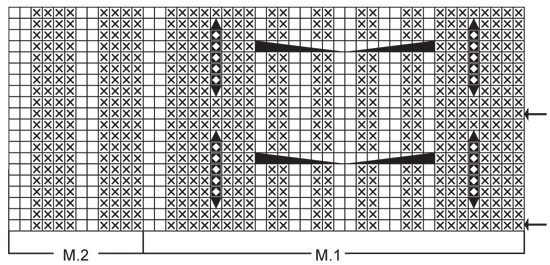
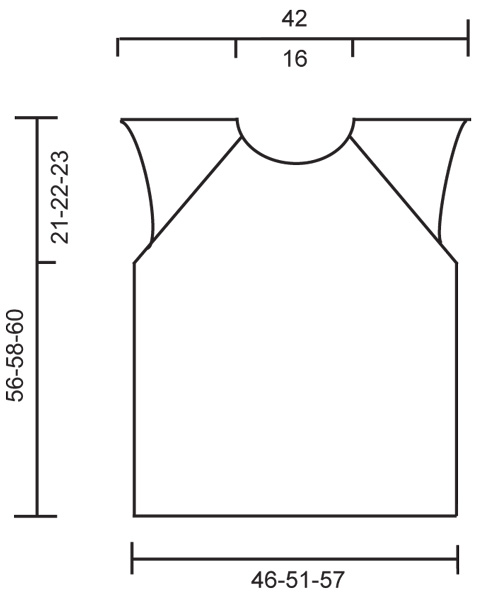
Gauge: 21 sts x 28 rows = 10 x 10 cm in stockinette st. Garter st, when knitting flat: Knit all sts, all rows. Pattern: See chart. The pattern is seen from the right side. Knitting tips-1: All decs are made on right side rows. Dec 1 st inside 3 edge sts, knit as follows from edge: 1 st in garter st and 2 sts in stockinette st. After 3 edge sts: P 2 tog Before 3 edge sts: P 2 tog, twisting sts Knitting tips-2: read this entire section before knitting: You will be increasing sts for the shoulder at the same time as decreasing for the armhole. All incs and decs occur on the same rows (right side rows). Dec 1 st as explained in knitting tips-1 by P 2 tog. At the same time inc 1 st with yo - make the first inc inside of 1 edge st, then inc inside 1 st more each time so that there will be a line of holes along «raglan» armhole. Note: Knit the edge st and then the first 2 increased sts (3 sts at side edge) in garter st throughout – these sts will fold under at the edge – knit the remaining increased sts in stockinette st. ------------------------------------------------------------ Front: Cast on 106-118-130 sts. Establish pattern on first row as follows: P 1, Pattern 2 over 36-42-48 sts, Pattern 1 (= 34 sts), Pattern 2 over 34-40-46 sts, P 1. Continue in pattern as established until the piece measures 35-36-37 cm. Bind off 4 sts at each side = 98-110-122 sts remain, then dec 1 st at each side for armhole inside 3 edge sts every other row 5-9-13 times - see knitting tips-1 = 88-92-96 sts. Now dec and inc 1 st every other row 24-22-19 times according to knitting tips-2. At the same time when the piece measures approx. 48-50-52 cm - adjust to end after one of the arrows on the chart - put the center 20 sts on a st holder for the neck. Then bind off at each neck edge every other row: 3 sts 1 time, 2 sts 2 times and 1 st 2 times. After all neck shaping and incs/decs for sleeve are complete, 25-27-29 sts remain on each shoulder. Continue in stockinette st with the 3 outermost sts of shoulder in garter st. When the piece measures 56-58-60 cm put a marker at the side = top of shoulder – and bind off 1-5-10 sts at neck edge = 24-22-19 sts remain. Continue on shoulder sts for back. Cast on 1 new st at the neck edge = 25-23-20 sts. Then dec 1 st at the neck edge every other row until all sts are decreased. Back: Cast on 94-106-118 sts. Establish pattern on first row as follows (right side row): P 1, K 2, Pattern 2 over 90-102-114 sts, P 1. Continue with pattern as established until the piece measures 35-36-37 cm. Dec 1 st for armhole at each side every other row 29-31-32 times - see knitting tips-1. At the same time when the piece measures 54-56-58 cm bind off the center 30 sts for the neck. Then bind off 2 sts at each neck edge on the next row = 1-5-10 sts remain on each shoulder. Bind off, the piece measures approx. 56-58-60 cm. Assembly: Sew shoulder seams. Sew shoulder piece from front to back using 1 edge st as seam allowance - see that the sleeves start on the same place on back as on front. Sew side seams using 1 edge st as seam allowance. Note: The P 4 at each side of front is the side –the seams are offset to the back. Collar: Pick up approx. 92-100 sts (divisible by 4, incl. sts on st holder) around the neck on double-pointed needles and knit rib (K 2, P 2) - see that sts follow those on front. Bind off in pattern when the collar measures 18 cm. |
||||||||||||||||||||||
Diagram explanations |
||||||||||||||||||||||
|
||||||||||||||||||||||
 |
||||||||||||||||||||||
 |
||||||||||||||||||||||
Have you finished this pattern?Tag your pictures with #dropspattern or submit them to the #dropsfan gallery. Do you need help with this pattern?You'll find 17 tutorial videos, a Comments/Questions area and more by visiting the pattern on garnstudio.com. © 1982-2026 DROPS Design A/S. We reserve all rights. This document, including all its sub-sections, has copyrights. Read more about what you can do with our patterns at the bottom of each pattern on our site. |
||||||||||||||||||||||


With over 40 years in knitting and crochet design, DROPS Design offers one of the most extensive collections of free patterns on the internet - translated to 17 languages. As of today we count 324 catalogs and 12278 patterns - 12268 of which are translated into English (US/in).
We work hard to bring you the best knitting and crochet have to offer, inspiration and advice as well as great quality yarns at incredible prices! Would you like to use our patterns for other than personal use? You can read what you are allowed to do in the Copyright text at the bottom of all our patterns. Happy crafting!
Post a comment to pattern DROPS 73-15
We would love to hear what you have to say about this pattern!
If you want to leave a question, please make sure you select the correct category in the form below, to speed up the answering process. Required fields are marked *.