DROPS Alpaca Bouclé
DROPS Alpaca Bouclé
80% Alpaca, 15% Wool, 5% Polyamide
from 5.00 $ /50g
Get the yarn to make this pattern from 30.00$.

The yarn cost is calculated from the pattern’s smallest size and the yarn’s cheapest product type. Looking for an even better price? You might find it on the DROPS Deals!

DROPS Super Sale

Sandy

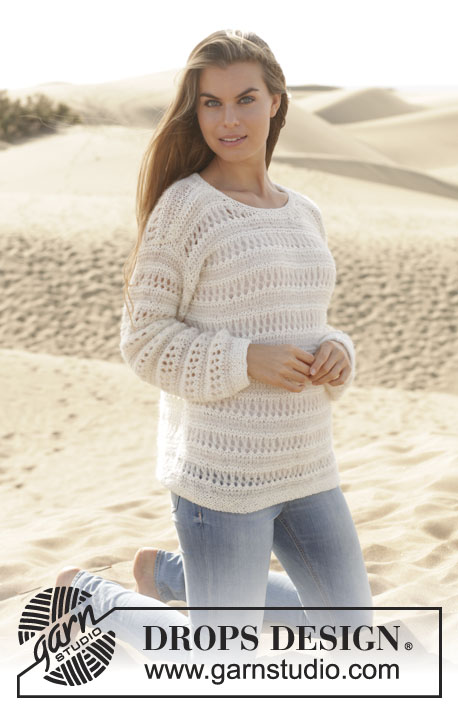
Knitted DROPS jumper in garter st with dropped sts in ”Alpaca Bouclé”. Size: S - XXXL.

DROPS 153-18
DROPS design: Pattern no ab-043
Yarn group C
-----------------------------------------------------------
Size: S - M - L - XL - XXL - XXXL
Finished measurements:
Bust: 100-108-118-126-138-152 cm / 39½"-42½"-46½"-49½"-54 1/4"-59 3/4"
Full length: 60-62-64-66-68-70 cm / 23 5/8''-24 3/8''-25¼''-26''-26¾''-27½''

Materials: DROPS ALPACA BOUCLE from Garnstudio
300-300-350-350-400-450 g color no 2020, light beige

DROPS CIRCULAR NEEDLE (80 and 40 cm / 32" and 16") SIZE 7 mm / US 10.75 - or size needed to get 14 sts x 17 rows in stockinette st or 14 sts x 26 rows in garter st = 4'' x 4'' (10 x 10 cm).

-------------------------------------------------------

Alternative Yarn – See how to change yarns here
Yarn Groups A to F – Use the same pattern and change the yarn here
Yarn usage using an alternative yarn – Use our yarn converter here

-------------------------------------------------------

DROPS Alpaca Bouclé
DROPS Alpaca Bouclé
80% Alpaca, 15% Wool, 5% Polyamide
from 5.00 $ /50g
Get the yarn to make this pattern from 30.00$.

The yarn cost is calculated from the pattern’s smallest size and the yarn’s cheapest product type. Looking for an even better price? You might find it on the DROPS Deals!

DROPS Super Sale

SAVE 30% on 6 cotton favorites!
Valid until 04.12.2024

Pattern instructions

NOTE: This pattern is written in American English. All measurements in charts are in cm. For conversion from inches to cm - click here. There are different terms for crocheting in American and British English. If this pattern includes crochet, click for "crochet terms" here. For this pattern in British English, please click here.
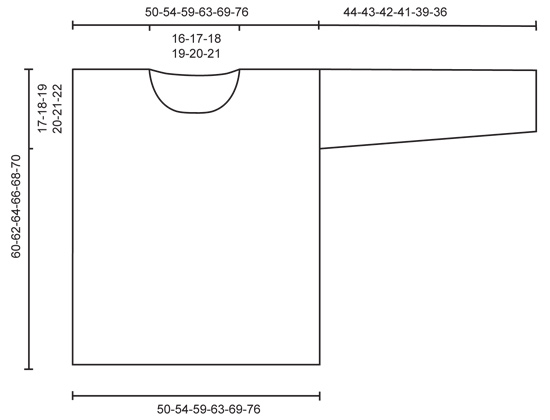
GARTER ST (back and forth on needle):
K all rows. 1 ridge = K2 rows.

GARTER ST (in the round):
* K 1 round and P 1 round *, repeat from *-*. 1 ridge = 2 rounds.

MEASURING TIP:
Because of the pattern all measurements must be done by holding the piece up otherwise the garment will be too long when worn.

PATTERN:
Row 1-6: K all sts.
Row 7: * K 1, 2 YOs *, repeat from *-* until 1 st remains, finish with K 1.
Row 8: * K 1, drop YOs off the needle *, repeat from *-* until 1 st remains, finish with K 1.
Repeat row 1 to 8 until finished measurements.
----------------------------------------------------------

JUMPER:
Worked back and forth on circular needle to make room for all the sts. The entire body is worked in PATTERN - see explanation above. Work sleeves in stockinette st with 6 ridges at the bottom.

BACK PIECE:
Cast on 72-78-84-90-98-108 sts (includes 1 edge st in each side) on circular needle size 7 mm / US 10.75 with Alpaca Bouclé. Work pattern. REMEMBER THE GAUGE! When piece measures 43-44-45-46-47-48 cm / 17''-17¼''-17¾''-18''-18½''-19'' – READ MEAURING TIP – bind off 1 edge st in each side for armhole at beg of the next 2 rows = 70-76-82-88-96-106 sts. Work until piece measures 58-60-62-64-66-68 cm / 22¾''-23 5/8''-24 3/8''-25¼''-26''-26¾'', adjust so that next row is 1st row in pattern. Slip the middle 20-22-24-26-26-28 sts on a stitch holder for neck and finish each shoulder separately. Continue to bind off 1 st on next row from neck = 24-26-28-30-34-38 sts remain on the shoulder. Loosely bind off all sts when piece measures 60-62-64-66-68-70 cm / 23 5/8''-24 3/8''-25¼''-26''-26¾''-27½''.

FRONT PIECE:
Cast on and work as back piece. When piece measures 50-52-54-56-58-60 cm / 19 3/4''-20½''-21¼''-22''-22¾''-23 5/8'', adjust so that next row is 1st row in pattern, slip the middle 20-22-24-26-26-28 sts on a stitch holder for neck and finish each shoulder separately. Continue to bind off 1 st on next row from neck = 24-26-28-30-34-38 sts remain on the shoulder. Loosely bind off all sts when piece measures 60-62-64-66-68-70 cm / 23 5/8''-24 3/8''-25¼''-26''-26¾''-27½''.

SLEEVE:
Worked back and forth on circular needle. Cast on 38-40-42-44-46-48 sts (includes 1 edge st in each side) on circular needle size 7 mm / US 10.75 with Alpaca Bouclé. Work 6 ridges in garter st. Continue in stockinette st with 1 edge st in garter st in each side. When piece measures 8 cm / 3 1/8'', inc 1 st in each side. Repeat inc every 6-5-5-4-4-3 cm / 2 3/8"-2"-2"-1½"-1½"-1 1/8" 5-6-6-7-7-8 more times (= 6-7-7-8-8-9 inc in total) = 50-54-56-60-62-66 sts. When piece measures 44-43-42-41-39-36 cm / 17 1/4"-17"-16½"-16 1/8"-15 1/4"-14 1/4" (shorter measurements in the larger sizes because of wider shoulders), bind off all sts.

ASSEMBLY:
Sew the shoulder seams. Sew in sleeves. Sew underarm seams and side seams in one inside one edge st.

NECK EDGE:
Pick up around the neck from RS 76 to 94 sts (includes sts on stitch holders) with Alpaca Bouclé on circular needle size 7 mm / US 10.75. Work 2 ridges in garter st. Bind off.

Diagram

All measurements in charts are in cm.

diagram measurements
Do you have a question? See a list of frequently asked questions (FAQ)

Knitting tension is what determines the final measurements of your work, and is usually measured per 10 x 10 cm. It is provided like so: number of stitches in width x number of rows in height - eg: 19 stitches x 26 rows = 10 x 10 cm.

The knitting tension is very individual; some people knit/crochet loosely while others work tightly. You adjust the knitting tension with the needle size, which is why the suggested needle size only serve as a guide! You need to adjust this (up or down) to ensure that YOUR knitting tension matches the knitting tension provided in the pattern. If you work with a different knitting tension than provided you will have a different yarn consumption, and your work will have different measurements than what the pattern suggests.

The knitting tension also determines which yarns can replace each other. As long as you achieve the same knitting tension you can replace one yarn with another.

See DROPS lesson: How to measure your tension/gauge

See DROPS video: How to make a gauge tension swatch

The required amount of yarn is provided in grams, eg: 450 g. To calculate how many balls you’ll need you first need to know how many grams are in 1 ball (25g, 50g or 100g). This information is available if you click on the individual yarn quality on our pages. Divide the amount required with the amount of each ball. For example, if each ball is 50g (the most common amount), the calculation will be as follows: 450 / 50 = 9 balls.

The important thing when changing from one yarn to another is that the knitting/crochet tension remains the same. This is so that the measurements of the finished piece will be the same as on the sketch provided. It is easier to achieve the same knitting tension using yarns from the same yarn group. It is also possible to work with multiple strands of a thinner yarn to achieve the knitting tension of a thicker one. Please try our yarn converter. We recommend you to always work a test swatch.

Please NOTE: when changing yarn the garment might have a different look and feel to the garment in the photo, due to individual properties and qualities of each yarn.

See DROPS lesson: Can I use a different yarn than the one mentioned in the pattern?

All our yarns are categorised into yarn groups (from A to F) according to thickness and knitting tension – group A contains the thinnest yarns and group F the thickest. This makes it easier for you to find alternative yarns to our patterns, should you wish to switch yarn. All yarns within the same group have a similar knitting tension and can easily replace each other. However, different yarn qualities have different structures and properties which will give the finished work a unique look and feel.

Click here for an overview of the yarns in each yarn group

At the top of all our patterns you’ll find a link to our yarn converter, which is a helpful tool should you wish to use a different yarn than suggested. By filling in the yarn quality you wish to replace, the amount (in your size) and number of strands, the converter will present good alternative yarns with the same knitting tension. Additionally it will tell you how much you’ll require in the new qualities and whether you’ll need to work with multiple strands. Most skeins are 50g (some are 25g or 100g).

If the pattern is worked with multiple colours, every colour will have to be converted separately. Similarly, if the pattern is worked with several strands of different yarns (for example 1 strand Alpaca and 1 strand Kid-Silk) you will have to find alternatives for each, individually.

Click here to see our yarn converter

Since different yarns have different qualities and textures we have chosen to keep the original yarn in our patterns. However, you can easily find options among our available qualities by using our yarn converter, or simply pick a yarn from the same yarn group.

It is possible that some retailers still have discontinued yarns in stock, or that someone has a few skeins at home that they would like to find patterns for.

The yarn converter will provide both alternative yarn as well as required amount in the new quality.

If you think it's hard to decide what size to make, it can be a good idea to measure a garment you own already and like the size of. Then you can pick the size by comparing those measures with the ones available in the pattern's size chart.

You'll find the size chart at the bottom of the pattern.

See DROPS lesson: How to read size chart

The needle size provided in the pattern serves only as a guide, the important thing is to follow the knitting tension. And since knitting tension is very individual, you will have to adjust the needle size to ensure that YOUR tension is the same as in the pattern – maybe you’ll have to adjust 1, or even 2 needle sizes, up or down to achieve the correct tension. For this, we recommend that you work test swatches.

Should you work with a different knitting tension than the one provided, the measurements of the finished garment might deviate from the measurement sketch.

See DROPS lesson: How to measure your tension/gauge

See DROPS video: How to make a gauge tension swatch

Working a garment top-down provides more flexibility and room for personal adjustment. For example it is easier to try the garment on while working, as well as making adjustments to length of yoke and shoulder caps.

The instructions are carefully explaining every step, in the correct order. Diagrams are adjusted to the knitting direction and are worked as usual.

The diagram depicts all rows/rounds, and every stitch seen from the right side. It is read from bottom to top, from right to left. 1 square = 1 stitch.

When working back and forth, every other row is worked from the right side and every other row is worked from the wrong side. When working from the wrong side, the diagram will have to be worked reversed: from left to right, knit stitches are purled, purl stitches are knit etc.

When working in the round every round is worked from the right side and the diagram are worked from right to left on all rounds.

See DROPS lesson: How to read knitting diagrams

The diagram depicts all rows/rounds, and every stitch seen from the right side. It is worked from bottom to top, from right to left.

When working back and forth every other row is worked from the right side: from right to left and every other row is worked from the wrong side: from left to right.

When working in the round, every row in the diagram are worked from the right side, from right to left.

When working a circular diagram you start in the middle and work your way outwards, counter clockwise, row by row.

The rows usually start with a given number of chain stitches (equivalent to the height of the following stitch), this will either be depicted in the diagram or explained in the pattern.

See DROPS lesson: How to read crochet diagrams

Instructions for working several diagrams after each other on the same row/round, will often be written like so: “work A.1, A.2, A.3 a total of 0-0-2-3-4 times". This means you work A.1 once, then A.2 is worked once, and A.3 is repeated (in width) the number of times provided for your size – in this case like so: S = 0 times, M = 0 times, L=2 times, XL= 3 times and XXL = 4 times.

The diagrams are worked as usual: begin with the first row in A.1, then work the first row in A.2 etc.

See DROPS lesson: How to read knitting diagrams

See DROPS lesson: How to read crochet diagrams

The total width of the garment (from wrist-to-wrist) will be larger in the larger sizes, despite the actual sleeves being shorter. The larger sizes have longer sleeve caps and wider shoulders, so there will be a good fit in all sizes.

The measurement sketch/schematic drawing provides information regarding the full length of the garment. If it’s a jumper or a jacket the length is measured from the highest point on the shoulder (usually closest to the neckline), and straight down to the bottom of the garment. It is NOT measured from the tip of shoulder. Similarly, the length of yoke is measured from the highest point on the shoulder and down to where yoke is split into body and sleeves.

See DROPS lesson: How to read a schematic drawing

Diagrams are often repeated on the round or in height. 1 repeat is the diagram the way it appears in the pattern. If it says to work 5 repeats of A.1 in the round, then you work A.1 a total of 5 times after/next to each other in the round. If it says to work 2 repeats of A.1 vertically/in height you work the entire diagram once, then begin again at the start and work the entire diagram one more time.

Chain stitches are slightly narrower than other stitches and to avoid working the cast-on edge too tight, we simply chain more stitches to begin with. The stitch count will be adjusted on the following row to fit the pattern and measurement sketch.

The rib edge is more elastic and will contract slightly compared to, for example, stocking stitch. By increasing before the rib edge, you avoid a visible difference in width between the rib edge and the rest of the body.

It’s very easy to cast off too tightly, and by making yarn overs while casting off (and simultaneously casting these off) you avoid a too tight cast off edge.

See DROPS video: How to bind off with yarn overs (yo)

To achieve an even increase (or decrease) you can increase on, for example: every 3rd and 4th row alternately, like so: work 2 rows and increase on the 3rd row, work 3 rows and increase on the 4th. Repeat this until the increase is complete.

See DROPS lesson: Increase or decrease 1 st on every 3rd and 4th row alternately

Should you prefer to work in the round instead of back and forth, you may of course adjust the pattern. You’ll need to add steeks mid-front (usually 5 stitches), and follow the instructions. When you would normally turn and work from the wrong side, simply work across the steek and continue in the round. At the end you’ll cut the piece open, pick up stitches to work bands, and cover the cut edges.

See DROPS video: How to knit steeks and cut open

Should you prefer to work back and forth instead of in the round, you may of course adjust the pattern so you work the pieces separately and then assemble them at the end. Divide the stitches for the body in 2, add 1 edge stitch in each side (for sewing) and work the front and back pieces separately.

See DROPS lesson: Can I adapt a pattern for circular needles into straight needles?

Pattern repeats can vary slightly in the different sizes, in order to get the correct proportions. If you’re not working the exact same size as the garment in the photo, yours might deviate slightly. This has been carefully developed and adjusted so that the complete impression of the garment is the same in all sizes.

Make sure to follow instructions and diagrams for your size!

If you have found a pattern you like which is available in women’s size it’s not very difficult to convert it to men’s size. The biggest difference will be the length of sleeves and body. Start working on the women size that you think would fit across the chest. The additional length will be worked right before you cast off for the armhole/sleeve cap. If the pattern is worked top-down you can add the length right after the armhole or before the first decrease on sleeve.

Regarding additional yarn amount, this will depend on how much length you add, but it is better with a skein too many than too few.

All yarns will have excess fibres (from production) that might come off as lint or shedding. Brushed yarns (ie hairier yarns) have more of these loose, excess fibres, causing more shedding.

Shedding also depends on what is worn under or over the garment, and whether this pulls at the yarn fibres. It’s therefore not possible to guarantee that there will be no shedding

Below are some tips on how to get the best result when working with hairier yarns:

1. When the garment is finished (before you wash it) shake it vigorously so the looser hairs come off. NOTE: do NOT use a lint roller, brush or any method that pulls at the yarn.

2. Place the garment in a plastic bag and put it in your freezer - the temperature will cause the fibres to become less attached to each other, and excess fibres will come off easier.

3. Leave in the freezer for a few hours before taking it out and shaking it again.

4. Wash the garment according to the instructions on the yarn label.

Pilling is a natural process that happens to even the most exclusive of fibers. It's a natural sign of wear and tear that is hard to avoid, and that is most visible in high friction areas of your garment like a sweater's arms and cuffs.

You can make your garment look as new by removing the pilling, using a fabric comb or a pill/lint remover.

Still can't find the answer you need? Then scroll down and leave your question so one of our experts can try to help you. This will be done normally within 5 to 10 working days.
In the meantime, you can read the questions and answers that others have left to this pattern or join the DROPS Workshop on Facebook to get help from fellow knitters/crocheters!

You might also like...

Post a comment to pattern DROPS 153-18

We would love to hear what you have to say about this pattern!

If you want to leave a question, please make sure you select the correct category in the form below, to speed up the answering process. Required fields are marked *.

Comments / Questions (30)

country flag Marit Tvervåg wrote:

Kan dette mønsteret strikkes rundt opp til armene?

18.02.2023 - 13:56

DROPS Design answered:

Hej Marit, mønsteret er forklaret for at strikke frem og tilbage... hvis du vælger at strikket rundt, så skal hver 2.pind strikkes vrang fra retsiden :)

23.02.2023 - 15:05

country flag Carina Swanström wrote:

Hej, har kommit fram till att det inte stämmer när det gäller maskantalet på ärmarna på mönster ab-043. Spelar ingen roll vilka stickor jag använder. Har prövat rundsticka 7 80cm och rundsticka 7 40cm. Även prövat med vanliga raka men ärmen blir alldeles för stor runt handled. Om jag skulle minska antalet maskor så kommer den ju inte att passa vid axeln. Så hur skall jag göra? Tacksam för svar. MVH// Carina

01.09.2019 - 16:45

DROPS Design answered:

Hei Carina. Om du syns den blir for vidd rundt håndleddet, kan du f.eks legg opp mindre masker, og da øke disse maskene når det skal økes frem til ferdig mål (øke oftere). Bare husk å ha samme maskeantall ved slutt som det står i oppskriften. God Fornøyelse!

02.09.2019 - 11:49

country flag Ingeborg Mortensen wrote:

Har lavet strikkeprøve. Men når jeg strikker mønsteret bliver arbejdet ca 30 cm for bred. Øv. Har pillet op ,hvad nu?

12.07.2017 - 11:42

DROPS Design answered:

Hej Ingeborg, hvis du har 14 m på 10 cm i bredden, så stemmer målene med dem som står i måleskitsen. Husk at hulmønsteret gør tøjet elastisk, det vil sige at jo mere du strikker i højden, jo mere vil det også vokse i højden og samtidig trække sig lidt sammen i bredden. Hvis det bliver for bredt så kan du prøve med et pindenummer mindre. God fornøjelse!

12.07.2017 - 12:02

country flag Helle Petersen wrote:

Lys søgrøn Jeg har købt garn til denne trøje med 50 % rabat i en netshop. Valgte lys søgrøn, lidt efter udelukkelses metoden da jeg ikke havde lyst til at strikke noget i beige eller brund. Hold da op det er en flot farve og rigtigt lækkert at strikke i lige nu hvor det er 27 grader i skyggen på min terasse. Jeg strikker faktisk kun Drops modeller da de findes i str. 3XL, dejligt når man er en fyldig kvinde.

06.06.2016 - 11:53

Wendy French wrote:

By mistake I started this sweater on US 7 needles...so it should have been way too small...but it was about three times wider than it should have been for the size I was knitting. Disappointing, frustrating, and a waste of time!

21.02.2016 - 14:10

DROPS Design answered:

Dear Mrs French, remember to check and keep correct tension, ie 14 sts x 17 rows in stockinette st = 10 x 10 cm - this jumper has an oversized shape - see measurements for each size in measurement chart. Happy knitting!

22.02.2016 - 11:30

Shirley wrote:

I have done three swatches with this pattern using the required wool and gauge. However the number of rows on each one is too long. Using 6.5 mm gives me the nearest width for the gauge but the length is more than the required 10 cm. Do you have any suggestions.

08.11.2015 - 22:48

DROPS Design answered:

Dear Shirley, you can try another technique for your K/P sts - see videos under video tab - remember your DROPS store will also have tips & advices for a personnal assistance. Happy knitting!

02.12.2015 - 17:10

country flag Marianne Hansen wrote:

Har fundet glittergarnet . tak for hjælpen Hilsen Marianne

21.01.2015 - 17:38

country flag Marianne Kjær Hansen wrote:

Hej Igen Tak for dit svar jeg har prøvet og søge på Drops glitter , men der kommer ikke noget frem ,kan du hjælpe ? Hilsen Marianne

21.01.2015 - 17:32

country flag Marianne Kjær Hansen wrote:

Hej :) jeg er igang med denne Sandy bluse. Kunne godt tænke mig måske at strikke noget sølv/glimmer /glinsende effekt ind i glatstrikken på ærmerne. Vi det kunne lade sig gøre og har i eventuelt noget Matriale/produkt i kunne anbefale ? På forhånd mange tak Venlig hilsen Marianne

21.01.2015 - 14:16

DROPS Design answered:

Hej Marianne. Det lyder som en sjov idé. Hvad med at pröve med vores DROPS Glitter? Den traad kan du strikke med og det paavirker ikke strikkefastheden. Det bliver sikkert rigtig flot!

21.01.2015 - 14:40

Barbara McLennan wrote:

I knitted most of this pattern only to fine it looked terrible, really messy and the drop stitches look twice as long as those in the photo. My tension seems right though as the garment measures the same in width as my chosen size. I am considering starting all over, but don't want the same result. The only thing I did differently is knitted the pattern in the round to the armholes. Maybe I am just not good with big needles. Any ideas? Or do I make a scarf :)

05.12.2014 - 01:54

DROPS Design answered:

Dear Mrs McLennan, working in the round maybe the reason that it didn't work - you make double yos, so that the drop is longer than normal, but if your tension is correct, it should work. What about make a swatch and wash it (to make the pattern "settle" more). For any individual help, remember you can contact your DROPS store. Happy knitting!

05.12.2014 - 11:33