
Popular categories
Looking for a yarn?


Comments / Questions (25)
![]() Colomo wrote:
Colomo wrote:
Peut tricoter ce modele en grosseur de la laine 3 merci de me donner les explication pour le realiser ,je suis debutante encore merciiiiiii
20.03.2016 - 16:13DROPS Design answered:
Bonjour Mme Colomo, nous ne sommes malheureusement pas en mesure de pouvoir adapter chacun de nos modèles à chaque demande individuelle. Vous pouvez rechercher dans notre base de données un modèle correspondant à votre tension ou demander conseil au magasin où vous avez acheté votre fil. Bon tricot!
21.03.2016 - 10:21
![]() Liliana Bisognin wrote:
Liliana Bisognin wrote:
Realizzato,bellissimo grazie,Liliana
07.01.2016 - 15:20
![]() Minger wrote:
Minger wrote:
J'ai fait 2 fois ce modèle; 1 fois pour ma petite fille, une fois pour moi... Très agréable à tricoter et à porter. Cordialement. FM
17.10.2014 - 15:13
![]() Kristin wrote:
Kristin wrote:
Hallo nochmal :-) die Jacke ist wirklich sehr schön geworden! Und die Wolle war gut bemessen - in Gr. S sind ca. 10g übrig geblieben. Daraus habe ich eine Häkelblume gemacht, gefilzt und auf den Kragen aufgenäht :-)
12.05.2014 - 10:22DROPS Design answered:
Liebe Kristin, eine wunderschöne Idee! Viel Spaß beim Tragen und bei den nächsten Strickprojekten! :-)
12.05.2014 - 16:52
![]() Minger wrote:
Minger wrote:
Je l'ai fait avec le coloris 7139. Superbe. Par contre j'ai pris une taille de moins. C'est suffisant.
11.05.2014 - 17:35
![]() Kristin wrote:
Kristin wrote:
Danke für den Tipp :-) hat gut geklappt!
08.05.2014 - 08:14
![]() Kristin wrote:
Kristin wrote:
Hallo! Ich stricke dieses Model gerade in dunkellila, wird sehr schön. Anders als auf dem Foto rollen sich die Krausrippen zu Beginn der Arbeit aber unschön nach außen - gibt es neben Dämpfen eine andere Möglichkeit, das zu glätten?
06.05.2014 - 09:04DROPS Design answered:
Liebe Kristin, Sie können Teile nach dem Stricken mit Stecknadeln auf einer geeigneten Unterlage (Teppich, Styroporplatte o.Ä.) feststecken (dabei die richtigen Maße der Teile einhalten), anfeuchten, z.B. mit einer Sprühflasche für Blumen, und vollständig trocknen lassen. Oder Sie legen feuchte Tücher auf die aufgespannten Teile und lassen alles trocknen. Danach sollte sich der Rand nicht mehr eindrehen.
06.05.2014 - 14:40Eva wrote:
Love this jacket,it is baggy for size,but i knit 2 sizes smaller.will be ok,lovely.
01.03.2014 - 14:11Елена wrote:
Очень симпатичная и стильная модель. Обязательно свяжу такую.
30.12.2013 - 19:38
![]() Strickmamsell wrote:
Strickmamsell wrote:
Ich habe mir dieses Modell gestrickt,in BabyMerino Fb. erika,Kragen in Mohair,in Gr.46 (XXXL ?)es ist edel zu langen/kurzen schmalen Röcken, ich finde es super schick
13.10.2013 - 18:54
|
|
Uptown Girl#uptowngirlcardigan |
|
|
|
|
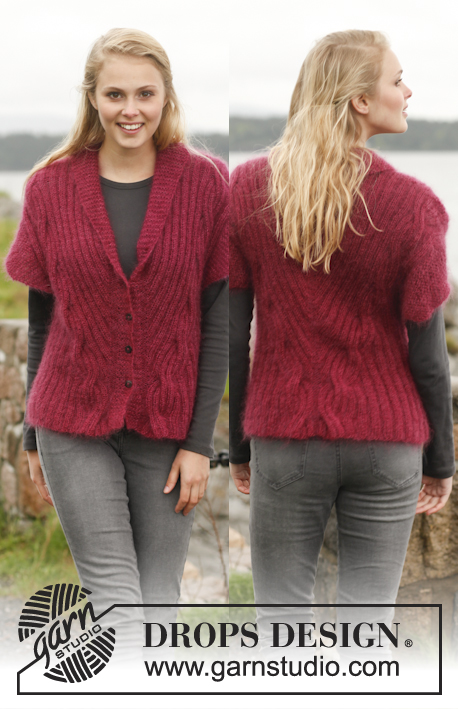
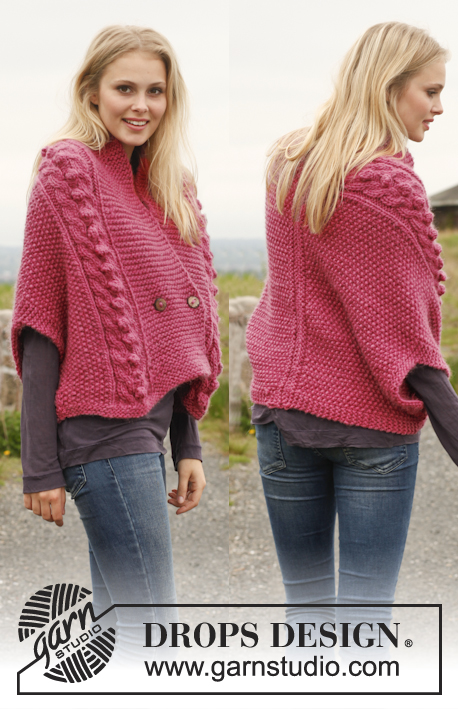
Knitted DROPS jacket in double seed st with shawl collar in ”Lima”. Size: S - XXXL.
DROPS 151-12 |
|
|
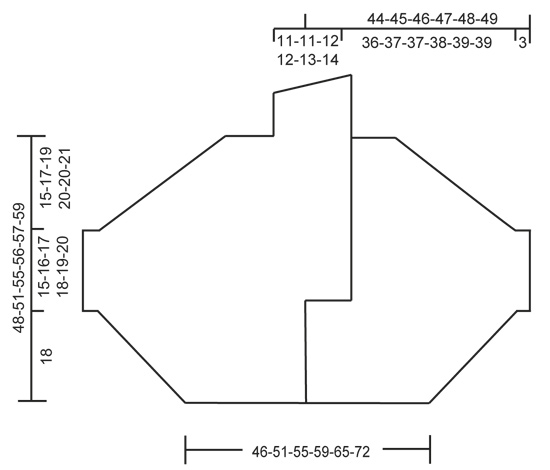
GARTER ST (back and forth on circular needle): K all rows. 1 ridge = K2 rows. DOUBLE SEED ST: Row 1: * K 1, P 1 *, repeat from *-*. Row 2: K over K and P over P. Row 3: * P 1, K 1 *, repeat from *-*. Row 4: P over P and K over K. Repeat rows 1 to 4. BUTTONHOLE: Dec for buttonholes on right band. 1 buttonhole = P tog second and third st from edge and make 1 YO. Dec for buttonholes when piece measures: SIZE S - XXXL: 1, 7, 13 and 19 cm / ½", 2¾", 5⅛" and 7½" ---------------------------------------------------------- BACK PIECE: Worked back and forth on circular needle to make room for all the sts. Piece is first worked in stockinette st and then in DOUBLE SEED ST - see explanation above. Cast on 88-96-104-112-124-136 sts on circular needle size 4 mm / US 6 with Lima. Work 2 ridges in GARTER ST - see explanation above. Switch to circular needle size 5 mm / US 8. Now continue piece in stockinette st. Work 0-0-0-0-0-2 rows in stockinette st. Then inc in each side of piece on every row from RS as follows: 1 st 8-12-14-16-20-20 times, then cast on 2 sts at end of row 13-10-8-6-2-0 times in total in each side = 156-160-164-168-172-176 sts. REMEMBER THE GAUGE! Work 0-0-0-0-0-2 rows in stockinette st. The piece now measures approx. 18 cm / 7" in all sizes. Then cast on 6 sts in each side of piece at end of the next 2 rows = 168-172-176-180-184-188 sts. Work the 6 inc sts in each side in garter st AT THE SAME TIME work DOUBLE SEED ST - see explanation above, over the middle 156-160-164-168-172-176 sts. When piece measures 33-34-35-36-37-38 cm / 13"-13⅜"-13¾"-14¼"-14½"-15’, bind off 6 sts in garter st in each side (bind off at beg of the next 2 rows) = 156-160-164-168-172-176 sts. Then work in double seed st while AT THE SAME TIME binding off at beg of every row in each side as follows: 4 sts 6-4-1-1-0-0 times and 2 sts 12-17-22-23-25-26 times. AT THE SAME TIME when 2 dec in each side remain, bind off the middle 18-18-20-20-22-22 sts for neck and finish each shoulder separately. Continue to bind off 1 st on next row from neck = 20-20-23-23-24-24 sts remain on the shoulder. On next row after last dec in the side bind off all sts, piece measures approx. 48-51-54-56-57-59 cm / 19"-20"-21½"-22"-22½"-23¼". LEFT FRONT PIECE: Worked back and forth on circular needle to make room for all the sts. Piece is first worked in stockinette st and then in double seed st. Cast on 48-52-56-60-66-72 sts (includes 4 band sts towards mid front) on circular needle size 4 mm / US 6 with Lima. Work 2 ridges in garter st. Switch to circular needle size 5 mm / US 8. Now work piece in stockinette st with 4 band sts in garter st towards mid front – work band in garter st until finished measurements. Work 0-0-0-0-0-2 rows in stockinette st. Then cast on new sts at end of every row from WS (i.e. towards the side) as on back piece = 82-84-86-88-90-92 sts. REMEMBER THE GAUGE! Work 0-0-0-0-0-2 rows in stockinette st. The piece now measures approx. 18 cm / 7" in all sizes. Then cast on 6 sts at the end of next row from WS = 88-90-92-94-96-98 sts. Work the 6 inc sts in garter st, AT THE SAME TIME work double seed st over the next 78-80-82-84-86-88 sts. When piece measures 24-24-25-26-27-28 cm / 9½"-9½"-9¾"-10¼"-10½"-11", cast on 12-12-16-16-18-18 new sts for collar at end of row from RS = 100-102-108-110-114-116 sts (= 16-16-20-20-22-22 band sts). NOTE: Work band sts in garter st until finished measurements AT THE SAME TIME work 1 st of seed st into band, i.e. no of sts in garter st in band inc and no of sts in seed st on front piece dec (no of sts does not vary), repeat displacement every 2 cm / ¾" 9-9-10-10-11-12 more times (= 10-10-11-11-12-13 times in total) = 26-26-31-31-34-34 sts in garter st. AT THE SAME TIME when piece measures 33-34-35-36-37-38 cm / 13"-13⅜"-13¾"-14¼"-14½"-15", bind off 6 sts in garter st at beg of next row from RS = 94-96-102-104-108-110 sts. Then dec in the side at beg of every row from RS as on back piece = 46-46-54-54-58-58 sts remain on needle. On next row from RS after last dec in the side, bind off the first 20-20-23-23-24-24 sts for shoulder = 26-26-31-31-34-34 sts in garter st remain for collar. After last bind off on shoulder, piece measures approx. 48-51-54-56-57-59 cm / 19"-20"-21¼"-22"-22½"-23¼". Work in garter st over the remaining sts with short rows, beg from WS: * 2 rows back and forth over the first 20-20-25-25-28-28 sts, 2 rows over all sts *, repeat from *-* until piece measures 9 cm / 3½" at the shortest. Bind off. RIGHT FRONT PIECE: Work as left front piece but reversed. I.e. inc in the side at the end of every row from RS, cast on new sts for collar at end of row from WS and dec in the side at beg of every row from WS. Dec in addition for BUTTONHOLES - see explanation above - on band. NOTE: Beg short rows on collar from RS. ASSEMBLY: Sew side seams in front loop of outermost st up to and with the 6 inc sts in garter st. Sew shoulder seams in front loop of outermost st from and with the 6 inc sts in garter st up to neck dec. Sew the collar tog mid back and sew it to the neckline at the back. Sew on buttons. |
|
 |
|
Have you finished this pattern?Tag your pictures with #dropspattern #uptowngirlcardigan or submit them to the #dropsfan gallery. Do you need help with this pattern?You'll find 17 tutorial videos, a Comments/Questions area and more by visiting the pattern on garnstudio.com. © 1982-2026 DROPS Design A/S. We reserve all rights. This document, including all its sub-sections, has copyrights. Read more about what you can do with our patterns at the bottom of each pattern on our site. |


With over 40 years in knitting and crochet design, DROPS Design offers one of the most extensive collections of free patterns on the internet - translated to 17 languages. As of today we count 325 catalogs and 12298 patterns - 12288 of which are translated into English (US/in).
We work hard to bring you the best knitting and crochet have to offer, inspiration and advice as well as great quality yarns at incredible prices! Would you like to use our patterns for other than personal use? You can read what you are allowed to do in the Copyright text at the bottom of all our patterns. Happy crafting!
Post a comment to pattern DROPS 151-12
We would love to hear what you have to say about this pattern!
If you want to leave a question, please make sure you select the correct category in the form below, to speed up the answering process. Required fields are marked *.