
Popular categories
Looking for a yarn?


Comments / Questions (30)
![]() Francine wrote:
Francine wrote:
Voici ce que j'ai compris à reprendre au rang 1 du diagramme dès que l'on a 151 m. 1 endroit, A3, 7 fois A2, A1, 1 jersey, A3, 7 fois A2, A1, 1 endroit = 151m Chaque reprise au rg 1, ajouter ainsi 6 A2
05.09.2023 - 10:28
![]() Jette wrote:
Jette wrote:
Hej Når jeg har strikket A3 A2 A1 mønsteret 1 x, hvordan kommer jeg så videre? Strikker jeg igen A3 A2 A1 og selv regner mønsteret ud eller fortsætter jeg med A4 A5 A6 A7 A8 A9 og så igen forfra?
29.10.2022 - 14:41DROPS Design answered:
Hei Jette. Husk at for hver gang A.2 er strikket 1 gang i høyden blir det 6 rapporter mer av A.2 på hver side av midt-masken (dette vil du se automatisk evnt kan du telle maskene og sette makemarkører mellom hver A.2 for bedre oversikt). Du strikker 1 rillemaske + A.3 + A.2 + A.1 + Midt-maske + A.3 + A.2 + A.1 + 1 rillemaske, og slik strikkes det til arbeidet måler ca 58 cm målt langs midt-maske og det er 605 masker på pinnen. Neste pinne fra retten startes det å strikke ette de andre diagrammene (A.4 til og med A.9). Disse diagrammene gjentas bare 1 gang i høyden før det felles løst av. mvh DROPS Design
31.10.2022 - 11:56
![]() Emmy wrote:
Emmy wrote:
Hej, verkar som att maskantalet för varven med mönster stämmer inte med nästa varv. t.ex A3 borde vara 4 maskor efter första varvet men på diagrammet står att det blir bara 3 maskor.. hjälp!
29.01.2020 - 16:51DROPS Design answered:
Hej Jag förstår att det ser lite konstigt ut men ser man på alla 3 diagram tillsammans så stämmer det. Ökningarna på varje sida av minskningarna hör ihop (även om det inte blir så tydligt när de är i olika diagram) och ökningarna längst ut på sidorna blir de ökade maskorna. Lycka till!
30.01.2020 - 13:43
![]() Tamar Terpstra wrote:
Tamar Terpstra wrote:
Ik begrijp niet goed waarom er staat dat er staat dat A.3 uit twee steken bestaat. Ik tel in totaal 4 steken, namelijk 1omslag, 1recht, 1omslag en nog 1recht=4steken (toch?) Hierdoor klopt de derde naald volgens mij niet, waar staat 1omslag 3recht,1omslag ...ik heb vier steken op nodig staan...hoe moet ik dit oplossen? Met vr.groet, T.Terpstra
29.10.2019 - 19:07DROPS Design answered:
Dag Tamar,
In dit geval kun je het feit dat het aantal steken van A.3 op zichzelf niet klopt negeren en gewoon de derde naald breien zoals aangegeven, omdat A.3, A.2 en A.1 bij elkaar horen waarbij de steken in totaal wel weer kloppen. Ik heb een klein proefje gebreid en het patroon zou goed uit moeten komen.
30.10.2019 - 10:31
![]() DONATELLA PIETRAPERTOSA wrote:
DONATELLA PIETRAPERTOSA wrote:
Buongiorno,La balza del bordo è a parte o compresa nello schema?
12.07.2018 - 09:23DROPS Design answered:
Buongiorno Donatella, nelle spiegazioni è indicata tutta la lavorazione, balza compresa. Buon lavoro!
12.07.2018 - 09:43
![]() Irène wrote:
Irène wrote:
Bonjour, le modèle est superbe, mais comment faites vous après avoir obtenu les 545 mailles ? il faut continuer avec les diagramme A4 A5 A6 A7 A8 A9 mais nous sommes sur la partie supérieure du châle et non sur les côtés, or sur la photo la partie volantée sur trouve sur le côté. Faut-il relever des mailles sur les côtés ? si je travaille selon vos explications le volant se trouve sur le haut du châle et non sur les côtés. Merci pour votre réponse. Cordialement
16.03.2018 - 08:18DROPS Design answered:
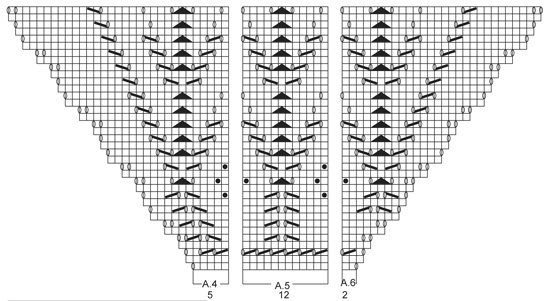
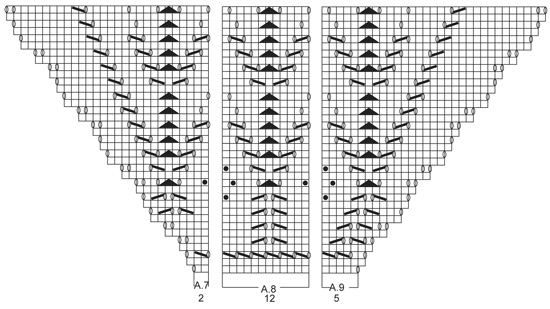
Bonjour Irène, le châle se tricote de haut en bas, en forme de triangle: on augmente sur les côtés et au milieu tout du long. Après les 545 m on termine ainsi: 1 m point mousse, A.9, 22 fois A.8, , A.7, 1 m jersey (m centrale), A.6, 22 fois A.5, A.4 et 1 m point mousse = 1+ (5+22x12+2) + 1 + (2+22x12+5) + 1 = 545 m. Bon tricot!
16.03.2018 - 09:29
![]() Alylla wrote:
Alylla wrote:
Merci pour votre réponse rapide ! Mais en procédant ainsi, je n'obtiens que 81 m au total, au lieu de 101 ?!
19.09.2014 - 18:53DROPS Design answered:
Bonjour Alylla, après avoir tricoté 1 fois les diagrammes A.3, 1 x A.2 et A.5 de chaque côté de la m centrale (avec 1 m point mousse de chaque côté), vous avez 101 m. À chaque fois que l'on tricote ces 3 diagrammes en hauteur, on augmente de 72 m, on avait 29 m + 72 = 101. Après avoir tricoté 2 fois les diagrammes en hauteur, vous aurez 101+ 72 = 173 m et ainsi de suite jusqu'à ce que vous ayez tricoté 7 fois les diag. en hauteur = 533 m. Bon tricot!
20.09.2014 - 10:26
![]() Alylla wrote:
Alylla wrote:
Bonjour ! Superbe modèle, mais je bloque au niveau des explications. J'ai tricoté 1 fois A3A2A1 en hauteur, et j'ai bien obtenu 101 mailles ; mais je ne sais pas comment continuer ! Pour le 25ème rang, cela donnerait donc 49 mailles de chaque ôté de la maille centrale, + 2 mailles extérieures au point mousse. Mais je ne comprends pas comment se répartissent les diagrammes le long du rang ! Pouvez vous me dire, maille par maille, comment je dois tricoter le 25ème rang ? Merci :)
19.09.2014 - 12:49DROPS Design answered:
Bonjour Alylla, quand vous avez tricoté 1 fois les diagrammes A.1, A.2 et A.3 en hauteur, recommencez comme avant, c'est-à-dire A.1 sur les premières m, répétez A.2 une fois de plus que la dernière fois en hauteur, puis A.3 sur les dernières m. Ainsi, on tricote 2 fois A.2 entre A.1 et A.3 la 2ème fois, puis 3 fois A.2 entre A.1 et A.3 la 3ème fois et ainsi de suite. Bon tricot!
19.09.2014 - 16:28Hanna wrote:
Hej! Vad är åtgången räknat i Drops lace för det här mönstret?
26.05.2014 - 22:52DROPS Design answered:
Hej Hanna. Du kan se her hvordan du skal udregne åtgången i DROPS Lace i forhold til DROPS Kid-Silk
27.05.2014 - 15:42
![]() Datiche wrote:
Datiche wrote:
Bonjour, je suis en train de realiser cet ouvrage mais je ne comprends pas comment repartir les diagrammes je suis arrivee aux 101 m j ai tricote une fois A3 A2 A1 en hauteur pouvez vous m aider et me dire quels rapports ensuite je dois reprendre.Merci beaucoup
26.05.2014 - 16:02DROPS Design answered:
Bonjour Mme Datiche, après avoir tricoté 1 fois les diagrammes en hauteur, vous continuez comme avant en suivant A.1, A.2 et A.3 mais vous avez maintenant suffisamment de mailles pour tricoter 2 x A.2 en largeur de chaque côté de la maille centrale. Quand la 2ème série est terminée en hauteur, reprenez de nouveau comme avant, vous aurez 3xA.2 en largeur et ainsi de suite. Bon tricot!
27.05.2014 - 08:55
|
|||||||||||||||||||
Madeleine#madeleineshawl |
|||||||||||||||||||
|
|
|||||||||||||||||||
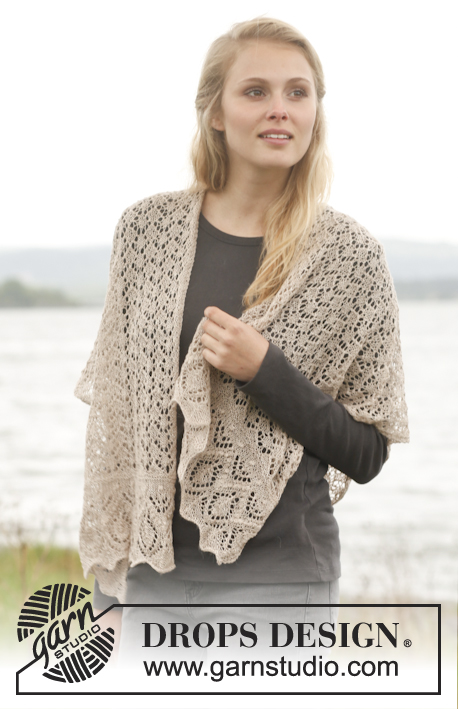
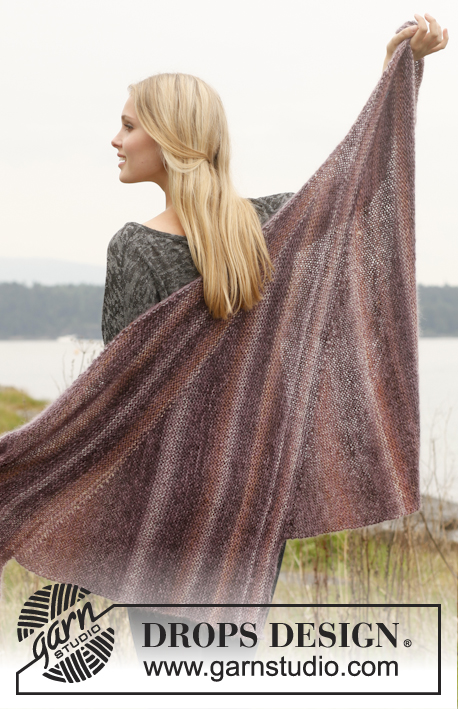
Knitted DROPS shawl with lace pattern in ”Kid-Silk”.
DROPS 151-18 |
|||||||||||||||||||
|
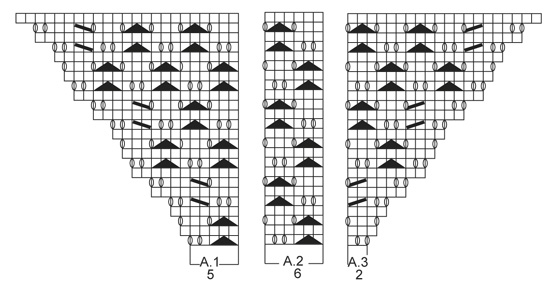
GARTER ST (back and forth on needle): K all rows. 1 ridge = 2 rows K. PATTERN: See diagrams A.1-A.9. Diagrams show all rows in pattern from RS. INCREASE TIP: All inc are done from RS. Work YOs as sts on next row (not twisted) to make holes. Inc 4 sts on every other row as follows: Inc 1 st at beg of row as follows: 1 st in garter st, 1 YO. Inc 2 sts in the middle of piece as follows: 1 YO, 1 st in stockinette st (= st with marker), 1 YO. Inc 1 st at end of row as follows: 1 YO, 1 st in garter st. ---------------------------------------------------------- SHAWL: Worked back and worth on circular needle from neck and down with 1 st in GARTER ST - see explanation above - in each side. Cast on 3 sts on circular needle size 3 mm / US 2.5 with Kid-Silk. K 6 rows. After 6th row do not turn piece but rotate 90 degrees clockwise, pick up 3 sts along the edge (i.e. 1 st in every ridge), rotate piece again clockwise and pick up 3 sts along cast-on edge (i.e. 1 st in every st) = 9 sts on needle. Insert 1 marker in the 5th st (st marks the middle of the shawl). Then continue in stockinette st with 1 st in garter st in each side while AT THE SAME TIME inc 4 sts on every row from RS - Read INCREASE TIP! Continue like this until there are 29 sts on the needle. REMEMBER THE KNITTING GAUGE! Then work as follows from RS: 1 st in garter st, A.3 (= 2 sts), A.2 (= 6 sts), A.1 (= 5 sts), 1 st in stockinette st (= mid st, worked in stockinette st until finished measurements), A.3, A.2, A.1 and finish with 1 st in garter st. When A.2 has been worked 1 time vertically (= 24 rows), there are 101 sts on needle. Continue pattern like this – NOTE: Every time A.2 has been worked 1 time vertically, there are 6 repetitions more of A.2 on each side of mid st. REMEMBER THE KNITTING GAUGE! Work a total of 7 repetitions of A.2 (piece measures approx. 58 cm / 22¾" measured along mid st) = 533 sts on needle - AT THE SAME TIME on the last row of the A.1, A.2, A.3 (=purl row) increase 6 sts evenly on each side of the mid st (= total of 12 sts) to a totalt of 545 sts. Work next row from RS as follows: 1 st in garter st, A.9 (= 5 sts) and then A.8 (= 12 sts) until 2 sts remain before mid st, work A.7 (= 2 sts), 1 st in stockinette st, A.6 (= 2 sts), repeat A.5 (= 12 sts) until 6 sts remain, work A.4 (= 5 sts) and finish with 1 st in garter st. Work 1 repetition of pattern vertically. LOOSELY bind off. |
|||||||||||||||||||
Diagram explanations |
|||||||||||||||||||
|
|||||||||||||||||||
 |
|||||||||||||||||||
 |
|||||||||||||||||||
 |
|||||||||||||||||||
Have you finished this pattern?Tag your pictures with #dropspattern #madeleineshawl or submit them to the #dropsfan gallery. Do you need help with this pattern?You'll find 14 tutorial videos, a Comments/Questions area and more by visiting the pattern on garnstudio.com. © 1982-2026 DROPS Design A/S. We reserve all rights. This document, including all its sub-sections, has copyrights. Read more about what you can do with our patterns at the bottom of each pattern on our site. |
|||||||||||||||||||


With over 40 years in knitting and crochet design, DROPS Design offers one of the most extensive collections of free patterns on the internet - translated to 17 languages. As of today we count 325 catalogs and 12298 patterns - 12288 of which are translated into English (US/in).
We work hard to bring you the best knitting and crochet have to offer, inspiration and advice as well as great quality yarns at incredible prices! Would you like to use our patterns for other than personal use? You can read what you are allowed to do in the Copyright text at the bottom of all our patterns. Happy crafting!
Post a comment to pattern DROPS 151-18
We would love to hear what you have to say about this pattern!
If you want to leave a question, please make sure you select the correct category in the form below, to speed up the answering process. Required fields are marked *.