
Popular categories
Looking for a yarn?


Comments / Questions (24)
![]() Joyce Boonstra wrote:
Joyce Boonstra wrote:
Bij het beginnen aan de ruche staat er dat je gelijkmatig moet meerderen tot 85 steken (maat 122/128). Maar ik begin het voorpand met 88. Lees ik iets verkeerd?
30.08.2025 - 09:30DROPS Design answered:
Dag Joyce,
Ja, er zou inderdaad minderen moeten staan in plaats van meerderen. Ik heb het doorgegeven aan de ontwerpafdeling om na te kijken en aan te passen. Voor nu zou je verder kunnen door te minderen naar het aangegeven aantal steken, zodat je uitkomt met de ruche.
30.08.2025 - 10:51
![]() Anja wrote:
Anja wrote:
Hallo. Leider verstehe ich bei den Schultern nicht, was mit den 4 kettmaschen an dem Reihenenden passiert. Werden diese einfach übersprungen? Und was passiert mit dem Luftmaschen, die als feste Maschen zählen? Vielen Dank im Voraus.
17.11.2023 - 23:19DROPS Design answered:
Liebe Anja, leider sehe ich nicht genau, was Sie hier meinen, welche 4 Wettmaschen meinen Sie hier? können Sie uns bitte mehr sagen? Danke im voraus für Ihr Verständnis.
20.11.2023 - 09:35
![]() Joke Kok wrote:
Joke Kok wrote:
Hoe kan ik dit patroon verkleinen voor maat 92?
28.06.2022 - 19:16DROPS Design answered:
Dag Joke,
Helaas is dit patroon er vanaf maat 98/104. Je zou eens ij de babypatronen kunnen kijken voor een vergelijkbaar patroon. Deze gaan namelijk wel vaak tot en met maat 92.
03.07.2022 - 13:26
![]() Regula wrote:
Regula wrote:
Ich beginne mit 93 Lm, erhalte aber nach 1. Reihe gem. *-* nur 80 Fm. Sollte der Start mit 94 Lm sein?
21.04.2022 - 09:08DROPS Design answered:
Liebe Regula, Anleitung wird korrigiert, mit 93 Lm häkeln Sie 1 fM in die 2.Lm von der Nadel häkeln, dann 1 fM in jede der nächsten 9 (anstatt 7.) Lm, * 1 Lm überspringen, 1 fM in jede der nächsten 6 Lm *, von * - * wdh = 81 fM. Danke für den Hinweis, viel Spaß beim häkeln!
03.05.2022 - 09:34
![]() Bobbie wrote:
Bobbie wrote:
I am unable to get the gauge no matter what the hook size. 15 rows of A.1 with double crochet and triple crochets is just impossible, what am I doing wrong? I amusing Muskat yarn as prescribed.
14.07.2020 - 16:59DROPS Design answered:
Dear Bobbie, in US-English you should work double crochets (treble crochet is the UK-word to US-double crochet) - edit language by clicking on the scroll down menu below foto. Happy crocheting!
15.07.2020 - 07:29
![]() Marci Palencia wrote:
Marci Palencia wrote:
In working the shoulders...I understand when it says work 1st four st together, but what does "2 by 2" mean? I have googled this, but can't find an explanation.
16.07.2017 - 15:13DROPS Design answered:
Hi Marci, This means that you work together the first 2 stitches and then work together the next 2 stitches. Happy knitting!
17.07.2017 - 06:22
![]() Marianna wrote:
Marianna wrote:
Hallo, Begrijp ik nou goed dat ik de ruche er later aan moet haken? Ik haak pas sinds kort en snap dan niet helemaal hoe ik dat moet doen. Alvast bedankt!
27.12.2016 - 20:02DROPS Design answered:
Hoi Marianna. Ja, de ruche langs de onderkant wordt na het afmaken van het voorpand gehaakt. Hetzelfde na het haken van het achterpand.
30.12.2016 - 12:26
![]() Mireille wrote:
Mireille wrote:
Avevo del cottone da lavorare col uncinetto n.4 cosi ho scelto questo modello che comunque mi piace molto. Ho fatto il campione per essere tranquilla era giusto. Però dopo aver iniziato il lavoro e lavorato qualche giro mi sembrava troppo grande e misurando invece di 41cm ho 45cm. Mi puoi aiutare se tolgo maglie circa 2 taglie giusto? Ma per le diminuzioni come faccio? Mi puoi dare delle proporzioni? Grazie mille 😊
10.02.2016 - 00:29DROPS Design answered:
Buongiorno Mireille, probabilmente la sua tensione è cambiata durante il lavoro, aveva lavato il campione? Se ha già finito le diminuzioni in iniziali può iniziare le diminuzioni per lo scalfo qualche giro prima. Ci riscriva se ha ancora bisogno di aiuto. Buon lavoro!
10.02.2016 - 15:06
![]() Severine wrote:
Severine wrote:
J adore facile a faire tres bien expliqué
23.01.2015 - 22:29
![]() Gros wrote:
Gros wrote:
Bonjour, je ne comprends pas le passage: écouler ensemble 2 b à 1 b du bord de chaque côté Merci
24.10.2014 - 11:08DROPS Design answered:
Bonjour Mme Gros, les diminutions des emmanchures se font ainsi: crochetez la 1ère B du rang, écoulez les 2 B suiv ens, continuez le rang jusqu'à ce qu'il reste 3 B, écoulez les 2 B suiv ens, et terminez par 1 B dans la dernière B. Répétez ce rang encore 4 fois (5 fois au total). Bon crochet!
24.10.2014 - 11:40
|
||||||||||
Candy Rose#candyrosedress |
||||||||||
|
|
||||||||||
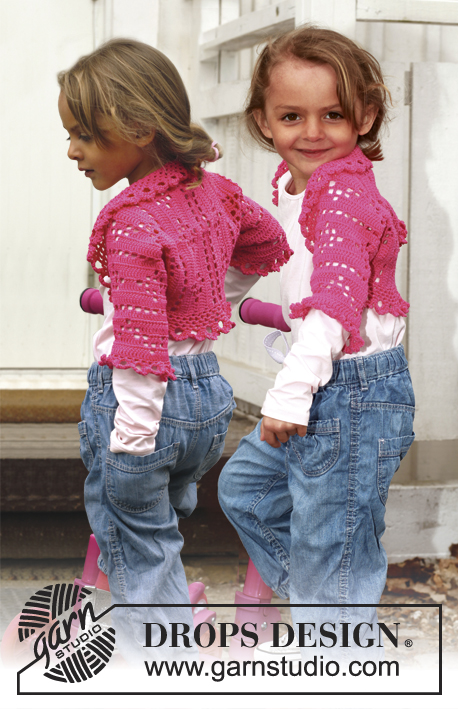
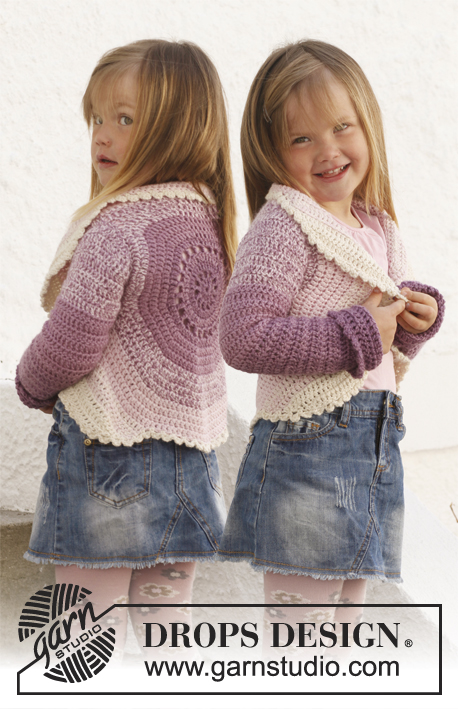
Crochet dress with lace pattern in DROPS Muskat. Size children 3 - 12 years.
DROPS Children 24-29 |
||||||||||
|
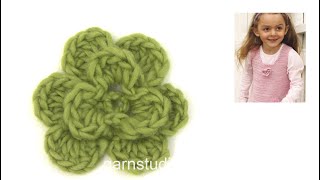
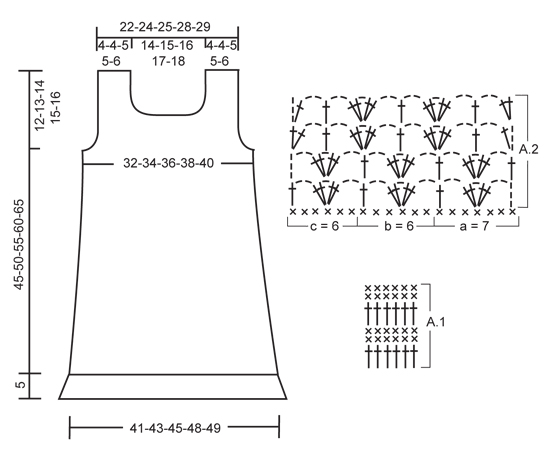
CROCHET INFO: On every sc row replace first sc with 1 ch. On every dc row replace first dc with 3 ch. PATTERN: See diagrams A.1 and A.2. DECREASE TIP: Dec 1 st by working 2 sts tog. Work 2 sc tog as follows: Insert hook in first st and pull thread through, insert hook in next st and pull thread through, make 1 YO and pull thread through all 3 loops on hook. Work 2 dc tog as follows: Work 1 dc in first st but wait with last pull through, work 1 dc in next st but on last pull through, pull thread through all 3 loops on hook. -------------------------------------------------------- DRESS: To make the texture the same on the piece work it back and forth in 2 parts, and sew tog when finished. FRONT PIECE: Ch 81-85-88-93-97 with Muskat on hook size 4 mm / G/6. Continue with 1 sc in 2nd ch from hook, then 1 sc in each of the next 2-6-9-7-4 ch, * skip ch 1, 1 sc in each of the next 6 ch *, repeat from *-* the entire row = 70-74-77-81-84 sc (first ch = 1 sc). Turn and work 1 sc in every st - READ CROCHET INFO! Continue with diagram A.1 (1st row = 1 dc in every sc). REMEMBER THE CROCHET GAUGE! When piece measures 18-20-21-22-23 cm / 7"-8"-8¼"-8¾"-9", dec 4 sts evenly - READ DECREASE TIP! Repeat dec every 4-4-5-5-6 cm / 1½"-1½"-2"-2"-2⅜" 3 more times = 54-58-61-65-68 sc. When piece measures 33-37-41-45-49 cm / 13"-14½"-16"-17¾"-19¼", dec for armholes in each side. This is done as follows: Work sl sts over the first 3-4-4-4-4 sts, then work until 3-4-4-4-4 sts remain, turn piece. On next row work the second and third and the 2 next to last sts in each side tog – SEE DECREASE TIP! Repeat dec on every row 4 more times. After all dec, 38-40-43-47-50 sts remain on row. When piece measures 38-43-47-51-55 cm / 15"-17"-18½"-20"-21½", dec for neck. This is done by working each shoulder separately. 1ST SHOULDER: Work over the first 12-12-13-14-15 sts, turn and work the first 4 sts tog 2 by 2, then work the rest of row. Turn and work until 2 sts remain before neck, work these tog, turn. On next row work the first 2 sts tog, then work the rest of row. Turn, work until 2 sts remain, work these tog = 7-7-8-9-10 sts remain on shoulder. Continue A.1 until piece measures 45-50-55-60-65 cm / 17¾"-19¾"-21½"-23½"-25½", fasten off. 2ND SHOULDER: Work as first shoulder - make sure to start on correct row in diagram and to finish at the top with the same row as 1st shoulder. FLOUNCE AT THE BOTTOM: Now work a flounce at the bottom of dress as follows: Beg by working 1 row with sc from RS – inc evenly so that there are a total of 79-85-85-91-97 sc. Turn and continue with diagram A.2 as follows: a over the first 7 sts, then b until 6 sts remain, finish with c. Work the 4 rows in A.2 one time, the flounce measures approx. 5 cm / 2", fasten off. BACK PIECE: Work as front piece to and with armhole dec = 38-40-43-47-50 sts on row. Continue to work until piece measures approx. 43-48-53-58-63 cm / 17"-19"-21"-22¾"-24¾". Then finish each shoulder separately as follows: Work 1 row over the first 9-9-10-11-12 sts, turn, work the first 2 sts tog, work the rest of row. Turn and work until 2 sts remain towards neck, work these tog. Turn, work 1 st in every st the entire row, fasten off. Repeat on the other shoulder. Work flounce at the bottom the same way as on front piece. ASSEMBLY: Sew shoulder seams edge to edge to avoid a chunky seam. And sew side seams edge to edge to make them less visible. EDGE AROUND ARMHOLE AND NECK: Work as follows around the armholes and neck line. 1 sc, * ch 2, skip approx. 0.5 cm / ¼", 1 sc *, repeat from *-* around the entire opening and finish with 2 ch and 1 sl st in first sc at beg of round. CROCHET FLOWER Work on hook size 4 mm / G/6 with Muskat. Ch 4 and form a ring with 1 sl st in first ch. ROUND 1: * 1 sc in ch-ring, ch 3 *, repeat from *-* a total of 3 times and finish with 1 sl st in first sc from beg of round = 3 ch-spaces. ROUND 2: Crochet as follows in every ch-space: 1 sl st, 5 dc and 1 sl st = 3 leaves. Turn piece - work next round on the back of the flower. ROUND 3: ch 1, work 1 sc around first sc from 1st round, ch 4, work 1 sc at the bottom in the mid of first leaf from 2nd round, * then ch 4, work 1 sc around next sc from 1st round, then ch 4, work 1 sc at the bottom in the mid of next leaf from 2nd round *, repeat from *-* until there are a total of 5 ch-spaces, finish with 4 ch and 1 sl st in first sc from from beg of round = 6 ch-spaces. Turn piece - work next round on the front of the flower. ROUND 4: Crochet as follows in every ch-space: 1 sl st, 6 dc and 1 sl st = 6 leaves. Fasten off. Sew the flower on to the dress. |
||||||||||
Diagram explanations |
||||||||||
|
||||||||||
 |
||||||||||
Have you finished this pattern?Tag your pictures with #dropspattern #candyrosedress or submit them to the #dropsfan gallery. Do you need help with this pattern?You'll find 7 tutorial videos, a Comments/Questions area and more by visiting the pattern on garnstudio.com. © 1982-2026 DROPS Design A/S. We reserve all rights. This document, including all its sub-sections, has copyrights. Read more about what you can do with our patterns at the bottom of each pattern on our site. |
||||||||||


With over 40 years in knitting and crochet design, DROPS Design offers one of the most extensive collections of free patterns on the internet - translated to 17 languages. As of today we count 325 catalogs and 12298 patterns - 12288 of which are translated into English (US/in).
We work hard to bring you the best knitting and crochet have to offer, inspiration and advice as well as great quality yarns at incredible prices! Would you like to use our patterns for other than personal use? You can read what you are allowed to do in the Copyright text at the bottom of all our patterns. Happy crafting!
Post a comment to pattern DROPS Children 24-29
We would love to hear what you have to say about this pattern!
If you want to leave a question, please make sure you select the correct category in the form below, to speed up the answering process. Required fields are marked *.