
Popular categories
Looking for a yarn?


Comments / Questions (21)
![]() Cathy wrote:
Cathy wrote:
On the Betty spiral felted potholder. How do you close the hole in the center before felting?
16.02.2026 - 18:31DROPS Design answered:
Hi Cathy, You can tack a strand up and down around the cast-on stitches, then tighten the strand before fastening. This will close the hole. Regards, Drops Team.
17.02.2026 - 06:56
![]() Wusel7 wrote:
Wusel7 wrote:
Da es Big Delight nun nicht mehr gibt: Welche Altetnative hat man für einen schönen Farbverlauf?
18.11.2023 - 23:14DROPS Design answered:
Liebe Wusel7, leider haben wir keine andere filzbare Wolle mit Farblauf - siehe hier. Viel Spaß beim stricken!
20.11.2023 - 10:29
![]() Anette Frandsen wrote:
Anette Frandsen wrote:
Hej Jeg forsøger at lave den runde grydelap, og har pillet op rigtig mange gange. Den ‘kupler’ sig så det kan være starten på en bøllehat. Som om der mangler en vending i hver ‘rapport’. Hvad gør jeg forkert. Jeg strikker i Big Delight
21.08.2019 - 09:19DROPS Design answered:
Hei Anette. Sjekk strikkefastheten din og sjekk at du strikker alle vendinger. Det er også laget en hel video til denne grytelappen, ta en titt på den og se om du kan finne ut hva du evnt gjør feil. God Fornøyelse!
09.09.2019 - 11:07
![]() Lehna wrote:
Lehna wrote:
Dag, ik heb twee vragen over het minderen bij de ronde pannenlap: elke 12e nld 2 st samenbreien, volgens mij is de 12e nld een herh van nld 98, dus zou je na het overhalen van de opgenomen steek 2 steken moeten samenbreien? Dit blijkt niet uit de video. En wat gebeurt er met de herhalingen van nld 95? Moet ik dan steeds een stk minder breien voor ik het werk keer? Alvast dank voor uitleg, Vriendelijke groet, Lehna
21.08.2019 - 08:06DROPS Design answered:
Dag Lehna,
Het minderen doe je steeds op de buitenkant van de pannenlap en je hebt inderdaad na elke mindering een steek minder op de naald. De doe je dus niet perse op de naald 98, maar wel steeds om de 12 naalden herhalen.
01.09.2019 - 12:09
![]() Tina wrote:
Tina wrote:
Jag har en fråga ang. den runda grytlappen. Jag har fortsatt sticka v.95-98 och är nu framme vid markören men diametern är bara 19 cm på det bredaste stället så känns inte rätt att börja maska av redan. Grytlappen har dessutom kupat sig så jag misstänker att jag gjort något fel, men vad? Vad betyder " det stickas 4 v i varje rätst rand från cirkeln/föregående v."?
14.05.2019 - 10:27DROPS Design answered:
Hej Tina, Stickar du i DROPS Eskimo? Kan det vara så att din stickfasthet är för tight ... ? Har du 17 m på 10 cm i bredden och 33 varv rätstickat i höjden. Om du har mer än 17 m på 10 cm så måste du använda en tjockare sticka så arbetet blir lösare. Lycka till :)
15.05.2019 - 15:39Mónica wrote:
Muchas gracias por responderme!!!!,,, aplicaré la indicación,,,, saludos y mi agradecimiento nuevamente!!! felices fiestas navideñas a todos.
10.12.2014 - 02:27
![]() Mara wrote:
Mara wrote:
Aiuto!!!sto realizzando la presina a spirale, tutto bene fino al 93° ferro, ora non riesco proprio a capire nonostante il video da quale ferro devo riprendere la maglia per formare la spirale! riprendendo dal 1° ferro rimane il buco al centro... grazie mille Mara
06.12.2014 - 23:04DROPS Design answered:
Buongiorno Mara. Al ferro 94, la m va ripresa nel filo davanti della m del primo ferro. La presina andrà poi infeltrita e questo dovrebbe far sì che il buco al centro si chiuda o quantomeno si riduca. Buon lavoro!
07.12.2014 - 15:48Mónica wrote:
Espiral redondo no entiendo:"Continuar de esta manera,aumentando 1pt al final de la vta sig después de 2hileras más tejidas sobre todos los pts hasta tener 10pts en la ag, se han tejido 90hileras hasta ahora" confunde, pues entiendo que debo tejer como hasta la vta42, dice 90vtas,entonces:"aumentando 1pt al final de la hilera sig después de 2hileras más tejidas sobre todos los pts",donde se aplica? me indica 3vtas no acortadas y 1aumento entonces para mí son 93vtas y 11pts.
22.11.2014 - 08:22DROPS Design answered:
Hola Mónica! Si te fijas después de ¨tejer¨ la secuencia de derechos va aumentando: HILERA 3-4: Tejer 1d, HILERA 5-6: Tejer 2d, ...= 3 pts HILERA 7-8: Tejer 1d, HILERA 9-10: Tejer 2d, HILERA 11-12: Tejer 3d, ...=4 pts HILERA 13-14: Tejer 1d, HILERA 15-16: Tejer 2d, HILERA 17-18: Tejer 3d, HILERA 19-20: Tejer 4d, ...= 5 pts HILERA 21-22: Tejer 1d, HILERA 23-24: Tejer 2d, HILERA 25-26: Tejer 3d, HILERA 27-28: Tejer 4d, HILERA 29-30: Tejer 5d, ...= 6 pts tienes que seguir con esa secuencia hasta tener = 10 pts q es justo en la fila 90.
30.11.2014 - 20:31
![]() Barbara wrote:
Barbara wrote:
Schöne Topflappen, keine Frage, aber: Schon beim Stricken des runden Topflappens irritierte mich das große Loch in der Mitte. Bis die Topflappen aus der Waschmaschine kamen, hatte ich noch Hoffnung, dass es vielleicht verschwinden würde. Leider war dies nicht der Fall. Gibt es einen Trick dieses Loch zu vermeiden? Und noch eine Frage zum quadratischen Modell: Soll bei den verkürzten Reihen die erste Masche der Rückreihe nur abgehoben (wie beim runden Modell) oder gestrickt werden?
15.10.2014 - 18:28DROPS Design answered:
Eigentlich sollte das Loch nach dem Filzen tatsächlich verschwunden sein. Wenn es besonders groß ist, können Sie es mit einem Faden etwas zusammenziehen. Zu den verkürzten R können Sie sich auch das Video "Verkürzte Reihen" anschauen, den Link dazu finden Sie unter "Videos" im Kopf der Anleitung. Sie können die erste M wie beim runden Topflappen und wie im Video gezeigt auch abheben, damit werden Löcher vermieden.
16.10.2014 - 14:42
![]() Birgit wrote:
Birgit wrote:
Tolle Filzwolle! Habe 2 runde und einen quadratischen Topflappen nach Anleitung aus einem Knaeuel gestrickt.
28.03.2013 - 20:43
|
|||||||
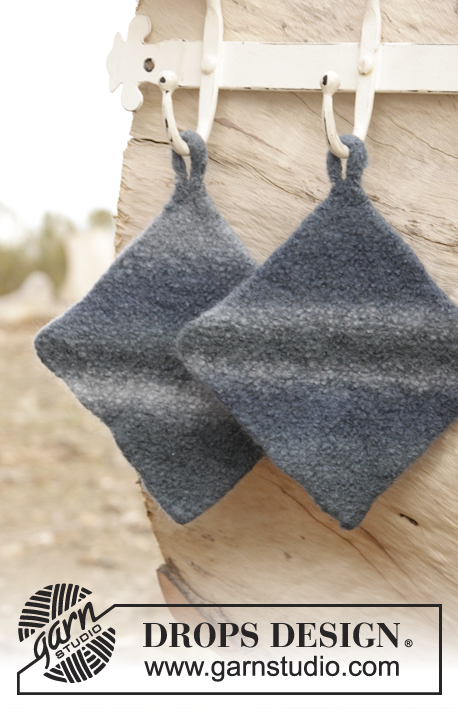
Betty#bettypotholders |
|||||||
|
|
|||||||
Felted DROPS pot holders in "Big Delight".
DROPS 147-30 |
|||||||
|
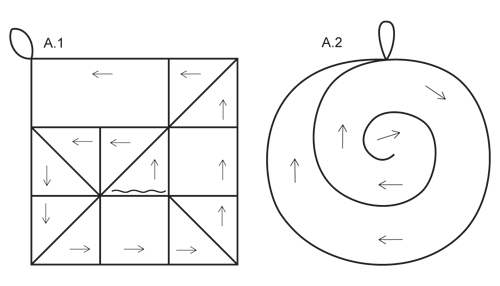
GARTER ST (back and forth on needle): K all rows. 1 ridge = K 2 rows. SHORT ROWS (applies to rectangular pot holder): Work 1 row over the first 14 sts, turn and work back. Work 1 row over the first 13 sts, turn and work back. Continue with short rows, work 1 st less every time until 2 rows have been worked only over the first stitch. Then work 1 row over the first 2 sts, turn and work back, 1 row over the first 3 sts, turn and work back. Continue like this by working 1 st more every time until 1 row has been worked over the first 14 sts, turn and work back. 1 repetition with short rows = 54 rows. KNITTING TIP (applies to round pot holder): When turning mid piece, slip first st. Tighten yarn and continue as before. This is done to avoid holes where turning. ---------------------------------------------------------- RECTANGULAR POT HOLDER IN SPIRAL: The entire pot holder is worked in GARTER ST, i.e. K all rows. Diagram A.1 shows knitting direction. Cast on 14 sts on needle size 5 mm / US 8 with Big Delight and work in GARTER ST – see explanation above, AT THE SAME TIME work 1 repetition with SHORT ROWS - see explanation above. Then K 2 rows over all sts, work 1 repetition with short rows, K 2 rows over all sts and 1 repetition with short rows again. *Then work 1 row over all sts (from RS). Work next row as follows (from WS): Pick up the outermost st from cast on edge, work first st from left needle, pass the new st over, work the rest of row, work 2 rows back and forth over the 14 sts (without picking up) *, repeat these 4 rows from *-* until 1 st has been picked up in every other st along cast on edge. Work 1 repetition with short rows. ** Work 1 row over all sts (from RS), work next row as follows (from WS): Pick up in front loop of outermost st along the side on first row with short rows, work first st from left needle, pass the new st over, work the rest of row, work 2 rows back and forth over the 14 sts (without picking up) **, repeat these 4 rows from **-** until 1 st has been picked up in every other garter st ridge along the entire side from previous row. Work 1 repetition with short rows, repeat from **-** until 1 st has been picked up in every other garter st ridge along the entire side from previous row and bind off – NOTE: make sure to bind off from cast on edge and out towards the corner. When 1 st remains, make a loop in the corner as follows: * Make 1 YO, dec 1 st by passing st over YO *, repeat from *-* until loop measures approx. 10 cm / 4". Cut the yarn, pull it through last st and fasten loop nicely in the corner of pot holder. Pot holder measures approx. 25 x 25 cm / 9¾" x 9¾" . FELTING: The piece can be felted either in the washing machine or the tumble dryer – read description below. Remember: Subsequent washes are as for a normal wool garment. IN WASHING MACHINE: Washing machines will vary when felting. If the piece is not felted enough, it can be felted again. If it is felted too much, it can be stretched to the correct size while still wet. DO THE FOLLOWING: Lay the piece in the washing machine, using a programme of approx. 40 minutes (not a wool programme). Wash at 40 degrees C = 104 degrees F without pre-wash, detergent is optional. After washing, shape the piece while it is still wet. IN TUMBLE DRYER: Felting in a tumble dryer gives good control over the degree of felting. The tumble dryer can be opened during drying to check the size of the piece. If it is not felted enough it can be thoroughly wetted and felted again. If it is felted too much it can be stretched to the correct size while still wet. DO THE FOLLOWING: Lay the piece in water so it becomes completely wet, then place it in the tumble dryer and begin the drying process. Dry to the desired size, checking regularly. ---------------------------------------------------------- ROUND POT HOLDER IN SPIRAL: The entire pot holder is worked in GARTER ST, i.e. K all rows. Cast on 2 sts on needle size 5 mm / US 8 with Big Delight. ROW 1-2: K 2 sts, turn and K back. ROW 3-4: K 1 st, turn and K back. ROW 5-6: K 2 sts, turn and work 2 sts in first st, K last st = 3 sts. ROW 7-8: K 1 st, turn and K back. ROW 9-10: K 2 sts, turn and K back. ROW 11-12: K 3 sts, turn and K 1, work 2 sts in next st, K last st = 4 sts. ROW 13-14: K 1 st, turn and K back. ROW 15-16: K 2 sts, turn and K back. ROW 17-18: K 3 sts, turn and K back. ROW 19-20: K 4 sts, turn and K 2, work 2 sts in next st, K last st = 5 sts. ROW 21-22: K 1 st, turn and K back. ROW 23-24: K 2 sts, turn and K back. ROW 25-26: K 3 sts, turn and K back. ROW 27-28: K 4 sts, turn and K back. ROW 29-30: K 5 sts, turn and K 3, work 2 sts in next st, K last st = 6 sts. ROW 31-32: K 1 st, turn and K back. ROW 33-34: K 2 sts, turn and K back. ROW 35-36: K 3 sts, turn and K back. ROW 37-38: K 4 sts, turn and K back. ROW 39-40: K 5 sts, turn and K back. ROW 41-42: K 6 sts, turn and K 4, work 2 sts in next st, K last st = 7 sts. Continue like this by inc 1 st at the end of next row after 2 rows more have been worked over all sts until there are 10 sts on needle, 90 rows have now been worked – insert 1 marker. Work next row as follows from RS: ROW 91 (= RS): Work the first 8 sts. ROW 92 (= WS): Turn and work back. ROW 93 (= RS): Work all sts. ROW 94 (= WS): Pick up the outermost st in front loop from 1st row, work first st from left needle, pass the new st over, work the rest of row. ROW 95 (= RS): Work the first 8 sts. ROW 96 (= WS): Turn and work back. ROW 97 (= RS): Work all sts. ROW 98 (= WS): Pick up the outermost st in front loop from 3rd row, work first st from left needle, pass the new st over, work the rest of row. Repeat the last 4 rows upwards, work 4 rows in every garter st ridge from circle/previous row. Continue with spiral until marker on 90th row. Now dec gradually so that 1 st remains on needle as follows: Continue the same way (repeat rows 95-98) while AT THE SAME TIME K tog the first 2 sts at beg of every 12th row (i.e. every 6th ridge) until only 1 st remains on needle. Now make a loop as follows: * 1 YO, pass st on right needle over YO *, repeat from *-* until loop measures approx. 10 cm / 4". Cut the yarn, pull it through st and fasten the loop. Pot holder measures approx. 23 cm / 9" in diameter. FELTING: See explanation under rectangular pot holder. |
|||||||
Diagram explanations |
|||||||
|
|||||||
 |
|||||||
Have you finished this pattern?Tag your pictures with #dropspattern #bettypotholders or submit them to the #dropsfan gallery. Do you need help with this pattern?You'll find 8 tutorial videos, a Comments/Questions area and more by visiting the pattern on garnstudio.com. © 1982-2026 DROPS Design A/S. We reserve all rights. This document, including all its sub-sections, has copyrights. Read more about what you can do with our patterns at the bottom of each pattern on our site. |
|||||||


With over 40 years in knitting and crochet design, DROPS Design offers one of the most extensive collections of free patterns on the internet - translated to 17 languages. As of today we count 325 catalogs and 12298 patterns - 12288 of which are translated into English (US/in).
We work hard to bring you the best knitting and crochet have to offer, inspiration and advice as well as great quality yarns at incredible prices! Would you like to use our patterns for other than personal use? You can read what you are allowed to do in the Copyright text at the bottom of all our patterns. Happy crafting!
Post a comment to pattern DROPS 147-30
We would love to hear what you have to say about this pattern!
If you want to leave a question, please make sure you select the correct category in the form below, to speed up the answering process. Required fields are marked *.