
Looking for a yarn?


Comments / Questions (31)
![]() MakarNig wrote:
MakarNig wrote:
Buy furosemide water pill furosemide 40mg ca
22.08.2025 - 04:32
![]() Nathalie Monka wrote:
Nathalie Monka wrote:
Bonjour, j’aimerais savoir si j’ai bien compris . Après les 3 premières diminutions pour le haut du bikini, il faut diminuer tous les 2 rangs ? Merci d’avance. N.Monka
12.08.2025 - 13:20DROPS Design answered:
Bonjour Mme Monka, pas exactement, une correction a été apportée ici: on va diminuer tous les rangs et, en sautant les 2 brides centrales, on a 1 bride en moins de chaque côté du milieu du triangle, tous les rangs. Merci pour votre retour. Bon crochet!
12.08.2025 - 16:05
![]() Drapbah wrote:
Drapbah wrote:
Where to buy vilitra
02.06.2025 - 06:52
![]() Mipoldo wrote:
Mipoldo wrote:
Eye drops with beta blockers
05.01.2025 - 02:01
![]() Tradalz wrote:
Tradalz wrote:
Vidalista 20 reviews
29.12.2024 - 13:38
![]() Levaaj wrote:
Levaaj wrote:
Malegra 100 gold
18.12.2024 - 06:09
![]() Levaap wrote:
Levaap wrote:
Marilyn Tan / DROPS 90-22 - Free knitting patterns by DROPS Design clomid post cycle
04.11.2024 - 04:44
![]() Marianne Muntz wrote:
Marianne Muntz wrote:
Bonsoir, je suis entrain de faire ce short..et ben je ne comprend vraiment rien quand il faut mettre sur des arrêts de maille...vraiment compliqué..je me demande si je vais pas le détricoter...ça fait 3 jours que je lis et relis..dommage
26.06.2024 - 22:28DROPS Design answered:
Bonjour Mme Muntz, lorsque vous avez mis vos mailles sur les arrêts de mailles 1, 2 et 3, tricotez les mailles restantes (81-85 ou 91 m, cf taille) ainsi: tricotez 5 ou 4 m sur l'endroit et mettez-les en attente sur l'arrêt de mailes 1, tricotez les mailes restantes jusqu'à ce qu'il reste 5 ou 4 m et mettez ces 5 - 4 m sur l'arrêt de mailles 3 (et non le 2 - correction faite), tournez et tricotez les mailles restantes; répétez ces 2 rangs - vous avez de moins en moins de mailles sur l'aiguille et de plus en plus sur les arrêts de mailles 1 et 3. Bon tricot!1
27.06.2024 - 08:58
![]() Marianne Muntz wrote:
Marianne Muntz wrote:
Bonsoir, je n’ai pas trouvé les dimensions du short..les 160 mailles pour la taille S est énorme...faudrait mettre les tours de taille et de hanche , pour avoir un aperçu.. je le fait dans les cotons conseillés...peut être pouvez vous me donner des conseils..merci
17.06.2024 - 19:36DROPS Design answered:
Bonjour Mme Muntz, nous n'avons pas de schéma pour ce modèle, il se tricote entièrement en côtes 1/1, il sera donc élastique, vous pouvez choisir votre taille habituelle. Sur la base de l'échantillon, 24 cm de côtes (non étirées) = 10 cm, les 160 mailles en taille S feront environ 67 cm de circonférence. Bon tricot!
18.06.2024 - 07:42
![]() Adjoums wrote:
Adjoums wrote:
Is cucumber good for your liver metronidazole 500 mg.
05.01.2024 - 15:11
|
|
Marilyn Tan |
|
|
|
|
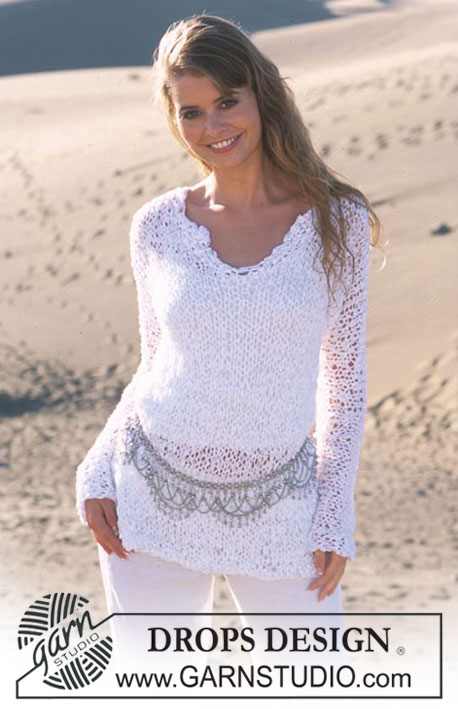
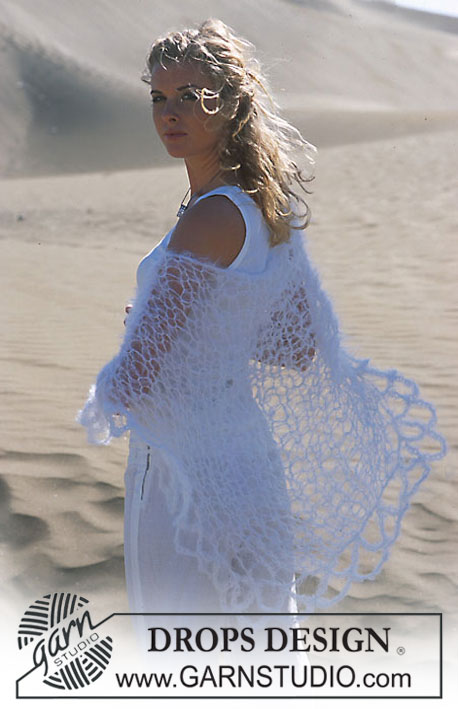
DROPS Crocheted bikini-top in Safran and Knit Shorts in Paris
DROPS 90-22 |
|
|
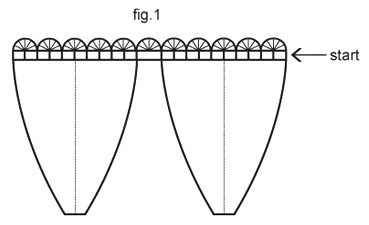
BIKINI-TOP: Crochet gauge: 22 dc x 11 rows = 10 x 10 cm. Crochet tips: At the beginning of every row ch 3 replaces 1 dc and every row ends with 1 sl st in the ch 3 at the beginning of previous row. Increasing tips: Inc 2 dc by crocheting 3 dc in dc with marker. Bikini-top: The piece is crocheted from the bottom up in 2 pieces, then put together with a lace lower edge. 1st piece: Ch 42-48-54. 1st row: 1 dc in 5th ch from hook, * skip over 1 ch, 1 dc in each of the 2 following ch *, repeat * - * and finish with 1 dc in the last ch = 27-31-35 dc. Put a marker in the center dc and move the marker up each row. Continue to crochet 1 dc in each dc – read Crochet tips – and at the same time inc 2 dc at marker on the following 4-4-5 rows – see Increasing tips = 35-39-45 dc. Now begin decreasing at center of piece: 1st row: 16-18-21 dc, skip over 3 dc, 16-18-21 dc, turn the work. 2nd row: 15-17-20 dc, skip over 2 dc, 15-17-20 dc, turn the work. 3rd row: 14-16-19 dc, skip over 2 dc, 14-16-19 dc, turn the work. Continue decreasing in this manner, by skipping over the 2 center dc (there will be 1 dc less at each side of center after every row). When 4 dc remain cut yarn and fasten = a total of 20-22-26 rows, the piece measures approx. 18-20-24 cm. Crochet an identical 2nd piece. Then crochet a row of ch-loops to join the 2 sides together – see Fig.1. Start at one side of one piece and from wrong side: 1 sc in first dc, ch 5 (= 1 dc + ch 2), skip over 2 dc, * 1 dc in the next dc, ch 2, skip over 2 dc *, repeat * - * a total of 7-9-11 times and finish with 1 dc in last dc, but for Size S skip over 3 dc instead of 2 dc two times and for Size L skip over 1 dc instead of 2 dc two times = 8-10-12 ch-loops, then ch 3, 1 dc in first dc on the next piece, * ch 2, skip over 2 dc, 1 dc in the next dc *, repeat * - * as on 1st piece = 18-22-26 dc on row, turn the work. Next row (= lace edge): ch 1, skip over 2 ch, * in the next dc crochet: 2 dc, 1 tr, 1 dtr, ch 2, 1 dtr, 1 tr and 2 dc, skip over 2 ch, 1 dc and ch 2 *, repeat * - * a total of 3-4-5 times, in the next dc crochet: 2 dc, 1 tr, 1 dtr, ch 2, 1 dtr, 1 tr and 2 dc, skip over 2 ch, 1 dc and ch 1, in the next ch (= center ch-loop between the 2 pieces) crochet: 2 dc, 1 tr, 1 dtr, ch 2, 1 dtr, 1 tr and 2 dc, skip over 1 ch, 1 dc and ch 2, * in the next dc crochet: 2 dc, 1 tr, 1 dtr, ch 2, 1 dtr, 1 tr and 2 dc, skip over 2 ch, 1 dc and ch 2 *, repeat * - * a total of 3-4-5 times, in the next dc crochet: 2 dc, 1 tr, 1 dtr, ch 2, 1 dtr, 1 tr and 2 dc, skip over 2 ch and finish with 1 sl st in ch 3 at the beginning of previous row. Ribbon: Thread the wide ribbon through the ch-loops at lower edge and tie in back. Thread each of the narrow ribbons through the hole at the top of each bra piece, fold in half, then tie at the back of the neck. Decorate with a small silk flower at center front. SHORTS: Sizes: S - M - L Hip measurements: 90/94 - 96/100 - 102/106 cm [35-⅜"/37" - 37.75"/39-⅜" - 40-⅛"/41.75"] The shorts should fit snugly, make the appropriate size for you. Materials: DROPS PARIS from Garnstudio 200-200-250 gr nr 17, natural DROPS 4.5 mm [US 7] short circular needles, or size needed to obtain correct gauge. Accessories: approx. 3 meters natural white ribbon (approx. 10 mm width) for band around stomach Gauge: 24 sts x 23 rows in rib = 10 x 10 cm (unstretched) Rib: * K 1, P 1 *, repeat * - *. Body: Cast on 160-170-180 sts on smaller short circular needles; join and place a marker at the join. Knit rib (if you wish to have a tighter rib at top of shorts, knit together with a strand of elastic for the first 3 cm). When the piece measures 22-25-28 cm divide sts on 3 st holders as follows: 32-35-37 sts on st holder-1 (= front right leg), put 15 sts on st holder-2 (= crotch front) and put 32-35-37 sts on st holder-3 (= left front leg) = 81-85-91 sts remain on needles (= back). Now continue with rib back and forth on needles over sts on back and put the outermost sts at each side onto st holder-1 and st holder-3 as follows: * Put the 5-4-4 outermost sts at the beginning of row (seen from the right side) onto st holder-1, knit rib to last 5-4-4 sts and put these onto st holder-3, turn and knit back over all sts *, repeat * - * a total of 5-6-7 times. On the next row (= right side) put the outermost 8-11-10 sts at the beginning of row onto st holder-1 and the 8-11-10 sts at end of row onto st holder-3 = 15 sts remain on needles, bind off in rib (there are now 65-70-75 sts on st holder-1 and st holder-3). Alternatively, put the 15 sts on a st holder and join with crotch (below) in Kitchener st. Crotch: Put the 15 sts from st holder-2 back on needles and knit rib back and forth until crotch measures 11-13-15 cm, bind off in rib. Sew crotch edge to edge to the 15 sts bound off on back. Or join with Kitchener st if you have put those sts on a st holder (see above). Right leg: Put the 65-70-75 sts on st holder-1 on a short circular needle, then pick up 21-26-29 sts along crotch edge = 86-96-104 sts. Join and knit rib until leg measures 4-4-5 cm (from picked up sts). Bind off loosely in rib. Left leg: Knit the same as the right. Ribbon: Wrap a ribbon 2 times around stomach for decoration and make a knot at the back. |
|
|
|
Have you finished this pattern?Tag your pictures with #dropspattern or submit them to the #dropsfan gallery. Do you need help with this pattern?You'll find 14 tutorial videos, a Comments/Questions area and more by visiting the pattern on garnstudio.com. © 1982-2025 DROPS Design A/S. We reserve all rights. This document, including all its sub-sections, has copyrights. Read more about what you can do with our patterns at the bottom of each pattern on our site. |
With over 40 years in knitting and crochet design, DROPS Design offers one of the most extensive collections of free patterns on the internet - translated to 17 languages. As of today we count 314 catalogs and 11851 patterns - 11841 of which are translated into English (US/in).
We work hard to bring you the best knitting and crochet have to offer, inspiration and advice as well as great quality yarns at incredible prices! Would you like to use our patterns for other than personal use? You can read what you are allowed to do in the Copyright text at the bottom of all our patterns. Happy crafting!
Post a comment to pattern DROPS 90-22
We would love to hear what you have to say about this pattern!
If you want to leave a question, please make sure you select the correct category in the form below, to speed up the answering process. Required fields are marked *.