
Popular categories
Looking for a yarn?


Comments / Questions (39)
![]() Mija wrote:
Mija wrote:
In the first round of the crochet edge, "Work with beige 1 dc in every htr and 2 dc in every transition between every square" does the transition mean the corner 2 chains in the final round of the squares, or where assembly work (3 chains) was done? If I follow the written instructions, I have to ignore the corner chain in each end of squares.
20.06.2023 - 18:49DROPS Design answered:
Dear Mija, the transition between 2 squares is where you crocheted both squares together (the 3 chains); and in each corner (where you worked 2 htr, 2 ch, 2 htr on last round on square, you will crochet 1 dc, 2 ch, 1 dc around these 2 chains. Happy crocheting!
21.06.2023 - 07:52
![]() Sofia Broborg wrote:
Sofia Broborg wrote:
Det står fel i slutet på varv 5, i svensk och norsk beskrivning Svenskt Varv 5 slutar med "1 km i 1.fm" Borde väl vara ”1 sm i 1:a fm i början på v”? NORSKA Varv 5: " Kjm til 1.lm-bue og hekle 1 lm, 3 fm om samme lm-bue, deretter hekles det 3 fm om hver lm-bue" - där saknas smygmaska i slutet av varvet helt och hållet. Har jämfört med varv 5 i engelsk (US) beskrivning - där görs en smygmaska (=slip stitch) i varvets första fm.
20.05.2023 - 19:44
![]() Anne Henehan wrote:
Anne Henehan wrote:
Hello Team Drops, Can you forward on a link for crocheting a throw/ blanket using Drops Sky. I love your patterns and colour combinations. Thank you, keep up the good work.
28.11.2021 - 11:07DROPS Design answered:
Dear Anne. you can find our blanket-patterns using DROPS Sky yarn HERE . Happy Stitching!
28.11.2021 - 23:14
![]() Monica wrote:
Monica wrote:
Hei. Skal man ikke ha to halvstaver helt til slutt/siste omgang? Er dette riktig? Et hjørne blir litt ulikt de andre
20.06.2021 - 13:27DROPS Design answered:
Hei Monica. Du starter med å hekle 1. hjørne, deretter er det forklart hvordan 1. langside og 2. hjørne hekles. Gjenta det som står mellom stjernene (langside + hjørne) omgangen rundt. Når det er gjentatt omgangen rundt, skal ikke siste del av forklaringen mellom stjernene hekles ettersom 1. hjørne allerede er heklet og nå skal det avsluttes med 1 kjedemaske i luftmasken i begynnelsen av omgangen. Se gjerne videoen på hvordan ruten er heklet. mvh DROPS design
21.06.2021 - 12:08
![]() Marta wrote:
Marta wrote:
I den svenska översättningen måste det stå fel förkortning I slutet av varv 5. 1km ska väl vara 1 sm (= smygmaska)?
13.12.2020 - 11:29
![]() Maria wrote:
Maria wrote:
Nel video tutorial alla fine del 7 giro non vengono lavorate le 2 mm a prima dell’ultimo arco. È corretto? Nella descrizione mi sembrava che andassero lavorate. Grazie se mi chiarite il dubbio.
19.09.2019 - 15:40DROPS Design answered:
Buongiorno Maria. Sono corrette le indicazioni nel testo. I quattro lati devono essere lavorati in modo uguale. Buon lavoro!
21.09.2019 - 11:32
![]() AnitaThon wrote:
AnitaThon wrote:
Hvordan hekkler jeg overgangen fra en rute til neste. Starter jeg igjen med 1 festmaske i begge buene, eller fortsetter jeg som første rute slutter??? i sikksakk frem og tilbake med 3 luftmasser imellom??
03.07.2019 - 18:36DROPS Design answered:
Hej Anita, du fortsætter i siksak som første rude. God fornøjelse!
05.07.2019 - 13:56
![]() Anita Thon wrote:
Anita Thon wrote:
Jeg klarer ikke sammenhekklingen av rutene i overgangen. Hvordan starter jeg 2. Rute, når jeg har hekklet sammen de første to: - med festmarkering som i begynnelsen, eller fortsette som den 1. ruten slutter?
03.07.2019 - 18:31
![]() SchmauKe wrote:
SchmauKe wrote:
Hallo. Sehr schöne Anleitung. Allerdings habe ich eine Frage zur 7. Runde. Dort steht mit einer Kettmasche in der 3. Luftmasche abschließen. Wenn ich es richtig verstanden habe, beginnt die 7. Runde allerdings nicht mit 3 Luftmaschen sondern mit 1 Luftmasche und einem halben Stäbchen und müsste man dann nicht mit einer Kettmasche im 1. halben Stäbchen enden? Vielleicht stehe ich aber auf dem Schlauch. Vielen Dank schon mal.
11.04.2019 - 17:00DROPS Design answered:
Liebe Frau Schmauke, am Ende der 7. Runde muss man tatsächlich mit 1 Kettmasche in die erste der 2 Luftmaschen in der Mitte der 1. Ecke, bzw wie im Video gezeigt, Anleitung wird korrigiert. Viel Spaß beim häkeln!
12.04.2019 - 10:33
![]() Clara wrote:
Clara wrote:
Salve, non mi è chiaro come assemblare i vari quadrati nel confezionare la coperta, con che criterio devo unirli???grazie mille
13.02.2019 - 20:16DROPS Design answered:
Buongiorno Clara, per confezionare la coperta deve guardare il disegno che illustra come posizionare i quadrati e iniziare ad unirli a strisce e poi in verticale. Li deve posizionare rovescio contro rovescio e lavorare come indicato nel paragrafo CONFEZIONE. Buon lavoro!
14.02.2019 - 06:42
|
||||||||||||||||||||||
Romantic Memories#romanticmemoriesblanket |
||||||||||||||||||||||
 |
 |
|||||||||||||||||||||
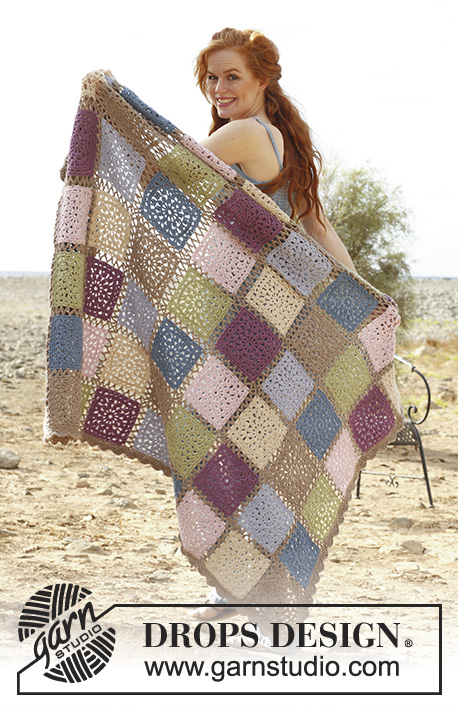
Crochet DROPS blanket with squares in ”Lima”.
DROPS 138-32 |
||||||||||||||||||||||
|
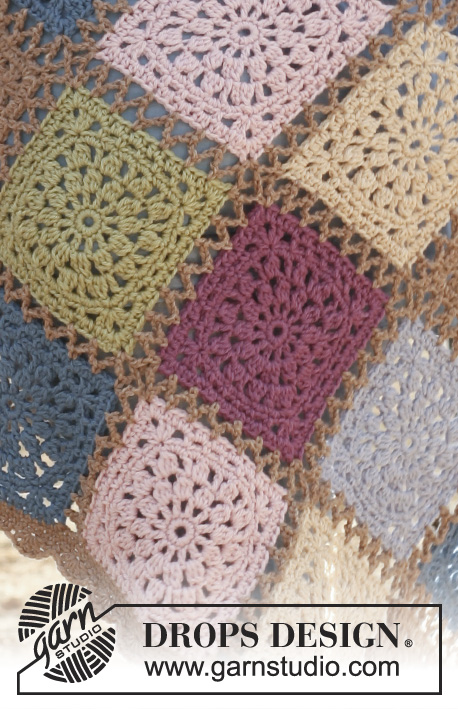
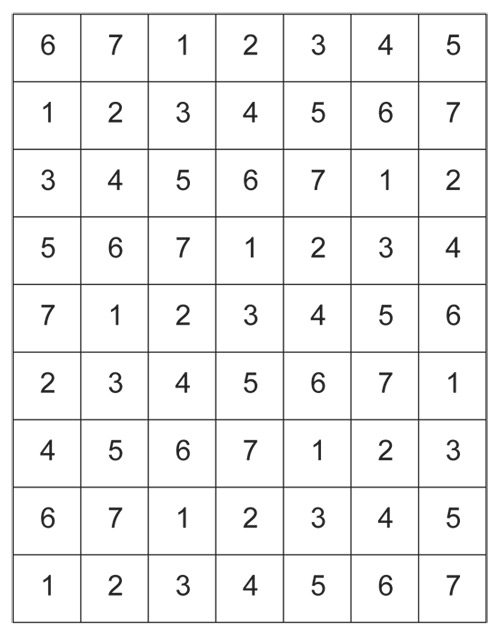
CROCHET INFO: Replace first dc with ch 3 and finish round with 1 sl st in 3rd ch from beg of round. BOBBLE START: Ch 3, work 1 dc – but wait with last pull through (= 2 sts on hook), work 1 dc the same way in the same st, pull yarn through all 3 sts on hook = 1st bobble on round. BOBBLE: Work 1 dc – but wait with last pull through (= 2 sts on hook), work 2 dc the same way in the same st, pull yarn through all 4 sts on hook. PATTERN: SQUARE 1 = beige SQUARE 2 = gray blue SQUARE 3 = pistachio SQUARE 4 = powder pink SQUARE 5 = heather SQUARE 6 = light beige SQUARE 7 = ice blue Place squares as shown on fig. 1 (squares are displaced 2 squares to the right on every row). ---------------------------------------------------------- BLANKET: Work 9 squares with every color = 63 squares in total. SQUARE: Worked in the round. Ch 6 on hook size 4.5 mm/US 7 with Lima and form a ring with 1 sl st in first ch. ROUND 1: ch 1, 12 sc in ch-ring, finish with 1 sl st in first sc. ROUND 2: ch 4 (= 1st dc + 1 ch), * 1 dc in next sc, ch 1 *, repeat from *-* the entire round - Read CROCHET INFO above, finish with 1 sl st in 3rd ch from beg of round = 12 dc and 12 ch-spaces. ROUND 3: Sl st until 1st ch-space and work BOBBLE START - Read explanation above, * ch 3, 1 BOBBLE - Read explanation above - in next ch-space *, repeat from *-* 11 times, finish with ch 3, 1 sl st at the top of 1st bobble from beg of round = 12 bobbles and 12 ch-spaces. ROUND 4: Sl st until 1st ch-space and work BOBBLE START, * ch 2, 1 dc in next BOBBLE, ch 2, 1 BOBBLE in next ch-space *, repeat from *-* 11 times, finish with ch 2, 1 dc in next bobble, ch 2, 1 sl st in 1st bobble from beg of round = 12 bobbles, 12 dc and 24 ch-spaces. ROUND 5: Sl st until 1st ch-space and ch 1, 3 sc in same ch-space, then work 3 sc in every ch-space, end with 1 sl st in first sc = 72 sc. ROUND 6: Work as follows in 1st sc: ch 3, 1 dc, ch 2, 2 dc = 1st corner, * work [ch 2, skip 2 sc, 1 sc in next sc] a total of 5 times, ch 2, skip 2 sc, in next sc work as follows: 2 dc, ch 2, 2 dc = next corner *, repeat from *-* the entire round. When repeating from *-* the last time, do not work 2 dc, ch 2 and 2 dc but work 1 sl st in 3rd ch from beg of round = 20 sc and 28 ch-spaces. ROUND 7: Sl st until 1st ch-space, work [ch 1, 1 hdc, ch 2, 2 hdc] in same ch-space (= 1st corner), * 1 hdc in the next 2 dc, work 2 hdc in each of the next 6 ch-spaces, 1 hdc in the next 2 dc, [2 hdc, ch 2, 2 hdc] in ch-space in next corner *. Repeat from *-* the entire round. When repeating from *-* the last time, do not work [2 dc, ch 2, 2 dc] but work 1 sl st in the first of the ch sts in the middle of first corner at beg of round, fasten off. Work 9 squares with every color = 63 squares in total. ASSEMBLY: Work squares tog alongside and then across. Place the squares with 7 squares in width and 9 rows in height - see fig. 1 and read PATTERN above. Place 2 and 2 squares on top of each other WS against WS, and crochet them tog with beige as follows: Work 1 sc in ch-space in the corner on 1st square, ch 3, 1 sc in ch-space in the corner on 2nd square, * ch 3, skip 2 hdc on 1st square, 1 sc in next hdc on 1st square, ch 3, skip 2 hdc on 2nd square, 1 sc in next hdc on 2nd square *, repeat from *-*, finish with ch 3, 1 sc in ch-space in the corner on 1st square, ch 3, 1 sc in ch-space in the corner on 2nd square. NOTE: Make sure that the transitions between every square are pretty when the squares are worked tog alongside. CROCHET EDGE: Work an edge around the entire blanket as follows: Work with beige 1 sc in every hdc and 2 sc in every transition between every square. NOTE: In ch-space in each corner work as follows: 1 sc, ch 2, 1 sc. On next round work 1 sc in every sc, in every ch-space in the corner work 1 sc, 2 ch and 1 sc. Work 1 more round the same way = 3 rounds with sc. Work next round as follows: 1 sc in 1st sc, * skip 2 sc, in next sc work 5 dc with 1 ch between each dc, skip 2 sc, 1 sc in next sc *, repeat from *-* the entire round, fasten off. |
||||||||||||||||||||||
Diagram explanations |
||||||||||||||||||||||
|
||||||||||||||||||||||
 |
||||||||||||||||||||||
Have you finished this pattern?Tag your pictures with #dropspattern #romanticmemoriesblanket or submit them to the #dropsfan gallery. Do you need help with this pattern?You'll find 9 tutorial videos, a Comments/Questions area and more by visiting the pattern on garnstudio.com. © 1982-2026 DROPS Design A/S. We reserve all rights. This document, including all its sub-sections, has copyrights. Read more about what you can do with our patterns at the bottom of each pattern on our site. |
||||||||||||||||||||||


With over 40 years in knitting and crochet design, DROPS Design offers one of the most extensive collections of free patterns on the internet - translated to 17 languages. As of today we count 325 catalogs and 12298 patterns - 12288 of which are translated into English (US/in).
We work hard to bring you the best knitting and crochet have to offer, inspiration and advice as well as great quality yarns at incredible prices! Would you like to use our patterns for other than personal use? You can read what you are allowed to do in the Copyright text at the bottom of all our patterns. Happy crafting!
Post a comment to pattern DROPS 138-32
We would love to hear what you have to say about this pattern!
If you want to leave a question, please make sure you select the correct category in the form below, to speed up the answering process. Required fields are marked *.