
Popular categories
Looking for a yarn?


Comments / Questions (58)
![]() Jenny MacLeod wrote:
Jenny MacLeod wrote:
I am not understanding the Back Piece .
29.12.2024 - 08:47DROPS Design answered:
Dear Jenny, in the BACK PIECE section you simply adjust the neckline depth. So work 4cm in garter stitch over the back piece stitches, while the other stitches are in threads or stitch holders. Then cut the thread and move all stitches back to the needles. Happy knitting!
30.12.2024 - 01:58
![]() Josianne Santoro wrote:
Josianne Santoro wrote:
Salve, sto realizzando il modello Orion e ho un problema con le maniche. La spiegazione del modello dice di lavorarle a ferri accorciati ma non indica, almeno io non lo vedo, ogni quante maglie tornare indietro. Mi potete fornire un chiarimento ? Grazie
18.03.2016 - 21:26DROPS Design answered:
Buonasera Josianne, deve seguire le indicazioni riportate per lavorare i ferri accorciati sulle maniche, a partire dal centro sotto la manica: ad esempio per la taglia S deve lavorare finchè non rimangono 20 m, girare il lavoro, lavorare finché non rimangono 20 m, girare il lavoro, lavorare le m rimaste sul ferro, lavorare 3 ferri su tutte le m *, ripetere da *-* finché la manica non misura 10 cm dal segnapunti. Buon lavoro!
18.03.2016 - 21:36
![]() Klazien Modderman-Bijlsma wrote:
Klazien Modderman-Bijlsma wrote:
Nog even ter verificatie: het patroon spreekt van twee steekverhoudingen, voor naald 3,5 en voor naald 5. In het patroon wordt uitsluitend melding gemaakt van naald 3,5. In een van de antwoorden op de gestelde vragen wordt aangegeven dat het patroon tot aan het lijf in naald 3,5 wordt gebreid, het lijf in naald 5 en de mouwen in naald 3,5. Is dit correct of wordt het gehele patroon gewoon in naald 3,5 gebreid?
12.11.2015 - 21:19DROPS Design answered:
Hoi Klazien. Je wisselt in het lijf naar breinaald 5 mm, lees: Ga als er 5 cm in ribbelst zijn gebreid (eindig na 1 nld aan de verkeerde kant) verder met rondbreinld 5 mm., dus beide naalden worden gebruikt.
13.11.2015 - 15:34
![]() Gerda Meijer wrote:
Gerda Meijer wrote:
Met welke confectiematen corresponderen XL, XXL en XXXL?
22.04.2015 - 16:32DROPS Design answered:
Hoi Gerda. Ongeveer 42-44-46, maar om zeker te zijn van je keus, kijk op de maattekening onderaan. Hier staan alle afmetingen in cm per maat. Vergelijk deze met je eigen afmetingen om je maat te kiezen.
23.04.2015 - 13:46
![]() Margot wrote:
Margot wrote:
Herfra måles arb...rad 2! Där skifter man.
09.04.2015 - 18:54
![]() Susanne Lie wrote:
Susanne Lie wrote:
Hei...skal hele jakken strikkes med pinne 3,5?? Hvor skifter man eventuelt ?? Mvh Susanne
09.04.2015 - 10:51DROPS Design answered:
Hei Susanne. Jo men på ryg og forstk skifter man til pinde 5 og tager ind og fortsætter i glatstrik således: "Når der er strikket 5 cm med retstrik (afpas efter 1 p fra vrangen) skiftes der til rundp 5. Strik 1 p ret fra retsiden samtidig med at der tages 48-52-58-64-68-76 m ind ..."
22.04.2015 - 16:00
![]() Marjolein wrote:
Marjolein wrote:
In het begin van het patroon staat de steek verhouding voor de pennen 3,5mm en voor 6mm. Maar verder in het patroon gaat het alleen nog maar over 3,5 mm maar ik wil het graag breien op 6mm? Waar kan ik dan het patroon vinden?
03.06.2014 - 12:46DROPS Design answered:
Hoi Marjolein. Je gebruikt beide naalden voor dit patroon. Je breit de panden tot aan het LIJF met breinaald 3,5 mm. Voor het lijf wissel je van breinaald en breit de lijf af met breinaald 5. De mouwen worden met breinaald 3,5 mm gebreid.
03.06.2014 - 13:43
![]() Claudia wrote:
Claudia wrote:
Mich irritiert einfach das Foto weil dort nur das Muster der 10 Blendmaschen sich ändert und der Rest so aussieht als ob er gleich bleibt. Also müsste ich doch die Blendmaschen glatt rechts stricken und den Rest weiter wie vorher auch in Krausrippe.
08.04.2014 - 16:57DROPS Design answered:
Liebe Claudia, das Muster ist auf dem Foto nicht gut zu erkennen. Sie stricken den oberen Teil komplett kraus rechts, also auch die Blenden-M. Wenn Sie beim Abschnitt "Vorder- und Rückenteil" angekommen sind und dort dann bis zu der Stelle kraus re gestrickt haben, an der Sie zu Nadel 5 wechseln, stricken Sie glatt re weiter und nur die Blenden-M kraus rechts.
08.04.2014 - 22:35
![]() Claudia wrote:
Claudia wrote:
Hallo, ich bin gerade beim Vor- und Rückenteil und verstehe nicht wie nach dem Wechsel auf Nadelstärke 5 weitergestrickt wird. Muss ich wirklich die Blendmaschen krausrippe stricken (hin und zurück rechts) und den Rest glatt rechts? Auf dem Bild sieht das Muster im Vergleich zu weiter oben nur bei den Blendmaschen anders aus und der rest sieht gleich aus. Wenn ich die Blendmaschen aber weiter Krausrippe stricke bleibt das Musster doch gleich oder?
07.04.2014 - 12:57DROPS Design answered:
Liebe Claudia, ich bin nicht ganz sicher, wonach Sie fragen: Sie stricken glatt rechts mit je 10 M. Krausrippe (=kraus rechts) auf beiden Seiten.
08.04.2014 - 11:07
![]() Judy wrote:
Judy wrote:
What needle size isused for sleeves. I assume it is the smaller needle to match the neck area but the pattern doesn't say.
05.05.2013 - 12:41DROPS Design answered:
Dear Judy, sleeves are worked with smaller needles, pattern has been edited. Happy knitting!
07.05.2013 - 08:08
|
|
Orion#orioncardigan |
|
 |
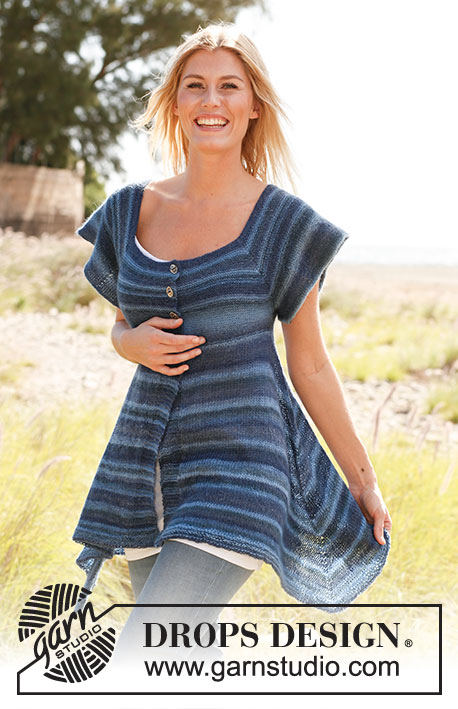 |
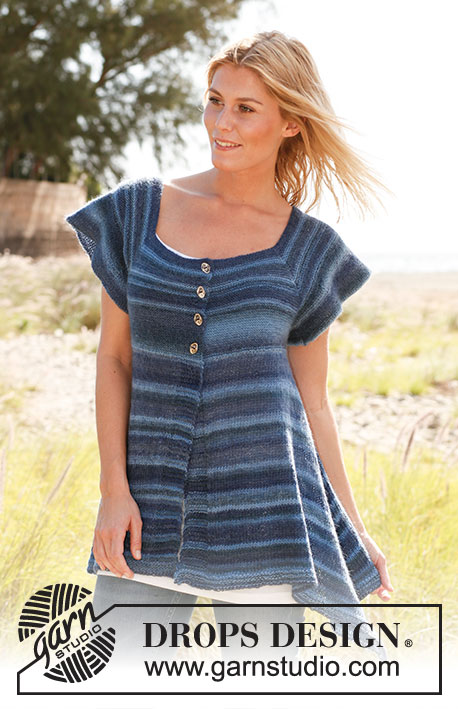
Knitted DROPS jacket with short sleeves, worked top down in ”Delight”. Size S-XXXL
DROPS 136-16 |
|
|
TIP FOR SWITCHING THREADS: To make the color transitions in Delight pretty when switching ball, it is important to find a ball that starts with the same color last ball ended with. GARTER ST (back and forth on needle): K all rows. 1 ridge = 2 rows K. BUTTON HOLES: Bind off for 4 button holes on right band on yoke – bind off at beg of row from WS. 1 button hole = bind off fourth st from mid front and cast on 1 new st on next row over this st. Bind off for button holes when piece measures: SIZE S and M: 2, 8 and 14 cm / ¾", 3⅛" and 5½" SIZE L and XL: 2, 6½, 11 and 16 cm / ¾", 2½", 4¾" and 6¼". SIZE XXL and XXXL: 2, 7, 12 and 17 cm / ¾", 2¾", 4¾" and 6¾". --------------------------------------------------------- JACKET: Worked top down. Worked back and forth on a circular needle from mid front to make room for all the sts. Remember BUTTON HOLES on right band - see explanation above. READ TIP FOR SWITCHING THREADS! Cast on 138-152-158-166-170-184 sts (includes 5 band sts in each side towards mid front) on circular needle size 3.5 mm / US 4 with Delight (cast on evenly and not too loose, this is the neck edge). K 1 row from WS. Insert 4 markers in the piece as follows (from RS): 1st marker in the 21st-22nd-23rd-23rd-24th-26th st, 2nd marker in the 54th-60th-62nd-66th-67th-72nd st, 3rd marker in the 85th-93rd-97th-101st-104th-113th st and 4th marker in the 118th-131st-136th-144th-147th-159th st, 20-21-22-22-23-25 sts remain after last marker (sts up to 1st marker = left front piece, sts between 1st and 2nd marker and sts between 3rd and 4th marker = sleeves, sts between 2nd and 3rd marker = back piece and sts after 4th marker = right front piece). READ ALL OF THE FOLLOWING SECTION BEFORE CONTINUING! Continue in GARTER ST - see explanation above – at the same time on 1st row, inc 1 st on each side of the 4 sts with markers – inc by making 1 YO (= 8 inc). On next row K YOs twisted to avoid holes (i.e. work in back loop of st instead of front). REMEMBER THE GAUGE! Repeat inc every other row a total of 23-25-28-30-32-35 times = 322-352-382-406-426-464 sts. Remember the button holes! K 1 row from WS after last inc, cut the yarn. Slip the first 44-47-51-53-56-61 sts (incl 1st marker) on stitch holder 1 (= left front piece), slip the next 78-87-94-102-106-115 sts on stitch holder 2 (= sleeve), keep the next 78-84-92-96-102-112 sts (incl 2nd and 3rd marker) on needle for back piece, slip the next 78-87-94-102-106-115 sts on stitch holder 3 (= sleeve) and slip the last 44-47-51-53-56-61 sts (incl 4th marker) on stitch holder 4 (= right front piece). BACK PIECE: = 78-84-92-96-102-112 sts. To avoid a deep neck line at the back, work 4 cm / 1½" in garter st back and forth down the back piece sts (finish after 1 row from WS), cut the thread. BODY: Work sts from stitch holder 1 (= 44-47-51-53-56-61 sts) on to needle, cast on 2-4-6-8-10-12 new sts under sleeve, then work over back piece sts (= 78-84-92-96-102-112 sts), cast on 2-4-6-8-10-12 new sts under sleeve and work sts from stitch holder 4 on to needle (= 44-47-51-53-56-61 sts). There are now 170-186-206-218-234-258 sts on needle. NOW MEASURE PIECE FROM HERE! Continue in garter st back and forth – at the same time on 1st row inc 24-26-28-36-42-46 sts evenly (do not inc over 10 sts in each side towards mid front) = 194-212-234-254-276-304 sts. When 5 cm / 2" in garter st have been worked (finish after 1 row from WS), switch to circular needle size 5 mm / US 8. K 1 row from RS while at the same time dec 48-52-58-64-68-76 sts evenly (do not dec over 10 sts in each side towards mid front) = 146-160-176-190-208-228 sts. Insert a marker in the 40th-43rd-47th-51st-55th-60th st in from each side. Continue in stockinette st with 10 sts in garter st towards mid front – AT THE SAME TIME on 1st row from RS - inc 1 st on each side of the 2 markers (inc by making 1 YO, on next row P YOs twisted to avoid holes). Repeat inc on every row from RS until section in stockinette st measures 40 cm / 15¾" (mid back). Now work 8 rows in garter st over all sts while at the same time continuing inc in the sides. LOOSELY bind off. LEFT SLEEVE: Work back and forth on circular needle size 3.5 mm/US 4 from mid under sleeve – insert a marker in the middle of the 2-4-6-8-10-12 sts that were cast on mid under sleeve on body. Start from the marker and pick up 1 st in each of the 1-2-3-4-5-6 sts that were cast on under sleeve towards front piece, work the 78-87-94-102-106-115 sts from stitch holder 2 on to needle, pick up 9 sts along the 4 cm / 1½" in garter st worked extra on back piece and pick up 1 st in each of the 1-2-3-4-5-6 sts cast on under sleeve towards back piece, i.e. up to marker = a total of 89-100-109-119-125-136 sts. Insert a marker mid on top of sleeve – NOW MEASURE PIECE FROM HERE! Work in garter st with short rows back and forth from marker mid under sleeve as follows: * Work until 20-21-22-23-24-25 sts remain, turn piece, work until 20-21-22-23-24-25 sts remain, turn piece, work the rest of row, work 3 rows over all sts *, repeat from *-* until piece measures 10-10-12-12-14-14 cm / 4"-4"-4¾"-4¾"-5½"-5½" in the middle of sleeve from marker. Bind off all sts. RIGHT SLEEVE: With circular needle size 3.5 mm/US 4 start by picking up 1 st in each of the 1-2-3-4-5-6 sts cast on under sleeve towards back piece, then pick up 9 sts along the 4 cm / 1½" in garter st worked extra on back piece, work the 78-87-94-102-106-115 sts from stitch holder 3 on to needle and pick up 1 st in each of the 1-2-3-4-5-6 sts cast on under sleeve towards front piece. Then finish as left sleeve. ASSEMBLY: Sew sleeve seam in outer loops of edge sts. Sew on buttons. |
|
 |
|
Have you finished this pattern?Tag your pictures with #dropspattern #orioncardigan or submit them to the #dropsfan gallery. Do you need help with this pattern?You'll find 11 tutorial videos, a Comments/Questions area and more by visiting the pattern on garnstudio.com. © 1982-2026 DROPS Design A/S. We reserve all rights. This document, including all its sub-sections, has copyrights. Read more about what you can do with our patterns at the bottom of each pattern on our site. |
|


With over 40 years in knitting and crochet design, DROPS Design offers one of the most extensive collections of free patterns on the internet - translated to 17 languages. As of today we count 325 catalogs and 12298 patterns - 12288 of which are translated into English (US/in).
We work hard to bring you the best knitting and crochet have to offer, inspiration and advice as well as great quality yarns at incredible prices! Would you like to use our patterns for other than personal use? You can read what you are allowed to do in the Copyright text at the bottom of all our patterns. Happy crafting!
Post a comment to pattern DROPS 136-16
We would love to hear what you have to say about this pattern!
If you want to leave a question, please make sure you select the correct category in the form below, to speed up the answering process. Required fields are marked *.