
Popular categories
Looking for a yarn?


Comments / Questions (90)
![]() Marja wrote:
Marja wrote:
Graag wil ik weten hoe vaak je een verkorte toer moet doen.
22.01.2026 - 19:47DROPS Design answered:
Dag Marja,
Je breit om en om een verkorte toer en een hele toer over de ribbelsteken. Dus wat tussen de sterretjes staat onder de uitleg bij 'VERKORTE TOEREN' herhaal je steeds.
25.01.2026 - 20:20
![]() Carola wrote:
Carola wrote:
Garnet Alpaca som rekommenderas för denna pläd har stickfastighet 24x32 för att få 10 x 10 cm men i mönstret står att man ska använda stickor så man får 24 x 48. När jag byter stickor för att få fler varv förändras ju även antalet maskor för 10 cm så jag blir lite fundersam. Hur ska jag tänka? Jag har provstickat och får inte fram det tydliga mönster så som det ser ut på bilden, ska det ev. vara ett tjockare garn?
12.01.2026 - 16:29DROPS Design answered:
Hej Carola, det er forskellig strikkefasthed i højden alt efter om du strikker rätstickat (ret på hver pind) eller slätstickat :)
26.01.2026 - 15:03
![]() Regine Birk wrote:
Regine Birk wrote:
Hallo, ich möchte die Decke aus Drops Merino Extra Fine stricken. Ist das möglich oder ist das Brombeermuster eher für dünnere Garne geeignet? Vielen Dank im Voraus!
24.01.2025 - 14:45
![]() Nina wrote:
Nina wrote:
Hi, ich fand die Decke sehr schön und hab mir auch das Orginalgarn besorgt, welches ebenfalls sehr schön ist. Ich habe einige Reihen des mittleren Musters gestrickt, aber dann die Decke wieder aufgetrennt und stricke jetzt ein ganz anderes Muster. Ich fand es überhaupt nicht schön. Es entstehen grosse Löcher trotz sehr dünner Nadeln und die Decke ich überhaupt nicht kuschelig. schade. Mit den anderen Anleitungen und dem Ergebnis war ich immer sehr zufrieden.
20.12.2024 - 13:43
![]() Kaya wrote:
Kaya wrote:
Hi, also ich habe das Muster begonnen und es glaube ich aber nicht richtig verstanden. Aktuell bin ich an dem Punkt, dass ich die 16 Maschen zugenommen habe und jetzt bei 160 Maschen bin. Als nächstes würde ich 24 M re stricken und dann mit der untersten Zeile von M1 beginnen und dann wieder 24M re stricken. Dann kommt die zweite Zeile wo ich wieder 24M re stricke und dann die 112 inneren M re stricke - ist das so richtig oder ist die zweite Zeile schon eine verkürzte Reihe ?
28.09.2024 - 18:07DROPS Design answered:
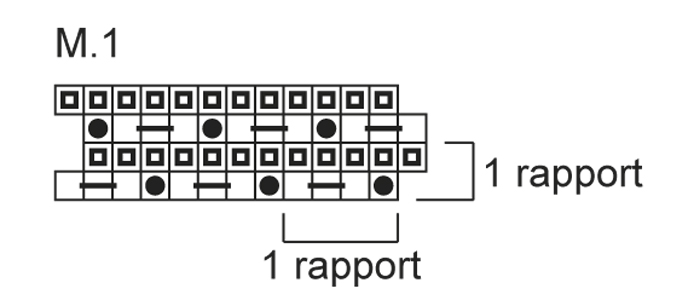
Liebe Kaya, bei der 1. Hin-Reihe nach den Zunahmen stricken Sie das Muster M.1 zwischen die 24 Maschen kraus rechts; dh: 24 M kraus rechts, die 4 Maschen für je 1 Rapport M.1 wiederholen (28 Mal) und mit 24 M kraus rechts enden. Bei den Rückreihen stricken Sie 24 M Krausrechts, die 4 M für je 1 Rapport (von links nach rechts) wiederholen und mit 24 M Krausrechts enden. Viel Spaß beim Stricken!
30.09.2024 - 08:05
![]() Julie Sheehy wrote:
Julie Sheehy wrote:
The video of a blackberry stitch is purl 3 together but this is not what this pattern states. Is there a tutorial for this? And also all the blackberry videos I've seen call for purling the non pattern row but this is calling for knitting is that correct? Thank you Julie
07.05.2023 - 19:22DROPS Design answered:
Dear Julie, the blackberry stitch can be worked in different ways, but the basis is the same: you make 3 stitches in one and then work the next 3 stitches together. The video shows one method and the chart another one. The one in the chart should look slightly fluffier than the one in the video. And yes, you knit all stitches on the WS, since you work the 2nd and 4th rows without the pattern, instead of the 1st and 3rd rows as in the video. Happy knitting!
07.05.2023 - 19:40
![]() Julie Sheehy wrote:
Julie Sheehy wrote:
I am confused on the short rows so for the row you are knitting the K1,P1,K1 in same stitch are you only doing the short row on one side then when you turn to knit back you are doing a short row on that side. Is there a way to get the pattern written out. Is the diagram from the top down or bottom up? thank you, Julie
07.05.2023 - 18:55DROPS Design answered:
Dear Julie, the short rows are only worked over the stitches in garter stitch and not the stitches in chart M.1, so they shouldn't interfere with each other. You work over the sts in garter stitch, then you turn and work back over these stitches and then you work one normal row. On the other side, work only over the stitches in garter stitch in that side, turn and work back and turn and work a normal row. Charts are read from the bottom up; you can see more information about charts here: https://www.garnstudio.com/lesson.php?id=68&cid=19
07.05.2023 - 19:44
![]() Agnes wrote:
Agnes wrote:
Sziasztok, A következőképp készítettem el ezt a takarót, hátha segítség valakinek: Drops Big Merino fonal 5 mm-es körkötőtűvel kötve. 144 szemmel kezdtem (20+104+20), szaporitás nélkül készítettem a mintát, minden második sorba került csak rövidített lustakötés sor. 650 g (13x50g) fonalból 74x94 cm-es takaró készült. Csodás minta! Köszönöm!
28.03.2023 - 18:05
![]() Karoliina wrote:
Karoliina wrote:
Tämä ohje tuottaa minulle niin paljon päänvaivaa. En ymmärrä mallipiirrosta. Ymmärtääkseni se on eri kuin karhunvatukkaneulos? Voinko silti tehdä vain karhunvatukkaneulosta? En saa mitään järkevää neulomalla kolme yhteen silmukkaan niin että 1n, langankierto nurjalta puolelta, 1n.
03.12.2022 - 21:20DROPS Design answered:
Hei, mallineuleen ensimmäinen kerros on oikean puolen kerros. Eli 1 nurja silmukka + 1 langankierto + 1 nurja silmukka tehdään työn oikealta puolelta. Nurjan puolen kerroksilla neulotaan oikeaa.
16.01.2023 - 18:06
![]() Cornelie wrote:
Cornelie wrote:
Stricke die Decke wie angegeben nach dem Diagramm. Habe zwischendurch das Videotutorial zu Brombeermuster angesehen - das ist nicht identisch. Macht wahrscheinlich nichts, irritiert nur. Könnte man das angleichen? Vielen Dank.
15.09.2022 - 22:40DROPS Design answered:
Liebe Cornelie, es sind nur kleine Unterschied zwischen Video und Anleitung, da es immer mehrere Technike gibt, Sie können entweder wie im Video or wie in der Anleitung zu- bzw abnehmen. Viel Spaß beim stricken!
16.09.2022 - 09:40
|
||||||||||
Bundle of Joy#bundleofjoyblanket |
||||||||||
|
|
||||||||||
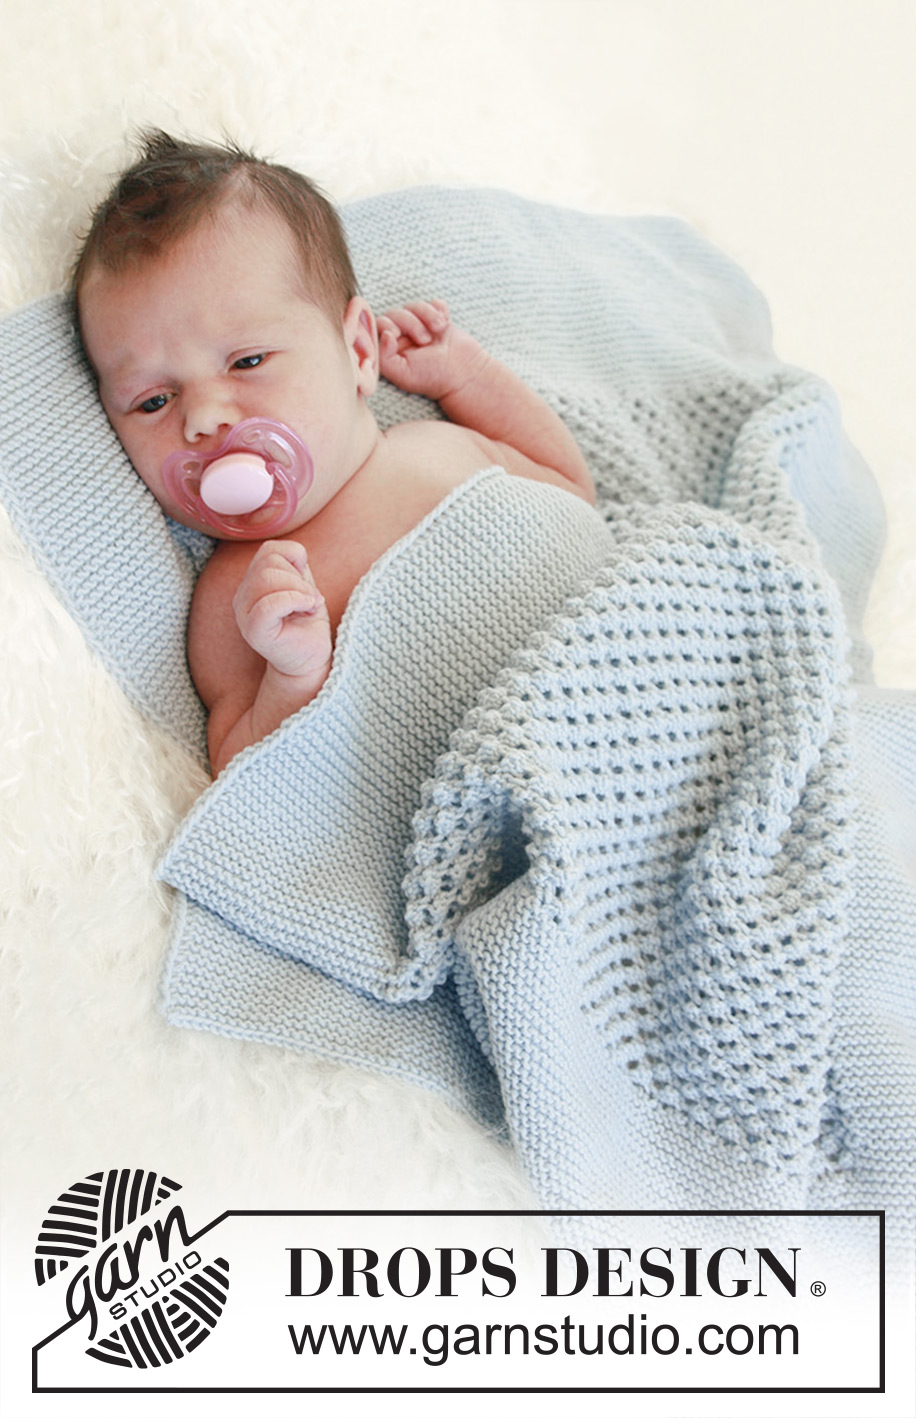
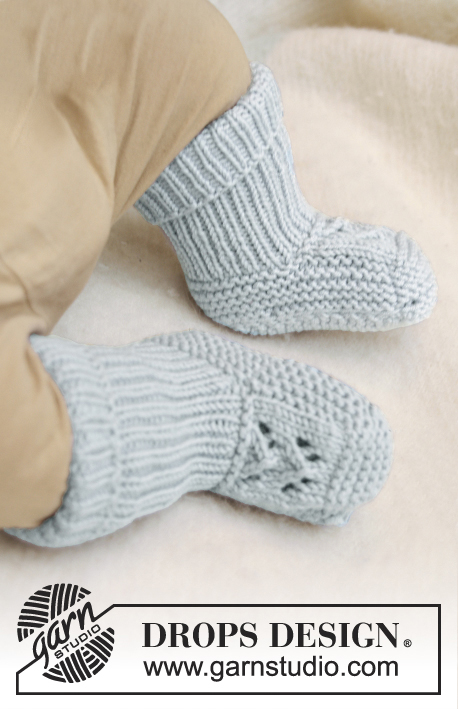
Knitted baby blanket with blackberry pattern in DROPS Alpaca
DROPS Baby 21-38 |
||||||||||
|
GARTER ST (back and forth on needle): K all rows. PATTERN: See diagram M.1. The diagram shows the pattern from RS. SHORT ROWS (applies to sts in garter st in the sides of blanket): To avoid the blanket from retracting in the sides because of sts in garter st, work extra rows in garter st in each side as follows: * K 1 row over the outermost 24 sts, turn piece, slip first st, tighten yarn and work back, work 1 row over all sts as explained in the pattern (K 24 sts, diagram M.1 over 112 sts, K 24 sts), turn piece *, repeat from *-*. -------------------------------------------------------- BLANKET: Worked back and forth on a circular needle to make room for all the sts. LOOSELY cast on 144 sts on needle size 3 mm / US 2or3 with Alpaca. Work in GARTER ST - see explanation above. When piece measures 12 cm / 4¾" – adjust so that next row is worked from WS – inc 16 sts evenly over the middle 96 sts (i.e. inc in every 6th st by working 2 sts into 1 st) = 160 sts. Continue to work as follows: 24 sts in garter st, diagram M.1 over the next 112 sts, 24 sts in garter st – AT THE SAME TIME work short rows over the outermost 24 sts in each side – SEE EXPLANATION ABOVE. Continue like this until piece measures approx. 68 cm / 26¾", now K 1 row from RS while AT THE SAME TIME dec 16 sts evenly over the middle 112 sts (i.e. work every 6th and 7th st tog) = 144 sts. Work in garter st over all sts (the short rows are now finished). LOOSELY bind off when section in garter st after Blackberry pattern measures 12 cm / 4¾", the entire blanket measures approx. 80 cm / 31½". |
||||||||||
Diagram explanations |
||||||||||
|
||||||||||
 |
||||||||||
Have you finished this pattern?Tag your pictures with #dropspattern #bundleofjoyblanket or submit them to the #dropsfan gallery. Do you need help with this pattern?You'll find 7 tutorial videos, a Comments/Questions area and more by visiting the pattern on garnstudio.com. © 1982-2026 DROPS Design A/S. We reserve all rights. This document, including all its sub-sections, has copyrights. Read more about what you can do with our patterns at the bottom of each pattern on our site. |
||||||||||


With over 40 years in knitting and crochet design, DROPS Design offers one of the most extensive collections of free patterns on the internet - translated to 17 languages. As of today we count 325 catalogs and 12298 patterns - 12288 of which are translated into English (US/in).
We work hard to bring you the best knitting and crochet have to offer, inspiration and advice as well as great quality yarns at incredible prices! Would you like to use our patterns for other than personal use? You can read what you are allowed to do in the Copyright text at the bottom of all our patterns. Happy crafting!
Post a comment to pattern DROPS Baby 21-38
We would love to hear what you have to say about this pattern!
If you want to leave a question, please make sure you select the correct category in the form below, to speed up the answering process. Required fields are marked *.