DROPS Fabel
DROPS Fabel
75% Wool, 25% Polyamide
from 3.00 $ /50g
Get the yarn to make this pattern from 18.00$.

The yarn cost is calculated from the pattern’s smallest size and the yarn’s cheapest product type. Looking for an even better price? You might find it on the DROPS Deals!

DROPS Super Sale

Eden

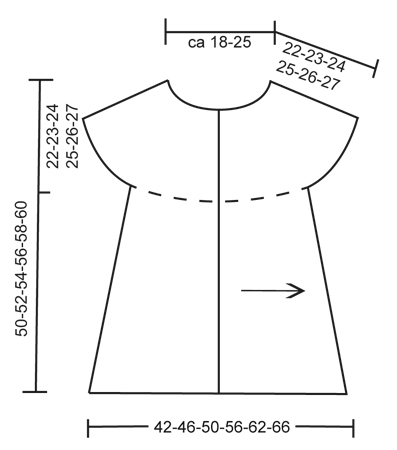
Knitted DROPS vest in garter st worked sideways with short rows in ”Fabel”. Size: S - XXXL.

DROPS 134-4
DROPS design: Pattern no FA-154
Yarn group A
--------------------------------------------------------
Size: S - M - L - XL - XXL - XXXL
Finished measurements:
Bust: 84-92-100-112-124-132 cm / 33"-36 1/4"-39½"-44"-48 3/4"-52"
Full length: 50-52-54-56-58-60 cm / 19 3/4''-20½''-21¼''-22''-22¾''-23 5/8''

Materials: DROPS FABEL from Garnstudio
Color no 604pl, ocean view: 200-250-250-300-300-350 g
Color no 300, brown: 50 g for all sizes for crochet borders

DROPS STRAIGHT NEEDLES size 3.5 mm / US 4 - or size needed to get 23 sts x 45 rows in garter st = 10 x 10 cm / 4'' x 4''.

DROPS CROCHET HOOK size 4 mm / G/6

DROPS ANGULAR BUFFELHORN BUTTONS NO 538: 5 pieces

-------------------------------------------------------

Alternative Yarn – See how to change yarns here
Yarn Groups A to F – Use the same pattern and change the yarn here
Yarn usage using an alternative yarn – Use our yarn converter here

-------------------------------------------------------

DROPS Fabel
DROPS Fabel
75% Wool, 25% Polyamide
from 3.00 $ /50g
Get the yarn to make this pattern from 18.00$.

The yarn cost is calculated from the pattern’s smallest size and the yarn’s cheapest product type. Looking for an even better price? You might find it on the DROPS Deals!

DROPS Super Sale

SAVE 30% on 6 cotton favorites!
Valid until 04.12.2024

Pattern instructions

NOTE: This pattern is written in American English. All measurements in charts are in cm. For conversion from inches to cm - click here. There are different terms for crocheting in American and British English. If this pattern includes crochet, click for "crochet terms" here. For this pattern in British English, please click here.
KNITTING TIP:
Every time piece is turned in the middle of piece, slip first st as if to K, tighten yarn and knit back. This is done to avoid holes when working short rows.

SHORT ROWS:
Work short rows in the middle of the piece to give the garment a slight A shape. Beg from bottom edge and work up to neck like this:
* Work all sts, turn and work back.
Work 103-108-112-115-119-122 sts, turn and work back. READ KNITTING TIP!
Work 89-94-97-99-103-105 sts, turn and work back.
Work 71-75-77-79-81-83 sts, turn and work back *.
Repeat from *-*, i.e. 1 repetition = 2 rows at the top and 8 rows at the bottom.

MEASURING TIP:
Measure when piece is flat, it is important not to stretch the piece when measuring.
--------------------------------------------------------

VEST:
Worked across back and forth on needle. Beg mid front on left front piece and finish mid front on right front piece.
NOTE: The picture of the vest has been reversed.

LEFT FRONT PIECE:
The whole piece is worked in garter st, i.e. K all rows.
Loosely cast on 115-120-125-129-134-138 sts on needle size 3.5 mm / US 4 with ocean view Fabel. 1st row is worked from RS (= from bottom edge and up to neck). Work 3 cm / 1 1/8'' over all sts (= band), finish after 1 row from WS. REMEMBER THE GAUGE! Continue with SHORT ROWS - see explanation above!
Continue like this until piece measures approx. 23-25-27-30-33-35 cm / 9"-9 3/4"-10 5/8"-11 3/4"-13"-13 3/4" from cast on edge (measured at the bottom on the widest) – READ MEASURING TIP!
Then work side piece as follows: Work 1 cm / 3/8'' back and forth over only the 64-67-70-72-74-76 sts from bottom edge. Insert 1 marker (= middle of the side). Work 1 cm / 3/8'' back and forth over the same sts, and slip them on 1 stitch holder (finish after 1 row from RS, sts are to be used on back piece later). Then work sleeve.

LEFT SLEEVE:
= 51-53-55-57-60-62 sts on needle. Work back and forth with short rows on the same places as before until piece measures approx. 30-31-32-33-34-35 cm / 11¾''-12¼''-12½''-13''-13 3/8''-13¾'' (at the bottom on the widest), finish after 1 row from WS.

BACK PIECE:
Work the 64-67-70-72-74-76 sts from stitch holder back on needle (from WS) = 115-120-125-129-134-138 sts. Continue with short rows as before. When piece measures approx. 21-23-25-28-31-33 cm from marker in the side (measured at the bottom on the widest), insert another marker (= mid back). Continue with short rows until piece measures approx. 20-22-24-27-30-32 cm / 8"-8 3/4"-9½"-10 5/8"11 3/4"-12½" from marker mid back (measured at the bottom on the widest). Now work side piece as follows: Work 1 cm / 3/8'' back and forth over only the 64-67-70-72-74-76 sts from bottom edge. Insert another new marker (= middle of the side). Work 1 cm / 3/8'' back and forth over the same sts (finish after 1 row from RS), then slip them on 1 stitch holder. Work right sleeve.

RIGHT SLEEVE:
Work as left sleeve.

RIGHT FRONT PIECE:
Work the 64-67-70-72-74-76 sts from stitch holder back on needle (from WS) = 115-120-125-129-134-138 sts.
Continue with short rows as on back piece. When same no of rows have been worked on right front piece as on left front piece (minus band = 3 cm / 1 1/8''), work band as follows: Work 1½ cm / ½" back and forth over all sts. On next row from RS, bind off for button holes as follows (= from bottom edge): Work 12 sts for all sizes, bind off the next 2 sts, * work 12-13-14-14-15-15 sts, bind off the next 2 sts *, repeat from *-* a total of 4 times, work the rest of row. On next row cast on 2 new sts over the bound off sts. Work over all sts until band measures a total of 3 cm / 1 1/8''. Loosely bind off.

ASSEMBLY:
Crochet with 2 strands brown on hook size 4 mm / G/6 as follows: Beg at the bottom of right front piece with 1 sc, * ch 2, skip approx. 1 cm / 3/8'' and fasten with 1 sc *, repeat from *-* up along right front piece, along the collar, back of neck and down along left front piece, cut the yarn and fasten.
Sew on buttons.

Diagram

All measurements in charts are in cm.

symbols = knitting direction
diagram
Do you have a question? See a list of frequently asked questions (FAQ)

Knitting tension is what determines the final measurements of your work, and is usually measured per 10 x 10 cm. It is provided like so: number of stitches in width x number of rows in height - eg: 19 stitches x 26 rows = 10 x 10 cm.

The knitting tension is very individual; some people knit/crochet loosely while others work tightly. You adjust the knitting tension with the needle size, which is why the suggested needle size only serve as a guide! You need to adjust this (up or down) to ensure that YOUR knitting tension matches the knitting tension provided in the pattern. If you work with a different knitting tension than provided you will have a different yarn consumption, and your work will have different measurements than what the pattern suggests.

The knitting tension also determines which yarns can replace each other. As long as you achieve the same knitting tension you can replace one yarn with another.

See DROPS lesson: How to measure your tension/gauge

See DROPS video: How to make a gauge tension swatch

The required amount of yarn is provided in grams, eg: 450 g. To calculate how many balls you’ll need you first need to know how many grams are in 1 ball (25g, 50g or 100g). This information is available if you click on the individual yarn quality on our pages. Divide the amount required with the amount of each ball. For example, if each ball is 50g (the most common amount), the calculation will be as follows: 450 / 50 = 9 balls.

The important thing when changing from one yarn to another is that the knitting/crochet tension remains the same. This is so that the measurements of the finished piece will be the same as on the sketch provided. It is easier to achieve the same knitting tension using yarns from the same yarn group. It is also possible to work with multiple strands of a thinner yarn to achieve the knitting tension of a thicker one. Please try our yarn converter. We recommend you to always work a test swatch.

Please NOTE: when changing yarn the garment might have a different look and feel to the garment in the photo, due to individual properties and qualities of each yarn.

See DROPS lesson: Can I use a different yarn than the one mentioned in the pattern?

All our yarns are categorised into yarn groups (from A to F) according to thickness and knitting tension – group A contains the thinnest yarns and group F the thickest. This makes it easier for you to find alternative yarns to our patterns, should you wish to switch yarn. All yarns within the same group have a similar knitting tension and can easily replace each other. However, different yarn qualities have different structures and properties which will give the finished work a unique look and feel.

Click here for an overview of the yarns in each yarn group

At the top of all our patterns you’ll find a link to our yarn converter, which is a helpful tool should you wish to use a different yarn than suggested. By filling in the yarn quality you wish to replace, the amount (in your size) and number of strands, the converter will present good alternative yarns with the same knitting tension. Additionally it will tell you how much you’ll require in the new qualities and whether you’ll need to work with multiple strands. Most skeins are 50g (some are 25g or 100g).

If the pattern is worked with multiple colours, every colour will have to be converted separately. Similarly, if the pattern is worked with several strands of different yarns (for example 1 strand Alpaca and 1 strand Kid-Silk) you will have to find alternatives for each, individually.

Click here to see our yarn converter

Since different yarns have different qualities and textures we have chosen to keep the original yarn in our patterns. However, you can easily find options among our available qualities by using our yarn converter, or simply pick a yarn from the same yarn group.

It is possible that some retailers still have discontinued yarns in stock, or that someone has a few skeins at home that they would like to find patterns for.

The yarn converter will provide both alternative yarn as well as required amount in the new quality.

If you think it's hard to decide what size to make, it can be a good idea to measure a garment you own already and like the size of. Then you can pick the size by comparing those measures with the ones available in the pattern's size chart.

You'll find the size chart at the bottom of the pattern.

See DROPS lesson: How to read size chart

The needle size provided in the pattern serves only as a guide, the important thing is to follow the knitting tension. And since knitting tension is very individual, you will have to adjust the needle size to ensure that YOUR tension is the same as in the pattern – maybe you’ll have to adjust 1, or even 2 needle sizes, up or down to achieve the correct tension. For this, we recommend that you work test swatches.

Should you work with a different knitting tension than the one provided, the measurements of the finished garment might deviate from the measurement sketch.

See DROPS lesson: How to measure your tension/gauge

See DROPS video: How to make a gauge tension swatch

Working a garment top-down provides more flexibility and room for personal adjustment. For example it is easier to try the garment on while working, as well as making adjustments to length of yoke and shoulder caps.

The instructions are carefully explaining every step, in the correct order. Diagrams are adjusted to the knitting direction and are worked as usual.

The diagram depicts all rows/rounds, and every stitch seen from the right side. It is read from bottom to top, from right to left. 1 square = 1 stitch.

When working back and forth, every other row is worked from the right side and every other row is worked from the wrong side. When working from the wrong side, the diagram will have to be worked reversed: from left to right, knit stitches are purled, purl stitches are knit etc.

When working in the round every round is worked from the right side and the diagram are worked from right to left on all rounds.

See DROPS lesson: How to read knitting diagrams

The diagram depicts all rows/rounds, and every stitch seen from the right side. It is worked from bottom to top, from right to left.

When working back and forth every other row is worked from the right side: from right to left and every other row is worked from the wrong side: from left to right.

When working in the round, every row in the diagram are worked from the right side, from right to left.

When working a circular diagram you start in the middle and work your way outwards, counter clockwise, row by row.

The rows usually start with a given number of chain stitches (equivalent to the height of the following stitch), this will either be depicted in the diagram or explained in the pattern.

See DROPS lesson: How to read crochet diagrams

Instructions for working several diagrams after each other on the same row/round, will often be written like so: “work A.1, A.2, A.3 a total of 0-0-2-3-4 times". This means you work A.1 once, then A.2 is worked once, and A.3 is repeated (in width) the number of times provided for your size – in this case like so: S = 0 times, M = 0 times, L=2 times, XL= 3 times and XXL = 4 times.

The diagrams are worked as usual: begin with the first row in A.1, then work the first row in A.2 etc.

See DROPS lesson: How to read knitting diagrams

See DROPS lesson: How to read crochet diagrams

The total width of the garment (from wrist-to-wrist) will be larger in the larger sizes, despite the actual sleeves being shorter. The larger sizes have longer sleeve caps and wider shoulders, so there will be a good fit in all sizes.

The measurement sketch/schematic drawing provides information regarding the full length of the garment. If it’s a jumper or a jacket the length is measured from the highest point on the shoulder (usually closest to the neckline), and straight down to the bottom of the garment. It is NOT measured from the tip of shoulder. Similarly, the length of yoke is measured from the highest point on the shoulder and down to where yoke is split into body and sleeves.

See DROPS lesson: How to read a schematic drawing

Diagrams are often repeated on the round or in height. 1 repeat is the diagram the way it appears in the pattern. If it says to work 5 repeats of A.1 in the round, then you work A.1 a total of 5 times after/next to each other in the round. If it says to work 2 repeats of A.1 vertically/in height you work the entire diagram once, then begin again at the start and work the entire diagram one more time.

Chain stitches are slightly narrower than other stitches and to avoid working the cast-on edge too tight, we simply chain more stitches to begin with. The stitch count will be adjusted on the following row to fit the pattern and measurement sketch.

The rib edge is more elastic and will contract slightly compared to, for example, stocking stitch. By increasing before the rib edge, you avoid a visible difference in width between the rib edge and the rest of the body.

It’s very easy to cast off too tightly, and by making yarn overs while casting off (and simultaneously casting these off) you avoid a too tight cast off edge.

See DROPS video: How to bind off with yarn overs (yo)

To achieve an even increase (or decrease) you can increase on, for example: every 3rd and 4th row alternately, like so: work 2 rows and increase on the 3rd row, work 3 rows and increase on the 4th. Repeat this until the increase is complete.

See DROPS lesson: Increase or decrease 1 st on every 3rd and 4th row alternately

Should you prefer to work in the round instead of back and forth, you may of course adjust the pattern. You’ll need to add steeks mid-front (usually 5 stitches), and follow the instructions. When you would normally turn and work from the wrong side, simply work across the steek and continue in the round. At the end you’ll cut the piece open, pick up stitches to work bands, and cover the cut edges.

See DROPS video: How to knit steeks and cut open

Should you prefer to work back and forth instead of in the round, you may of course adjust the pattern so you work the pieces separately and then assemble them at the end. Divide the stitches for the body in 2, add 1 edge stitch in each side (for sewing) and work the front and back pieces separately.

See DROPS lesson: Can I adapt a pattern for circular needles into straight needles?

Pattern repeats can vary slightly in the different sizes, in order to get the correct proportions. If you’re not working the exact same size as the garment in the photo, yours might deviate slightly. This has been carefully developed and adjusted so that the complete impression of the garment is the same in all sizes.

Make sure to follow instructions and diagrams for your size!

If you have found a pattern you like which is available in women’s size it’s not very difficult to convert it to men’s size. The biggest difference will be the length of sleeves and body. Start working on the women size that you think would fit across the chest. The additional length will be worked right before you cast off for the armhole/sleeve cap. If the pattern is worked top-down you can add the length right after the armhole or before the first decrease on sleeve.

Regarding additional yarn amount, this will depend on how much length you add, but it is better with a skein too many than too few.

All yarns will have excess fibres (from production) that might come off as lint or shedding. Brushed yarns (ie hairier yarns) have more of these loose, excess fibres, causing more shedding.

Shedding also depends on what is worn under or over the garment, and whether this pulls at the yarn fibres. It’s therefore not possible to guarantee that there will be no shedding

Below are some tips on how to get the best result when working with hairier yarns:

1. When the garment is finished (before you wash it) shake it vigorously so the looser hairs come off. NOTE: do NOT use a lint roller, brush or any method that pulls at the yarn.

2. Place the garment in a plastic bag and put it in your freezer - the temperature will cause the fibres to become less attached to each other, and excess fibres will come off easier.

3. Leave in the freezer for a few hours before taking it out and shaking it again.

4. Wash the garment according to the instructions on the yarn label.

Pilling is a natural process that happens to even the most exclusive of fibers. It's a natural sign of wear and tear that is hard to avoid, and that is most visible in high friction areas of your garment like a sweater's arms and cuffs.

You can make your garment look as new by removing the pilling, using a fabric comb or a pill/lint remover.

Still can't find the answer you need? Then scroll down and leave your question so one of our experts can try to help you. This will be done normally within 5 to 10 working days.
In the meantime, you can read the questions and answers that others have left to this pattern or join the DROPS Workshop on Facebook to get help from fellow knitters/crocheters!

Post a comment to pattern DROPS 134-4

We would love to hear what you have to say about this pattern!

If you want to leave a question, please make sure you select the correct category in the form below, to speed up the answering process. Required fields are marked *.

Comments / Questions (53)

country flag Birgit Ziller wrote:

Wieviele Maschen haben die verkürzten Reihen an den Ärmeln???

13.03.2024 - 23:06

country flag Marianne Svensson wrote:

Hej! Jag har börjat sticka på denna väst som ska stickas på tvären framifrån. Enligt mönstret nerifrån och upp mot halsen. Börjat att sticka vändningar. Jag får då en vändning 5 cm från midjan uppåt. Ska det vara så ? I mitt tänkande bör väl västens vändningar bli en bit ner från halskanten. och löpa över framstycke, ärm, bakstycke och ärm. Kan det vara så att jag stickar fel mellan* och * på vändningar. Tacksam för svar. Mvh Marianne Svensson

07.12.2023 - 14:45

DROPS Design answered:

Hei Marianne. I f.eks str. S legger man opp 115 masker og når man starter å strikke vendinger, starter man nederst og strikker opp mot halsen. Man strikker først 103 masker, så vender man. Så 1.vendig kommer ganske nær halsen. Snu og strikk ned til kanten igjen, snu og strikk 89 masker opp mot halsen, snu og strikk ned til kanten, snu og strikk 71 masker, snu og strikk ned til kanten igjen. Du har nå strikket 1 rapport. Strikk denne rappoten til arbeidet måler 23 cm, mål nederst. mvh DROPS Design

11.12.2023 - 08:17

country flag Anne Emery wrote:

J'ai fini de tricoter la manche gauche et je ne comprends pas très bien comment reprendre les mailles mises en attentes. Cela fait un espèce de trou au niveau du dessous du bras ?

04.09.2022 - 19:22

DROPS Design answered:

Bonjour Mme Emery, au dernier rang rang de la manche gauche, vous avez tricoté toutes les mailles sur l'envers, tricotez maintenant les mailles du dos mises en attente (sur l'envers également, vous avez maintenant joint les 2 pièces et pouvez maintenant tricoter le dos. L'ouverture de la manche en haut correspond au passage du bras et sur le côté, vous avez tricoté 1 cm pour le côté (dessous du bras/de la manche). Bon tricot!

05.09.2022 - 09:28

country flag Gilardi Claudette wrote:

Je ne comprends pas l'explication des manches.que veut dire "avec les rangs raccourcis comme avant,aux mêmes endroits" Merci

31.01.2022 - 09:02

DROPS Design answered:

Bonjour Mme Gilardi, vous avez auparavant tricoté des rangs raccourcis sur toute la longueur, lorsque vous tricotez les manches, vous allez tourner aux mêmes endroit qu'avant (moins de fois car moins de marqueurs), et continuer ainsi les rangs raccourcis comme avant. Bon tricot!

31.01.2022 - 10:23

country flag Martens wrote:

Ik ben deze Eden vest aan het breien. Ik ben nu de libkermouw aan het breien. Deze moeten in verkorte toeren gebreid worden. De eerste en de tweede toer van de verkorte toeren moeten gewoon volledig heen en terug gebreid worden. Blijft dit ook gelden in de mouw? Want er zijn maar 2 verkorte toeren in de mouw ipv 3. Ik begrijp tevens niet hoe je 35 cm meet (aan de onderkant op het breedste deel) in de uitleg van de linkermouw. Kan u mij daarmee helpen, please?

09.01.2021 - 20:24

DROPS Design answered:

Dag Martens,

De lengte van de mouw meet je aan de onderkant van de mouw op het breedste deel. Als je verkorte toeren maakt op de mouw, keer je het werk op het zelfde punt als bij de panden, dus het aantal steken vanaf de hals tot het keerpunt voor de verkorte toeren moet hetzelfde zijn. Hoe de verkorte toeren herhaald worden is verder precies hetzelfde als op de panden.

10.01.2021 - 12:15

country flag Bobby Garland wrote:

OK, I think I get it. I need to do 1 more row on the LF (row 1 for me) in order to end at the top. Then, I need to attach a new yarn to stitch #64 on the WS and knit the side piece. Then I will end up with the last row on the RS. Then I will cut that yarn. Then I will go back to the top edge on the LF and pick up yarn and turn to the WS to start the sleeve on those 51 sts. It would have been nice if the instructions had been more specific, instead of saying "work approximately..."

08.01.2021 - 19:57

country flag Bobby Garland wrote:

I get what you are saying, but I am not asking about the sleeve, as I am not there yet. I need to know if I am to cut the yarn at the lower edge of the left front piece and reattach it to the WS at stitch #64 to start the first row of the side piece so as to end on the RS of the side piece as instructed. There is no other way to end up on the RS unless you start the side piece on the WS in the middle of the work.

08.01.2021 - 17:21

DROPS Design answered:

Dear Mrs Garland, after left front piece measures 23 cm, adjust so that next row will be worked from RS and now work this 1 cm starting from RS = from the bottom edge over the first 64 cm - adjust this 1 cm so that last row is worked from RS, then cut the yarn and join it to work sleeve (starting from RS) over the 51 sts left unworked on needle (starting from RS). Happy knitting!

11.01.2021 - 06:57

country flag Bobby Garland wrote:

OK, so you also cut the yarn at the end of the left front, which for me is at the lower edge, and reattach to stitch # 64 (for small size) in order to start the side piece on the WS, so as to finish last row of side piece on the RS?

08.01.2021 - 15:15

DROPS Design answered:

Dear Mrs Garland, the last row on left front piece is worked from RS, but when you turn and work sleeve, first row on sleve is worked from WS = this means you don't need to cut the yarn between left front piece and sleeve, then after sleeve, just work the 64 sts on side at the end of a WS row. - no need to cut the yarn neither between sleeve and back piece. Happy knitting!

08.01.2021 - 16:19

country flag Bobby Garland wrote:

Thank you for your response. Another question....I finished the left front and ended on row 8 of short row sequence, which means the next row would be a right side row. In order to finish the side piece on the RS as instructed and have the side pieces be the same number of rows and have a marker in the middle, I would have to start the side piece on the WS. Do I cut the yarn and start at stitch number 64 at the other end from the WS?

08.01.2021 - 14:08

DROPS Design answered:

Dear Mrs Garland, last row worked for side on front piece is worked from the right side, then cut the yarn and work sleeve. Last row worked on sleeve is from WS, after you have worked this last row on sleeve, work the stitches of the side at the end of this row = from WS, all stitches are now back on needle, turn and start short rows at the beg of next row from RS. Happy knitting!

08.01.2021 - 15:02

country flag Bobby Garland wrote:

For short rows, when moving from left front to sleeve to back to sleeve to right front, do you continue in the same numerical sequence from the previous section, or do you start again at row 1 or do you reverse the short row sequence, work rows 8-1? You start with row 1 at the left front border and end up with row 8 at the right front....the pieces would not be "mirrored." Even if you have the same number of rows, the short rows would not be in the same place. Does it matter?

04.01.2021 - 14:50

DROPS Design answered:

Dear Mrs Garland, after you have worked the sleeve, work the short rows on back piece starting from row 1 of short rows. Happy knitting!

05.01.2021 - 10:43