Rosevest

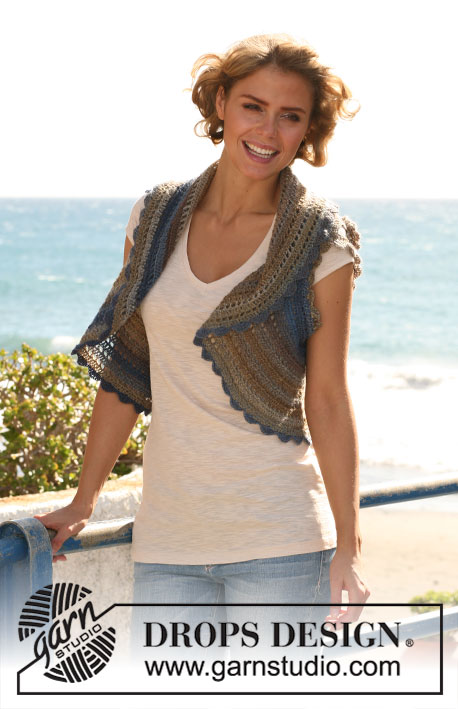
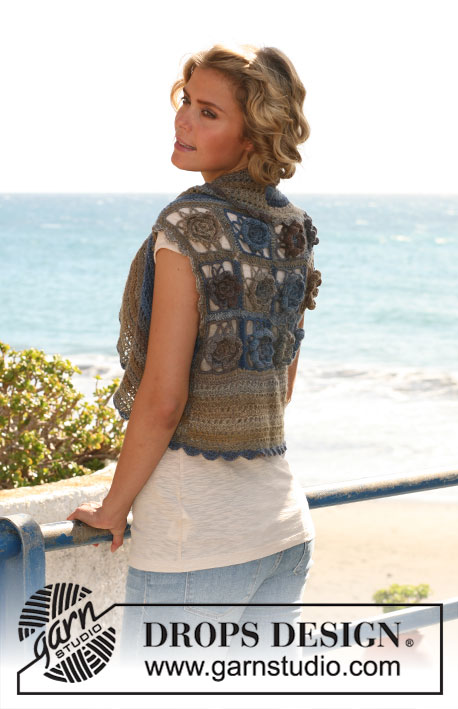
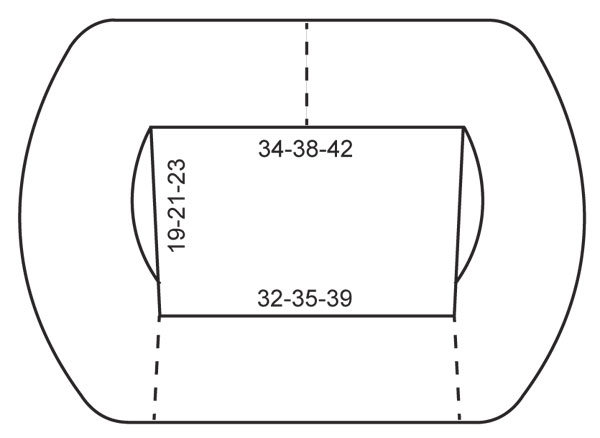
Crochet DROPS bolero with flower squares on the back in ”Delight”. Size: XS - XXL

DROPS 129-10
DROPS design: Pattern no DE-054
--------------------------------------------------------
Size: XS/S - M/L - XL/XXL

Materials: DROPS DELIGHT from Garnstudio
200-250-250 g color no 07, beige/blue mix

DROPS CROCHET HOOK size 3.5 mm/E/4 – or size needed to get 22 dc x 10 rows = 10 x 10 cm / 4'' x 4''.
1 square measures approx. 8 x 8 cm / 3 1/8''.

-------------------------------------------------------

Alternative Yarn – See how to change yarns here
Yarn Groups A to F – Use the same pattern and change the yarn here
Yarn usage using an alternative yarn – Use our yarn converter here

-------------------------------------------------------

Pattern instructions

NOTE: This pattern is written in American English. All measurements in charts are in cm. For conversion from inches to cm - click here. There are different terms for crocheting in American and British English. If this pattern includes crochet, click for "crochet terms" here. For this pattern in British English, please click here.
CROCHET INFO:
Replace first dc on every row/round with ch 3. Finish every round with 1 sl st in 3rd ch from beg of round.

INCREASE TIP: Inc 1 dc by working 2 dc in 1 dc.

CROCHET SQUARE WITH FLOWER:
Ch 4 on hook size 3.5 mm and form a ring with 1 sl st in first ch.
ROUND 1: * 1 sc in ch-ring, ch 3 *, repeat from *-* a total of 3 times and finish round with 1 sl st in first sc from beg of round = 3 ch spaces.
ROUND 2: Crochet as follows in every ch space: 1 sc, 3 dc and 1 sc, finish with 1 sl st in first sc = 3 leaves. Turn piece - work next round on the back of the flower.
ROUND 3: ch 1, 1 sc in 1st sc from 1st round, ch 4, 1 sc at the bottom of the 2nd dc on first leaf from 2nd round, ch 4, 1 sc in 2nd sc from 1st round, ch 4, 1 sc at the bottom of the 2nd dc on second leaf from 2nd round, ch 4, 1 sc in 3rd sc from 1st round, ch 4, 1 sc in the bottom of the 2nd dc on third leaf from 2nd round, ch 4, 1 sl st in first ch from beg of round = 6 ch spaces. Turn piece - work next round on the front of the flower.
ROUND 4: Crochet as follows in every ch space: 1 sc, 5 dc and 1 sc, finish round with 1 sl st in first sc from beg of round = 6 leaves. Turn piece - work next round on the back of the flower.
ROUND 5: ch 1, 1 sc in 1st sc from 3rd round, ch 5, 1 sc at the bottom of the 4th dc on first leaf from 4th round, ch 5, 1 sc at the bottom of the 3rd dc on second leaf from 4th round, ch 5, 1 sc at the bottom of the 2nd dc on third leaf from 4th round, ch 5, 1 sc between 3rd and 4th leaf from 4th round, ch 5, 1 sc at the bottom of the 4th dc on fourth leaf from 4th round, ch 5, 1 sc at the bottom of the 3rd dc on fifth leaf from 4th round, ch 5, 1 sc at the bottom of the 2nd dc on sixth leaf from 4th round, ch 5, 1 sl st in first ch from beg of round = 8 ch spaces. Turn piece - work next round on the front of the flower.
ROUND 6: Crochet as follows in every ch space: 1 sc, 1 dc, 4 tr, 1 dc and 1 sc, finish round with 1 sl st in first sc from beg of round = 8 leaves. Turn piece - work next round on the back of the flower.
ROUND 7: ch 1, 1 sc in 1st sc on 5th round, * ch 10, 1 sc in next sc on 5th round *, repeat from *-* a total of 7 times, finish with ch 10 and 1 sl st in first ch from beg of round = 8 ch spaces.
Turn piece, finish the square on the front.
ROUND 8: Work sl st until mid of first ch space, * ch 12, 1 sc in next ch space, ch 5, 1 sc in next ch space *, repeat from *-* a total of 3 times, ch 12, 1 sc in next ch space, ch 5, 1 sl st in sl st at top of first ch space from previous round.
ROUND 9: In every large ch space work as follows: 5 sc, ch 2 and 5 sc and in each of the small ch spaces work 5 sc, finish with 1 sl st in first sc from beg of round.
--------------------------------------------------------

BACK PIECE:
Work 9-12-16 CROCHET SQUARES - see explanation above.
Place the squares with 3-4-4 squares in the width and 3-3-4 squares in height. Crochet squares tog - crochet squares tog alongside and then across as follows:
Place 2 squares tog WS against WS and work tog from RS as follows:
1 sc in corner of first square, ch 1, 1 sc in corner of next square, ch 1, 1 sc in next st on first square, ch 1, 1 sc in next st on second square, ch 1, 1 sc in next st on first square, ch 1, 1 sc in next st on second square etc., finish when 1 sc has been worked in the last corner on both squares, fasten off. NOTE: Make sure that the transitions between every square are pretty when the squares are worked tog alongside.

Then work 1 round with dc around the entire back piece as follows (start at the top in the right corner):
1 sc in the corner, ch 3 (= 1 dc), then work 75-83-91 dc along the upper edge, then work 56-56-74 dc down along the side (make sure that the corners are worked loosely), then 72-78-86 dc along the bottom edge and 56-56-74 dc up along the side. Finish with 1 sl st in 3rd ch from beg of round. Fasten off.

EDGE PIECE IN THE SIDE:
Start mid back of neck. Work 1 dc in each of the 38-42-46 dc at the top along the back piece, then ch 45-49-53 (= armholes).
Turn piece. Work 1 dc in 4th ch from hook, then work 1 dc in every ch and 1 dc in every dc at the top of back until mid back of neck = 81-89-97 dc. Continue to work back and forth as follows:
ROW 1: ch 3 (= 1 dc), * ch 1, skip 1 dc, 1 dc in next dc *, repeat from *-*.
ROW 2: 1 dc in every dc and 1 dc in every ch.
Repeat these 2 rows upwards - AT THE SAME TIME when edge measures approx. 4 cm / 1½'' (adjust so that next row is a row with dc only), inc 16 dc evenly - READ INCREASE TIP - repeat inc when piece measures approx. 8, 12 and 16 cm / 3", 4 3/4" and 6 1/4" = 145-153-161 dc.
SIZE XL/XXL: Repeat inc when piece measures 20 cm / 8'' = 177 dc.
Work until edge measures approx. 18-20-22 cm / 7''-8''-8¾'' - adjust after 1 row with dc. Fasten off. Work the same way in the other side.

EDGE PIECE MID BACK:
Start with 1 sc in the corner at the bottom of the side. Ch 3 (= 1 dc), then work 1 dc in each of the 71-77-85 dc = 72-78-86 dc. Continue with 1st row and 2nd row as explained above back and forth until approx. 13-17-13 cm / 5"-6 3/4"-5" have been worked from the squares - adjust after 1 row with dc. Fasten off.

ASSEMBLY:
Sew tog mid back of neck. Sew edge to edge in front loop of outermost st to avoid a chunky seam.
Sew tog side piece and edge piece mid back, start in outer edge and sew inwards. Sew remaining piece on side piece to back piece.
Work the same way in the other side.

PICOT BORDER:
Work on hook size 3.5 mm/E/4 on the outer edge around the entire edge. Start mid back of neck and work as follows: 1 sc, * skip 2 sts, 3 dc in next st, ch 1, 1 dc in same st, ch 1, 3 dc in same st, skip 2 sts, 1 sc in next st *, repeat from *-* around the entire edge and finish with 1 sl st in sc from beg of round.
Work the same way around the armholes.

Diagram

All measurements in charts are in cm.

diagram measurements
Do you have a question? See a list of frequently asked questions (FAQ)

Knitting tension is what determines the final measurements of your work, and is usually measured per 10 x 10 cm. It is provided like so: number of stitches in width x number of rows in height - eg: 19 stitches x 26 rows = 10 x 10 cm.

The knitting tension is very individual; some people knit/crochet loosely while others work tightly. You adjust the knitting tension with the needle size, which is why the suggested needle size only serve as a guide! You need to adjust this (up or down) to ensure that YOUR knitting tension matches the knitting tension provided in the pattern. If you work with a different knitting tension than provided you will have a different yarn consumption, and your work will have different measurements than what the pattern suggests.

The knitting tension also determines which yarns can replace each other. As long as you achieve the same knitting tension you can replace one yarn with another.

See DROPS lesson: How to measure your tension/gauge

See DROPS video: How to make a gauge tension swatch

The required amount of yarn is provided in grams, eg: 450 g. To calculate how many balls you’ll need you first need to know how many grams are in 1 ball (25g, 50g or 100g). This information is available if you click on the individual yarn quality on our pages. Divide the amount required with the amount of each ball. For example, if each ball is 50g (the most common amount), the calculation will be as follows: 450 / 50 = 9 balls.

The important thing when changing from one yarn to another is that the knitting/crochet tension remains the same. This is so that the measurements of the finished piece will be the same as on the sketch provided. It is easier to achieve the same knitting tension using yarns from the same yarn group. It is also possible to work with multiple strands of a thinner yarn to achieve the knitting tension of a thicker one. Please try our yarn converter. We recommend you to always work a test swatch.

Please NOTE: when changing yarn the garment might have a different look and feel to the garment in the photo, due to individual properties and qualities of each yarn.

See DROPS lesson: Can I use a different yarn than the one mentioned in the pattern?

All our yarns are categorised into yarn groups (from A to F) according to thickness and knitting tension – group A contains the thinnest yarns and group F the thickest. This makes it easier for you to find alternative yarns to our patterns, should you wish to switch yarn. All yarns within the same group have a similar knitting tension and can easily replace each other. However, different yarn qualities have different structures and properties which will give the finished work a unique look and feel.

Click here for an overview of the yarns in each yarn group

At the top of all our patterns you’ll find a link to our yarn converter, which is a helpful tool should you wish to use a different yarn than suggested. By filling in the yarn quality you wish to replace, the amount (in your size) and number of strands, the converter will present good alternative yarns with the same knitting tension. Additionally it will tell you how much you’ll require in the new qualities and whether you’ll need to work with multiple strands. Most skeins are 50g (some are 25g or 100g).

If the pattern is worked with multiple colours, every colour will have to be converted separately. Similarly, if the pattern is worked with several strands of different yarns (for example 1 strand Alpaca and 1 strand Kid-Silk) you will have to find alternatives for each, individually.

Click here to see our yarn converter

Since different yarns have different qualities and textures we have chosen to keep the original yarn in our patterns. However, you can easily find options among our available qualities by using our yarn converter, or simply pick a yarn from the same yarn group.

It is possible that some retailers still have discontinued yarns in stock, or that someone has a few skeins at home that they would like to find patterns for.

The yarn converter will provide both alternative yarn as well as required amount in the new quality.

If you think it's hard to decide what size to make, it can be a good idea to measure a garment you own already and like the size of. Then you can pick the size by comparing those measures with the ones available in the pattern's size chart.

You'll find the size chart at the bottom of the pattern.

See DROPS lesson: How to read size chart

The needle size provided in the pattern serves only as a guide, the important thing is to follow the knitting tension. And since knitting tension is very individual, you will have to adjust the needle size to ensure that YOUR tension is the same as in the pattern – maybe you’ll have to adjust 1, or even 2 needle sizes, up or down to achieve the correct tension. For this, we recommend that you work test swatches.

Should you work with a different knitting tension than the one provided, the measurements of the finished garment might deviate from the measurement sketch.

See DROPS lesson: How to measure your tension/gauge

See DROPS video: How to make a gauge tension swatch

Working a garment top-down provides more flexibility and room for personal adjustment. For example it is easier to try the garment on while working, as well as making adjustments to length of yoke and shoulder caps.

The instructions are carefully explaining every step, in the correct order. Diagrams are adjusted to the knitting direction and are worked as usual.

The diagram depicts all rows/rounds, and every stitch seen from the right side. It is read from bottom to top, from right to left. 1 square = 1 stitch.

When working back and forth, every other row is worked from the right side and every other row is worked from the wrong side. When working from the wrong side, the diagram will have to be worked reversed: from left to right, knit stitches are purled, purl stitches are knit etc.

When working in the round every round is worked from the right side and the diagram are worked from right to left on all rounds.

See DROPS lesson: How to read knitting diagrams

The diagram depicts all rows/rounds, and every stitch seen from the right side. It is worked from bottom to top, from right to left.

When working back and forth every other row is worked from the right side: from right to left and every other row is worked from the wrong side: from left to right.

When working in the round, every row in the diagram are worked from the right side, from right to left.

When working a circular diagram you start in the middle and work your way outwards, counter clockwise, row by row.

The rows usually start with a given number of chain stitches (equivalent to the height of the following stitch), this will either be depicted in the diagram or explained in the pattern.

See DROPS lesson: How to read crochet diagrams

Instructions for working several diagrams after each other on the same row/round, will often be written like so: “work A.1, A.2, A.3 a total of 0-0-2-3-4 times". This means you work A.1 once, then A.2 is worked once, and A.3 is repeated (in width) the number of times provided for your size – in this case like so: S = 0 times, M = 0 times, L=2 times, XL= 3 times and XXL = 4 times.

The diagrams are worked as usual: begin with the first row in A.1, then work the first row in A.2 etc.

See DROPS lesson: How to read knitting diagrams

See DROPS lesson: How to read crochet diagrams

The total width of the garment (from wrist-to-wrist) will be larger in the larger sizes, despite the actual sleeves being shorter. The larger sizes have longer sleeve caps and wider shoulders, so there will be a good fit in all sizes.

The measurement sketch/schematic drawing provides information regarding the full length of the garment. If it’s a jumper or a jacket the length is measured from the highest point on the shoulder (usually closest to the neckline), and straight down to the bottom of the garment. It is NOT measured from the tip of shoulder. Similarly, the length of yoke is measured from the highest point on the shoulder and down to where yoke is split into body and sleeves.

See DROPS lesson: How to read a schematic drawing

Diagrams are often repeated on the round or in height. 1 repeat is the diagram the way it appears in the pattern. If it says to work 5 repeats of A.1 in the round, then you work A.1 a total of 5 times after/next to each other in the round. If it says to work 2 repeats of A.1 vertically/in height you work the entire diagram once, then begin again at the start and work the entire diagram one more time.

Chain stitches are slightly narrower than other stitches and to avoid working the cast-on edge too tight, we simply chain more stitches to begin with. The stitch count will be adjusted on the following row to fit the pattern and measurement sketch.

The rib edge is more elastic and will contract slightly compared to, for example, stocking stitch. By increasing before the rib edge, you avoid a visible difference in width between the rib edge and the rest of the body.

It’s very easy to cast off too tightly, and by making yarn overs while casting off (and simultaneously casting these off) you avoid a too tight cast off edge.

See DROPS video: How to bind off with yarn overs (yo)

To achieve an even increase (or decrease) you can increase on, for example: every 3rd and 4th row alternately, like so: work 2 rows and increase on the 3rd row, work 3 rows and increase on the 4th. Repeat this until the increase is complete.

See DROPS lesson: Increase or decrease 1 st on every 3rd and 4th row alternately

Should you prefer to work in the round instead of back and forth, you may of course adjust the pattern. You’ll need to add steeks mid-front (usually 5 stitches), and follow the instructions. When you would normally turn and work from the wrong side, simply work across the steek and continue in the round. At the end you’ll cut the piece open, pick up stitches to work bands, and cover the cut edges.

See DROPS video: How to knit steeks and cut open

Should you prefer to work back and forth instead of in the round, you may of course adjust the pattern so you work the pieces separately and then assemble them at the end. Divide the stitches for the body in 2, add 1 edge stitch in each side (for sewing) and work the front and back pieces separately.

See DROPS lesson: Can I adapt a pattern for circular needles into straight needles?

Pattern repeats can vary slightly in the different sizes, in order to get the correct proportions. If you’re not working the exact same size as the garment in the photo, yours might deviate slightly. This has been carefully developed and adjusted so that the complete impression of the garment is the same in all sizes.

Make sure to follow instructions and diagrams for your size!

If you have found a pattern you like which is available in women’s size it’s not very difficult to convert it to men’s size. The biggest difference will be the length of sleeves and body. Start working on the women size that you think would fit across the chest. The additional length will be worked right before you cast off for the armhole/sleeve cap. If the pattern is worked top-down you can add the length right after the armhole or before the first decrease on sleeve.

Regarding additional yarn amount, this will depend on how much length you add, but it is better with a skein too many than too few.

All yarns will have excess fibres (from production) that might come off as lint or shedding. Brushed yarns (ie hairier yarns) have more of these loose, excess fibres, causing more shedding.

Shedding also depends on what is worn under or over the garment, and whether this pulls at the yarn fibres. It’s therefore not possible to guarantee that there will be no shedding

Below are some tips on how to get the best result when working with hairier yarns:

1. When the garment is finished (before you wash it) shake it vigorously so the looser hairs come off. NOTE: do NOT use a lint roller, brush or any method that pulls at the yarn.

2. Place the garment in a plastic bag and put it in your freezer - the temperature will cause the fibres to become less attached to each other, and excess fibres will come off easier.

3. Leave in the freezer for a few hours before taking it out and shaking it again.

4. Wash the garment according to the instructions on the yarn label.

Pilling is a natural process that happens to even the most exclusive of fibers. It's a natural sign of wear and tear that is hard to avoid, and that is most visible in high friction areas of your garment like a sweater's arms and cuffs.

You can make your garment look as new by removing the pilling, using a fabric comb or a pill/lint remover.

Still can't find the answer you need? Then scroll down and leave your question so one of our experts can try to help you. This will be done normally within 5 to 10 working days.
In the meantime, you can read the questions and answers that others have left to this pattern or join the DROPS Workshop on Facebook to get help from fellow knitters/crocheters!

You might also like...

Post a comment to pattern DROPS 129-10

We would love to hear what you have to say about this pattern!

If you want to leave a question, please make sure you select the correct category in the form below, to speed up the answering process. Required fields are marked *.

Comments / Questions (37)

country flag Susan Latham wrote:

Love this pattern but I am confused with round 5 on the flower motif. I have 7 petals when it states I should have 8. What am I doing wrong? Have pulled out so many times. Is it a printing error?

23.10.2016 - 12:32

DROPS Design answered:

Dear Mrs Latham, make sure you are crocheting a total of 8 times "5 ch, 1 dc" as written under this round. Happy crocheting!

24.10.2016 - 14:36

country flag Petea wrote:

Vid kantstycket i sidan, vart ska man mäta "kanten"? I mitten vid nacken eller ute vid ärmhålan?

22.07.2016 - 18:43

DROPS Design answered:

Hej Petea. Det er vel lige meget da jeg vil mene du haekler det samme over alle maskerne? Ellers maal paa det breddeste stykke.

26.07.2016 - 16:45

country flag Jenny Miller wrote:

I love the pattern, but it is confusing because the printed directions are different than the directions online. I am working on the flowers, and I worked the initial flowers while sitting in front of the computer. I then printed the directions so that I could crochet on the go, only to find that there are many differences

25.09.2015 - 02:55

DROPS Design answered:

Dear Mrs Miller, crochet terminology is different in UK-English and in US-English, check you print the US-English pattern. Happy crocheting!

25.09.2015 - 09:51

country flag Christine Lecoq wrote:

Bonjour Si les carrés mesurent 8 cm, la e dos mesure donc en taille xl : 4 x 8 = 32 cm. Cela me paraît petit. N'y a t'il pas une erreur sur l'echantillon ? Il me faut au moins 50 cm pour le dos. Je vous remercie pour votre réponse.

17.08.2015 - 07:10

DROPS Design answered:

Bonjour Mme Lecoq, chaque carré doit bien mesurer 8 cm de côté, l'assemblage se fait avec 1 ms dans 1 carré, 1 ml, 1 ms dans l'autre carré et ajoutera de la largeur et de la longueur. Le tour de brides crocheté ensuite tout autour du dos donnera les mesures finales du schéma. Bon crochet!

17.08.2015 - 09:58

country flag Ellen Davidson wrote:

Drops. 129-10 xxl size not write not enough loops at sides for extra lenth please correct good pattern just needs adjusting

19.04.2015 - 01:28

DROPS Design answered:

Dear Mrs Davidson, pattern is correct: the edge on the side is worked on each side starting from mid top of back + 53 ch, inc 16 tr evenly when piece measures 4, 8, 12, 16 and 20 cm = 177 tr. Piece is then sewn to edge piece mid back then remaining sts are sew to the back piece (= armhole). Happy crocheting!

20.04.2015 - 13:51

country flag Jani wrote:

Das verstehe ich leider überhaupt nicht. 4 cm ab wo? Ab der 1. genau erklärten Reihe oder erst ab sozusagen 3.? Und in welcher Reihe soll ich nun die Stäbchen gleichmäßig aufnehmen, in einer 1. oder 2. ?

15.10.2013 - 21:10

DROPS Design answered:

Liebe Jani, es sind 4 cm Gesamthöhe des Seitenteils gemeint (also ab dem neuen Lm-Anschlag gemessen) und es wird in einer Stb-Reihe zugenommen.

16.10.2013 - 07:46

country flag Batoul Fawaz wrote:

Plz reply iwant to ask about increasing dc :where i start inceasing? in the biginning of the row??

30.09.2013 - 18:15

Batoul Fawaz wrote:

I want to ask about increasing dc i don't know where starting in the begining of the row??

30.09.2013 - 18:07

DROPS Design answered:

Deear Mrs Fawaz, Increase have to be done evenly on the row, ie work approx same number of sts on the row between each inc. Happy crocheting!

01.10.2013 - 08:39

Valeria wrote:

Lo terminé y quedó muy lindo, las explicaciones son claras y se puede hacer con facilidad. La lana se apelmaza demasiado para mi gusto, aunque los colores son muy lindos.

11.12.2012 - 20:54

Lara wrote:

This is a great piece, casual with a twist... I love it! Would very much appreciate diagrams for flower grannies; like so many others I prefer working from a diagram rather then from a written sequence.

09.08.2012 - 18:07