
Popular categories
Looking for a yarn?


Comments / Questions (69)
![]() Girard wrote:
Girard wrote:
Bonjour, Je cherche les diagrames des granny de la couverture Like A Wildflower 130-6 ? Les auriez vous s'il vous plait ?
05.10.2025 - 22:34DROPS Design answered:
Bonsoir, il n'y en a pas. Le modele est presente en forme ecrite, sans diagrammes. Bon crochet!
05.10.2025 - 22:38
![]() Nalida Van Tonder wrote:
Nalida Van Tonder wrote:
Why can't I download the pattern?
13.03.2025 - 10:24DROPS Design answered:
Dear Mrs Van Tonder, our patterns can only be printed, but using a virtual printer will allow you to save them as a .PDF File. Happy crocheting!
13.03.2025 - 16:02
![]() Patty Scharff wrote:
Patty Scharff wrote:
Blok 1 heeft aan de rand 28 stokjes en blok 2 heeft er 24. Klopt dit wel? Blok 2 is dus ook kleiner dan blok 1. Komt je dan niet in de problemen met het in elkaar haken?
03.09.2022 - 16:57DROPS Design answered:
Dag Patty,
Klopt, de vierkantjes hebben niet allemaal hetzelfde aantal stokjes langs de zijkanten, maar dit zou geen probleem moeten zijn bij het in elkaar haken.
14.09.2022 - 20:45
![]() Sandra wrote:
Sandra wrote:
Hallo, zum Viereck 1 Anfang Runde 6 hätte ich 2 Fragen. Erstens wo genau kommt die Kettmasche hin und zweitens, muss ich danach dann 3 LM - 1 LM und nochmal 3 LM häkeln? Danke
19.04.2021 - 21:01DROPS Design answered:
Liebe Sandra, die 6. Runde beginnt in einer Ecke (mit einer neuen Farbe) mit 1 Kettmasche um die Ecke, dann 1 Lm (ersetzt die erste feste Masche), 3 Lm, 1 feste Masche um den selben Luftmaschenbogen, dann von *bis* bis zur Ende der Runde häkeln/wiederholen. Viel Spaß beim häkeln!
20.04.2021 - 07:15
![]() Diana Colon wrote:
Diana Colon wrote:
Ich habe gesehen das die Quadrat in der letzten Reihe unterschiedliche Anzahl von Maschen hat. Passen die von Grösse denn zusammen beim zusammen häkeln ?
04.03.2021 - 15:17DROPS Design answered:
Liebe Frau Colon, am Ende werden Sie die Quadrate mit (1 fM in die Kante, 2 Lm, ca 1 cm überspringen*, und von *-* wiederholen, so ist hier die Maschenanzahl nicht so wichtig. Viel Spaß beim häkeln!
04.03.2021 - 16:09
![]() Paula wrote:
Paula wrote:
Hay cuadrados que tienen 24 puntos al final y otros 28? Para unirlos? No quedará descartado?
12.12.2020 - 12:15DROPS Design answered:
Hola Paula. Cuando unimos los cuadrados no trabajamos un punto en cada punto. La unión es flexible y se puede adaptar bien los lados de los cuadrados con números de puntos diferentes.
13.12.2020 - 12:00
![]() Schummeline wrote:
Schummeline wrote:
Wunderschöne Decke, tolle Farben, sehr gute Anleitung....TOP
11.12.2020 - 10:57
![]() Carolina wrote:
Carolina wrote:
Hola! Existe la posibilidad de tener imágenes de patrones en vez de sólo explicaciones para esta manta?
16.05.2020 - 22:51DROPS Design answered:
Hola Carolina. Este patrón solo tiene las explicaciones en formato texto. No hay posibilidad de añadir diagramas a los patrones ya publicados. Los modelos de las nuevas revistas ya contienen tanto diagramas como explicaciones en el texto.
18.05.2020 - 21:41
![]() Eleonora wrote:
Eleonora wrote:
Hi! Are there any charts available for the pattern of squares? Many Thanks//
25.04.2020 - 16:38DROPS Design answered:
Dear Eleonora, unfortunately we do not have a written out pattern for this piece. We think charted patterns are better not only because they are universal and can be "read" in every language, but also because they not only show you the very next step, but also how stitches and rows relate to each other. We so have a lesson on how to read cochet harts / diagrams here, and don't forget, if you get stuck, you can always ask for help in the store in person, or even over the phone, where you bought your DROPS yarn from. Happy Crafting!!
26.04.2020 - 20:57
![]() Ana wrote:
Ana wrote:
¿Que número corresponde al melocotón claro ?porque el 61 es color lima
13.01.2020 - 20:11DROPS Design answered:
Hola Ana. Es la numeración antigua de los los colores. Ahora, el melocotón claro es el Nº 27.
19.01.2020 - 23:04
|
|
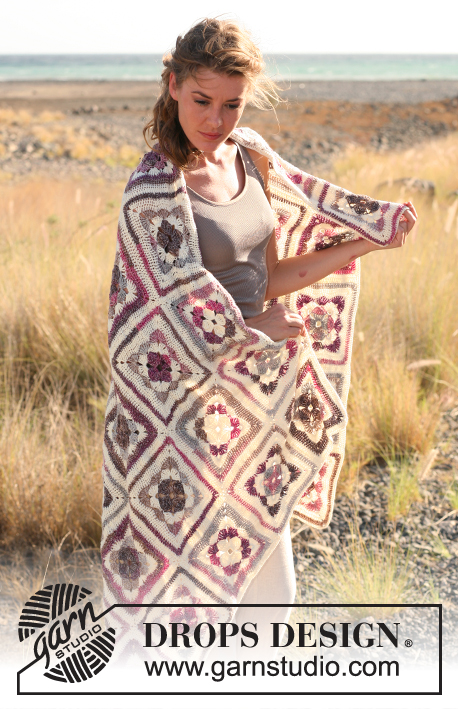
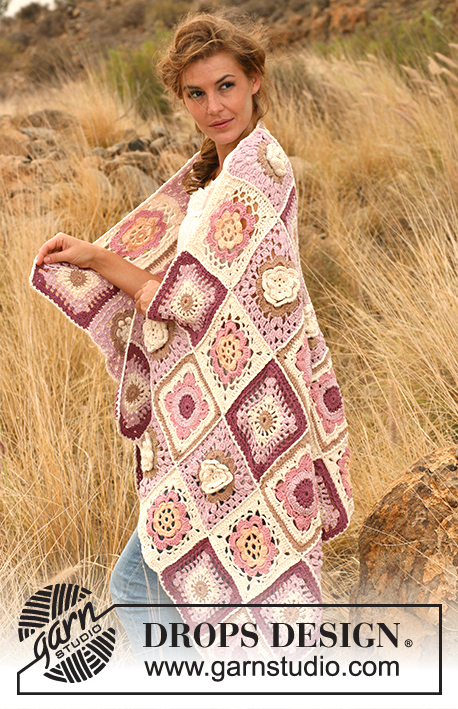
Like A Wildflower#likeawildflowerblanket |
|
 |
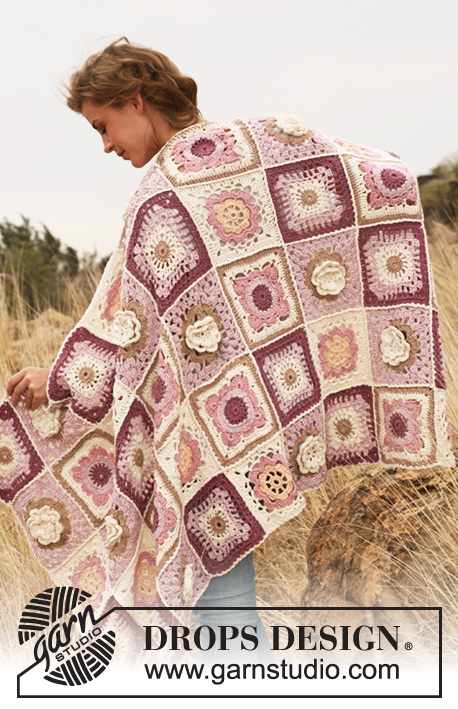 |
Crochet DROPS blanket in "Paris".
DROPS 130-6 |
|
|
CROCHET TIP: For every color change work last sl st at end of previous round with the new color. This is done to make the color changes pretty. EXPLANATION OF 1 TR-GROUP: Work 1 tr but do not YO and pull through the last time = 2 loops on hook. Work 1 tr but do not YO and pull through the last time = 3 loops on hook. Work 1 tr but do not YO and pull through the last time = 4 loops on hook, 1 YO, pull thread through all 4 loops on hook. -------------------------------------------------------- Work a total of 45 squares. Read CROCHET TIP! REMEMBER THE GAUGE! CROCHET SQUARE 1: Crochet a total of 10 pieces of square 1. Ch 6 on hook size 4.5 mm/ US 7 with dark old pink and form a ring with 1 sl st in first ch. ROUND 1: ch 3 (= 1 dc), continue to work 15 dc in ch-ring, finish with 1 sl st in 3rd ch from beg of round = 16 dc. ROUND 2: ch 4 (= 1 dc + 1 ch), * 1 dc in next dc, ch 1 *, repeat from *-* a total of 15 times and finish with 1 sl st in 4th ch from beg of round = 16 dc with 1 ch between each. Cut the yarn. ROUND 3: Switch to powder pink. Ch 3 (= 1 dc), * 2 dc in next ch, 1 dc in next dc *, repeat from *-* a total of 15 times and finish with 2 dc in last ch and 1 sl st in 3rd ch from beg of round = 48 dc. Cut the yarn. ROUND 4: Switch to light old pink. Ch 1, 1 sc in same st, * ch 5, 1 sl st in 5th ch from hook, skip 2 dc, 1 sc in next dc, ch 2, skip 2 dc, 1 sc in next dc, ch 3, skip 2 dc, 1 sc in next dc, ch 2, skip 2 dc, 1 sc in next dc *, repeat from *-* a total of 4 times but finish round with 1 sl st in first sc from beg of round (instead of 1 sc in next dc). ROUND 5: Work sl st until beg of first 5-ch space, ch 3 (= 1 dc), 4 dc + ch 3 + 5 dc in same ch space, * 1 sc in 2-ch space, 5 dc in 3-ch space, 1 sc in 2-ch space, 5 dc + ch 3 + 5 dc in 5-ch space *, repeat from *-* a total of 3 times, 1 sc in 2-ch space, 5 dc in 3-ch space, 1 sc in 2-ch space and finish with 1 sl st in 3rd ch from beg of round. Fasten off. ROUND 6: Switch to off white and beg with 1 sl st in first corner with 3 ch. Ch 1 (= 1 sc), ch 3, and 1 sc in same ch space, * ch 5, skip 5 dc, 1 dc in sc, ch 3, skip 2 dc, 1 sc in next dc, ch 3, skip 2 dc, 1 dc in next sc, ch 5, in the corner (3-ch space) work: 1 sc + ch 3 + 1 sc *, repeat from *-* a total of 4 times but finish round with 1 sl st in 2nd ch from beg of round (instead of 1 sc + ch 3 + 1 sc in the corner). ROUND 7: ch 3, 2 dc + ch 2 + 3 dc in same ch space (= corner), * 5 dc in 5-ch space, 3 dc in every 3-ch space, 5 dc in 5-ch space, in the corner (3-ch space) work: 3 dc + ch 2 + 3 dc *, repeat from *-* a total of 4 times but finish round with 1 sl st in 3rd ch from beg of round (instead of 3 dc + ch 2 + 3 dc in the corner). Cut the yarn. ROUND 8: Switch to dark beige. Ch 3 (= 1 dc), 1 dc in each of the next 2 dc, * in the corner (2-ch space) work 3 dc + ch 2 + 3 dc, continue to work 1 dc in each of the next 22 dc *, repeat from *-* a total of 3 times, in the corner work 3 dc + ch 2 + 3 dc, continue with 1 dc in each of the next 19 dc, finish with 1 sl st in 3rd ch from beg of round = 28 dc along each side and 2 ch in every corner. Cut the yarn. Fasten all threads. CROCHET SQUARE 2: Crochet a total of 10 pieces of square 2. Crochet 6 ch on hook size 4.5 mm with light peach and form a ring with 1 sl st in first ch. ROUND 1: Work 16 sc in ch-ring, finish with 1 sl st in first sc. ROUND 2: ch 6 (= 1 dc + 3 ch), * skip 1 sc, 1 dc in next dc, ch 3 *, repeat from *-* a total of 7 times and finish with 1 sl st in 3rd ch from beg of round = 8 dc with 3 ch between each. ROUND 3: ch 1, continue to crochet as follows in every ch space: 1 sc, 1 hdc, 3 dc, 1 hdc and 1 sc, finish round with 1 sl st in ch from beg of round = 8 leaves. Cut the thread. ROUND 4: Switch to light old pink. Ch 7, * 1 sc between the next 2 leaves, ch 6 *, repeat from *-* a total of 7 times, finish round with 1 sl st in 1st ch from beg of round = 8 ch spaces. ROUND 5: ch 1, continue to crochet as follows in every ch space: 1 sc, 1 hdc, 5 dc, 1 hdc and 1 sc, finish round with 1 sl st in ch from beg of round = 8 leaves. Cut and fasten the thread. ROUND 6: Switch to off white and start with 1 sl st in 2nd dc (of the 5 dc) on first leaf, ch 1, * ch 6 (= corner), skip 2 dc, 1 sc in next dc (last of the 5 dc) on same leaf, ch 5, 1 sc in 2nd dc (of the 5 dc) on next leaf, ch 4, skip 2 dc, 1 sc in next dc (last of the 5 dc) on same leaf, ch 5, 1 sc in 2nd dc (of the 5 dc) on next leaf *, repeat from *-* a total of 4 times but finish with 1 sl st in 1st ch from beg of round (instead of 1 sc in 2nd dc on next leaf). ROUND 7: 1 sl st in 6-ch space, ch 3 (= 1 dc), 3 dc + ch 4 + 4 dc in same ch space (= corner), * (ch 4, 1 sc in next ch space), repeat from (-) a total of 3 times, ch 4, in the corner work 4 dc + ch 4 + 4 dc *, repeat from *-* a total of 3 times, repeat from (-) a total of 3 times and finish with ch 4 and 1 sl st in 3rd ch from beg of round. ROUND 8: Ch 3 (= 1 dc), 1 dc in each of the next 3 dc, * in 4-ch space in the corner work 3 dc + ch 2 + 3 dc, 1 dc in each of the next 4 dc, 2 dc in next ch space, 3 dc in each of the next 2 ch spaces, 2 dc in next ch space, 1 dc in each of the next 4 dc *, repeat from *-* a total of 4 times but finish round with 1 sl st in 3rd ch from beg round (instead of 1 dc in each of the next 4 dc) = 24 dc along each side and 2 ch in every corner. Cut the yarn. Fasten all threads. CROCHET SQUARE 3: Crochet a total of 13 pieces of square 3. Ch 6 on hook size 4.5 mm/US 7 with dark beige and form a ring with 1 sl st in first ch. ROUND 1: ch 3 (= 1 dc), work 15 dc in ch-ring, finish with 1 sl st in 3rd ch from beg of round = 16 dc. Cut the yarn. ROUND 2: Switch to off white. Ch 5 (= 1 dc + 2 ch), * 1 dc in next dc, ch 2 *, repeat from *-* a total of 15 times and finish with 1 sl st in 3rd ch from beg of round = 16 dc with 2 ch between each. ROUND 3: 1 sl st in first ch space, ch 3 (= 1 dc), 1 dc + ch 3 + 2 dc in same ch space, * (ch 1, 1 sc in next ch space), repeat from (-) a total of 3 times, ch 1, in next ch space (= corner) work: 2 dc + ch 3 + 2 dc *, repeat from *-* a total of 3 times, repeat from (-) a total of 3 times, finish with ch 1 and 1 sl st in 3rd ch from beg of round. Cut yarn and fasten. ROUND 4: Switch to powder pink and start with 1 sl st in 3-ch space in first corner. Ch 3 (= 1 dc), 1 dc + ch 3 + 2 dc in same ch space, * (ch 2, 1 sc in next ch space), repeat from (-) a total of 4 times, ch 2, in next ch space (= corner) work 2 dc + ch 3 + 2 dc *, repeat from *-* a total of 3 times, repeat from (-) a total of 4 times, finish with ch 2 and 1 sl st in 3rd ch from beg of round. ROUND 5: Work sl st until beg of ch space in the corner, ch 3 (= 1 dc), 2 dc + ch 2 + 3 dc in the same ch space, * (ch 2, 1 sc in next ch space), repeat from (-) a total of 5 times, ch 2, in next ch space (= corner) work 3 dc + ch 2 + 3 dc *, repeat from *-* a total of 3 times, repeat from (-) a total of 5 times, finish with ch 2 and 1 sl st in 3rd ch from beg of round. Cut yarn and fasten. ROUND 6: Switch to dark old pink and start with 1 sl st in 2-ch space in first corner. Ch 3 (= 1 dc), 2 dc + ch 2 + 3 dc in same ch space, * (ch 2, 1 sc in next ch space), repeat from (-) a total of 6 times, ch 2, in next ch space (= corner) work 3 dc + ch 2 + 3 dc *, repeat from *-* a total of 3 times, repeat from (-) a total of 6 times, finish with ch 2 and 1 sl st in 3rd ch from beg of round. ROUND 7: ch 3 (= 1 dc), 1 dc in each of the next 2 dc, * in ch space in the corner work 2 dc + ch 2 + 2 dc, 1 dc in each of the next 3 dc, (2 dc in next ch space), repeat from (-) a total of 6 times, 1 dc in each of the next 3 dc *, repeat from *-* a total of 4 times but finish round with 1 sl st in 3rd ch from beg round (instead of 1 dc in each of the next 3 dc) = 24 dc along each side and 2 ch in every corner. Cut yarn and fasten all ends. CROCHET SQUARE 4: Crochet a total of 12 pieces of square 4. Ch 4 on hook size 4.5 mm/ US 7 with off white and form a ring with 1 sl st in first ch. ROUND 1: Work 8 sc in ch-ring, finish with 1 sl st in first sc. ROUND 2: ch 4 (= 1 sc + 3 ch), * 1 sc in next sc, ch 3 *, repeat from *-* a total of 7 times, finish with 1 sl st in 2nd ch from beg of round = 8 ch spaces. ROUND 3: Crochet in every ch space as follows: 1 sc, 4 dc, 1 sc, finish round with 1 sl st in first sc = 8 leaves. ROUND 4: Fold the leaves towards you and crochet at the back of these as follows: 1 sc in first sc from 2nd round, ch 8 (= 1 dc + 5 ch), * 1 dc in next sc from 2nd round, ch 5 *, repeat from *-* the entire round, finish with 1 sl st in 3rd ch from beg of round = 8 ch spaces. ROUND 5: Crochet in every ch space as follows: 1 sc, 6 dc, 1 sc, finish with 1 sl st in first sc = 8 leaves. Cut the yarn. ROUND 6: Switch to dark beige. Fold the leaves towards you and crochet at the back of these as follows: 1 sc in first dc from 4th round, ch 10 (= 1 dc + 7 ch), * 1 dc in next dc from 4th round, ch 7 *, repeat from *-* the entire round, finish with 1 sl st in 3rd ch from beg of round = 8 ch spaces. ROUND 7: Crochet in every ch space as follows: 1 sc, 8 dc, 1 sc, finish with 1 sl st in first sc = 8 leaves. Cut yarn and fasten. ROUND 8: Switch to powder pink and work 1 sl st in first dc on first leaf, ch 6 (= 1 dc + 3 ch), 1 tr-group in fourth dc on first leaf - SEE EXPLANATION ABOVE, ch 5, 1 tr-group in fifth dc on same leaf, * ch 3, 1 dc in last dc on same leaf, ch 3, 1 sc in third dc on next leaf, ch 3, 1 sc in sixth dc on same leaf, ch 3, 1 dc in first dc on next leaf, ch 3, 1 tr-group in fourth dc on same leaf, ch 5, 1 tr-group in fifth dc on same leaf *, repeat from *-* a total of 3 times, ch 3, 1 dc in last dc on same leaf, ch 3, 1 sc in third dc on next leaf, ch 3, 1 sc in sixth dc on same leaf, ch 3, 1 sl st in 3rd ch from beg of round. ROUND 9: 1 sl st in first ch space, ch 3 (= 1 dc), 2 dc in same ch space, ch 2, * 1 tr-group in 5-ch space, ch 5, 1 tr-group in same ch space, ch 2, (3 dc in next ch space, ch1 ) repeat from (-) a total of 4 times, 3 dc in next ch space, ch 2 *, repeat from *-* a total 3 times, 1 tr-group in 5-ch space, ch 5, 1 tr-group in same ch space, ch 2, (3 dc in next ch space, ch1 ) repeat from (-) a total of 4 times and finish with 1 sl st in 3rd ch from beg of round. ROUND 10: Work 1 sl st in each of the next 2 sts and 1 sl st in first ch space, ch 3 (= 1 dc), 2 dc in same ch space, ch 1, * in the corner (in 5-ch space) work 2 dc + ch 2 + 2 dc, ch 1, 3 dc in next ch space, (ch 1, 2 dc in next ch space) repeat from (-) a total of 4 times, ch 1, 3 dc in next ch space, ch 1 *, repeat from *-* total of 4 times but finish last time with 1 sl st in 3rd ch from beg of round (instead of 3 dc in next ch space) = 18 dc along each side and 2 ch in every corner. Cut yarn and fasten all ends. ASSEMBLY: 45 squares have now been worked. Place the squares with 5 squares in width and 9 squares in height. First crochet squares tog alongside and then across. Work squares tog with off white by working through the edge of 2 and 2 squares at a time as follows: * 1 sc through the edge of 2 squares, ch 2, skip approx. 1 cm / ½" *, repeat from *-*. EDGE: Crochet 1 round with off white around the entire blanket as follows: * 1 sc in edge, ch 2, skip approx. 1 cm / ½" *, repeat from *-* and finish with 1 sl st in sc from beg of round. |
|
Have you finished this pattern?Tag your pictures with #dropspattern #likeawildflowerblanket or submit them to the #dropsfan gallery. Do you need help with this pattern?You'll find 6 tutorial videos, a Comments/Questions area and more by visiting the pattern on garnstudio.com. © 1982-2026 DROPS Design A/S. We reserve all rights. This document, including all its sub-sections, has copyrights. Read more about what you can do with our patterns at the bottom of each pattern on our site. |
|


With over 40 years in knitting and crochet design, DROPS Design offers one of the most extensive collections of free patterns on the internet - translated to 17 languages. As of today we count 325 catalogs and 12298 patterns - 12288 of which are translated into English (US/in).
We work hard to bring you the best knitting and crochet have to offer, inspiration and advice as well as great quality yarns at incredible prices! Would you like to use our patterns for other than personal use? You can read what you are allowed to do in the Copyright text at the bottom of all our patterns. Happy crafting!
Post a comment to pattern DROPS 130-6
We would love to hear what you have to say about this pattern!
If you want to leave a question, please make sure you select the correct category in the form below, to speed up the answering process. Required fields are marked *.