
Popular categories
Looking for a yarn?


Comments / Questions (64)
![]() Badette wrote:
Badette wrote:
Modèle superbe je vais m y mettre maintenant. Merci pour toutes ces bonnes idées
25.04.2025 - 13:59
![]() Camilla Van Der Hoofd wrote:
Camilla Van Der Hoofd wrote:
Hej, har i en video eller en mere uddybet forklaring på dette stykke af opskriften vest Devine "Når arb måler 24-29-32 cm lukkes der af til ærmegab i beg af hver p i hver side således: 3 m 1-1-2 gange 2 m 1-2-2 gange og 1 m 1-2-3 gange = 44-48-54 m. For jeg forstår ikke spor af denne forklaring🙈 På forhånd tak🙏 Mvh Camilla van der Hoofd
25.11.2024 - 15:38DROPS Design answered:
Hej Camilla, hvis du strikker den mindste størrelse, så skal du når arbejdet måler 24 cm lukke af til ærmegab, først 3 masker i hver side én gang, så 2 masker i hver side 1 gang og sidst 1 maske i hver side 1 gang. Nu har du 44 masker tilbage :)
28.11.2024 - 14:24
![]() Anne Lemonnier wrote:
Anne Lemonnier wrote:
Merci pour votre réponse mais il faudrait que les magasins répondent !! je vais continuer à les appeler Cordialement Anne Lemonnier
11.03.2024 - 20:44
![]() Anne Lemonnier wrote:
Anne Lemonnier wrote:
Bonjour est ce que la laine drop snow \"gratte\" quand on la met sur la peau ? merci pour votre réponse Anne Lemonnier
10.03.2024 - 18:04DROPS Design answered:
Bonjour Mme Lemonnier, la sensibilité de chacun / chacune étant différente, je vous recommande de contacter votre magasin DROPS qui pourra vous assister dans le choix de la meilleure laine pouvant vous convenir, même par mail ou téléphone. Bon tricot!
11.03.2024 - 08:47
![]() Anne Lemonnier wrote:
Anne Lemonnier wrote:
Bonjour est ce que la laine drop snow \"gratte\" quand on la met sur la peau ? merci pour votre réponse Anne Lemonnier
08.03.2024 - 13:25
![]() Helstein wrote:
Helstein wrote:
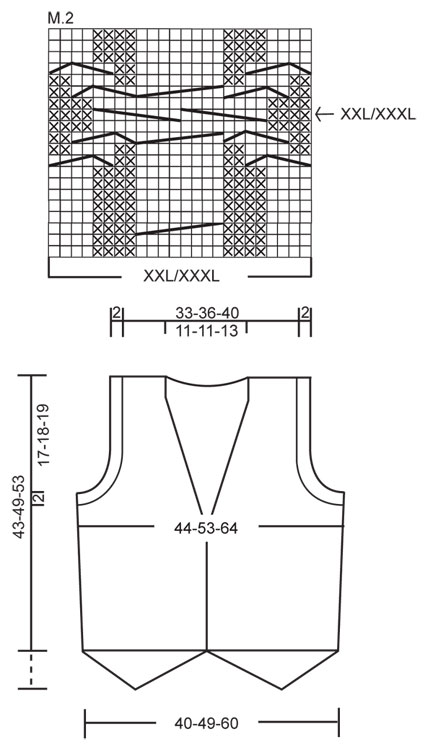
Hallo,ist die Länge komplett mit Dreieck angegeben oder ohne Dreieck? Über Länge von Dreieck steht gar nichts. Margarete
13.02.2024 - 22:51DROPS Design answered:
Liebe Margarete, die Länge beim Vorderteil werden nach dem Dreieck gemessen, so kommt das Eck noch dazu, siehe Maßskizze. Viel Spaß beim stricken!
14.02.2024 - 08:17
![]() Priscilla Chin wrote:
Priscilla Chin wrote:
Thanks for your quick response! My question is S/M with an arrow on the left side of the diagram mean it's the first row to start for the size M?
09.02.2024 - 18:55DROPS Design answered:
Dear Priscilla, no, you start the chart from the very beginning and repeat the whole charts. As stated in the pattern, at the end of the right front piece, the arrow marks the last row of the last repeat, where the piece should measure 40-46-50 cm. Happy knitting!
11.02.2024 - 22:49
![]() Priscilla Chin wrote:
Priscilla Chin wrote:
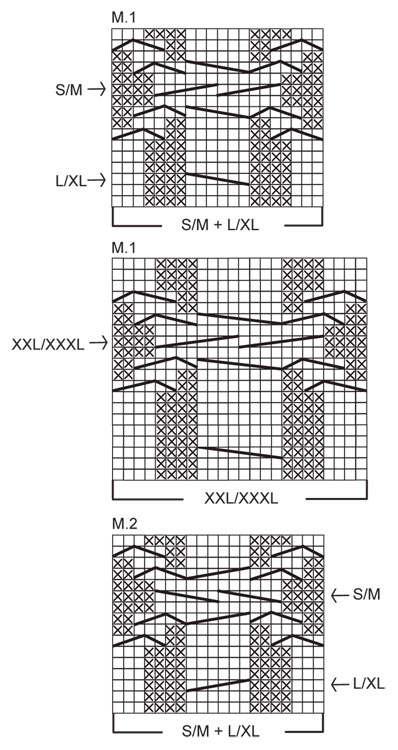
Hi, Thanks for sharing this pattern. My question is regarding the diagram M1. On the left side there is "S/M with an arrow" is that means its the first row to start for size S and size M? Thanks!
09.02.2024 - 00:58DROPS Design answered:
Dear Priscilla, this pattern is available in only 3 sizes, i.e. there is not a size S and a size M but only one size including both S and M. Happy knitting!
09.02.2024 - 08:19
![]() Viola wrote:
Viola wrote:
It's quite difficult to see where the S/M and L/XL sizes' patterns end and begin on the M diagrams. Would it be possible to get separate images of the L/XL pattern diagrams, please?
08.02.2024 - 11:02DROPS Design answered:
Dear Viola, it's the same diagrams for different sizes, just mark the row for your size with another colour to mark it and see it better. Or use markers in stitches, as you rather get. Happy knitting!
08.02.2024 - 15:44
![]() Margarete wrote:
Margarete wrote:
Hallo,ich habe Heute diese Weste angefangen,leider musste ich auch feststellen das der Diagramm entspricht nicht dem Bild.Oder verstehe ich das falsch. Nach jeder vorderen R,kommt hintere R Das heißt rechte Seite und linke Seite dann zwischen den Kreuzen gibt’s 10R. Oder der Diagramm zeigt auch rück R dann zwischen Kreuzen sind 5R? Schöne Grüße Margarete
15.01.2024 - 17:21DROPS Design answered:
Liebe Margarete, alle Zeihen sind im Diagram gezeichnet, dh die Hin- sowie die Rückreihen ; Hin-Reihen lesen Sie rechts nach links, Rückreihen lesen Sie links nach rechts. So sind es 5 Reihen in S/M und L/XL zwischen den mittleren Zopf in M.1 und M.2. Viel Spaß beim stricken!
16.01.2024 - 08:17
|
|||||||||||||||||||||||||||||||
Vest Divine#vestdivinevest |
|||||||||||||||||||||||||||||||
 |
 |
||||||||||||||||||||||||||||||
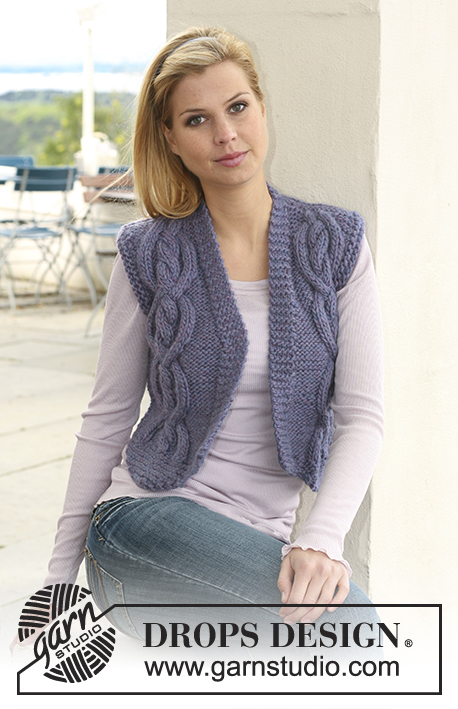
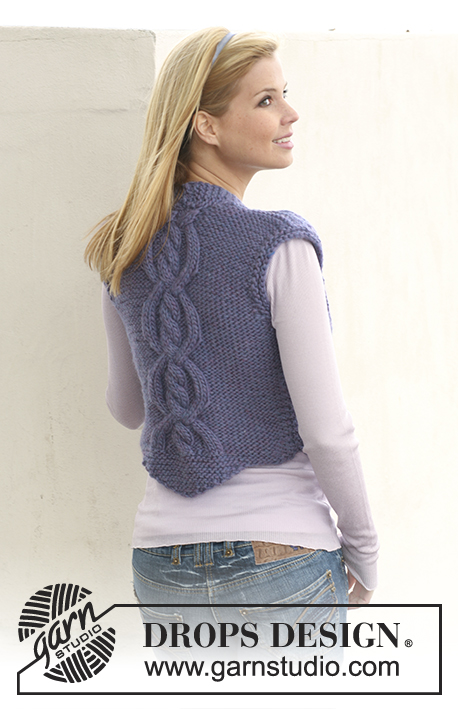
Knitted DROPS waistcoat with cables in ”Snow”. Size S/M - XXL/XXXL
DROPS 121-10 |
|||||||||||||||||||||||||||||||
|
GARTER ST (back and forth on needle): K all rows. INCREASING TIP: Inc from RS inside edge st by making 1 YO. On next row K YO into back of loop to avoid a hole. PATTERN: See diagram M.1 and M.2 – see diagram for your size. Diagram shows the pattern from RS and row 1 in diagram = RS. DECREASING TIP (applies to neckline): Dec 1 st inside the 5 front band sts in garter st. Make all dec from RS. Dec as follows after 5 front band sts: P2 tog. Dec as follows before 5 front band sts: P2 tog into back of loop. -------------------------------------------------------- WAISTCOAT: BACK PIECE: Cast on 2 sts on needle size 8 mm / US 11 with Snow. K 1 row from RS, AT THE SAME TIME inc 2 sts by working 1 st in front and back loop of these 2 sts = 4 sts on needle. K 1 row from WS. Continue in GARTER ST - see above - AT THE SAME TIME inc 1 st each side - See INCREASING TIP. Repeat the inc each side on every row a total of 12-14-16 times = 28-32-36 sts. Now cast on 8-11-15 new sts at the end of the next 2 rows = 44-54-66 sts. Insert a marker in piece – now measure piece from here! Work 4 rows garter st on all sts, AT THE SAME TIME on last row (= WS) inc 8-8-10 sts evenly on the middle 12-12-14 sts = 52-62-76 sts. Work next row as follows from RS: 1 garter st, P 15-20-25, M.1 (= 20 sts in SIZE S/M + L/XL and 24 sts in SIZE XXL/XXXL), P 15-20-25 and 1 garter st. Continue in pattern like this (from WS = 1 garter st, K 15-20-25, M.1 (= 20-20-24 sts), K 15-20-25 and 1 garter st). When piece measures 5-5-6 cm / 2"-2"-2⅜" inc 1 st each side - See INCREASING TIP. Repeat the inc when piece measures 15-15-18 cm / 6"-6"-7" = 56-66-80 sts. Work inc sts in reverse stockinette st (as seen from RS). When piece measures 24-29-32 cm / 9½"-11⅜"-12½" bind off for armhole at the beg of every row each side as follows: 3 sts 1-1-2 times, 2 sts 1-2-2 times and 1 st 1-2-3 times = 44-48-54 sts. After row marked with arrow in diagram, piece now measures approx 40-46-50 cm / 15¾"-18"-19¾", dec (= WS) 8-8-10 sts evenly on sts in M.1 = 36-40-44 sts (work remaining sts as before). On next row (= RS) bind off the middle 10-10-12 sts for neck and complete each shoulder separately. Now K all rows until finished measurements (first row = WS). AT THE SAME TIME on first row from RS dec 1 st on neckline = 12-14-15 sts left on shoulder. Bind off when piece measures 43-49-53 cm / 17"-19¼"-21". RIGHT FRONT PIECE: Cast on 2 sts on needle size 8 mm / US 11 with Snow. K 1 row from RS, AT THE SAME TIME inc 2 sts by working 1 st in front and back loop of these 2 sts = 4 sts on needle. K 1 row from WS. Continue in GARTER ST - see above - AT THE SAME TIME inc 1 st each side - See INCREASING TIP. Repeat the inc each side on every row a total of 8-8-10 times = 20-20-24 sts. Work 2 rows garter st, AT THE SAME TIME cast on 1-4-7 new sts at the end of first row (= towards the side) and 6-8-7 new sts at the end of second row (= towards front edge) = 27-32-38 sts. Insert a marker in piece – now measure piece from here! Work 4 rows garter st on all sts, AT THE SAME TIME on last row (= WS) inc 8-8-10 sts evenly on the middle 12-12-14 sts on the triangle = 35-40-48 sts. Work next row as follows from RS (= from mid front): 5 garter sts (= front band), P 5-7-7, M.1 (= 20 sts in SIZE S/M + L/XL and 24 sts in SIZE XXL/XXXL), P 4-7-11 and 1 garter st. Continue in pattern like this (from WS = 1 garter st, K 4-7-11, M.1 (= 20-20-24 sts), K 5-7-7 and 5 garter sts). AT THE SAME TIME when piece measures 10-10-12 cm / 4"-4"-4¾" inc 1 st at the side - See INCREASING TIP. Repeat the inc when piece measures 20-20-24 cm / 8"-8"-9½" = 37-42-50 sts. Work inc sts in reverse stockinette st (as seen from RS). When piece measures 20-22-23 cm / 8"-8¾"-9" work 2 rows garter st back and forth on the 5 front band sts only (do not work remaining sts), then continue on all sts again. AT THE SAME TIME on next row from RS dec for neck - See DECREASING TIP. Repeat the dec on every 4-6-6 row a total of 6-6-7 times. AT THE SAME TIME when piece measures 24-29-32 cm / 9½"-11⅜"-12½" bind off for armhole at the beg of every row from the side as described for back piece. After all dec for armhole and neck are complete there are 25-27-30 sts left on needle. After the row in diagram marked with arrow, piece now measures approx 40-46-50 cm / 15¾"-18"-19¾", dec (from WS) 8-8-10 sts evenly on sts in M.1 (work remaining sts as before) = 17-19-20 sts left on needle. Now K all rows until piece measures 43-49-53 cm / 17"-19¼"-21" - adjust so that next row is from WS. Now bind off 12-14-15 sts from the side towards the neck for shoulder = 5 sts left on needle for neckline. Continue in garter st back and forth on these sts until neckline measures approx 8-8-9 cm / 3"-3"-3½" and slip sts on a stitch holder – NOTE: measure length from shoulder to mid back on garment and adjust length of neckline accordingly. LEFT FRONT PIECE: Cast on and work like right front piece, but mirrored. Work M.2 instead of M.1. ASSEMBLY: Sew shoulder seams inside bind off row. Graft neckline tog mid back and sew to neckline on back piece with neat sts. SLEEVE EDGES: Pick up from RS approx 40 to 50 sts along armhole inside 1 edge st on needle size 8 mm / US 11 with Snow. K 1 row from WS and K 1 row from RS, then bind off with K sts from WS - NOTE: make sure edge is nice and even. Sew side seams, edge to edge in outer loops of sts to avoid a chunky seam. |
|||||||||||||||||||||||||||||||
Diagram explanations |
|||||||||||||||||||||||||||||||
|
|||||||||||||||||||||||||||||||
 |
|||||||||||||||||||||||||||||||
 |
|||||||||||||||||||||||||||||||
Have you finished this pattern?Tag your pictures with #dropspattern #vestdivinevest or submit them to the #dropsfan gallery. Do you need help with this pattern?You'll find 20 tutorial videos, a Comments/Questions area and more by visiting the pattern on garnstudio.com. © 1982-2026 DROPS Design A/S. We reserve all rights. This document, including all its sub-sections, has copyrights. Read more about what you can do with our patterns at the bottom of each pattern on our site. |
|||||||||||||||||||||||||||||||


With over 40 years in knitting and crochet design, DROPS Design offers one of the most extensive collections of free patterns on the internet - translated to 17 languages. As of today we count 325 catalogs and 12298 patterns - 12288 of which are translated into English (US/in).
We work hard to bring you the best knitting and crochet have to offer, inspiration and advice as well as great quality yarns at incredible prices! Would you like to use our patterns for other than personal use? You can read what you are allowed to do in the Copyright text at the bottom of all our patterns. Happy crafting!
Post a comment to pattern DROPS 121-10
We would love to hear what you have to say about this pattern!
If you want to leave a question, please make sure you select the correct category in the form below, to speed up the answering process. Required fields are marked *.