
Popular categories
Looking for a yarn?


Comments / Questions (26)
![]() Martina Nagl wrote:
Martina Nagl wrote:
Werden hier Reihen oder Runden gestrickt? Es steht nur "R." da
30.10.2024 - 15:08DROPS Design answered:
Liebe Frau Nagl, wegen Domino-Technik werden die Socken meistens in Hin- und Rückreihen (außer Spitze) gestrickt. Die Maschen werden aber in Runden angeschlagen und dann nach der 1. Runde links gestrickt wird man jedes Domino einzeln stricken. Viel Spaß beim Stricken!
30.10.2024 - 16:28
![]() Eleonora Helderman wrote:
Eleonora Helderman wrote:
Graag heb ik contact via email. Ik loop tegen een probleem aan in het patroon dat ik niet goed krijg. Na het minderen voor de hiel Het zit hem in de steken voor de onderkant voet en de 2 halve domino's Bij de eerste keer zijn de domino's al klaar en de ondervoet moet dan nog 5 naalden. Bij de herhaling kom ik hopeloos veel steken tekort. Graag contact.
01.04.2022 - 16:30
![]() Eileen wrote:
Eileen wrote:
Thank you so much, I had actually worked it out, an extra tip to all knitters, Read the instructions right through before you start!!!
16.07.2018 - 08:25
![]() Eileen wrote:
Eileen wrote:
On the heel section it mentions pick up stitches between the 2 stitch holders, but nowhere does it say when to put stitches on a stitch holder, please can you help?
14.07.2018 - 11:12DROPS Design answered:
Dear Eileen, at the beginning of heel you work 2 half-domino-squares (horizontal) and there are 4-5 sts on a thread on each side of middle st at the end of these half squares. You then pick up sts before the ss from thread, work the 4-5 sts from thread, pick up sts between st holders etc. to get 24-28 sts for heel. Happy knitting!
16.07.2018 - 08:18
![]() Monique wrote:
Monique wrote:
Vriendin in Duitsland wilde ze graag werden zo mooi dat ;) ik nu met de rest wol van verschillende sokken nu voor me zelf een paar maak bedankt voor dit mooie patroon met vr gr Moniqye
02.03.2015 - 18:16
![]() Gabriele wrote:
Gabriele wrote:
Ich bin grad dabei diese Socken zu stricken,bin schon sehr begeistert.
26.03.2013 - 17:23
![]() Kirstine Temmesen wrote:
Kirstine Temmesen wrote:
Hvilken side af disse strømper er ret? for når jeg laver disse bliver den side der er vrangen på de første omgange den pæneste, fordi det på den anden side er tydeligt at se indsætningen af den nye tråd (når den er en anden farve) i den første række... hvordan undgår jeg dette, hvis det rent faktisk er den oprindelige ret side der skal være ret?
03.12.2012 - 10:48DROPS Design answered:
Men det betyder jo ikke noget, du vælger den side som du synes er pænest!
04.12.2012 - 09:39
![]() Veera Vaarala wrote:
Veera Vaarala wrote:
Ihanat sukat. Miksi niiden ohjetta ei päässyt vielä lukemaan/tulostamaan?
01.08.2010 - 17:26
![]() Joke Dijkstra wrote:
Joke Dijkstra wrote:
Zou dolgraag dit patroon ruimschoots voor december willen hebben
27.07.2010 - 21:28Agnieszka wrote:
Świetna włóczka. Uwielbiam wzór enterlac i skarpetki wyglądają rewelacyjnie.
18.07.2010 - 18:12
|
|
Mirage Socks#miragesocks |
|
|
|
|
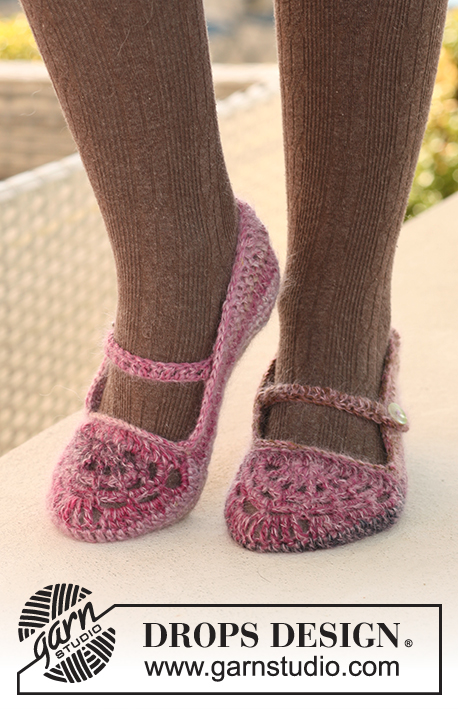
DROPS socks with domino squares in ”Delight”.
DROPS 126-38 |
|
|
KNITTING TIP-1: To avoid too many thread ends work each square on row 1 with separate balls and let the balls follow the squares up through the rows. KNITTING TIP-2: Always pick up sts from RS. WHOLE DOMINO SQUARE Worked as follows: Insert a marker in the middle st. Row 1 (= WS): K all sts Row 2 (= RS): K sts on row until 1 st remain before marker, slip 1 st as if to K, K2 tog, psso, K remaining sts on row. Repeat row 1 and 2, i.e. dec 2 sts in the middle of square on every other row until there is 1 st left on needle, cut the thread and pull it through the last st. HALF DOMINO SQUARE (horizontal): Pick up 19-21-23 sts between 2 squares from previous row. Work like whole domino square, but in addition to the dec in the middle of square also slip the last st at the end of every row (first time on first row from WS) on a stitch holder. Continue like this until there are 3-4-3 sts left on needle. Size US 5/6½ + 9½/10½ (EU 35/37 + 41/43): 3 sts left on needle (i.e. 4-5 sts on stitch holder each side). K 1 row from WS on the 3 sts. Work next row (= RS) as follows: slip 1 st as if to K, K2 tog, psso. Cut the thread and pull it through remaining st. Size US 7½/9 (EU 38/40): 4 sts left on needle. Work next rows (= RS) as follows: slip 1 st as if to K, K2 tog, psso, slip the last st on stitch holder at the side (i.e. 5 sts on stitch holder each side). Cut the thread and pull it through remaining st. HALF DOMINO SQUARE (vertical) Beg with 10-11-12 sts. Row 1 (= WS): K all sts. Row 2 (= RS): Work row until 2 sts before marker, K2 tog. On square at the end of row work mirrored, i.e. K tog the 2 sts after marker. Repeat row 1 and 2, i.e. dec 1 st in square (towards under foot) on every other row until there is 1 st left. Cut the thread and pull through st. HEEL DECREASES: Row 1 (= RS): Work row until 6-7-7 sts remain, slip next st as if to K, K1, psso, turn piece. Row 2 (= WS): Work row until 6-7-7 sts remain, slip next st as if to P, P1, psso, turn piece. Row 3 (= RS): Work row until 5-6-6 sts remain, slip next st as if to K, K1, psso, turn piece. Row 4 (= WS): Work row until 5-6-6 sts remain, slip next st as if to P, P1, psso, turn piece. Continue dec like this with 1 st less before each dec until there are 14-14-16 sts on needle. -------------------------------------------------------- SOCK: Beg working sock in the round from top of leg. Cast on 115-125-135 sts on double pointed needles size 2.5 mm / US 1 or 2 with Delight. P 1 round and work next round as follows: * K 10-11-12, slip 1 st as if to K, K2 tog, psso, K 10-11-12 *, repeat from *-* 5 times = 105-115-125 sts. Turn piece (now continue back and forth on needle) and work WHOLE DOMINO SQUARE - see above – on the first 21-23-25 sts. See KNITTING TIP-1! Continue with WHOLE DOMINO SQUARE on the next 21-23-25 sts and across the row = 5 Domino squares in total. Now pick up 10-11-12 sts - See KNITTING TIP-2! along the edge on the last square from previous Row, pick up 1 st between this and the next square and pick up 10-11-12 sts along the edge on next square = 21-23-25 sts on needle. Work Domino square as before. Pick up sts in the same way between all the squares and work Domino square (= 2 Rows with 5 Domino squares each). On Row 3 pick up sts in the same way between the squares but on row 1 (= from WS) on each of the 5 squares dec 2 sts evenly = 19-21-23 sts. Work Domino squares on these sts. On Row 4 pick up 19-21-23 sts between all squares and work Domino squares as before. Continue like this until there us a total of 6 Rows with Domino squares, the leg of sock now measures approx 17-19-20 cm / 6¾"-7½"-8". HEEL: On next Row work 2 HALF DOMINO SQUARES (horizontal) - see above. After the 2 half Domino squares pick up (from RS) 1 st before the first half square, then work the 4-5-5 sts from stitch holder back on needle, pick up 2 sts between the 2 stitch holders, and work the 4-5-5 sts from the other stitch holder back on needle and pick up 2 sts between the 2 half squares, work 4-5-5 sts from stitch holder back on needle, pick up 2 sts between the 2 stitch holders, work 4-5-5 sts from the other stitch holder back on needle and pick up 1 st after the last half square = 24-28-28 sts. P 1 row from WS at the same time dec 0-2-0 sts evenly = 24-26-28 heel-sts. Work stockinette st back and forth on heel-sts for 5-5.5-6 cm / 2"-2¼"-2⅜". Insert a marker. Now dec for heel - see HEEL DECREASES. After heel dec pick up 13-14-16 sts each side of heel = 40-42-48 sts. Slip sts on a stitch holder. UPPER FOOT 1: Pick up 19-21-23 sts for domino squares as before and work 3 Domino squares on upper foot. UNDER FOOT 1: Pick up 10-11-12 sts from RS along the edge of the outermost square on upper foot, then work the 40-42-48 sts from stitch holder back on needle, and pick up 10-11-12 sts along the edge of the outermost square the other side of upper foot = 60-64-72 sts. Insert a marker each side of the 40-42-48 sts from stitch holder (= under foot). Continue back and forth on needle in stockinette st on sts under foot, at the same time work HALF DOMINO SQUARE (vertical) - see above - each side. AT THE SAME TIME dec on sts under foot (from RS) each side as follows: K tog the first 2 sts after first marker and K tog into back of loop the last 2 sts before second marker. Dec like this on every other row a total of 13-14-15 times (= 14-14-18 sts left under foot). Continue until the half Domino squares each side are complete (dec are not completed but will continue later on). Slip sts under foot on a stitch holder. UPPER FOOT 2: Pick up 19-21-23 sts for domino squares as before and work 2 Domino squares on upper foot. Now pick up sts for next Row with squares. Work 3 Domino squares on upper foot. UNDER FOOT 2: Slip sts from stitch holder back on needle and pick up 10-11-12 sts in the outermost square each side on upper foot. Continue in stockinette st on sts under foot at the same time work half Domino square (vertical) each side. NOTE! Remember to continue dec under foot each side. When the half Domino square is complete slip the remaining 14-14-18 sts under foot on a stitch holder. UPPER FOOT 3: Pick up sts for squares as before and work 2 Domino squares on upper foot. Now pick up sts for next Row with squares but work 3 half Domino squares (horizontal). TOES: Slip the 14-14-18 sts from under foot back on needle, pick up 1 st before the first Half Domino square, * work the 4-5-5 sts from stitch holder back on needle, pick up 2 sts between stitch holders, work the 4-5-5 sts from stitch holders back on needle *, pick up 2 sts between squares, work from *-*, pick up 2 sts between squares, work from *-* and pick up 1 st after the last Half Domino square = 50-56-60 sts. Continue in the round. Work stockinette st on all sts until piece measures approx 18-19-21 cm / 7"-7½"-8¼" from marker on heel (approx 4-5-6 cm / 1½"-2"-2⅜" remain). Insert a marker each side with 25-28-30 sts on upper foot and 25-28-30 sts under foot. Continue in stockinette st, at the same time dec for toes each side of both markers. Dec as follows before K1 and marker: K2 tog. Dec as follows after marker and K1: K2 tog into back of loop. Dec like this each side on every other round a total of 4-5-8 times and then on every round 6-6-3 times = 10-12-16 sts left on needle. K2 tog across next round. Cut the thread and pull it through remaining sts, tighten tog and fasten. |
|
Have you finished this pattern?Tag your pictures with #dropspattern #miragesocks or submit them to the #dropsfan gallery. Do you need help with this pattern?You'll find 15 tutorial videos, a Comments/Questions area and more by visiting the pattern on garnstudio.com. © 1982-2026 DROPS Design A/S. We reserve all rights. This document, including all its sub-sections, has copyrights. Read more about what you can do with our patterns at the bottom of each pattern on our site. |


With over 40 years in knitting and crochet design, DROPS Design offers one of the most extensive collections of free patterns on the internet - translated to 17 languages. As of today we count 324 catalogs and 12284 patterns - 12274 of which are translated into English (US/in).
We work hard to bring you the best knitting and crochet have to offer, inspiration and advice as well as great quality yarns at incredible prices! Would you like to use our patterns for other than personal use? You can read what you are allowed to do in the Copyright text at the bottom of all our patterns. Happy crafting!
Post a comment to pattern DROPS 126-38
We would love to hear what you have to say about this pattern!
If you want to leave a question, please make sure you select the correct category in the form below, to speed up the answering process. Required fields are marked *.