
Popular categories
Looking for a yarn?


Comments / Questions (38)
![]() Karin wrote:
Karin wrote:
Hvordan får man strikket kanten rundt, man kan ikke have så mange masker på rundpinden. På forhånd tak Hilsen Karin
21.12.2025 - 16:49DROPS Design answered:
Hei Karin. Om du har flere rundpinner (gjerne 80 cm), kan du fint bruke det. mvh DROPS Design
22.12.2025 - 14:00
![]() Marga Møller wrote:
Marga Møller wrote:
Hvor meget mere garn skal jeg have , hvis jeg vil udvide tæppet med 2 omgange mere. Hvordan beregner jeg maske antallet ved de "nye omgange"
22.08.2025 - 16:47DROPS Design answered:
Hei Marga. Da vi ikke har strikket teppet med ekstra omganger har vi ikke den informasjonen. mvh DROPS Design
15.09.2025 - 14:09
![]() Gigi wrote:
Gigi wrote:
Können sie mir bitte helfen wie muss ich den 11 streifen stricken vom muster Spring Connection
29.08.2024 - 14:23
![]() Schidlowski Regina wrote:
Schidlowski Regina wrote:
Hallo,bin mittendrin diese Decke zu stricken ,ist eine Herausforderung für mich ,da man so viele Nadeln braucht,um die Maschen stillgelegten. Wie strickt man zum Schluss den Rand,da braucht man doch mehr als eine Nadel?
14.08.2024 - 11:13
![]() Carla Denser wrote:
Carla Denser wrote:
Thank you for this incredible group of instructions! You’re great! I’ll try and I think that I will succeed 🥰
08.08.2023 - 22:38
![]() MARIAGRAZIA wrote:
MARIAGRAZIA wrote:
Buongiorno, Quando inizio a riprendere le maglie sul lato corto di una striscia precedente e inizio a lavorare una nuova striscia il primo ferro sarà sul rovescio del lavoro, pertanto il 26° ferro mi risulterà lavorato sul diritto del lavoro, non sul rovescio come indicato dal modello... Potete darmi un chiarimento? Grazie.
17.01.2022 - 15:02DROPS Design answered:
Buonasera Mariagrazia, riprende le maglie e lavora il 1° ferro dal diritto del lavoro. Buon lavoro!
05.03.2022 - 22:29
![]() Elisa wrote:
Elisa wrote:
Desidero sviluppare questo disegno per un copriletto matrimoniale prima di acquistare la lana occorrente.
05.12.2021 - 15:21DROPS Design answered:
Buonasera Elisa, per un'assistenza così personalizzata può rivolgersi al suo rivenditore DROPS di fiducia. Buon lavoro!
06.12.2021 - 19:45
![]() Bea wrote:
Bea wrote:
Hallo, ich hätte Fragen zum Model Spring Connection 124/19: Wieso sollen im 4.-ten Streifen 55 Maschen aufgenommen werden? Warum? Der 5.-te Streifen ist eigentlich klar, 39 M, d.h. 13+13+13. Der. 6.-te Streifen 68M. Warum? Sollte es nicht 13+26+13 sein? Und wieviel Maschen werden dann in den weiteren Streifen aufgenommen? Danke vielmals im Voraus. Bea
29.10.2021 - 13:13DROPS Design answered:
Liebe Bea, dieses Video zeigt, wie man den Anfang dieser Decke strickt, sicher kann es Ihnen helfen. Viel Spaß beim stricken!
02.11.2021 - 13:29
![]() Gea wrote:
Gea wrote:
Beste drops team, als ik in gerstekorrel wil breien, verandert dan de steken verhouding?
27.04.2021 - 09:54DROPS Design answered:
Dag Gea,
De stekenverhouding bij gerstekorrel blijft ongeveer hetzelfde, dus je kunt gewoon het patroon blijven volgen. Veel breiplezier!
29.04.2021 - 14:59
![]() Birgit Jørgensen wrote:
Birgit Jørgensen wrote:
Hvordan skal jeg bære mig ad med at strikke hele kanten rundt om tæppet på en 80 cm rundpind ? Det er rigtig mange masker det drejer sig om er i tvivl om de alle kan være på pinden.
22.03.2021 - 10:34DROPS Design answered:
HEi Birgit. Ja, det blir mange masker på pinnen til slutt. Men om du har 2 rundpinner kan du bruke det for at det skal bli bedre plass. mvh DROPS design
22.03.2021 - 14:03
|
||||
Spring Connection#springconnectionblanket |
||||
 |
 |
|||
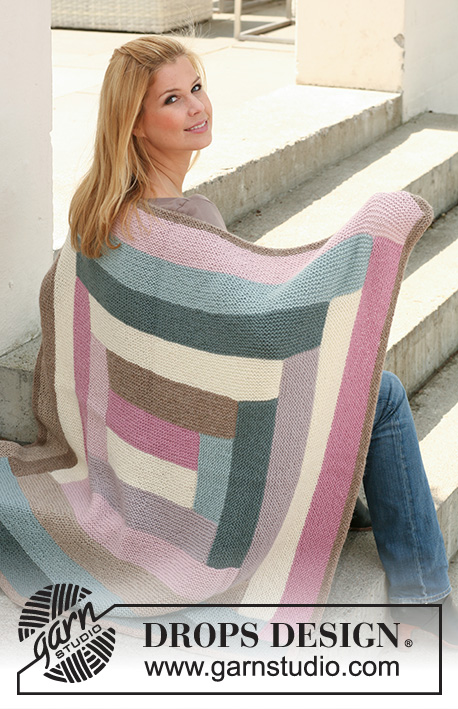
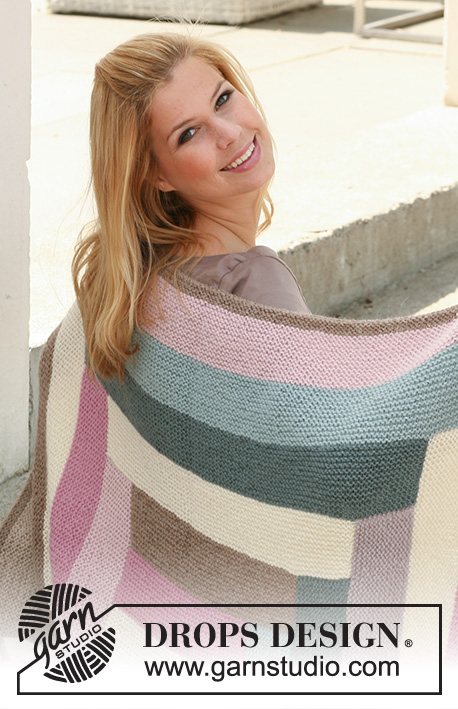
Knitted DROPS blanket with stripes in ”Nepal”.
DROPS 124-19 |
||||
|
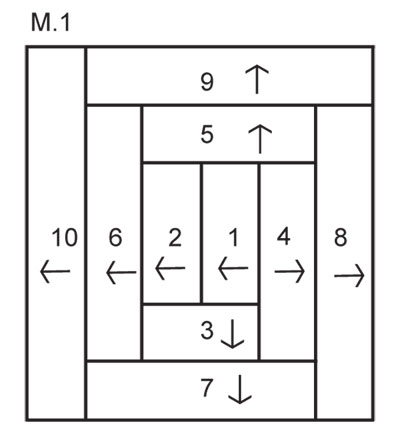
GARTER ST (back and forth on circular needle): K all rows. GARTER ST (in the round): K 1 round, P 1 round PATTERN: Diagram M.1 shows how to knit the beg of blanket. COLOR CHANGE: Work stripes as follows: Stripe 1: 3720 Stripe 2: 0100 Stripe 3: 7120 Stripe 4: 0618 Stripe 5: 3112 Stripe 6: 4311 Stripe 7: 7139 Stripe 8: 0100 Stripe 9: 3720 Stripe 10: 3112 Stripe 11: 4311 Stripe 12: 7139 Stripe 13: 0100 Stripe 14: 300m Stripe 15: 0100 Stripe 16: 7120 Stripe 17: 0618 Stripe 18: 7120 Stripe 19: 3720 Stripe 20: 3112 Stripe 21: 300m Stripe 22: 7139 -------------------------------------------------------- BLANKET: M.1 shows beg of blanket. Change color for each stripe - See COLOR CHANGE! STRIPE 1: Cast on 42 sts with 3720 and work 26 rows garter st. Leave sts on needle. STRIPE 2: (continue from stripe 1, but change to color 0100). Work 26 rows garter st, work last row from WS. Slip sts on a stitch holder STRIPE 3 (change color): Pick up 1 st in each row on the short side of stripe 1 and stripe 2 = 26 sts. Work 26 rows garter st, work last row from WS. Slip sts on a stitch holder. STRIPE 4 (change color): Pick up 1 st in each row on the short side of stripe 3, and 1 st in each st on cast on row on stripe 1 = 55 sts. Work 26 rows garter st, work last row from WS. Slip sts on a stitch holder. STRIPE 5 (change color): Pick up 1 st in each row on the short side of stripe 4, and 1 st in each row on the short side of stripe 1 and 2 = 39 sts. Work 26 rows garter st, work last row from WS. Slip sts on a stitch holder. STRIPE 6 (change color): Pick up 1 st in each row on the short side of stripe 5, work sts from stitch holder from stripe 2 back on needle, pick up 1 st in each row on the short side of stripe 3 = 68 sts. Work 26 rows garter st, work last row from WS. Slip sts on a stitch holder. Continue in the round as described for stripe-6 until you have knitted a total of 22 stripes, the blanket measures approx 95 cm / 37½", (width) and 105 cm / 41½" (length). Now knit a border round the whole blanket as follows with 0618: Work all sts on stitch holder back on needle and pick up 1 st in each row on the short sides. The border is worked in the round. Work 6 rounds garter st - see above - on all sts, AT THE SAME TIME on every other round inc with 1 YO each side of all corner sts, on next round K YO into back of loop to avoid a hole. |
||||
Diagram explanations |
||||
|
||||
 |
||||
Have you finished this pattern?Tag your pictures with #dropspattern #springconnectionblanket or submit them to the #dropsfan gallery. Do you need help with this pattern?You'll find 12 tutorial videos, a Comments/Questions area and more by visiting the pattern on garnstudio.com. © 1982-2026 DROPS Design A/S. We reserve all rights. This document, including all its sub-sections, has copyrights. Read more about what you can do with our patterns at the bottom of each pattern on our site. |
||||


With over 40 years in knitting and crochet design, DROPS Design offers one of the most extensive collections of free patterns on the internet - translated to 17 languages. As of today we count 325 catalogs and 12298 patterns - 12288 of which are translated into English (US/in).
We work hard to bring you the best knitting and crochet have to offer, inspiration and advice as well as great quality yarns at incredible prices! Would you like to use our patterns for other than personal use? You can read what you are allowed to do in the Copyright text at the bottom of all our patterns. Happy crafting!
Post a comment to pattern DROPS 124-19
We would love to hear what you have to say about this pattern!
If you want to leave a question, please make sure you select the correct category in the form below, to speed up the answering process. Required fields are marked *.